Category: Holiday Tips & Tricks

10 Holiday Tips & Tricks | Day Two

Welcome to Day Two of the 2017 edition of our always-popular 10 Holiday Tips & Tricks series here on The Digital Press blog!

Today, we’re reviving a post that originally appeared on The Digital Press blog back in December 2015, written by our favorite photography guru, Farrah Jobling. Farrah was one of the original founding members of The Digital Press’s creative team, but she bid a fond farewell to us here at TDP earlier this year in order to pursue an exciting new career change. Because we still get a bunch of questions about the elusive skill of creating and capturing bokeh when taking photographs this time of year, however, we decided to revive her post as one of this year’s 10 Holiday Tips & Tricks.

As such, here’s a look at her original post in its entirety… 😉


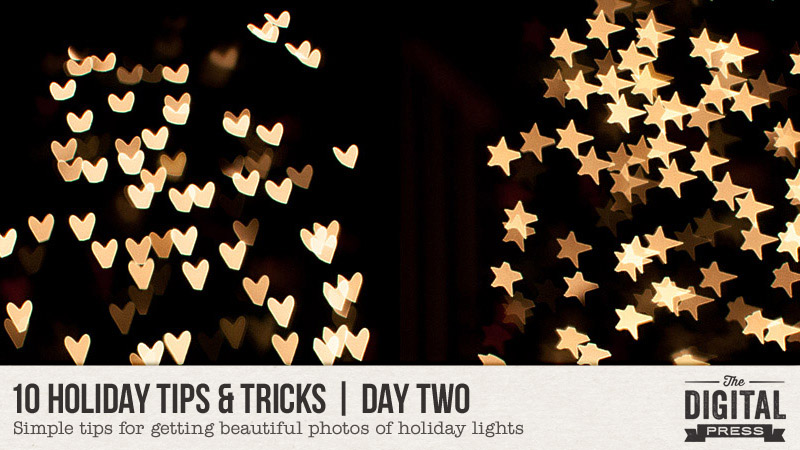
It’s beginning to look a lot like Christmas! Most people have their trees up, sparkling with lights… and now they’re wondering about the best way to get some great photos. Getting great photos of holiday lights is easier than you might think! Here is a simple tutorial to get those great shots.

First, I need to tell you a little about bokeh.

Bokeh is defined as “the way the lens renders out-of-focus points of light.” So what does this mean, exactly? In general, it means that while the in-focus parts of a photo are beautiful, the parts that are out-of-focus are just as beautiful. How do we apply this to our holiday lights? Easy peasy… we do what we never plan to do: we take a purposely out-of-focus shot.

The secret to shooting bokeh lies in its definition: out-of-focus points of light. You need four things to shoot great holiday bokeh: (1) pin-point highlights (twinkly lights on the tree), (2) low ambient light (your only light source should be the tree lights themselves), (3) a lens able to open to a large aperture (f/2.8 or wider), and (4) a short focal distance (or rather — enough distance between the lights and where your lens is actually focused).

TIPS:

  1. If you have a tripod, use it; if not, rest your camera on a steady surface.
  2. Turn off all other lights and use a higher ISO. I recommend ISO 800.
  3. Use your widest aperture. I recommend f/2.8 or wider.
  4. Keep your shutter speed high enough to avoid camera shake if you aren’t using a tripod. This will vary based on the amount ambient light available. I used SS 1/400.
  5. MANUAL focus! The key here is to manually take your lens out of focus to force your lens to a shorter focal distance.


Here is my example:


Don’t have a DSLR? No worries! You can still get great bokeh photos with a point and shoot camera (or even a cell phone camera). The key here is to trick your P&S (or phone) into taking a photo at a shorter focal distance. The answer? Put your camera on macro mode. Macro mode has a little tulip icon. I have an iPhone 6S and use the Camera+ app, which also has a macro mode.

Here is an example using my iPhone:


BONUS TIP:

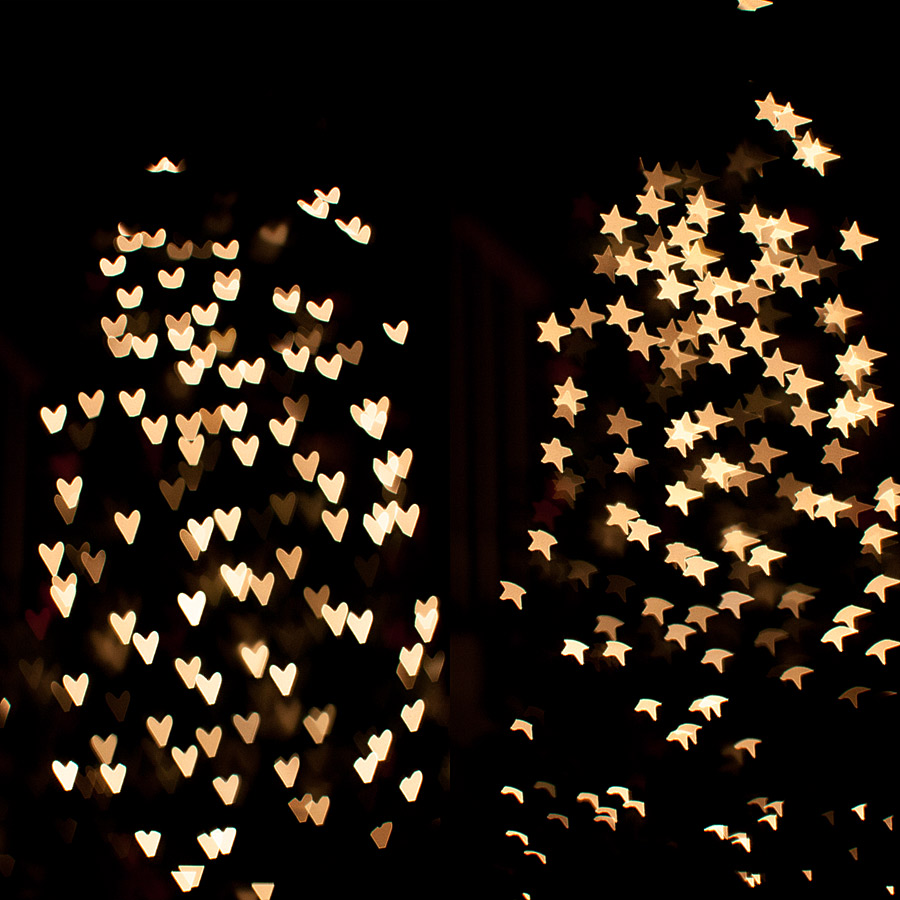
Want to get even more creative? Try making shaped bokeh!

To do so, I dug out my paper punches and punched a few shapes into black paper. I also used my DSLR and lens, as I haven’t figured out a way to do this with my phone’s camera.


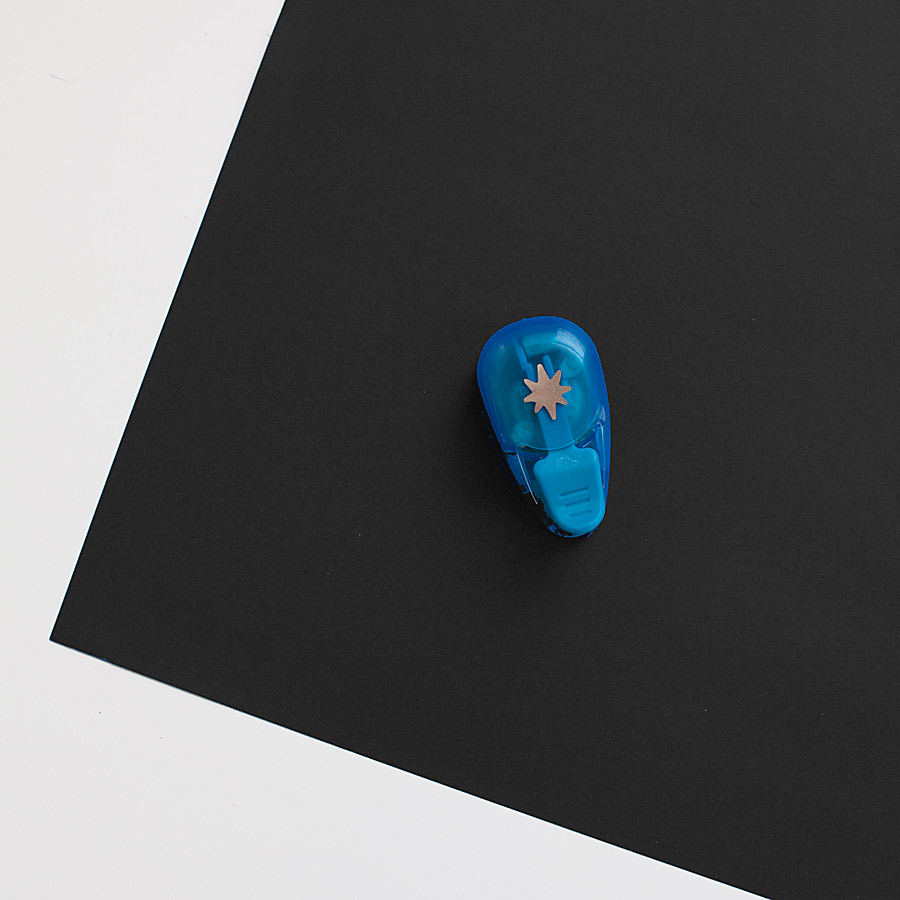
First, cut out a circle of paper the same size as your lens…


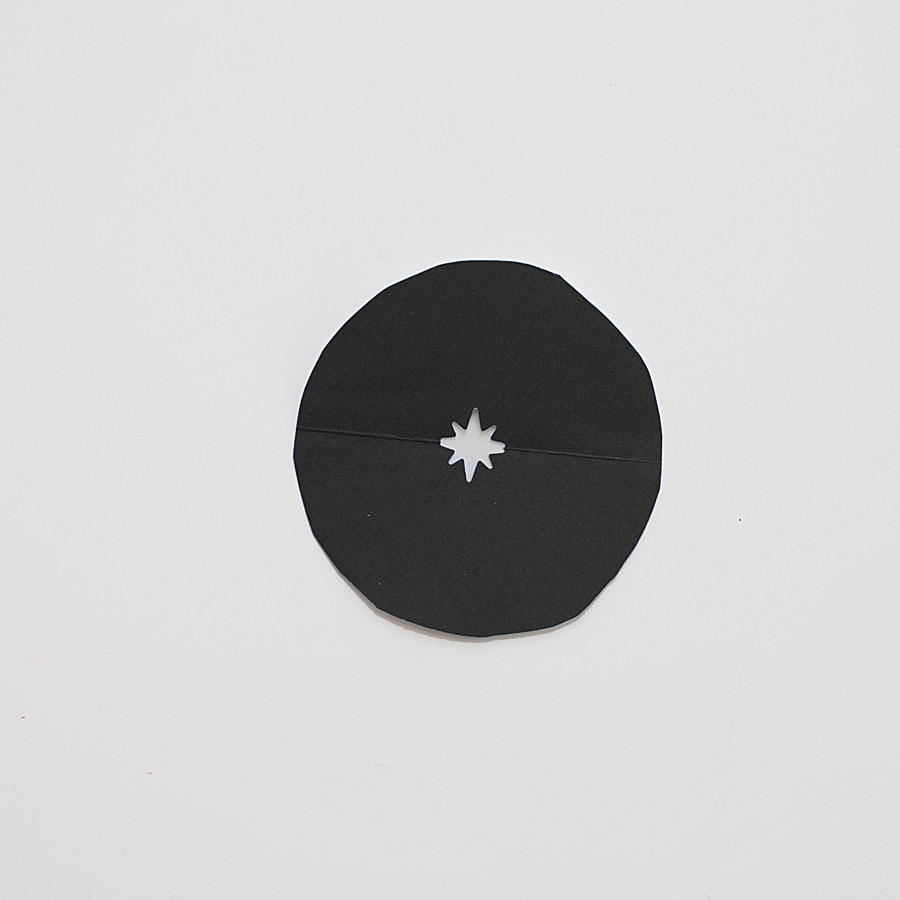
Punch a shape in the middle of the circle (fold the paper circle in half if your punch is short and you can’t reach the middle).

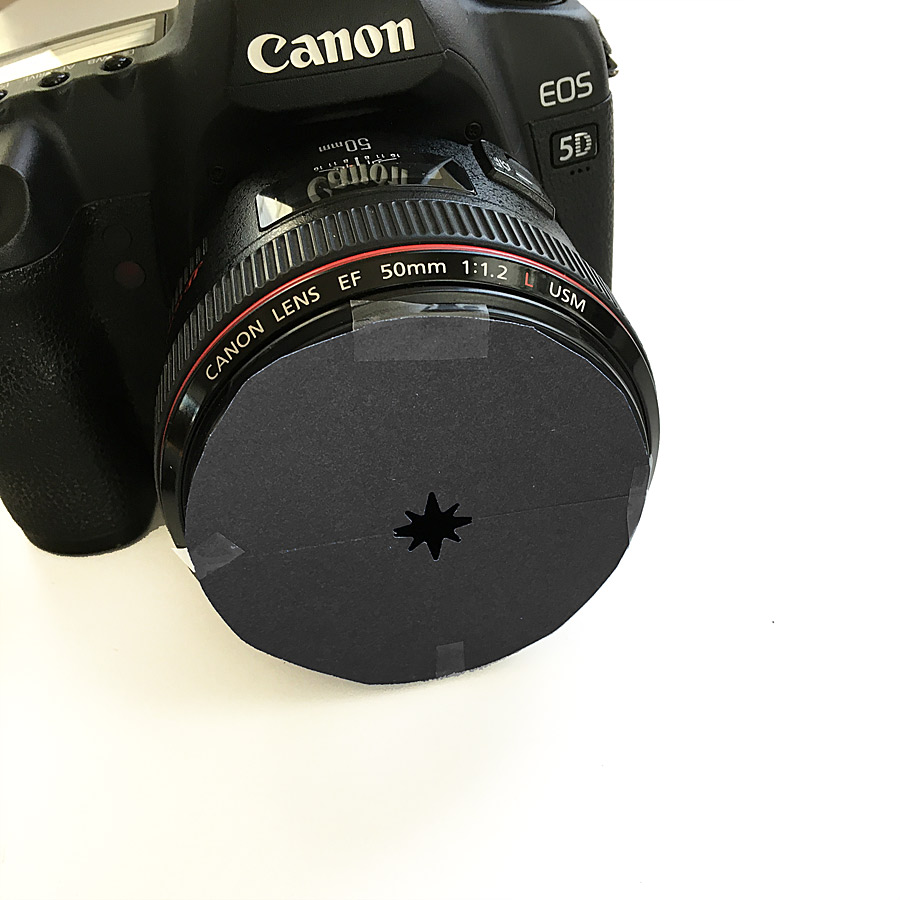
Next, tape the circle to your lens as shown below… and then follow the same instructions listed up above for “normal” bokeh photos.


Here’s a look at the result… isn’t it fun?


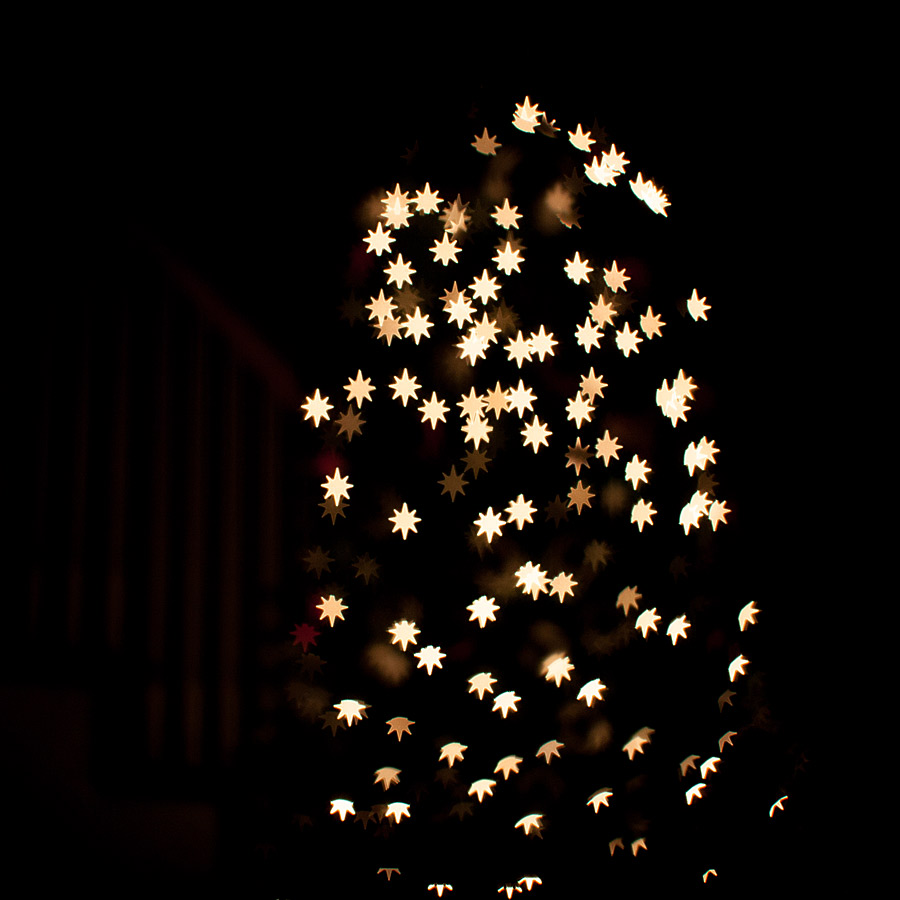
You can try some other fun shapes too…


Hopefully, this will help you capture some great bokeh photos this holiday season. Give it a try!

If you’re thinking of trying this… head over to The Digital Press’s challenge forum and get the details about how you can earn challenge points for December 2017 at TDP if you try any of our “Holiday Tips & Tricks” throughout the month as they appear here in this blog series!


Farrah
About the Author Farrah Jobling is a former member of The Digital Press creative team who left in 2017 to pursue a fantastic new career opportunity. She remains one of our favorite photography gurus, however, and therefore on occasion we find ourselves reviving her posts. She lives in Denver with her husband Mike; her son Nicholas; her daughter Claire; and her dog, Hope.

10 Holiday Tips & Tricks | Day One

Hello there! Amie here (of Little Lamm Paper Co.)… wishing you a very Happy December and welcoming you to Day One of the 2017 edition of our always-popular 10 Holiday Tips & Tricks series here on The Digital Press blog!

Today I’m here to share a fun “book-a-day” style Advent Calendar that I am doing this December with my son, Ian. I’m hoping this post is early enough to be helpful for anyone who has kids (or book-loving adults?) in their household and still needs Advent Calendar ideas for the upcoming holiday season!

I’m not going to lie… originally, in the beginning, my plan was to wrap up 24 books individually and tag each one with the numbers 1-24… but then I found a really easy (and actually quite fun!) “lazy” way to get this project up and running — an awesome time-saver, and yet still exciting for the recipient!

I was saved from the work (and waste) of endless wrapping by none other than the Dollar Spot at Target (you red card holders know where that is!). There, I found some cute burlap-ish gift bags and bought one to use as a daily “Santa Bag,” of sorts, to deliver each day’s book. I decided to alter one of my own home decor designs — the Arctic Reindeer print — to make an iron-on transfer for the bag…

After making birthday shirts for 6 years now, I definitely have a few tips to share for successful iron-on transfers…

  1. Don’t forget to reverse your image! If the image is not backwards on the paper, it will be on the shirt/bag. 😉
  2. Don’t use the “iron transfer” setting on your printer. This has always come out with fuzzy images on any printer I’ve ever owned. Instead, I reverse the image myself in Photoshop… and I print it out as a photo on matte paper at the best printing level. This gives me a perfect crisp image every time.
  3. LINT ROLLER YOUR CLOTH BEFORE DOING THE TRANSFER! We have 2 cats and a bulldog in our house, and no surface stays clear for more than 2 seconds. Most of my son’s birthday shirts have a cat hair embedded into the image if I forget this step.
  4. Don’t forget to let the image cool completely before taking off the paper.
  5. Save money by planning ahead. I’ve learned not to buy iron-on transfers from local big-box stores like Office Depot, etc. (where I have, in the past, spent $18 on the same item I could have gotten from Amazon for $8).

With regard to the book-a-day part of this Advent Calendar project… I have heard of some people who wrap library books or buy used books (BetterWorldBooks is a great used book source). Some people also just use any stories — they don’t necessarily have to be Christmas-themed!

For our family, we unwrap our last book on December 23rd due to the fact that we spend Christmas Eve with family. On that final night, my son gets a new book and a set of pajamas as his final gift. This year, we got him the Fantastic Beasts and Where to Find Them book because it has a Griffin on the cover (a family name!)… and also some Star Wars PJs so he can wear them to the late showing of the upcoming The Last Jedi movie on his birthday, which is December 26. 🙂

To make sure I remember to re-fill the book bag each night… I have set a reminder on my phone for 9:00pm each night starting on November 30th — and that’s when I put a new book into the sack. Then, the sack will go into the basket with any books that we have already opened…

Every morning when Ian wakes up, there will be a new package under the tree.

In case you need some ideas for books… here are some of my of favorite Christmas/winter-themed books from over the years…

  • Christmas for Greta and Gracie by Yasmeen Ismail
  • The Day Santa Stopped Believing in Harold by Maureen Fergus
  • Maple & Willow’s Christmas Tree by Lori Nichols
  • Bear’s Winter Party by Deborah Hodge
  • Bear Stays Up For Christmas by Karma Wilson
  • The Gingerbread Man Loose at Christmas by Laura Murray
  • Beyond the Pond by Joseph Kuefler
  • The Tea Party in the Woods by Akiko Miyakoshi
  • Du Iz Tak by Carson Ellis
  • Harold at the North Pole by Crockett Johnson
  • The Snowy Day by Ezra Jack Keats
  • Olive, the Other Reindeer by Vivian Walsh
  • A Wish to Be a Christmas Tree by Colleen Monroe
  • The Christmas Wish by Lori Evert
  • Olivia Helps With Christmas
  • Walking in a Winter Wonderland by Richard B Smith
  • Wendell The Narwhal by Emily Dove
  • The Christmas Eve Tree by Delia Huddy
  • The Lost Gift: A Christmas Story by Kallie George
  • The Great Spruce by John Duvall
  • The Wish Tree by Kyo Maclear
  • First Snow by Bomi Park
  • Little Penguins by Cynthia Rylant
  • The Little Reindeer by Nicola Killen
  • Pick a Pine Tree by Patricia Toht
  • Red and Lulu by Matt Tavares
  • Walk This World at Christmastime by Debbie Powell

If you’re thinking of trying this… head over to The Digital Press’s challenge forum and get the details about how you can earn challenge points for December 2017 at TDP if you try any of our “Holiday Tips & Tricks” throughout the month as they appear here in this blog series! Additionally, I’d love to see any photos of your December/holiday projects using TDP goodies in the gallery this month, so link me up after you’re finished creating and uploading! 🙂


Amie Lamm

About the Author  Amie Lamm is the designer behind Little Lamm Paper Co. at The Digital Press. She is a work at home mom/graphic artist living in Fargo, North Dakota with her hubby, her almost 6 year old son, 2 lazy cats, and a hyper bulldog. She survives her days with copious amounts of coffee and recorded episodes of Fixer Upper.

10 Holiday Tips & Tricks | Day Ten

Hello, and welcome to the very last day of our 10 Holiday Tips & Tricks series here on The Digital Press blog!

Today I am here to share with you an amazing last-minute tip for those of us who need to whip up a quick dessert for the upcoming holiday weekend.

Whether you suddenly find that you need to take a dessert to share at a friend or family member’s house… or you find that you will be having unexpected guests over to your house at the last minute… or you simply love holiday desserts and want to give this a try… this recipe is a total win!

And by “total win” I mean that it takes only about 15 minutes to make it, it’s delicious, and it’s even customizable! 😉


LAURA’S EASY-PEASY PEPPERMINT OREO ICE CREAM PIE

It cannot be stressed enough how quick and easy it is to make this pie. Seriously. It literally involves only 4 ingredients.

INGREDIENTS

  • 1 container of peppermint ice cream (about 1 quart?)
  • 25-30 Oreo cookies (if you buy one package, you can eat 5-10 of the cookies inside and use the rest to make the pie #winning )
  • 1/2 cup butter (or similar; I use “I Can’t Believe It’s Not Butter Lite” because it tastes just as good and has less fat/calories)
  • 1-2 candy canes (or equivalent amount of peppermint candies)

INSTRUCTIONS

  • Let the ice cream sit out on the counter while you work on the next few steps, to ensure that it will be softened enough to spread around by the time you need get to that step.
  • Put your cookies into a large (gallon-sized) zippered plastic bag and crush them with a rolling pin (or a bottle of wine, if you don’t own a rolling pin. We are crafters, people! We do what we have to do to get by with the supplies we have on hand!).
  • Melt the butter (microwave in 20-second intervals until it’s fully melted), and then add it and the crushed cookies in a large bowl. Combine until the cookies are just coated in the butter; stop stirring before everything gets too sticky/wet (or else it will be too hard to press into the pan without it sticking to your spoon).
  • Press the cookie mixture into the bottom of a pie plate. I find that it helps to use a light coating of cooking spray inside the pie plate, first, to keep the crust from sticking to the pan later.
  • Add the ice cream on top of the cookie crust layer. Place large spoonfuls near the center, and press down so that it pushes outward toward the edges of the pie crust as you work. Use the back of the spoon to even out this layer once it’s added, and also to swirl the melty ice cream on the top until it looks like you “did it all on purpose” (technical term).
  • Put your peppermint candy into a small (quart-sized) zippered plastic bag and crush it with your rolling pin / wine bottle. Then sprinkle the crushed candy on top of your pie.
  • Put the pie into the freezer for an hour or two until it hardens enough to be easy to cut/serve.

Once it’s been in the freezer for a while… all you have to do is cut, serve, and eat! It’s seriously that easy.

FUN VARIATIONS / CUSTOMIZATIONS

Let it be known that I have also made this pie using coffee ice cream (get the good stuff, people — Haagen Dazs — don’t mess around with imposters!), and I used chocolate shavings on top of the pie in place of the peppermint candy. To. Die. For.

I also have a friend who made this pie with a couple of pints of Ben & Jerry’s Cherry Garcia ice cream (cherry & chocolate chunks). She swears by it.

Myself, I have always wanted to try it with some Ben & Jerry’s Chunky Monkey (banana ice cream with chocolate chunks & walnuts)… but I’ve never gotten around to it. “Someday…”  *daydreams about dessert*

In truth, it really doesn’t matter what ice cream you use — it’s the Oreo crust that makes this ice cream pie so perfect. You can pair it with whatever floats your boat!

For now, though… I hope you have a very happy holidays and a fantastic weekend with your family and friends! 😉


Laura Passage

About the Author  Laura Passage is the owner of The Digital Press, and also the designer behind Wishing Well Creations by Laura Passage (WWC). She works now as a graphic designer in both the digital and paper scrapbooking industries, but previously spent over a decade working as a college soccer coach. She lives in the Pacific Northwest with her husband and two young sons (affectionately referred to as The Tiny Terrorists), and will rationalize eating coffee ice cream for breakfast to anyone who questions it.

10 Holiday Tips & Tricks | Day Nine

Hey there everyone! Kate here today, and it’s Day Nine of our 10 Holiday Tips & Tricks series here on The Digital Press blog.

Today I have a super simple hybrid project to share with you (along w/ a couple of free templates to download, below). It’s a great way to use digital supplies to dress up your gift card-sized packages!

Gift Card Envelopes

Aren’t these so fun?! 🙂

To create these gift card envelopes… simply open the envelope template (see the end of this blog post for the free download)… clip a digital paper (or papers) to the template… print… and cut.

There are options in the template file for adding a digital paper pattern to the inside of the envelope… as well as for adding coordinating paper(s) to the front flap, bottom flap, and also to the back — if you want to do so. I added some digital art to the front flap, a woodgrain paper to the other outer surfaces, and the cute coffee mug/cup pattern to the inside.

Tip: before printing the envelope, I printed a full 8.5 x 11 page of the coordinating cardstock (the coffee cups) that I wanted to use on the inside. Then, I printed the finished envelopes on the other side of the full sheet of patterned paper. This made it easier to line everything up for perfect cutting.

It’s possible to fit two per sheet. I cut mine by hand, and then cut the slit with a craft knife.

To finish it off, you just fold in the flaps, add your gift card, and slip the front flap into the slit. You can adhere the bottom flap to the side flaps if you want, but it isn’t necessary (OMG is anyone else tired of reading the word flap?! haha).


Cash (or Whatever) Envelopes

If you’ve just tried the first envelope project, above, then the process for this one will be pretty self-explanatory. It’s almost the same! Simply clip a paper or two… print… cut… decorate… ta-da! You have an envelope. Fold in the flaps (*cringe* LOL) and adhere, leaving the top flap open.

That’s really all there is to it!

Tip: I know they make special glue for DIY envelopes; when you’re ready to send it, you just have to wet it and fold it down to make it stick. For myself, however, I just used washi tape. It’s cute, and easy!

You can use these for cash or checks… or even tickets (as you can see I did, above).

I am not going to lie — something about this second envelope template was a giant pain to fix up nice (and I’m still not 100% totally happy with it, but shhh! don’t tell anyone)… so someone had better download it and use it and post pretty pictures of it! (*crying*) …it would make me so happy!

If you’d like to give either of these projects a try… you can download the templates I created to make these envelopes HERE.

Happy holidays! 😉


Kate About the Author  Kate is on the hybrid team here at The Digital Press. She lives on the Utah/Colorado border with her husband, 5 kids, 10 chickens, and a dog named Gracie. She’s a city-born girl who found she’s really a country girl at heart. She can be found outside, barefoot, and probably in her garden.

10 Holiday Tips & Tricks | Day Eight

Hey everyone! It’s Day Eight of our 10 Holiday Tips & Tricks series, and I’m here to share my latest project / passion… Zero Waste or ZW (although “zero” seems very extreme, any action in the right direction is a good thing!).

I’ve always been green, but I recently read Béa Johnson‘s book and started to implement some tips to reduce the amount of garbage we create. Minimalism, simplicity and Zero Waste go hand in hand, and I’m happy to share some ways you can help save the planet while still enjoying Christmas and giving gifts to your loved ones!

The best way to have a ZW Christmas is by picking immaterial or consumable gifts. Here are a few examples for kids (or grown ups, too!) :

  • Lessons (music, dance, sport)
  • Passes (zoo, natural park, amusement park)
  • Subscriptions (to a magazine, for example, or to a software *ahem… Photoshop!*)
  • Events (concert, sport competition)
  • Activities (even better to do as a family or as a one-on-one activity with a parent or special adult: mini-golf, bowling, skating, cinema, game night)
  • Crafting (and the material you need to create the art piece)
  • Coupons (for a movie night at home with popcorn and they pick the movie, a pass on one of their chores, permission to stay later than usual, etc.)
  • Gift card to their favorite store, so the recipient gets the pleasure to choose in addition to the pleasure of the gift itself
  • “recipe in a jar” for cookies, muffins, hot chocolate, sauces and more
  • Money (the ultimate consumable gift). You could try to fold the bills origami-style to make it more fun!

If you want to give a material gift, here are a few ideas:

  • choose second-hand gifts
  • pick environmental-friendly and long-lasting materials: wood, metal, sturdy plastic (Legos are virtually immortal!), fabric, glass (not for kids, obviously)
  • create DIY gifts like homemade soap, candy, jam, caramel or chocolate sauce, beauty products or home decor

The wrapping can be the perfect ZW final touch to your eco-friendly gifts. Avoid metallic paper which can’t be recycled. Why not use newspapers or plain kraft paper on which you (or your kids) can draw or stamp? Use cute jars, wooden boxes or baskets to store your gifts. Last but not least, fabric is a great way to wrap and can be re-used over and over again by the recipient. Simple bags (DIY or bought) can be re-used for grocery shopping, for example. A nice piece of fabric (or even a scarf, so that the wrapping is a gift too!) can make stunning gifts using the japanese furoshiki technique.

Here are two examples of my ZW gift giving this year.

For my brother and SIL, I offered them a photo session of their newborn baby girl when she was born in October and created the birth announcements. They think they’ll pay me back for the printing of the announcement but I’ve decided will be their Christmas gift. As I still want to physically give them something, I’ve created a cute card that matches the CD cover for their newborn pictures. This card can be recycled once it has fulfilled its purpose.

For my parents in law, I’ve bought wine and cooked homemade jam. They have everything they need and DEMANDED that we don’t give them any gift. Well, I’m a rebel and I know they will enjoy the fact that I made the effort to create something for them. To wrap this up I decided to try furoshiki with a scarf I don’t use very often and that I think my mother in law would like. Maybe she’ll re-use it, maybe not (in that case I’d take it back), we’ll see!

Here’s how I wrapped the jars and bottle: I started with the jars and the bottle on the scarf, pointing to opposite corners.

I covered the gifts with the scarf (the part that was closer to me) and folded the pointy end back in.

Then I rolled the gifts away from me and then folded the “roll” in the middle to put the jars and the bottle back up. Finally, I just had to tie a knot with the ends of the scarf and my wrapping was done!

It was very easy, even for Mrs-Two-Left-Hands here, and I just love how original it looks! Plus I don’t have to deal with tape, too short paper roll and ribbons… That’s a big win in my book!!

Here are the two cards I’ve created so far, one for my brother and SIL (on the left), the other one for my inlaws (on the right). I used the stunning Holiday Sparkle collab for those creations because I love its timeless elegant look. I simply added one of the already made journaling cards, created another one with a paper I liked, added a few elements, printed them, cut them out and adhered the elements on the cards, wrote my message and I was done. It took me no longer than 5 minutes. I used natural twine so that it can still be recycled.

I hope you enjoyed those tips to have a greener (and simpler) Christmas. Have fun celebrating with your loved ones!


ChloéAbout the author  Chloé is in charge of PR and communication for her small town by day, is a digiscrapper “by night,” and a photographer whenever the light is beautiful. She lives with her man and fur-babies in a small town of Alsace (in the northeast of France), where she loves to read, watch good TV shows (TWD being her absolute favorite), and just hang out with her friends — no matter if they are close by, online, or away in her Swiss hometown. She recently became quite obsessed with Bullet Journaling, Miracle Morning and Zero Waste.

10 Holiday Tips & Tricks | Day Seven


Hello everyone! It’s Day Seven of our 10 Holiday Tips & Tricks series this month… and I am here today to share a few delicious cocktails I created to help you celebrate the holidays with a little extra holiday spirit!

First, here is my version of a holiday Martini…

Tips: rim your glass with a thick layer of sugar to sweeten up your holiday. Want a kid-friendly alternative? Try a cherry limeade: add a splash of lime to a cherry 7-up. 🙂

Next… shake up your part with this festive peppermint candy cane-rimmed version of a White Russian…

Tip: kids will love this one if you adapt the most fun part of it by serving their milk in a candy cane rimmed glass this Christmas. Just skip the Baileys and Vodka!

And finally, I’m calling this holiday twist on a traditional grasshopper “The Grinch!” If you drink enough of this one, it will steal your Christmas… memories! Only kidding, of course! Please drink responsibly!

Tip: add green food coloring to egg nog for a non-alcoholic version.

I hope these tips will help you create some fun holiday beverages! Come join us in the forum and post your own images if you give any of these a try… 🙂


FarrahAbout the Author  Farrah Jobling is a member of the creative team here at The Digital Press. She lives in Denver with her amazing family — Mike, Nicholas (9), Claire (7), Hope (2 yr old puppy) & Kringle (9 mo old bunny). She works from home as a photographer and enjoys scrapping her personal photos.