Tutorial Tuesday | Syncing Mobile Photos

Hello, and welcome to another edition of our Tutorial Tuesday series here on The Digital Press blog! This week, I’m here to help you learn how to easily get all of the photos off your mobile phone and stored safely so you don’t lose any of your precious memories!

Anyone who has ever received that awful warning message on your phone, telling you to delete photos from your device in order to make space before you could take any new photos… knows how important it is to get your photos safely off your phone and saved somewhere more permanent/secure.

Remember when we had to actually plug in / connect our phone to our computer or laptop & open the folders to drag/drop photos?! Soooooo tedious! I literally remember the moment I set up my lightroom app to sync DIRECTLY to my external hard drive (EHD)… and how LIFE CHANGING it was for me (and my workflow).

Let’s face it… most people these days are mainly using their phones to take photos; the cameras on these things are just amazing! If you’re like me and take a lot of pictures, then there’s no amount of device storage on the phone itself that can handle my photo addiction!


LIGHTROOM

Many of us digi-scrappers who use Photoshop CC have the “Photography Plan” for $9.99 a month. Did you know that in addition to Photoshop CC… that plan also includes Lightroom? (both the cloud-based app & the Lightroom Classic desktop-focused app). The wonderful thing about Lightroom is that not only is it amazing photo editing software… but it’s also an organizational work horse! I know many scrappers who use it as their primary photo organization source. And while I won’t be delving into that aspect of the software here today… I will say that when I discovered the Lightroom mobile app syncs with the Lightroom desktop software — my mind was blown! Not only does it sync with the software, but it will send photos to wherever you tell it to send the files (in my case, that means sending them directly to my EHD)! And the crazy thing is that it’s SO easy to set up!

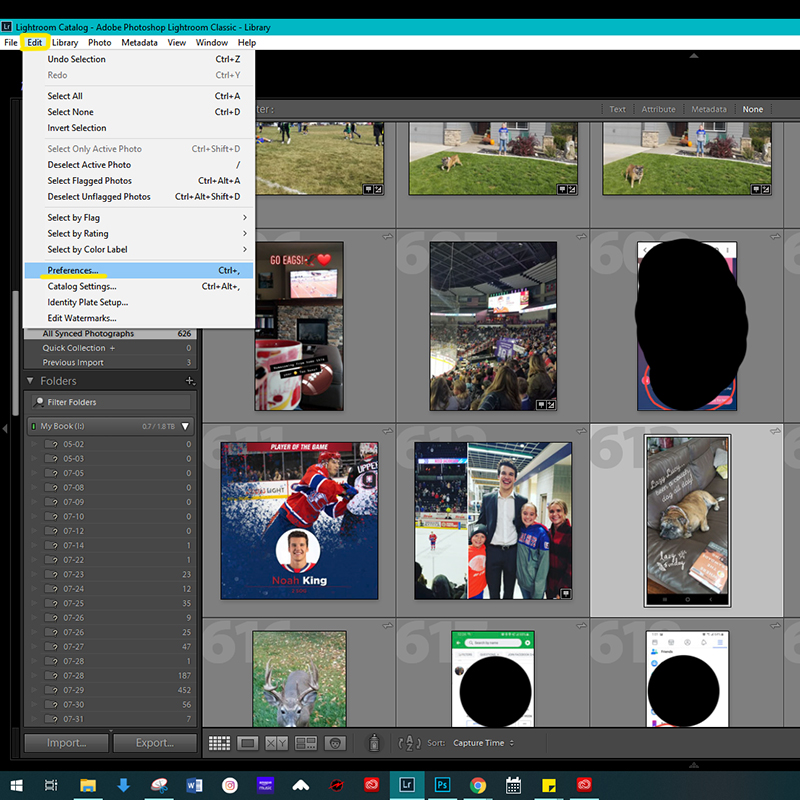
First, you’ll want to open up your Lightroom Classic software on your computer (the desktop app logo that is light blue, as shown here)…

Next you’ll click on the EDIT tab, then Preferences

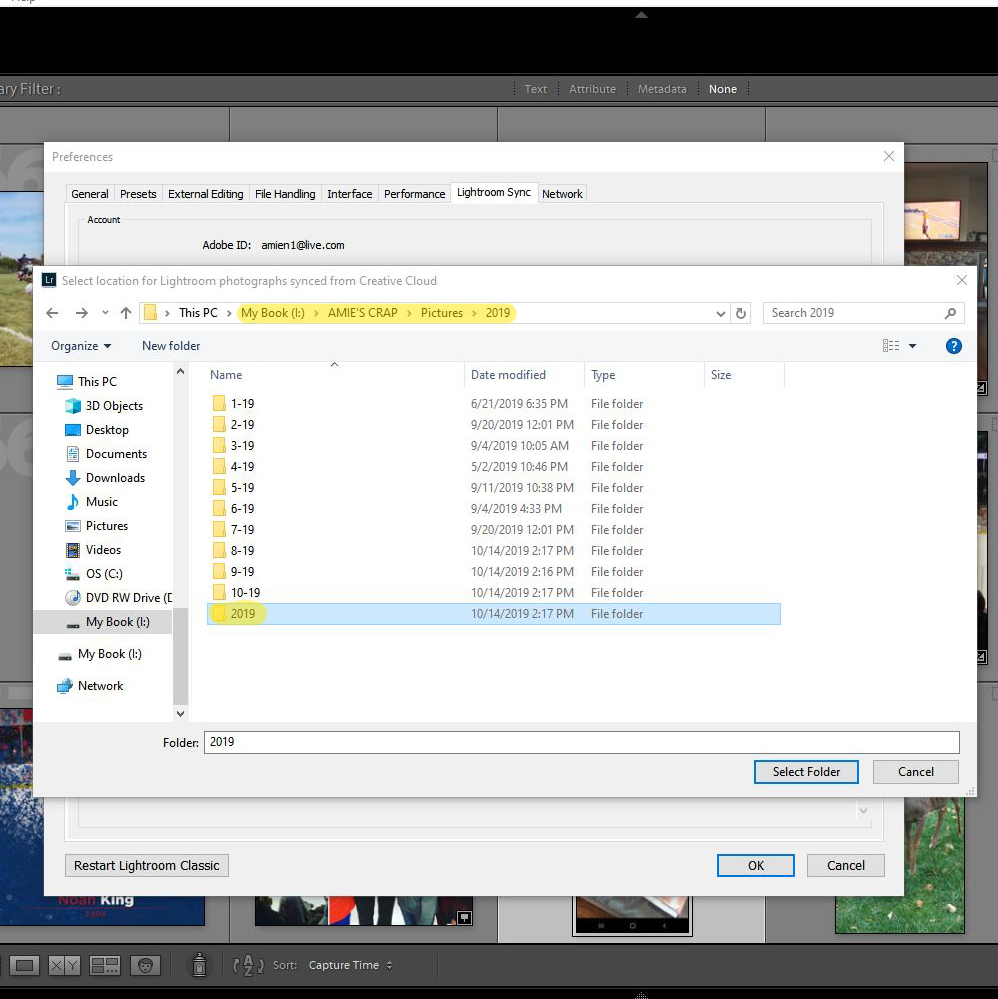
A window with all kinds of information will come up. Select the Lightroom Sync tab. You’ll want to check the box that says “Specify location for Lightroom’s Synced Images:” and then open the Choose button to select the folder you want your synced images to go into.

I also recommend you check the box to use subfolders, which will separate your photos by date (you can choose how your date folders are formatted with the dropdown menu, as well!)…

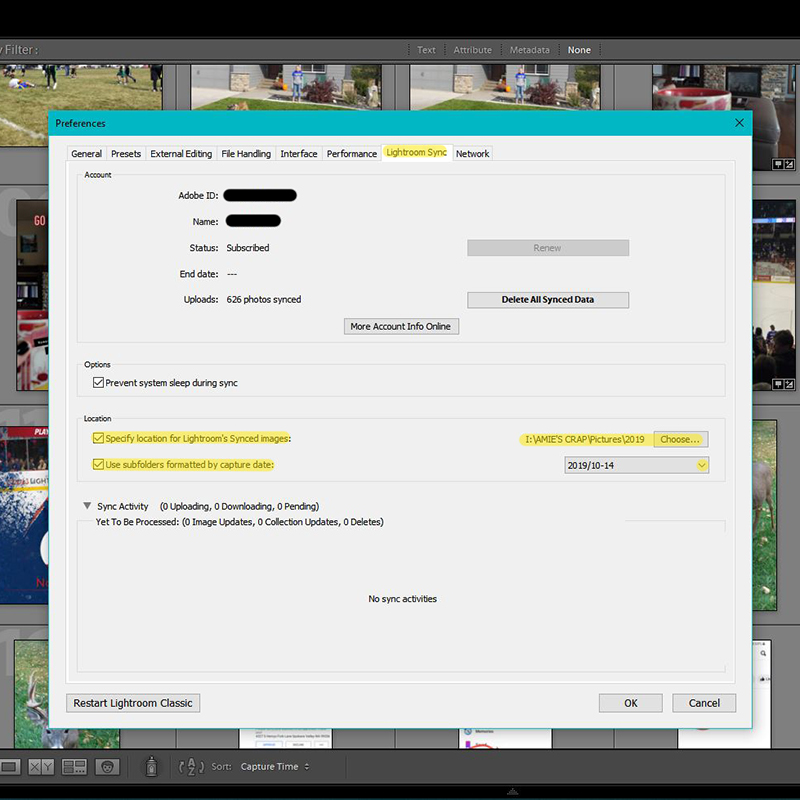
For my photos, I have them synced to a folder for the current year in my “PICTURES” folder on my EHD. Occasionally, I’ll go in & delete duplicates or random screenshots that I do not need to keep, & organize everything by month (not mandatory, but helpful)…

After doing that, you’re done with the Lightroom desktop set-up. From your mobile phone, now, you need to download the Lightroom app (the one that has rounded corners & is bright cyan, as shown here)…

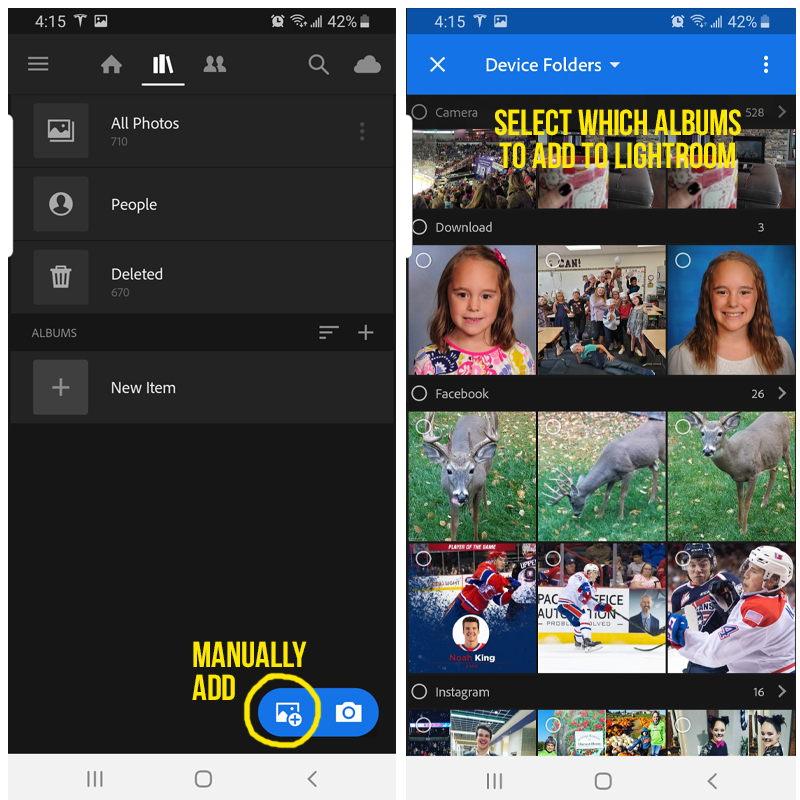
After you’ve logged in, at the home screen, you’ll want to click on the 3 horizontal lines (hamburger) on the UL side. Select Preferences. From this menu you can choose how you want your photos added & which albums to sync. I have my “AUTO ADD” turned on, then through that menu you can select which types of photos you want Lightroom to auto add to the app. I have everything except RAW photos added.

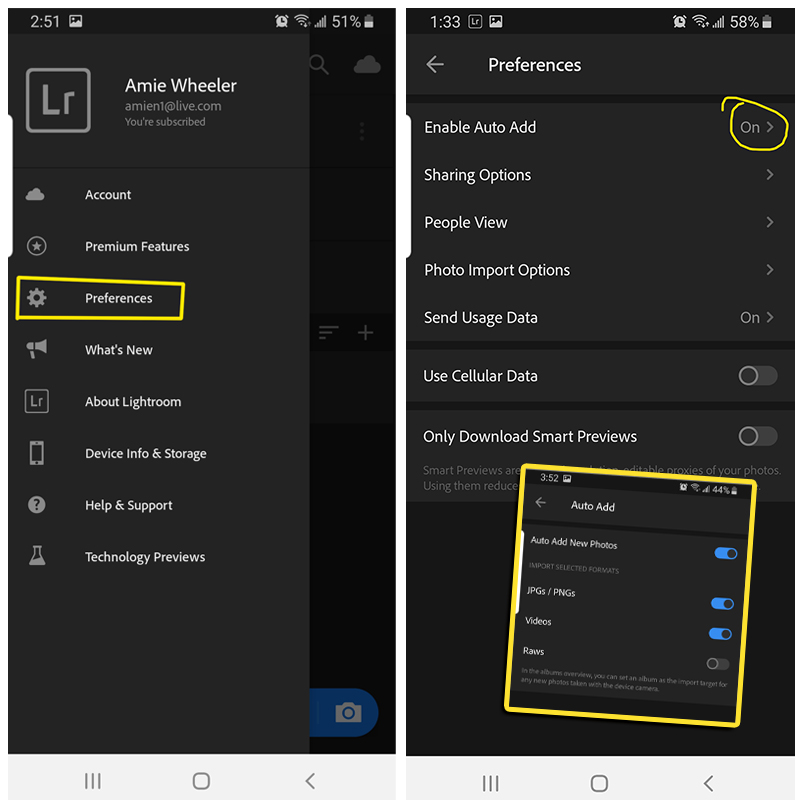
You do NOT have to have auto-add turned on. You can manually add photos to Lightroom, instead, by selecting the picture +  and then selecting which folders/albums to add.

Once your photos are added to the Lightroom mobile app… as soon as you open your desktop Lightroom classic app, your photos will sync! How cool is that?!

I typically open my Lightroom & Photoshop CC app on my desktop together at least every few days. All my photos seamlessly go where I’ve told them to go! Lightroom listens better than my kids! 😀


GOOGLE PHOTOS

The second app that is pretty crucial to my workflow is Google Photos. You may remember that at the beginning of the month, our resident App Scrapper — Sean — dove deep into Google Photos here on The Digital Press blog, & shared some great tips/tricks HERE.

I use Google Photos similarly, and the search function & ability to tag people are my favorites! The one thing that I also love about Google Photos, which he didn’t touch on in his post, was “Sharing” photos. I have my Google Photos account set up so that not only do MY mobile phone photos sync to my Google Photos, but also my husband & daughter’s phones/gmail accounts too! I love that I get my hubby’s pics, too — which are sometimes taken by me when his phone is handier than mine… and I also love that ALL of my daughter’s photos sync to me, as well… so it’s another level of monitoring what she’s taking pics of (all 42 billion pics of our dog… but I digress).

Within the app, under the main menu, select settings and then Shared Libraries. There, you can add gmail addresses for those who also use Google Photos. I also have my account set up to automatically sync (again taking one less step out of my to-do list!).

On my desktop, it’s super easy to download directly from the website. Also, when making QR codes for my layouts (of either videos or albums where there are just TOO many photos to scrap), I always link to my Google Photo account — much easier than uploading to YouTube, etc.


AMAZON PHOTOS

Last but not least, if you are an Amazon Prime customer, you are also eligible for Amazon Photos. Amazon Photos is another great way to back-up and share your personal photos with your friends and family. The company offers free, unlimited photo storage (at full resolution) to its Amazon Prime customers. Members get an additional 5GB of storage for videos and other documents or files.

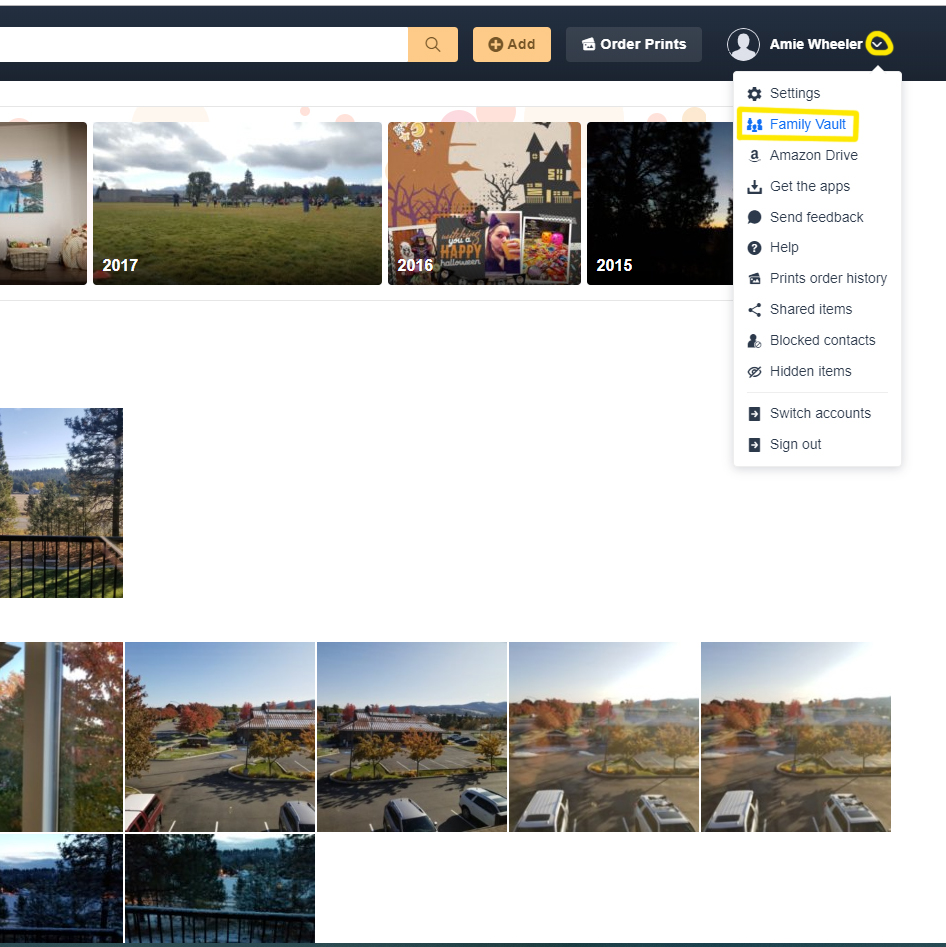
I use this app not only as a backup, but also for the Family Vault.  Amazon Prime subscribers in the US can invite up to 5 family members and friends to access & contribute their entire catalog of pictures and videos with Amazon’s Family Vault.

To do this, you click on your name with the drop down menu and then select the Family Vault. From that menu, you can send invites to your friends/family. Right now, I just have my Mom & Sister contribute their mobile pictures… and it’s so nice to have instant access to them for scrapping! From the Amazon Photos website, you can download any mobile photos directly to your computer.

Remember that issue, from the beginning of this post, about memory/space on our devices? Well, after the 3 apps I just referenced have synced my photos… I am able to DELETE ALL PHOTOS FROM MY PHONE!  Once those photos are safely stored away in the cloud and/or on my EHD… the different apps ensure that I still have access to the photos online if I need to re-download &/or if I’m not at my desktop where they reside on my EHD.

It’s such a time saver to have all this happen automatically in the background! I also have piece of mind that my photos are backed up in multiple locations just in case something happens to my phone. The apps discussed above are just a few of my favorites for accomplishing this… but I imagine there many more out there that do awesome stuff, too! I encourage you to try to get those thousands of pics off your phone & free up some storage!


About the Author  Amie is a craft-loving dental hygienist who lives in Washington state. She loves her husband, her two crazy kids, and her English Bulldog… as well as coffee, baking cupcakes, daffodils, glitter & sprinkles, reading a good book, and lip gloss — not necessarily in that order.

Friday Favorites | October 18, 2019

Hello, and welcome to another edition of our Friday Favorites series on The Digital Press blog! I’m excited to bring you yet another post in our newly-revamped Friday Favorites series, where every week we share some of the best creative inspiration we find in the gallery from our amazing community members here at TDP!

Here’s a look at a few of the newest layouts I love from TDP’s gallery this past week (they’re linked up to the original posts in the TDP gallery, so you can click through and leave them some LOVE!)…

First up is this gorgeous page by Renate that just jumped out of the gallery at me. The element placement is perfection and the use of the white background makes it pop! This is a beautiful example of how elements can really take a page to the next level!

Then, I came across this amazing page by Dragonhome that does an excellent job of including lots of photos as well as journaling! The mix of photos, as well as their placement on the page, really helps tell the story. The page design is fantastic as are the pops of color (red, yellow) amid the more low key blues that are used for most of the page!

This next page just spoke to me – I love how weaselwatchr was able to frame the adorable photo with the colorful triangles which gives the page such whimsy! I love the use of orange and yellow together as they are such a wonderful complimentary combination!

I adore ‘slice of life’ pages and this one by sylvia about laundry is just fantastic! I adore the large (and perfect) photo showing the laundry which really sets the stage for the rest of the page! The elements are the perfect addition to the page! And the mostly blue, with pops of orange and yellow color combination, gives the page such a beautiful balance!

One of my favorite things is a page that uses white space well! This page by Dalis is an amazing use of white space. I just adore those hearts and scribbles! The photo is fantastic and I adore the placements of the stitching, paint & other embellishments!

This final page by Mother Bear is just stunning! The black & white patterned paper background with the gorgeous flower clusters and the black and white photos … WOW! Such a beautifully composed page! The design just eases the eye across the page so beautifully!

I hope you’ve enjoyed this installment of our newly-revamped Friday Favorites series today! I had so much fun looking through the pages of inspiration that can be found in the gallery here at The Digital Press. I always feel like my creativity soars after browsing through all the amazing layouts!

Meanwhile, if you’re looking for even more scrappy inspiration… check out this weekend’s New Release products, as well… and then get creative, add your projects to the gallery, and perhaps you will be featured here in a future Friday Favorites post!


Amy

About the Author  Amy lives in Richmond, Virginia, with her husband and their 14-year-old boy/girl twins. Their 23-year-old daughter has recently finished up graduate school at Clemson and has started her first full-time job! She has been scrapbooking since the early 1990s, but discovered digital scrapbooking in 2005 when her twins were born… and has primarily scrapped digitally since that time. She is passionate about telling her family’s stories and documenting their life together. She is also a huge reader, a pop culture junkie, and LOVES all things beauty & makeup!

Tutorial Tuesday | Digital Paper Creases

Happy Tuesday y’all, and welcome to another edition of our Tutorial Tuesday series here on The Digital Press blog! Today I’m here to show you how you can use the gradient tool to make digital papers look creased. It’s easy and fun to do, and can totally change the look of a paper with just a few steps.

Sound fun? Let’s get started!

Step 1: Use your Polygonal Lasso Tool and draw a shape where you want your crease. You can take a peek at mine, below, and see that I wanted my crease to appear on the diagonal so I drew a triangle…

Step 2: Create a new layer above your paper.


Step 3: Select the Gradient Tool and choose Linear Gradient. Then, draw the gradient starting in the lower left part of your selection and move towards the center. Wherever you start is where the darkest part will be, as shown here…


Step 4: Use your Polygonal Lasso Tool again to draw another shape on the opposite side. Then, grab the Gradient tool again and start in the middle and move your way to the top right corner. You should notice the white space of your previous selection is next to the dark space of this selection (and where the light meets the dark is where your crease will be!)…


Step 5: Select this gradient layer and change the opacity until you like the desired effect (on mine, below, you can see I liked what it looked like at 14%). Also, you can play around with your blending modes until you get the look you are going for. I personally liked the Soft Light option with this particular background paper. Once you have the settings the way you like them… ta da! You have a crease!


Optional Step 6: Now… you could totally stop here… but I decided that I wanted to add another crease, so I repeated the first five steps in a different location and going the opposite direction (see next image).

You could put this second crease anywhere you want it. For myself, after creating a new layer, I drew another shape in the top left corner with my Polygonal Lasso Tool…


Then I added a gradient with my starting point in the top left corner…


I outlined the remaining portion of my page with my Polygonal Lasso Tool. Notice that you can go outside the page in order to do this…


Next I filled that portion with another gradient with the dark side directly touching the light side of my previous one (just like Step 4, above, but going the opposite direction)…


Once again, I changed the opacity of this layer (this time to 15% — just because I liked the way it looked), and I also changed the blending mode to Soft Light.

Voila! I have a twice-creased piece of paper…


This is so much fun, and really easy to do. You aren’t limited to diagonals, either; feel free to make your creases in horizontal or vertical directions, as well. Just remember that the light side of one gradient must be directly adjacent to the dark side of the other… as that’s what makes the crease.

Here is a look at a layout I created using my newly-creased background paper…


I hope you try this technique and have as much fun as I did making my layout!


Robin

About the author  Robin is a member of the creative team here at The Digital Press. A wife of 26 years and a mom of 4 crazy children (3 in college and 1 still at home), she says that her life occurs mostly in the car as she transports said crazy kids to their many, many homeschool activities. When not driving, Robin loves to make her family cringe by pulling out her camera again (and again, and again…).

Hybrid How-To | Lacing Cards

Hello, everyone! Welcome to another edition of our Hybrid How-To series here on The Digital Press blog! Today, I am here to show you how to make these adorable lacing cards using digital elements from your favorite digital kits.


Supplies Needed

  • Digital kit of your choice (I used Be A Unicorn by Mari Koegelenberg)
  • Cardstock
  • Scissors (or cutting machine if you prefer)
  • Hole punch
  • Yarn
  • Yarn needle

The first step is to select the images you want. I try and stick with simple images that will be easy to trace with yarn. The unicorn in this was more complicated than I would normally want, but I just really wanted that unicorn!

I enlarged them a bit, added two images per page, printed and cut them out.

I used an eyelet punch to make the holes around each image. Make sure the yarn needle can fit through the punch you’re using.

And that’s it! They’re ready to go.

I used to laminate them to give them more durability, but our local lamination place shut down and so I started letting the kids use them without the laminate and found it was just fine. Because they’re so quick to make, I can easily print and cut new ones using new images each time. My kids love lacing cards!


Kate About the Author  Kate is on the hybrid team here at The Digital Press. She lives on the Utah/Colorado border with her husband, 5 kids, 10 chickens, a dog named Gracie, and a cat named Kit. She’s a city-born girl who found she’s really a country girl at heart. She can be found outside, barefoot, and probably in her garden.

Friday Favorites | October 11, 2019

Hello, and welcome to another edition of our Friday Favorites series on The Digital Press blog! I’m excited to bring you yet another post in our newly-revamped Friday Favorites series, where every week we share some of the best creative inspiration we find in the gallery from our amazing community members here at TDP!

Here’s a look at a few of the newest layouts I love from TDP’s gallery this past week (they’re linked up to the original posts in the TDP gallery, so you can click through and leave them some LOVE!)…

First up is this sweet page by southernmother.  How gorgeous is this page! I absolutely love the color scheme and those amazing patterns. Her photos are just the sweetest and the little clusters around the photos are so beautifully done! Lovely use of the word bits and title work as well!


Next is this beautiful photoless page by HappyMamacita! I am such a fan of photoless pages but never feel like I can pull it off well. This page is just stunning. I love the patterned hearts and the sweet simple embellishments and word bits added to them. The scatter and coffee stains are absolutely perfect touches!


I love the beautiful fall photos in this layout by lady22! That photo is just so beautiful! I love the way she has set if off with the neutral paper on top of the gorgeous pattern! The tiny flowers and perfectly places word art pieces are stunning. The camera element and cameraman stamp are just the right touches. Wonderful layout and precious memory!


While browsing around the gallery, I also found some “oldies but goodies” that I thought I would share with you! So, here are some throwbacks from our amazing gallery!

How beautiful is this page by chigirl?! The peach and orange tones are absolutely lovely!! I really adore how she included the pops of green and blue as well. I love the placement of the photo to the side and her lovely cluster of flowers and elements. The use of the frame is so creative! This is just a gorgeous page!


Then I found this lovely page by elainem! I am in love with that split background design. Those two patterns look fantastic together! The photos are just the cutest and I really like how she used the other patterns and the scatter behind the photos to really set them off. Such a beautifully done layout!


I also found this stunning page by Margje! Her blending work is totally fabulous! I love how the photo, frame, and paints all blend together so perfectly! Fantastic work with the stamps and doodles as well! I adore that title work, too!!


I hope you’ve enjoyed this installment of our newly-revamped Friday Favorites series today! I had so much fun looking through the pages of inspiration that can be found in the gallery here at The Digital Press. I always feel like my creativity soars after browsing through all the amazing layouts!

Meanwhile, if you’re looking for even more scrappy inspiration… check out this weekend’s New Release products, as well… and then get creative, add your projects to the gallery, and perhaps you will be featured here in a future Friday Favorites post!


About the Author  Jan is a high school teacher, wife, mom, and grandma who spends most every little bit of free time she gets documenting her family’s memories through digital scrapbooking. She is a summertime sunshine and beach lover who gets her energy from being outdoors. She is currently looking forward to retirement and a beach chair with her name on it and someone bringing her fruity drinks on command!

Tutorial Tuesday | Unzip Products on Your Phone

Hello, and welcome to another edition of our Tutorial Tuesday series here on The Digital Press blog! I’m excited today to share with you a new feature of the iOS 13 update that unzips your purchased digital kits right on your phone… no other app needed! It’s a big breakthrough for app scrappers, as the other/previous app options for unzipping kits to use on our devices were very  cumbersome. It is a change that may prove to be really helpful for people who use Photoshop Elements (PSE) on their mobile devices, as well!

First, before we get started… a quick word on the iCloud Drive storage. Everyone with a iCloud account has 5GB of free space to use, and you can see your iCloud Drive in your native Files app (which is where all the unzipping takes place… sounds sultry, huh!). This is more than enough space to store a bunch of zipped and unzipped kits. You will have to move them eventually, however, to create more space for future purchases. But don’t worry!  I will show you how to do that, as well.

Let’s dive in!


And that’s it! It seriously goes so fast once you get the process down. I hope this helps you get your memories recorded that much quicker. I’m so glad Apple added this super helpful feature.


ABOUT THE AUTHOR  Meagan Johnson is a stay at home mom in Minnesota with an avid love for app scrapping and teaching others just how easy it is to scrap in the go!