Hybrid How-To | Customizing Digital Elements

One of the key things that attracts me to hybrid memory-keeping are all of the wonderful digital embellishments that can be used (and/or tweaked to work for any project!). Namely, the ability to print and cut digital elements many times over is definitely a huge bonus for crafters on a budget (one purchase = endless uses!). Even better, though, is the fact that if you need to alter an element slightly to make it fit into one of your projects — with digital elements, you can do this! Today, I am going to show you how to take a standard digital element and customize it for your project.

The first step is to choose a digital kit from the amazing selection at The Digital Press. I chose the gorgeous Fresh Air collection designed by Anita Designs and Kim B Designs, because I love the color combination and the clean lines…

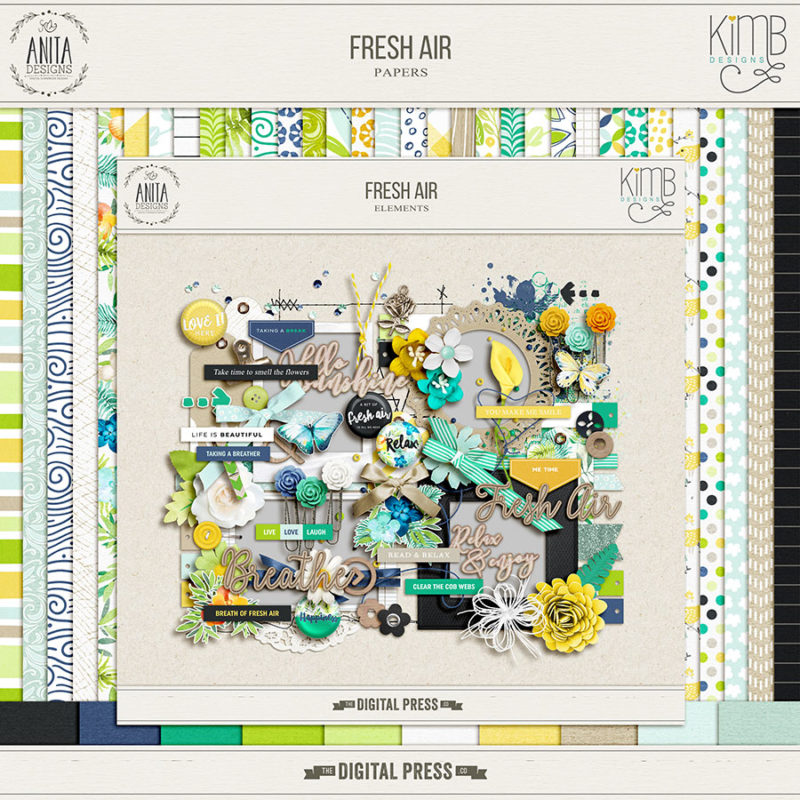
For my projects, I wanted to use one of the tags found in this collection (see below). The “Love” tag in the kit is gorgeous — but I wanted a shorter version for my project, so it would fit better into the space I had available. This next simple editing trick works wonders for tags that have a plain section.

Shorten a Tag

You will need photo editing software such as Photoshop (PS) or Photoshop Elements (PSE) — but there are plenty of alternative applications (there’s even a free online PS tool/version).

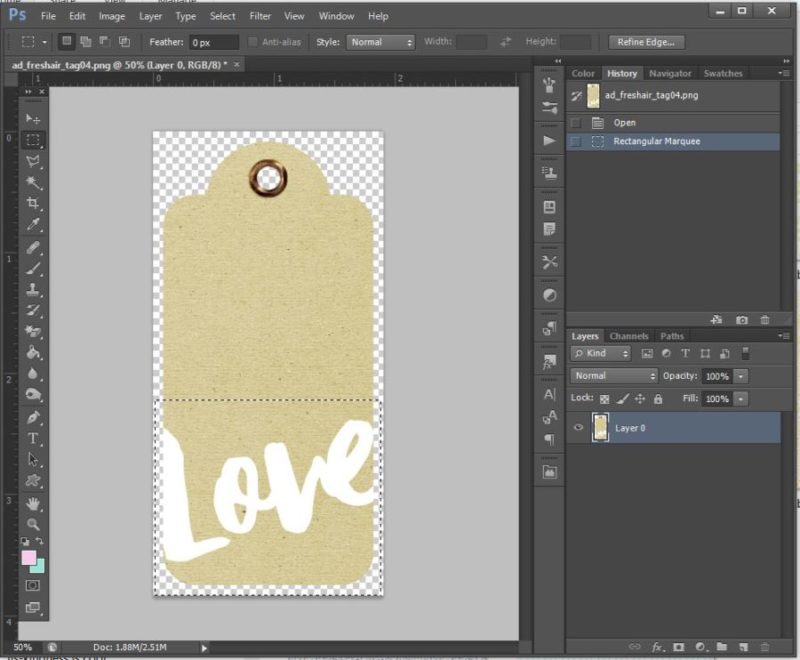
  1. Open your tag in the editor and select the marquee tool (shortcut key + m + the dashed rectangle on the left).
  2. Now select an area to move. We will shorten the tag by moving the lower section up towards the top of the tag. Drag the mouse to select an area as shown below…

3. Switch to the move tool (shortcut key =+ v).
4. Using the arrow keys, move the selected area up; you should see the tag becoming shorter as you move it…

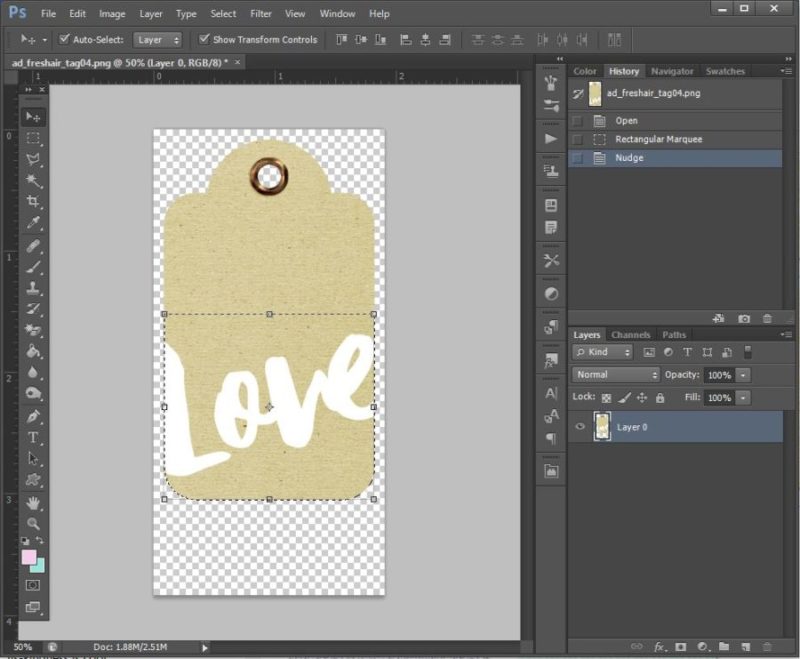
Voila! The tag is now shorter — and it’s just right for my project! This techinique is very simple but very effective.

*TIP* don’t forget to “Save As” a new document, or you will actually overwrite the original file — which you don’t want to do!

Cookie Cut Your Own Tag

Next up, how about making your own version of the tag? We will use a cookie cutter effect to create another tag from patterned paper. This time I’ll use the free online Photoshop tool to demonstrate…

  1. Open a tag and paper; the paper can be patterned or plain.
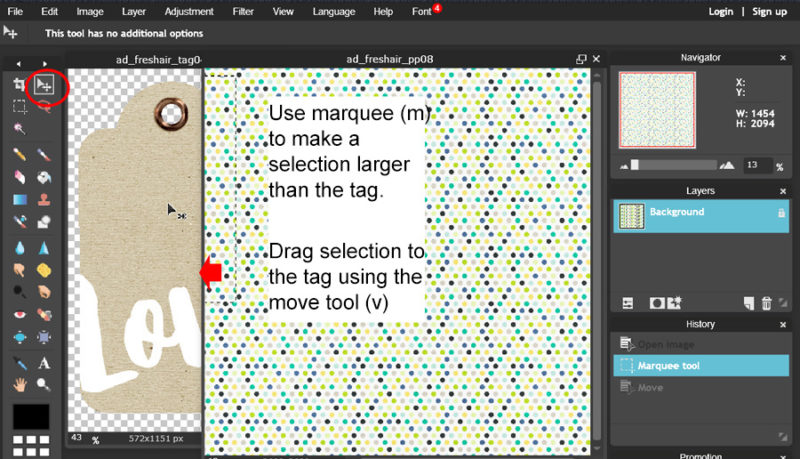
  2. On the patterned paper window, make a selection larger than your tag using the marquee tool (m).
  3. Now click and hold on the selected area to drag the paper selection across to the original tag. There will be 2 layers in the tag window.
  4. Close the patterned paper.

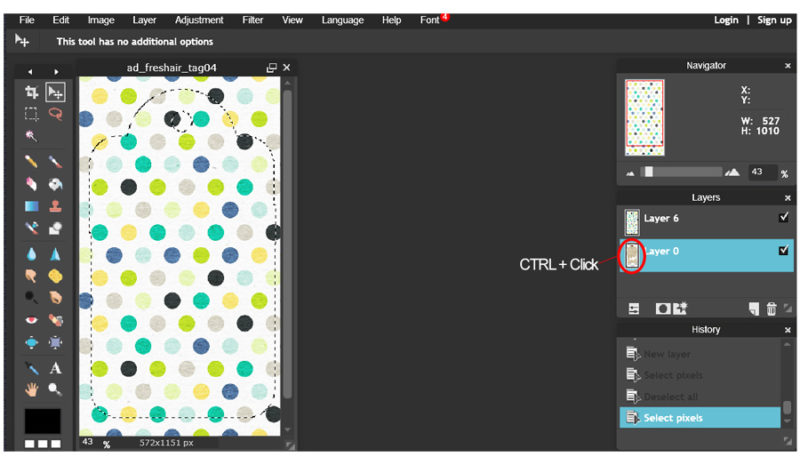
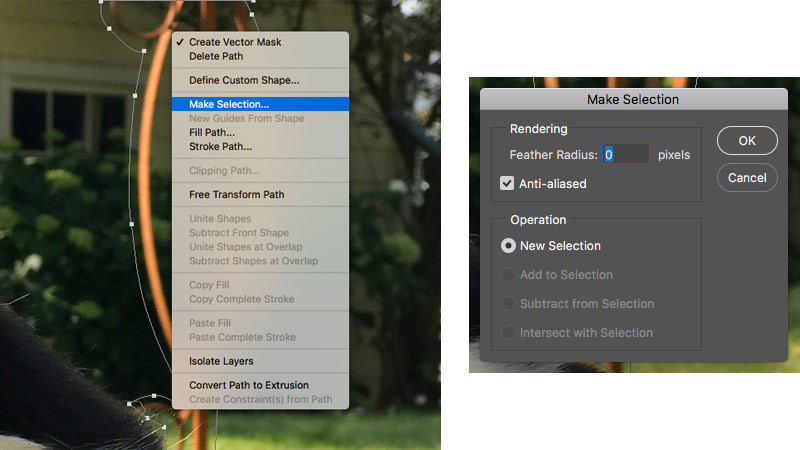
5. In the tag window, Ctrl+click on the icon on the tag layer (layer 0 as shown above). This selects the image outline. You will see the “marching ants” around the outside of the tag.
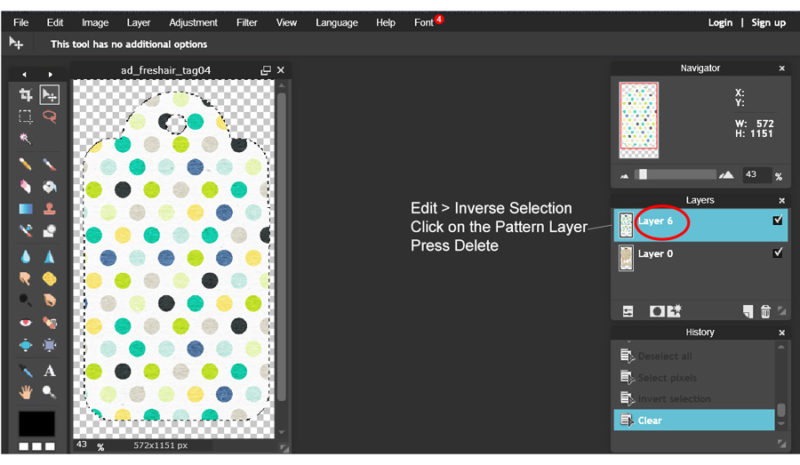
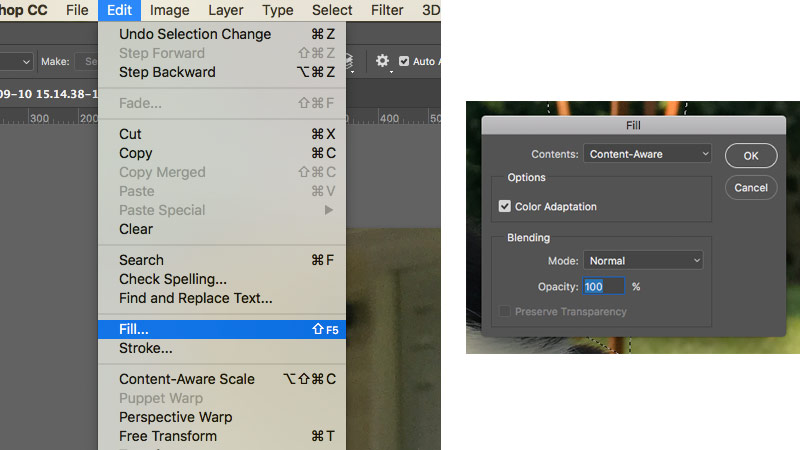
6. The current selection is the tag itself but we only want to cut the ‘excess paper’ outside of the tag. To invert the selection, Edit > Invert Selection. This selects everything except the tag shape.
7. To cut out the patterned paper in the shape of the tag, click the patterned paper layer.
8. Click Delete to delete the selected area. The excess paper is deleted leaving only the tag behind.

Ta-da! Your new tag is ready to decorate… but again, don’t forget to save as a new document first (so you don’t overwrite your original file).

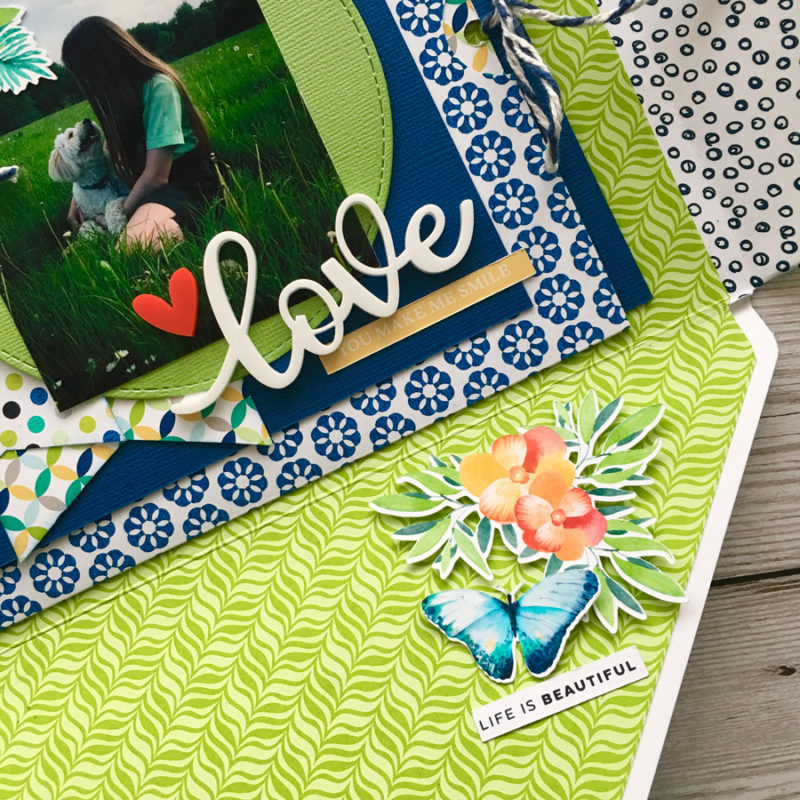
Here’s a look at my finished project, which is a decorated envelope (happy mail!)…

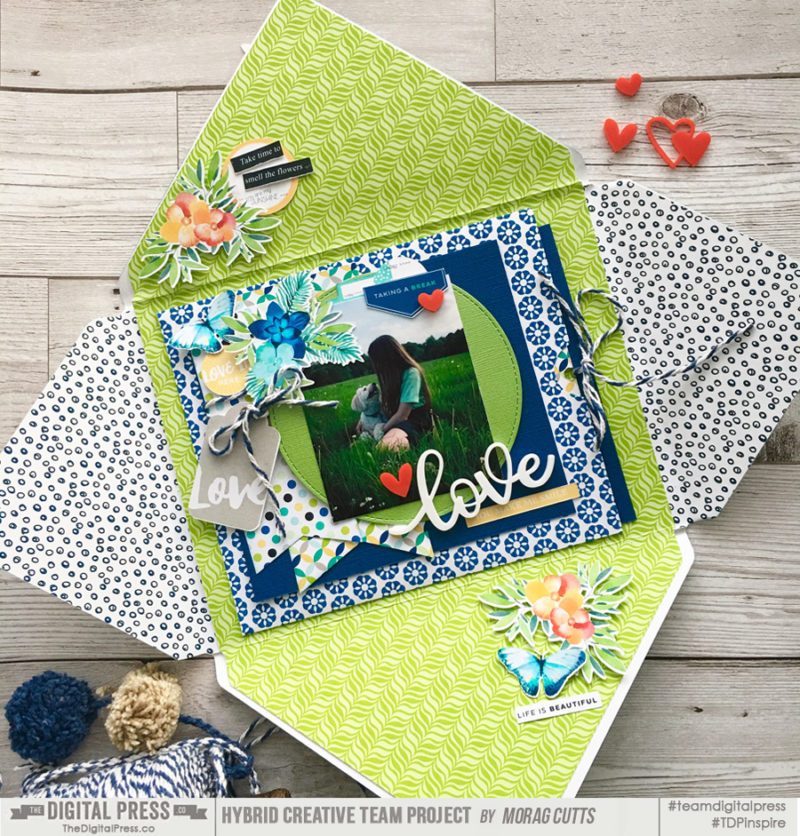
I used patterned papers from the kit to make an ‘envelope’. There are plenty of free envelope templates on the internet to use as a guide.

Here’s another closer-up view…

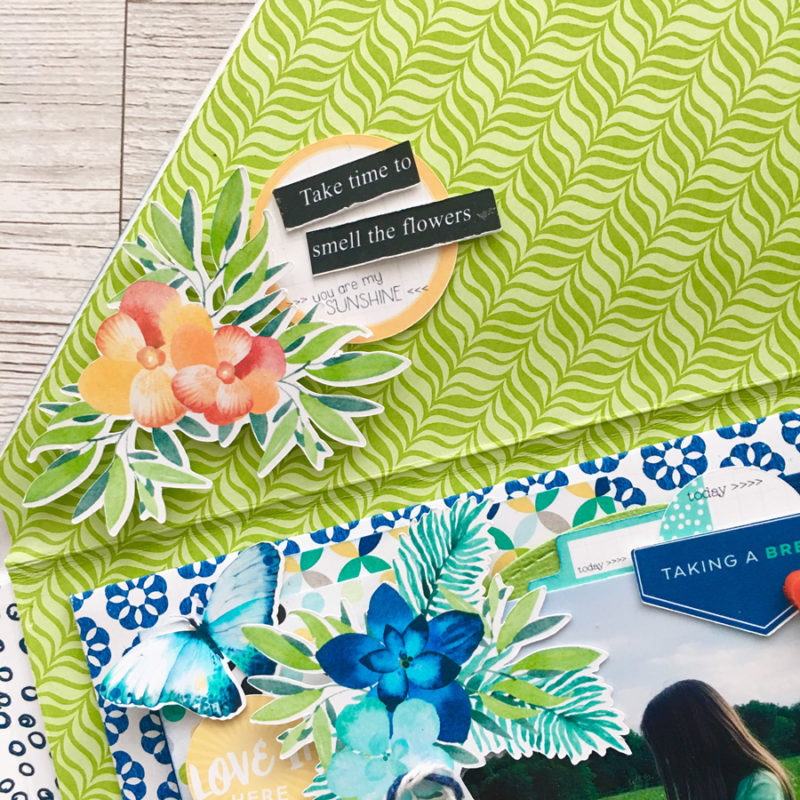
I only have singled-sided printing paper, so I lined the envelope with different papers. I really like the additional interest this created. It also made the project a bit more sturdy. A simple pocket holds a tag (for a message or for adding journaling). To finish off, I fussy-cut some flowers and butterflies and added tags and labels…

I hope that with a few of these ideas, I have inspired you to use elements from your own digital stash and tweak them around to make them work better for your own projects (and maybe even inspire you to try making your own happy mail and embellish with customised elements?). I think receiving a project like this would really make someone’s day!


Morag Cutts is part of the Hybrid Creative Team here at Digital Press. Morag has been an avid scrapper and photographer for ten years.  Although she adores the flexibility and creativity of digital, Morag can’t resist playing with paper and embellishments – so hybrid scrapping is the perfect medium for her!  Morag lives in the UK with her hubby, two kids and puppy.

Tutorial Tuesday | Removing Objects From Photos

Hello, and welcome to this week’s edition of our Tutorial Tuesday series here on The Digital Press blog!

This week, I’m going to cover two different ways to use Photoshop (and/or many other photo editing software programs) to remove unwanted objects from the backgrounds of your photos. I find myself using this process a lot when I know I have a great photo — you know, everyone’s eyes are open, everyone is smiling — but there’s something in the background that ruins it a little bit. That’s all easily fixed with one of these two methods!

Both methods ultimately do the same thing: Photoshop samples from the surrounding area to “guess” what would be behind the object you’re removing. I find I use both methods in succession, because each one has its pros and cons.

Method 1: Using the Content Aware Feature

Step 1: Open your image in Photoshop

Step 2: Using the pen tool, draw a path around the part of the photo that you want to remove. You don’t have to be super exact here, but still get it as close as you can. You’ll want to draw the path a little way out from the edge of the item you’re deleting, but not too close to any other foreground object nearby. You can see in this screenshot how close I’m getting…

Step 3: Make sure you’ve got a path drawn all the way around the object, and make sure to connect the ends. Then, right-click anywhere inside the path and choose “Make Selection.” In the pop-up window, choose “0” for the “Feather Radius” and leave all the other options as the defaults, as shown here…

Step 4: Now you should have an active selection around the object you want to remove… so it’s time for the magic to happen! Choose “Fill” from the Edit menu. In the dialog box, make sure the Opacity is set to 100% and leave all the other options as the default…

And voila! Your object disappears and Photoshop smartly fills in the space using samples from the surrounding area. Take a look below; on the left side, you can see what the image looked like before… and on the right, you can see I’ve taken out the metal structure and the leash…

It’s important to note that there will occasionally be a couple of places that need to be “cleaned up” where Content Aware doesn’t do a perfect job. For example, the cat’s paws didn’t come out quite right after I removed the leash from the background, using the method above. I’ll use Method 2 to fix this up…

Method 2: The Clone Stamp Tool

Step 1: From the toolbar, choose the Clone Stamp tool. It looks like this —> Screen Shot 2017-09-26 at 7.57.00 PM

From the options panel, choose a brush size that is appropriate for the area you’re fixing. If you’re removing a larger item, you can choose a larger brush. If you’re fixing up an edge, I like to use a 10 or 20 pixel brush. I like to set the hardness to about 50% so you end up with a blended edge and not a stark and obvious contrast…

Step 2: Holding down the ALT key (PC) or the OPTION key (Mac), click in an area of the photo from which you want to sample the replacement. You will see a little crosshairs circle icon to know that you’ve got it right. I usually try to choose a part of the image that has some amount of random texture or grain so that it still looks natural.

Step 3: Next, release the click and “paint” in the area you want to replace. Photoshop will copy the image from where you set the anchor… and then paint into the area you’re fixing with the other part of the photo…

Result: With a little practice and variation of brushes, you can see the result…

Here’s a look the complete “before and after” of this image, after using both methods. You can tell what a big difference it makes!

Hopefully these two techniques will help you fix up your photos more easily. Happy editing!


ShannonAbout the Author  Shannon has been completely addicted to digiscrapping since she began in early 2016 (though she’s been a scrapper since 2000). Her early morning ritual of a few quiet hours of scrapping while sipping a chai tea is her favorite part of each day. She is also the owner of a web design company, and when she’s not at the computer designing websites or digiscrap layouts, she’s probably hiking one of the local mountains in her hometown of Phoenix, Arizona. She is an avid reader and loves to travel to foreign countries.

Foodie Friday | Anita Designs

Well hello again, and welcome to another edition of our Foodie Friday series here on The Digital Press blog!

As you have likely already caught on throughout this past month… Foodie Friday is a new series based on the amazing response we had to the “Mess Hall” activities during TDP’s Summer Camp, back in July. As such, every Friday throughout the rest of the year, we will be combining this fun feature with our weekly designer feature series — and having some fun in the kitchen! Every week you will get the chance to peek into the lives (and kitchens) of your favorite TDP designers and creative team members.

This week’s fabulous recipes are coming to you from the spectacular Anita of Anita’s Designs. If you did not know already, Anita loves to cook… so she was very excited about sharing these recipes with you this week. I really enjoy cooking as well — and I love trying out new recipes — so I was super excited to see some new things here that I have not tried before!

Today we are sharing a series of recipes that Anita cooked one weekend this month for her family. In a way, this is “A Day in the Kitchen with Anita” documented! 🙂

[all photo credits to Anita ]

So, what are these delicious things you see pictured above?

  • Sunday Soup (a.k.a. Meatball Veggie Soup)
  • Waldorf Salad and Tarragon Oil
  • Pork Filet (Minute Steaks) in White Wine Sauce
  • Ice Cream with Chocolate Dipped Strawberries

Sunday Soup (a.k.a. Meatball Veggie Soup)

Anita says, “this is a soup most people in Holland know and eat. My grandma used to cook this on Sunday for all kids and grand-kids. My husband’s mom makes it too sometimes, and hers is just as delicious as the one my grandma made. We call it ‘Groentesoep’.”

INGREDIENTS NEEDED
—4 liters (about 1 gallon) water
—broth to make 4 liters of soup
—500 gm (about 1 lb.) minced meat
—500 gm (about 2 cups) finely chopped mixed veggies ( carrots, cauliflower, leek, celery, white cabbage, etc)
—a handful of vermicelli
—flavor enhancers for soup (optional)

INSTRUCTIONS
—In a large pot bring the water to a boil.
—In a bowl add seasoning to the meat (salt, pepper, paprika, etc. to taste).
—Mix the seasoning into the meat and then form small meatballs.
—Add the meatballs to the boiling water and reduce the heat to low.
—Cook the meatballs in the water for about 60 minutes, removing the foam that collects on top every 10 to 15 minutes.
—Add the broth to the soup and cook for an additional 60 minutes.
—Add the chopped veggies to the soup.
—If desired, add the flavor enhancers to the soup and cook for additional 55 minutes.
—Add the vermicelli and cook until the vermicelli is soft, then remove from heat.
[serves: 8-12 people]


Waldorf Salad and Tarragon Oil

INGREDIENTS NEEDED
—3 Granny Smith apples, thinly sliced
—2 celery stalks, leaves picked, stalks thinly sliced
—1 red onion, thinly sliced
—100g (1/2 cup) walnuts, toasted and chopped
—170g (1 cup) raisins or a bunch of purple grapes
—50g (1/4 cup) tarragon leaves, roughly chopped
—1/2 Tb white wine vinegar
—60ml (1/4 cup) extra virgin olive oil
—a bunch of radishes
—juice from 1 lemon
—150 gm (about 3/4 cup) mayonnaise

INSTRUCTIONS
—Combine lemon juice and mayonnaise in a bowl and season to taste with salt and pepper.
—Place the apple, celery stalks and leaves, onion, nuts and raisins in a large bowl and toss with the dressing.
—Make the tarragon oil by combining the tarragon, vinegar, olive oil in a bowl.
—Serve the Waldorf salad and drizzle with tarragon oil on top.

[serves: 6-8 people]


Pork Filet (Minute Steaks) in White Wine Sauce

About this dish, Anita says… “I served the pork filet and Waldorf salad with pomme duchess (duchess potatoes).”

INGREDIENTS NEEDED
—8 thin pork filets
—4 Tbs flour
—100gm (1/2 cup) butter
—4 cloves of garlic
—250 ml (about 1 cup) white wine
—200 ml (about 1 cup) broth
—20gm (3/4 cup) fresh chopped parsley

INSTRUCTIONS
—Mix the salt and and pepper into the flour and dip the pork filets in the mixture.
—Shake off excess flour and saute them in 50 gm (1/4 cup) of butter for about 4 to 6 minutes, turning over once in the middle.
—Remove from skillet, cover with foil and let rest.
—Add in remain butter and saute the garlic for about 1 minute.
—Add the wine and broth.
—Bring to a boil and let it boil for about 10 minutes or until it is 1/3 reduced.
—Place the meat back in the pan, and warm it on a low heat for about 7 minutes with the lid on the pan.
—Remove from heat and plate filets.
—Add parsley to the butter wine sauce and give it a good stir. Serve the sauce in a bowl, or over the meat in the plate.
[serves: 8 people]


Ice Cream with Chocolate Dipped Strawberries

INGREDIENTS NEEDED
—200 ml (1 cup) semi-skimmed milk
—2 tbs liquid honey
—250g (1 and 1/4 cup) fine sugar
—600 (3 cups) ml crème fraîche
—250 grams  strawberries
— 2 icecream waffles per person
—100 ml (1/2 cup) water
—additional fresh strawberries (to coat with chocolate)

INSTRUCTIONS
—Put the milk, honey and 1 cup of sugar in a pot on low heat and whisk until the sugar dissolves.
—Remove from heat and let cool slightly.
—In a bowl, add the cooled milk/honey sugar mixture to the fresh cream. whisk until blended.
—Place cream mix in an ice cream machine and let it work 1.5 to 2 hours (if you don’t have a ice cream machine, put the mix in a container and put in freezer and stir it gently every 15-20 minutes).
—Remove the green from 250gm of strawberries and slice in half.
—Add strawberry halves, 100ml water and 50gm sugar to a pot and bring to boil on med/high heat.
—reduce heat and crush the strawberries let the mix thicken for about 20-25 minutes (it should be syrup like).
—Remove from heat and let cool.
—Once cooled, mix the strawberry syrup into the freezing ice cream mixture with a fork and return to freezer for at least 20 minutes.
—Skewer the remaining strawberries from the top.
—set a bowl above a pot of boiling water and add chocolate to the bowl, stirring regularly until the chocolate is melted.
—Holding your skewer, dip the strawberries into the chocolate and twist to coat evenly.
—Place dipped strawberries on a baking sheet to cool, then store in the fridge until needed.

TO SERVE
—You can simply serve the ice cream in a bowl, and garnish it with the chocolate-dipped strawberries… OR…
—You can also place a waffle on a plate, and put a scoop of ice cream on top; add a second waffle on top and do another scoop; top with some chocolate sauce, sprinkled chopped nuts, and some whipped cream; serve with chilled chocolate dipped strawberries on the side.
[servings: 1 liter/10 people]


I don’t know about you, but just reading through those recipes and looking at the photographs got me ready to hit the kitchen (or at least have a nice snack!). Everything looks so amazing!

If you’re up for a challenge… come to the forum and check out our Recipe Book challenge, which launched this month and is designed to help you create a quick-&-simple book of your favorite recipes — get this — in time to print it up and give it to friends and family members as a holiday gift later this year(!). Sound like fun? Come check it out HERE.

Meanwhile, it wouldn’t be a designer feature week without a fantastic sale and a special Free-with-Purchase offer… so you’ll be excited to see what Anita has in store for you! Not only is her entire shop marked down 30% OFF throughout her entire feature week (sale prices will be valid through 11:59pm ET on Thurs 9/28)… but she also has this awesome deal in her shop all week long, as well! Spend $10+ in the Anita Designs shop, and get the following brand-new FULL COLLECTION (!) that just launched in her shop today — completely FREE!


Erin is an artsy crafty kind of girl who is currently dabbling in far too many things, but is working hard to enjoy every moment of it, while avoiding the rain, which is difficult due to living in the land of many rains. She is slowly learning to use her smart phone to capture all the fun little bits of life that would otherwise go unremembered in the busy craziness that is raising a family!

Tutorial Tuesday | Sharing Layouts in the Forum

Hi Scrappers, and welcome to another edition of our Tutorial Tuesday series here on The Digital Press blog!

With Digital Scrapbooking Day (DSD) just around the corner, I am looking forward to seeing a lot of amazing layouts shared in our DSD forum posts! So, this seems like a perfect time to review how to share layouts — linking them up from the TDP gallery into posts within the forums. It’s really very simple, once you do it a few times!

Follow these steps and you’ll be a layout-sharing expert…

  1. Locate the layout that you would like to share in the gallery.
  2. Click on the layout.
  3. To the lower-right (below your layout) and you will see a box that says “Additional Info” (see header image example, above).
  4. In that “Additional Info” box, locate the BB Code and copy it (on a PC… click-highlight + Ctrl-C; on a Mac it will be Command-C).
  5. Go to the forum and find the entry box where you would like to add the layout.
  6. Add any text that you would like to appear before the layout in your post.
  7. Paste in the BB Code.
  8. Add any additional text that you would like to have appear below your layout
  9. Click “Preview” to check your post to make sure it looks just right.
  10. Click “Post Reply” once you are happy with your post.
  11. Admire the amazing job you just did sharing your layout in the forums! 🙂

See? I told you it was simple! That’s seriously all there is to it.

I hope that this quick tutorial will inspire you to share a lot of layouts in the forum (it comes in especially handy to participate in our monthly challenge system, etc.)!

Now — we invite you to come get more involved in The Digital Press’s forum! A great place to start is in our RAVE REVIEWS thread; each month, we have a thread in which we share layouts that inspire us. Anyone is welcome to post on that thread, so head over there now to practice sharing a layout in the forums! You can find the RAVE REVIEWS thread in the ADVICE COLUMNS section of our forum.


About the Author  Katie is a member of the creative team here at The Digital Press. She lives in Central Florida with her husband and their four sweet but crazy boys. When she’s not dodging Nerf bullets or trying to dig out from under the never-ending pile of laundry, she enjoys photography, cooking, going to Disney World with her family, and, of course, digital scrapbooking.

Foodie Friday | LJS Designs

Welcome to another edition of Foodie Friday here on The Digital Press blog!

Continuing with our new series on “what’s cooking on the homes of our design team and creative team members”…I had fun chatting with Lorie Starcher of LJS Designs to see what she has going on in her kitchen! Lorie is currently on a journey to better health and is following the ketogenic (or keto) food program, so we thought it might be fun to show you some of her favorite recipes. If you’re not sure what keto is… basically, you eliminate all sugars and you really (and I mean really!) reduce carbohydrates. If you like bacon and cheese, however, you’re definitely in for a treat!

Check out the following photos. Doesn’t this all look yummy? I think even if I made this and it didn’t look quite as pretty as the photo… well …did I say bacon and cheese?!

photo credits: [1] Pinterest, [2] Pinterest, [3] The Grass Fed Girl

So, what is all of this deliciousness you see above?

  • Parmesan Crusted Chicken with Bacon Cream Sauce
  • Loaded Cauliflower
  • Pumpkin Spice Keto Fat Bombs

Parmesan Crusted Chicken with Bacon Cream Sauce

Says Lorie: “Crispy bacon, creamy sauce, and juicy chicken will make you sing keto praises!” I’m thinking to myself, cheese, bacon and cream …how could this possibly be “diet” food?! There are a few versions of this recipe, and a lot of keto recipes on the internet (just do a Google search, or head over to Pinterest — but do so on a full stomach, otherwise you’ll end up hungry!), but this is the version that Lorie loves…

INGREDIENTS NEEDED

—1 lb chicken breasts
—1 tablespoon avocado oil mayonnaise
—4 tablespoons shredded parmesan cheese
—3 slices of bacon (cooked and crumbled; reserve the fat)
—1/2 cup of heavy whipping cream
—1 tablespoon cream cheese
—1/2 teaspoon garlic powder
—salt and pepper to taste

INSTRUCTIONS

—Preheat oven to 400 degrees. Rinse and pat dry the chicken. Using a basting brush, coat the top of each chicken breast with the mayonnaise. Top the chicken with 3 tablespoons of the parmesan cheese (reserve 1 tablespoon – you’ll need it later).
—Bake uncovered for 40-50 minutes. Using a meat thermometer, you’ll be looking for an internal temperature of 160 degrees, and the juices should run clear.
—When the chicken has about 10-15 minutes to go, start making your sauce.
—In a skillet, warm up the reserved bacon fat, but be careful to not overheat – the fat should not be sizzling or bubbling. Whisk in the heavy cream until well combined, and continue whisking until it starts to foam up on the edges of the skillet.
—Add the cream cheese and whisk until smooth. Add the remaining parmesan cheese and garlic powder. Whisk. Add some bacon crumbles, but reserve some for garnishing.
—To plate, drizzle the cream cheese sauce over the chicken, and top with bacon crumbles.

[ recipe adapted from Keto in Pearls ]

Loaded Cauliflower

Says Lorie: “I usually pair this with a cheeseburger patty with relish and mayo. Made with butter, sour cream, chives, cheddar cheese and bacon, it’s the ultimate in low-carb comfort food.”

INGREDIENTS NEEDED

—1 lb cauliflower florettes
—4 oz sour cream
—1 cup grated cheddar cheese
—2 slices cooked bacon, crumbled
—2 tablespoons snipped chives
—3 tablespoons butter
—1/4 teaspoon garlic powder
—salt and pepper to taste

INSTRUCTIONS

—Cut the cauliflower into bite-sized pieces and add them to a microwave safe bowl. Add 2 tablespoons of water, cover and microwave for 5-8 minutes until completely tender. Drain the excess water and let sit uncovered for a minute or two.
—Add the cauliflower to a food processor and process until fluffy. Add the butter, garlic powder, and sour cream and process until it resembles the consistency of mashed potatoes. Remove the mashed cauliflower to a bowl and add most of the chives, saving some to add to the top later. Add half of the cheddar cheese and mix by hand. Season with salt and pepper.
—Top the loaded cauliflower with the remaining cheese, remaining chives and bacon. Put back into the microwave to melt the cheese or place the cauliflower under the broiler for a few minutes.

[ recipe adapted from Low Carb Maven ]

Now, after your fill of cheese and bacon, you may ask “What’s for dessert?” Many times, we’ll reach for something sweet — but how do you do that on a keto program when you’ve eliminated all sugars and processed foods? You have a “fat bomb.” I know! I thought the same thing! How is that a dessert?! (that name scares me!) Although sugar is a no-no, snacks or treats that are high in good fats are allowed; they help fuel your body. Lorie hasn’t tried any fat bombs yet, but we both love pumpkin… so I went in search of a pumpkin recipe, which we both thought would be appropriate as we head into the fall season. These look so easy to make…

Pumpkin Spice Keto Fat Bombs

INGREDIENTS NEEDED
—1/2 cup coconut oil
—3/4 cup pumpkin puree
—1/3 cup golden flax
—1 teaspoon cinnamon
—1/2 teaspoon nutmeg (optional)
—1/4 teaspoon sea salt
—1/3 teaspoon Stevia

INSTRUCTIONS

—Mix all ingredients in a bowl and place in the freezer for about 30 minutes.
—Roll into balls and place in the refrigerator for about 1 hour before eating.

[recipe adapted from The Grass Fed Girl ]

I’d love to hear what you think of the pumpkin spice fat bombs! 🙂 If you make them, leave a comment here and let us know what you think!

Meanwhile, it wouldn’t be a designer feature week without a fantastic sale and a special Free-with-Purchase offer… so you’ll be excited to see what Lorie of LJS Designs has in store for you! Not only is her entire shop marked down 30% OFF throughout her entire feature week (sale prices will be valid through 11:59pm ET on Thurs 9/28)… but she also has this awesome deal in her shop all week long, as well! Spend $10+ in the LJS Designs shop, and get the following brand-new product that just landed in the shop today — completely FREE!


KatAbout the Author Kat Hansen is a creative team member here at The Digital Press. A Director of Human Resources by day, she loves the opportunity to spend a few hours each evening being creative. Vacation memories feature pretty heavily in Kat’s scrapbooking pages, as do her son and “daughter” (of the four-legged furry kind). Kat has quite the sense of humor (she “blames” her father for this), which she incorporates into her journaling and memory-keeping.

Tutorial Tuesday | Custom-Shaped Text Boxes

Hello, and welcome to another edition of our Tutorial Tuesday series here on The Digital Pres blog!

A little while back, we showed you a technique for writing text around the outside of a shape (like a circle, etc.) — and today, we thought it would be fun to follow that up by showing you how to write text inside (instead of around the perimeter of) any shape!

I imagine that most of the time when you add journaling to your page, it is in the shape of a rectangle or a square… but sometimes it can be fun to use something different. There are all sorts of shapes you can use… circles, hearts, arrows, and even letters or numbers!

For the purposes of this tutorial, I am using Photoshop CS5.1 — but the steps should be similar for other versions, as well.


First, I will show you how to use one of the default shapes that you will most likely have in Photoshop already.

In your toolbar, select the shape tool. When you first open up photoshop, this tool is usually displayed as a rectangle — but when you click and hold the rectangle some other options will also appear, including the “custom shape tool” (which looks to me like a splat of jelly! – see below). With your “custom shape tool” selected, you can then choose another shape. On my machine, the toolbar for this is at the top of my workspace, and looks like this…

When I click on the arrow, a drop-down menu of standard shapes appears. I have chosen a heart (by clicking on the heart on that drop down menu), but you can choose any shape you like from that menu.

With the heart shape selected, I move my cursor onto my page, and then press SHIFT and hold down the LEFT button on my mouse, and drag it until I have the right size heart for my text/page.

Once I have defined size and shape, I can go back to my toolbar and select the TEXT tool, and then click inside the new shape I have created. The cursor looks like an “I” with a dotted circle around it. That means I am ready to type, and my text will fill the shape of the heart, like this…

I decided to play around with this a little more, and decided to use a letter as the shape for my text (a giant M, for my son Matthew). To do this, I first used the TEXT tool to write a giant M on my page. I chose a chunky but simple font for my M, so that the shape wouldn’t be too fussy to fill with text.

So, with my giant letter M, and the type tool selected, I hovered over the letter and RIGHT clicked to choose the CREATE WORK PATH option from the pop-up menu.

Now, when I go over to the layer menu (on the right of my workspace), and click on the eye icon, so “hide” the text layer, I am left with just the outline of the M, rather than the solid black M. I can then put my cursor back into my M text box and the cursor looks like an I with a dotted circle around it, and I can then write my text inside the M shape box. Like this:

I filled my M with all the things that I want to remember about my son at this age, and here is how it looks on my completed page:

You can have all sorts of fun using different shapes, letters, numbers, and even words as text boxes. One of our creative team members, Amie, made a fun Halloween page using this technique and wrote her journaling inside the word “BOO” — such a cute idea!

I hope today’s tutorial might give you a new option for the formatting of your journaling — something fun and a little different!


CorrinAbout the Author  Corrin is a member of the creative team here at The Digital Press. She is a fan of the Big Bang Theory and a lover of cozy pajamas. She lives in the breezy South of England with her husband and 4 crazy kids, who regularly discover & plunder her secret chocolate stashes! She is still trying to get the house straight after moving nearly 3 years ago. Who knows… maybe this will be the year she reaches the bottom of the laundry pile!