Author: The Digital Press

Tutorial Tuesday | Using Color Casts on Photos

Hello everyone! Today I am going to talk about something that we probably don’t see many examples of in the scrapbooking galleries. Have you seen photos with colours that match more closely with other design elements on the page or are colour blocked to give a more graphic feel and wondered how it is done? So, let’s drive straight in.

Colour casts are something that we should be very careful about. They may not work for all kinds of photos and layouts. Of course, there are many ways to do it but I will be highlighting two distinct approaches today.

1. All over photo colour cast to harmonise the layout

This is my original photo that I will play around with.

After usual edits, I decided to overlay a slight blue green tinge. The steps followed are shown in the image below.

Using a solid overlay is the easiest way of adding a cast or a tint. However, if you don’t like all of your photo to be tinted you could very easily use the gradient tool to create a more subtle or dramatic (as the case may be) effect.

As you can see, I have used a gradient so that there is minimal tint on the girls and more on the background.

Once you are comfortable with these basic steps, you can practically play with different blending modes and select the one that suits your photo/layout the most. A couple of other options shown below:

Hue blending mode 47%

Overlay blending mode 50%

2. Overlay a block of colour on photos – partially/in patterns

The colour casts can also be used selectively – for example if used in conjunction with geometric shapes, the effect could be quite graphic. Here is one of the layouts I created to demonstrate this.

So that’s it, some quick ways to add colour casts. Hope you have found this useful. Please share any layouts you make using these techniques in the comments below.

Till next time then, happy scrapping!


Profile pic avatar small

About the Author Shivani Sohal is a donner of many alter-egos. A finance professional by day in busy London, she morphs into a seemingly normal mum of two in the evenings and weekends. She is constantly found with her fingers in too many pies and juggling the metaphorical balls. That is living on the edge for her; aided by the two ankle biters and a darling hubby who define the warm and mushy for her. She is ferociously dedicated to memory keeping — almost immune to any nay-sayers (or equally-disruptive crying children or annoying house fires!); keeping her head down and forging ahead at all times.

Tutorial Tuesday | 5 Tips for Sports Photography

Do you sometimes find it uninspiring to scrapbook sports photos? As a busy mom of 3 boys I have spent countless hours on the sidelines of almost every sport and have thousands of sports photos to prove it! The majority of those photos will never make in onto a scrapbook page, but the stellar ones that take your breath away, those will!  Today I am sharing my top 5 tips to help you capture stellar scrapbook worthy sports photos!

1. Nail the shot with sharp focus – It helps if you have a particular person of interest playing the game because then you can follow this person on the field of play with your camera. This is especially true with continuous movement sports such as soccer and basketball. If you don’t have a person of interest, you can focus on a position such as pitcher, batter, quarter back, etc.

Consider using a continuous focus mode so that you can focus on the action as your kids move around. In your manual it’s called AF-C (Nikon) or AI Servo (Canon).  You’ll thank yourself for making the switch when you’re photographing kids indoor sports because it’s so much easier to follow the action than moving around a single focus point.

2. Anticipate the Action – Knowing where to stand is one of the most important parts of sports photography.  Each sport is different and the games have their own flow of action.  Photographers want to be where the action is going, not where it has been.  Each sport generally offers a ton of options as far as where a photographer can stand. Get to a game early to find the best spot or move around as the play continues to get different shots from multiple spots.

3. Capture the emotion – photos showing the emotions of playing the game are the most rewarding and memorable. Sports offer a variety of photo opportunities aside from the action on the field. While the expressions of the players involved in the action are usually great, don’t forget about the players not involved in the action or the coaches and fans. The sidelines are great for shots of players interacting with each other, coaches instructing players, and sideline portraits. Don’t be afraid to turn away from the action during the moments to catch the emotion in the bench area.

4. Tell the story with composition – A sporting event is rich with storytelling ideas and opportunities for great composition. Use the lines of the field or the movement of the player to tell the unique story of the game in action. Use items that would sometimes be considered an eyesore to creatively frame your photos. A simple baseball fence can become a unique frame for your subject if you shoot close enough to it:

5. Take multiple shots – Use a continuous (burst) shooting mode to capture several frames in succession. Depending on how fast the games move, you’ll be able to capture a great series of images of your child in action. Use a zoom lens to get in close to your player, so it feels like you are right there with them on the field :

Don’t expect every photograph to be a game-winning shot. The best way to get better with any photography is with perseverance and practice, and before you know it you’ll start to see more consistent results!


JenniferHigniteJennifer Hignite is a mom of three boys and new homeowner with her fiance in the mitten state of Michigan. When she is not scrapbooking, she enjoys photography, watching her boys play sports, decorating, and shopping at Target.

Hybrid How-To | Physical Layouts Using Multiple Photos

Hi everyone, and welcome to another edition of our Hybrid How-To series here on The Digital Press blog!  Today, I’m here to show you how to create a layout with multiple photos, using an example that I created to document my family’s Christmas Eve.

If you’ve followed my posts here on the blog in the past, you know that I love working with paper and physical elements/stamps, but sometimes I also miss being able to change things and make adjustments like I can with my digital layouts. This is why hybrid projects are my favorite way to make pages! The best of both worlds! I also think digital kits are a fantastic way to stretch our crafty budgets; we can print and cut as many times as we like.

Using multiple photos on a hybrid layout can sometimes be difficult — but over time, I’ve found a trick. When I want to use more than one photo on a hybrid layout, I find that it’s actually easier to have a digital template as a starting point. 🙂

Isn’t that an easy tip? You might not think of using a digital template for a hybrid project… but it’s so helpful! You don’t have to overthink the design and you get to have more fun time playing with photos, papers, and elements. I really recomend you to give it a try. You won’t regret it!

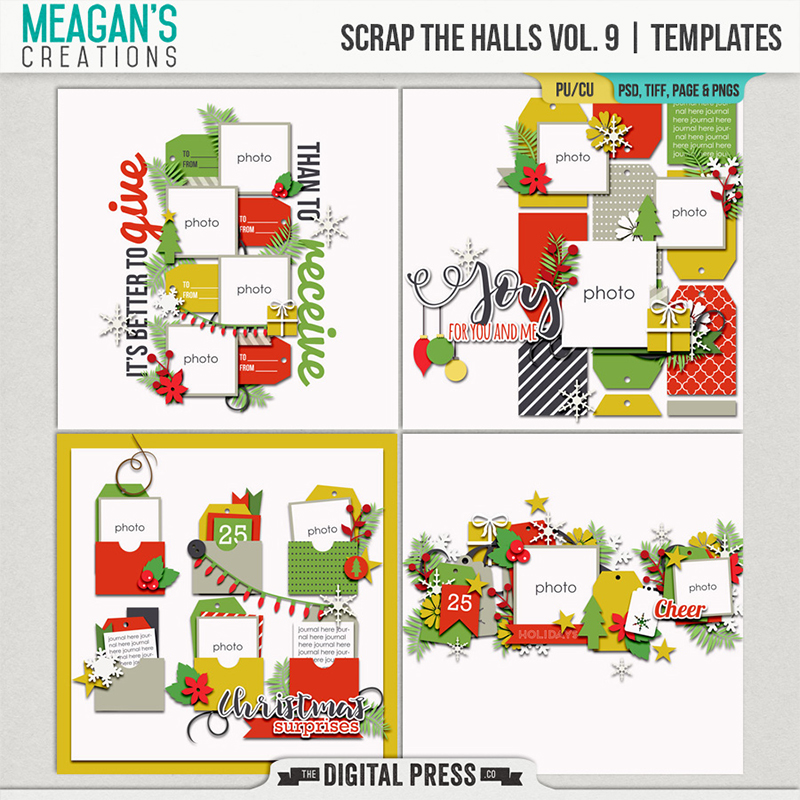
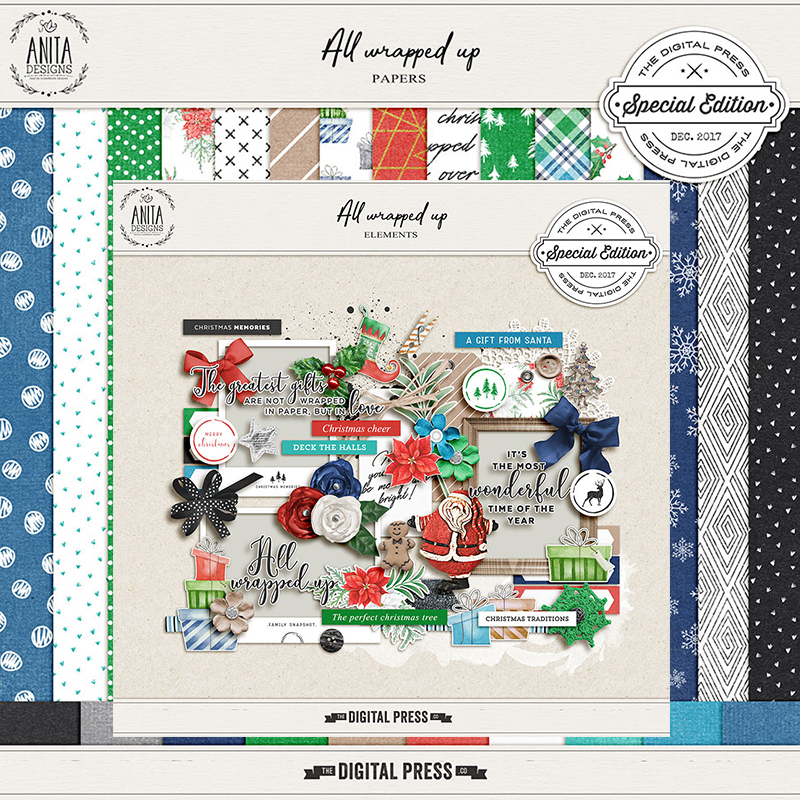
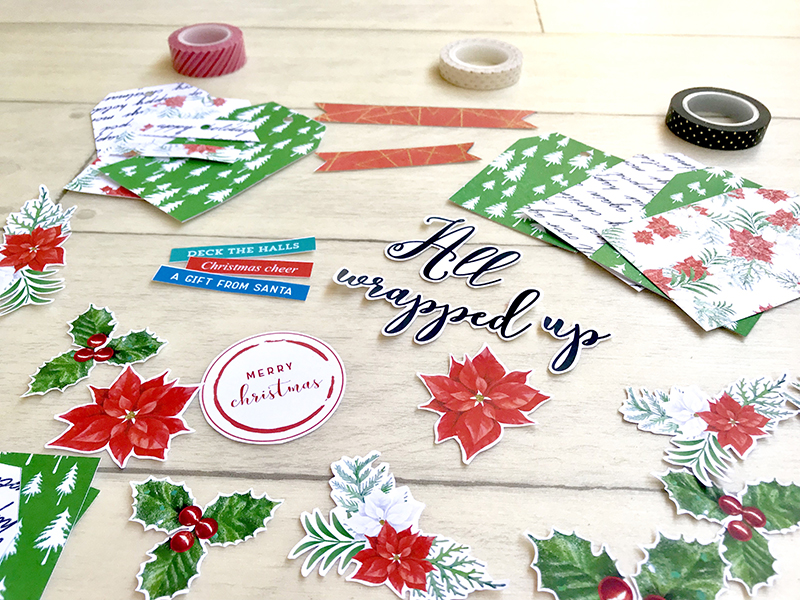
For the my example layout today, I used two different digital products — a template from Meagan’s Creations’ Scrap the Halls Vol. 9, and the digital kit All Wrapped Up by Anita Designs.


So here’s how I used a digital template to create my actual physical page…

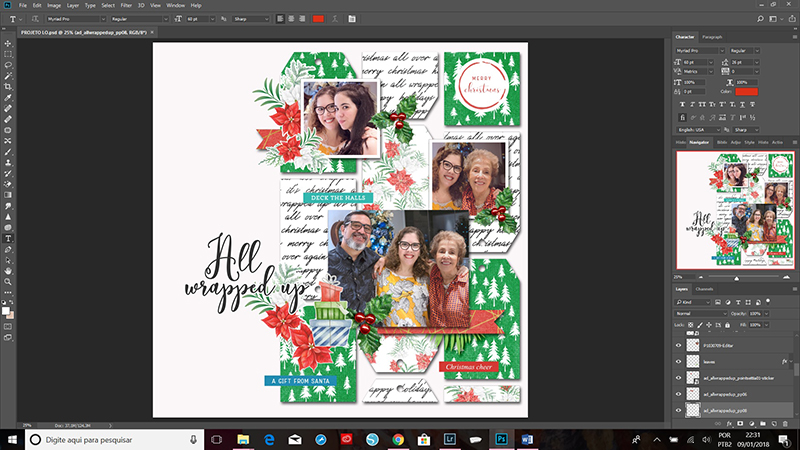
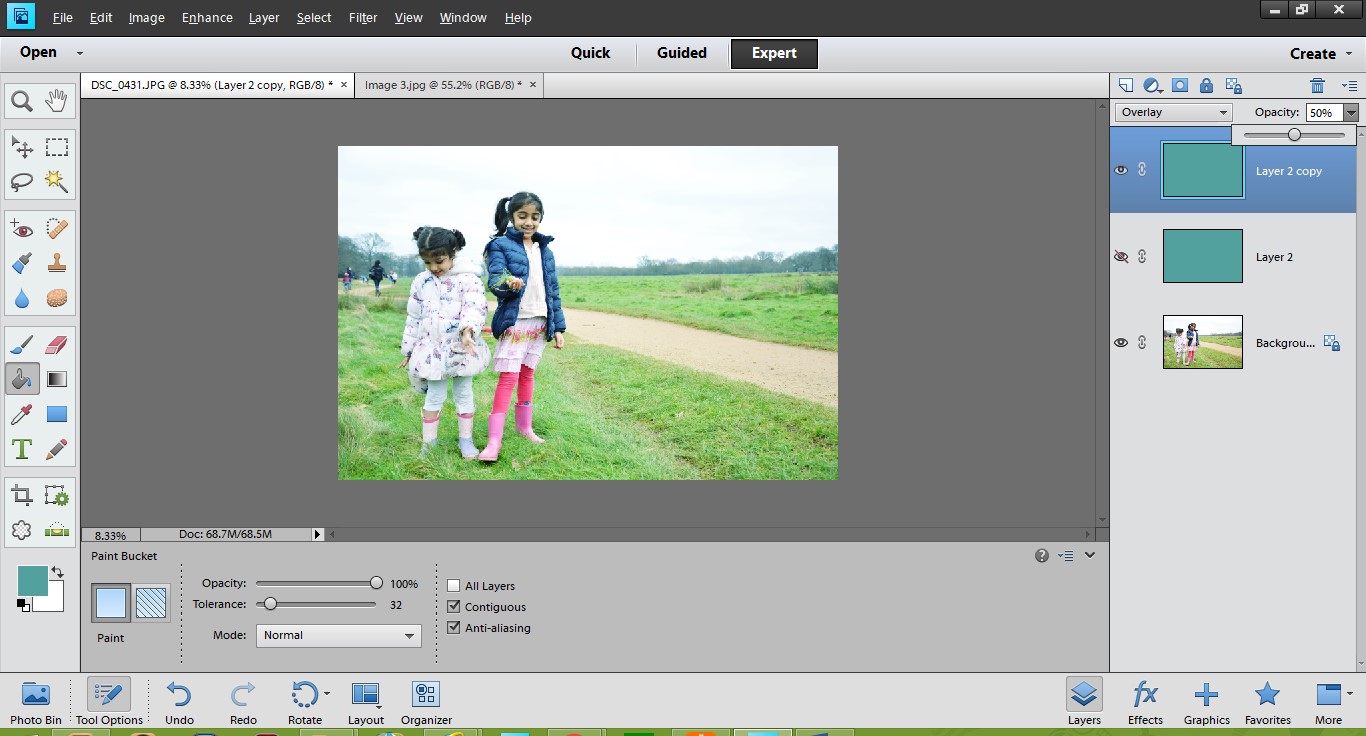
First, I started out by creating my page in Photoshop, using my digital template and the digital items that I planned to print out afterward. Here’s a look at the template I chose, before I began working with it…

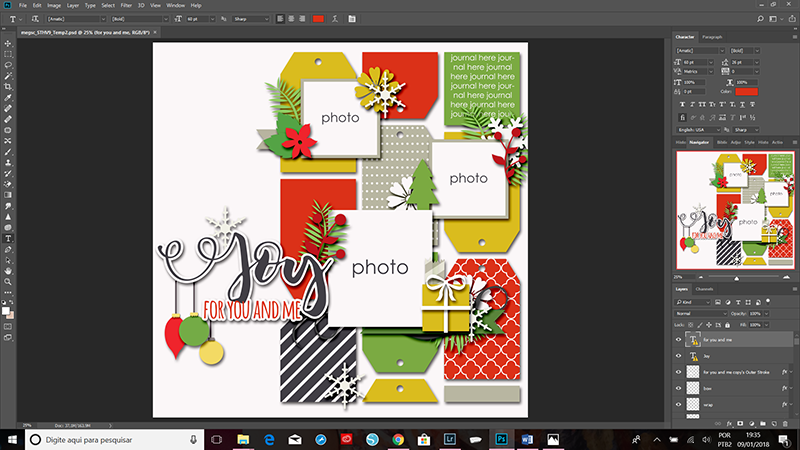
…and here’s a second look at the template once I added my photo, digital papers, and embellishments…

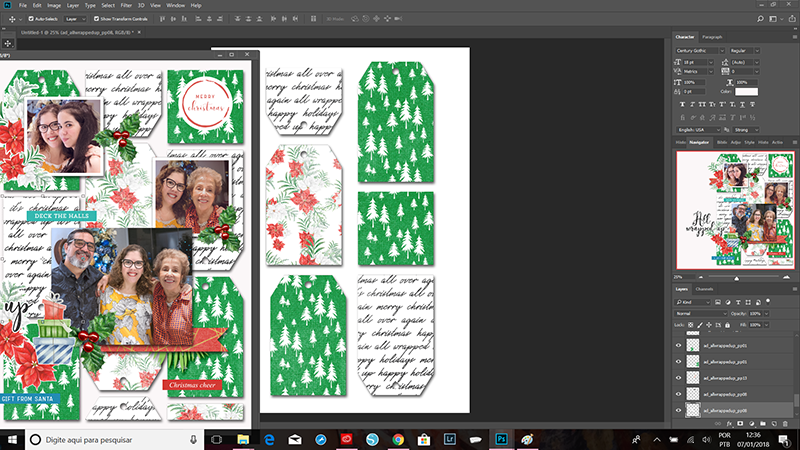
After I have all of my items sized the way I want on my digital version of the layout, I separate each of the pieces (see next image, below right) into another document to use for printing and cutting. I like to save them all as a .JPG file, which I then use to print and fussy cut. Although I have a Silhouette Cameo, sometimes I simply fussy cut just because I love it!

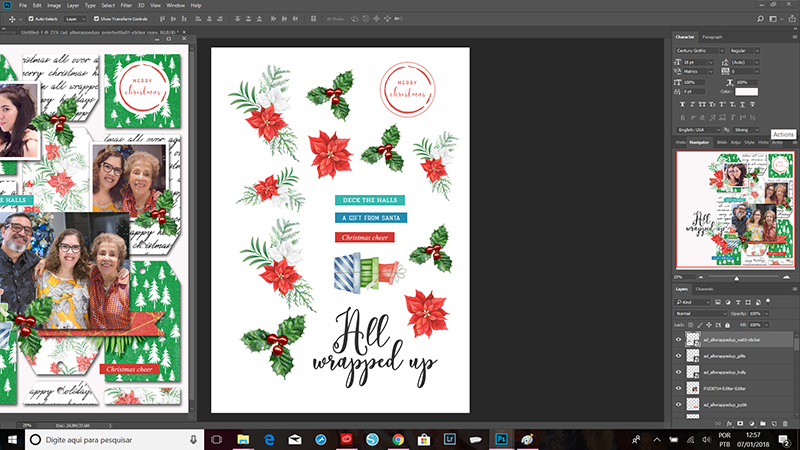
As you can see in the next image, I actually duplicated some elements (tags, mainly). I often do this when I am prepping a hybrid layout — just because I like to have extras to add into my stash to have ready to use in the future.

Here are my pieces printed and ready to cut…

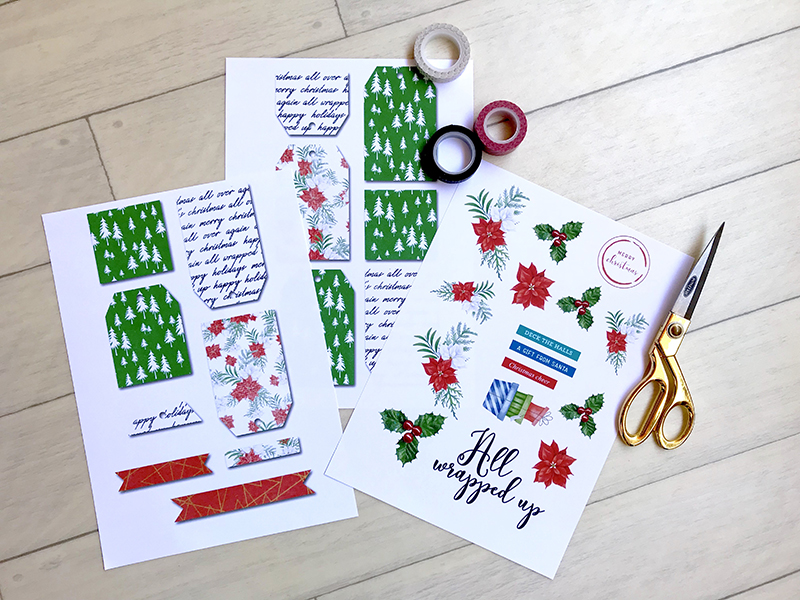
…and here’s a look at my embellishments after I cut them out…

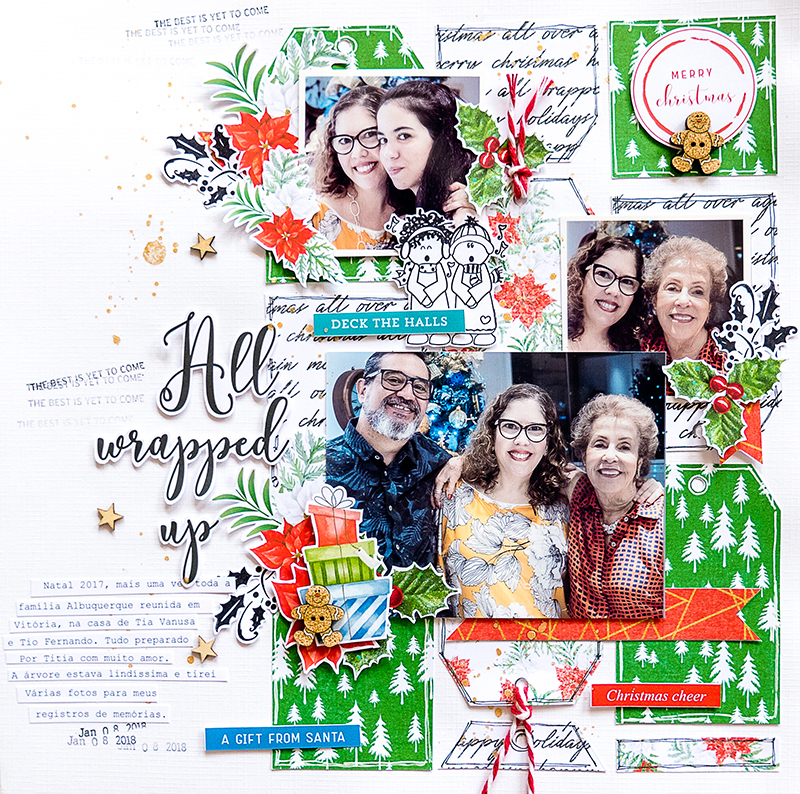
After I have all my pieces cut out, I can put them back together on a physical 12×12 page and then add other physical elements, stamps, wood veneers, gingerbread man buttons (!), and some spray ink splatters, as shown here…

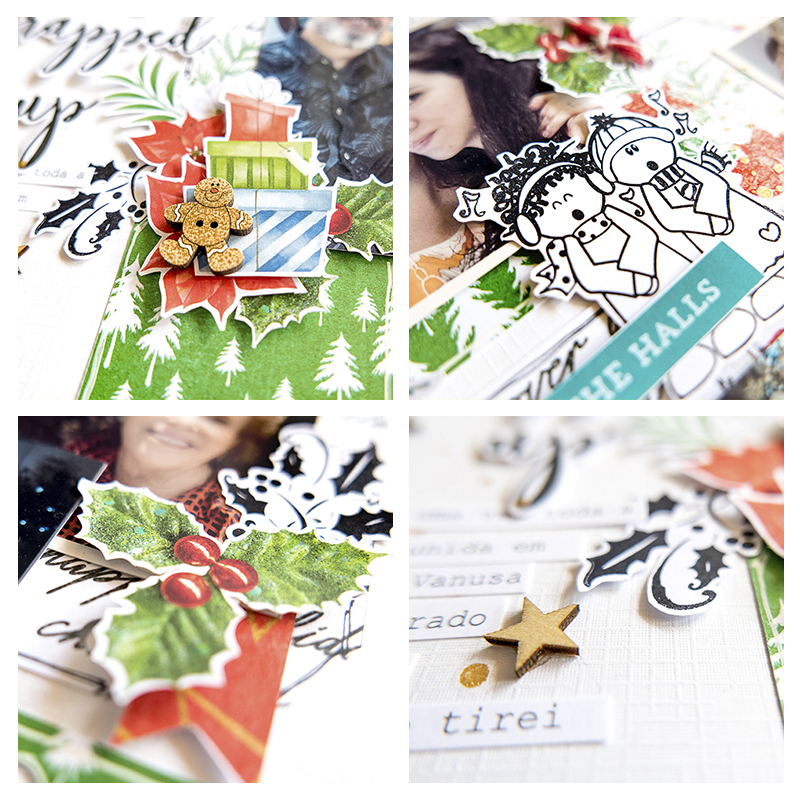
Here are a few close-up views, so you can get a better look at the fun hybrid elements I created…

Here are some more tips I use to bring the layout to life:

  • I use multiple kinds of adehsive in order to give dimension to the project; I use regular double-sided tape, as well as thicker foam tape to add some dimension to certain items.
  • I put the adhesive in the center of my tags and elements. Leaving their borders without adhesive, they can overlap each other  and not stay totally flat.
  • I like to use stamps to add texture.
  • In this case, when my page was almost done, I thought it needed more contrast… so I went back and stamped/cut the black holly stickers and the cute black-&-white angels.
  • I glued the holly stickers under my greens and, for the angels, I used foam tape. I think these new add ons make my layout pop.
  • And the final “cherries on top” are the physical supplies I added: gingerbread man buttons, wood stars, and also red and white twine.
  • I also couldn’t resist adding some gold splatters. I love using paint sprays/splatters to add some color and interest.
  • Finally, I love to make my journaling on little white paper strips.

If you’d like to give this a try, too, don’t forget that you can earn challenge points at TDP! Come visit the CROSSWORD SECTION in The Digital Press forum, and you’ll find this month’s Hybrid Challenge thread (for each month’s Hybrid Challenge at TDP, you get to choose one of the month’s “Hybrid How-To” tutorial posts from here on the blog and make your own version). If you choose to give today‘s project a try… all you have to do is make a hybrid page using some digital elements and papers, along with a digital template as your foundation for the composition of the page. You’ll see how fun it is! Give it a shot, and share your final results with us! We can’t wait to see what you come up with.

Have a great weekend you guys, and happy scrapping!


PERFIL TDP

About the Author  Andrea Albuquerque is part of the Hybrid Creative Team here at Digital Press. Andrea has been a scrapper since 2010 and a photographer since 2012. Although she adores the flexibility and creativity of digital, she can’t resist playing with paper, paint, and embellishments… so hybrid scrapping is the perfect medium for her! She lives in Brazil with her hubby.

Foodie Friday | KimB

Welcome to another edition of our Foodie Friday series here on The Digital Press blog!

This week, we are featuring KimB, and peeking into her kitchen to learn a few of her favorite recipes. This is Kim’s third feature on The Digital Press blog (if you want to learn even more about her, you can find her first feature article from June 2016 HERE, and her second feature article from February 2017 HERE).

According to Kim, “ These are totally South African recipes and family favourites that are used when we have guests over who end up staying for dinner.”

[ photo credits: [2] Rhodesquality.com, [3] Lovingitvegan.com ]

So, what are these delicious things you see pictured above?

  • Lasagna Soup
  • Sweetcorn Bread
  • The Don Pedro

LASAGNA SOUP

This recipe is one that I, Erin, recently found via a friend on Facebook.  It is perfect for warming up on a cold winter day, or enjoying al fresco on a breezy summer evening.

INGREDIENTS NEEDED

  • 2 TBSP olive oil
  • 2 28 oz cans of organic fire roasted tomatoes
  • About 4 TBSP organic tomato paste
  • About 4 cups chopped yellow onion
  • 2 tablespoons minced garlic or 4 cloves minced
  • 1 tsp red pepper flakes
  • 4 tsp oregano
  • 4 bay leaves
  • 8-12 cups chicken stock
  • salt and pepper to taste
  • fresh basil
  • 1 package of your favorite pasta

FOR THE TOPPING

  • One small bag Italian cheese mix
  • 1- 15 oz container ricotta
  • Italian seasoning
  • Salt pepper

INSTRUCTIONS

  • Heat olive oil in a large stock pot
  • Add onions and garlic and sauté until nice and fragrant
  • Add beef and cook until brown (drain if needed)
  • Add seasonings and tomato paste and cook on medium stirring until the paste turns a nice rusty reddish brown color
  • Add tomatoes,  broth, bay leaves, salt and pepper to taste
  • Bring to a boil and then let simmer 30 mins
  • Cook pasta separately until al dente
  • Mix together the cheese topping ingredients in a seperate bowl
  • Build each bowl with some pasta covered in broth and topped with a huge dollop of the cheese mix!
  • Add fresh chopped basil as a tasty garnish.

SWEETCORN BREAD

About this recipe, Kim says, “I cook this when I need to whip up something quickly without having to worry about finding or following a recipe as it is quick and easy and a super delicious crowd pleaser! ”

INGREDIENTS NEEDED

  • 500 g (4 C) self-raising flour
  • 5 ml (1 t) salt
  • pinch of smoked paprika
  • 60 ml (4 T) melted butter
  • 3 eggs
  • 375 ml (1½ C) plain yoghurt
  • 1 x 410 g can Cream Style Sweetcorn
  • 125 ml (½ C) grated cheddar cheese

INSTRUCTIONS

  • In a large bowl, sift together the flour, salt and paprika.
  • In a separate bowl, whisk the melted butter, eggs and yoghurt together and stir in the tin of Cream Style Sweetcorn.
  • Pour the sweetcorn mixture into the flour mixture and mix with a wooden spoon to bring together into a soft batter.
  • Spoon the batter into a loaf pan that’s greased and floured, and sprinkle the cheese over the top.
  • Bake in a preheated oven at 170°C for 30 – 45 minutes or until baked through.
  • Serve warm

 VARIATIONS

  • Add 2 Tbls chopped chives/spring onions(green parts) or any herbs of your liking/ cooked bacon or ham / chillies or jalapeños
  • Or serve with JAM for a sweet version.

THE DON PEDRO

Kim says “Nobody is exactly sure where the ‘Don Pedro’ originated from, but it’s one that all South African’s love to drink and it’s so easy to make.  It’s a grown up milkshake/ dessert cocktail usually served in a stemmed wine glass but any glass will do. Some call it a cocktail and others a dessert.. I can drink it anytime! LOL”

INGREDIENTS NEEDED

  • 1 cup good quality vanilla ice cream
  • 2 shots Kahlua
  • 2 tablespoons cream (or milk for a less richer version)
  • Grated chocolate or flake for garnish
  • Short straw

INSTRUCTIONS

  • In a Blender – Blend the ice cream until soft and creamy
  • Add the liqueur and cream/milk and blend until smooth.
  • Pour into a stemmed glass/ or jam jar for a modern twist.
  • Grate chocolate over top for garnish and serve with a short straw

 VARIATIONS

  • Add a swirl of chocolate syrup around glass inner for a ‘sexier’ look… or …replace the chocolate with sprinkled cinnamon.


Well I don’t know about you, but I am ready for a good meal!

Meanwhile, it wouldn’t be a designer feature week without a fantastic sale and a special Free-with-Purchase offer… so you’ll be excited to see what KimB has in store for you! Not only is her entire shop marked down 30% OFF throughout her entire feature week (sale prices will be valid through 11:59pm ET on Thurs 1/18)… but she also has this awesome deal in her shop all week long, as well! Spend $10+ in the KimB shop at The Digital Press and get her brand-new (just released today!) TA DA : Kit completely FREE!


Erin is an artsy crafty kind of girl who is currently dabbling in far too many things, but is working hard to enjoy every moment of it, while avoiding the rain, which is difficult due to living in the land of many rains. She is slowly learning to use her smart phone to capture all the fun little bits of life that would otherwise go unremembered in the busy craziness that is raising a family!

Tutorial Tuesday | Simplifying Yearly Album Projects

Happy New Year, scrappers! It’s time for another edition of our Tutorial Tuesday series… and I’m here today to share a few easy tips for simplifying the process of creating an annual album (thus making it possible to stick with these long-term projects!).

As we embark on a new year, I know many ofus are planning on creating some sort of yearly pocket scrapbooking album. Whether you choose to do weekly or monthly layouts, it is important to think about setting yourself up to be successful for the whole year. Many times in the past, I have started out with grand plans to do a weekly pocket layout… only to get burned-out by the end of the second month due to over-complicating my layouts.

This year, though, I am going to try to simplify my weekly layouts in order to make it through the year and have a finished album as the clock strikes midnight and brings 2018 to a close. I thought I would share some of my simplification ideas with you, too, in case you are planning a similar project!

Yearly Pocket-Style Album Tips

1. Choose a few templates and reuse them throughout the year — I find that I sometimes spend as much time looking for templates as I do actually scrapping the layout. This year, I am going to try to stick to a few templates in order to speed up my scrapping. You can always rotate the templates if you need to mix things up a bit. A template collection makes this really easy! My all-time favorite pocket scrapping template collection is Laura Passage’s Project Twenty Fifteen Template Bundle. There are templates in there for so many different combinations and they are very versatile (including options for stitching).

2. Use one kit for multiple layouts — If I used a different kit for each weekly spread, I would spend a LOT of time sorting through papers, embellishments and cards. By using the same kit for multiple layouts, you can streamline the process of sorting through kits and simplify your scrapping. For example, for January, I might use a monthly kit like the amazing Monthly Chronicles | FROST for all of my January layouts. These types of kits give me plenty of choices, so that my layouts have variety but I am still only sorting through one kit per month

3. Schedule a set scrapping time for these layouts — I am going to do Monday-Sunday layouts, so I set a reminder in my calendar so that I remember to scrap my weekly spreads on Monday evenings. I find that getting behind stresses me out and then I am more likely to give up on my projects. By setting aside dedicated scrap time for these special layouts, I will stay up to date. Whether you are doing a weekly or monthly format, schedule time to complete your layouts to stay up to date.

4. Embrace the ‘less is more’ ideal — Don’t we want to use all those gorgeous embellishments and papers? But, it takes lots of time to get each one placed just right. Instead, try using a few favorite cards, papers, and elements and let your photos be the stars of the layouts. It will speed up the process and get those layouts complete in no time.

And finally, the one tip that I think is the most important…

5. Be flexible — Did you have a busy week and not take enough photos? Run out of time to do a layout one week or month? NO BIG DEAL! Forgive yourself and do what works. Maybe you combine two weeks together in one spread or just do a monthly layout instead if you feel like you are falling behind. Know that whatever you do to save those memories for your family is enough! Scrap whatever you can proudly!

I wish you a very happy 2018, and hope that you find success with your scrapping goals!


KatieAbout the Author  Katie is a member of the creative team here at The Digital Press. She lives in Central Florida with her husband and their four sweet but crazy boys. When she’s not dodging Nerf bullets or trying to dig out from under the never-ending pile of laundry, she enjoys photography, cooking, going to Disney World with her family, and, of course, digital scrapbooking.

Tutorial Tuesday | Adding Your Handwriting to Digital Layouts

Hello, and welcome to the very first Tutorial Tuesday post of 2018, here on The Digital Press blog!

Today I am visiting the blog to share with you a really quick, simple, and fun (!) procedure for adding your own handwriting (or that of your children, other family members, friends, etc.) to your digital scrapbook pages.

It’s much quicker and easier than you’d think! Here’s a short 3-ish minute video to show you exactly how it’s done…

Yes, it’s really that easy! I hope you’ll give it a try.


Dawn Farias

About the Author  Dawn Farias is school teacher, a mom of 5, and the designer behind the Dawn by Design brand at The Digital Press. She lives in San Antonio, Texas with her family.