Category: Designer Features

Foodie Friday | Mari Koegelenberg Creations

Hello! I’m Robin and am here on The Digital Press blog today to bring you another fun edition of our Foodie Friday series!

As you’ve seen this fall, Foodie Friday is our newest blog series… based on the amazing response we had to the “Mess Hall” feature during TDP’s Summer Camp back in July. People just loved our food features… and as such, most every Friday throughout the rest of the year we will be combining the Foodie Friday thing with our weekly designer feature series — and having some fun in the kitchen! Every week you will get the chance to peek into the lives (and kitchens) of your favorite TDP designers and creative team members. It’s been very fun so far!

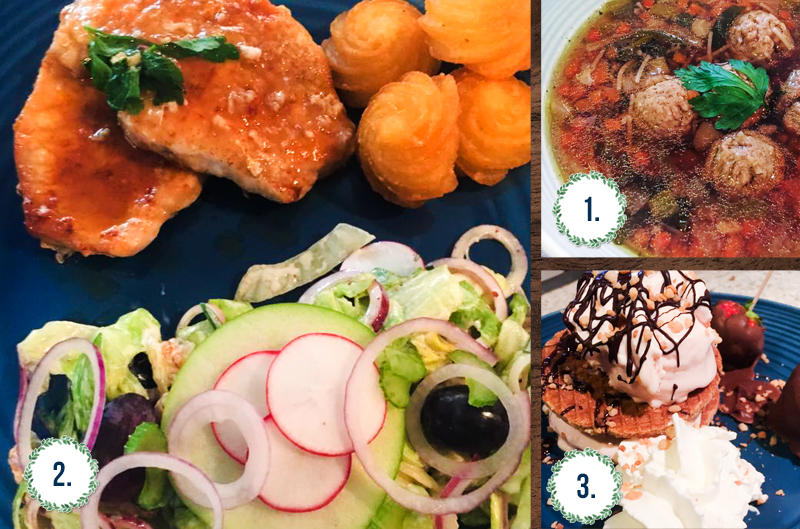
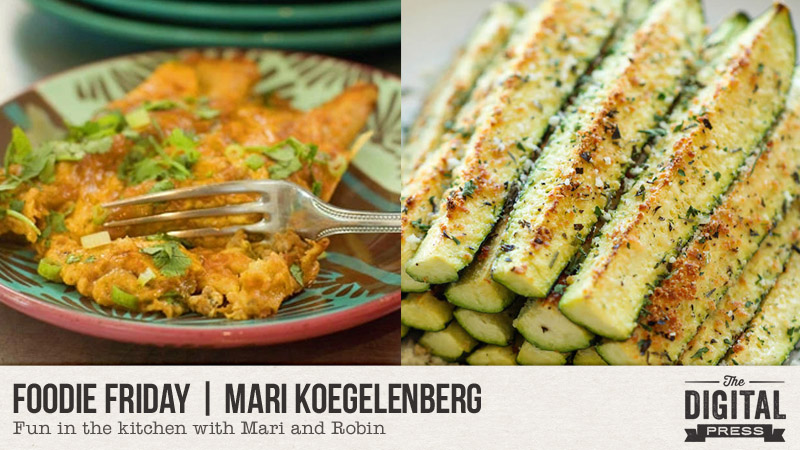
This week Mari from Mari Koegelenberg Creations is here to share a few delicious recipes with us from her kitchen! Take a peek…

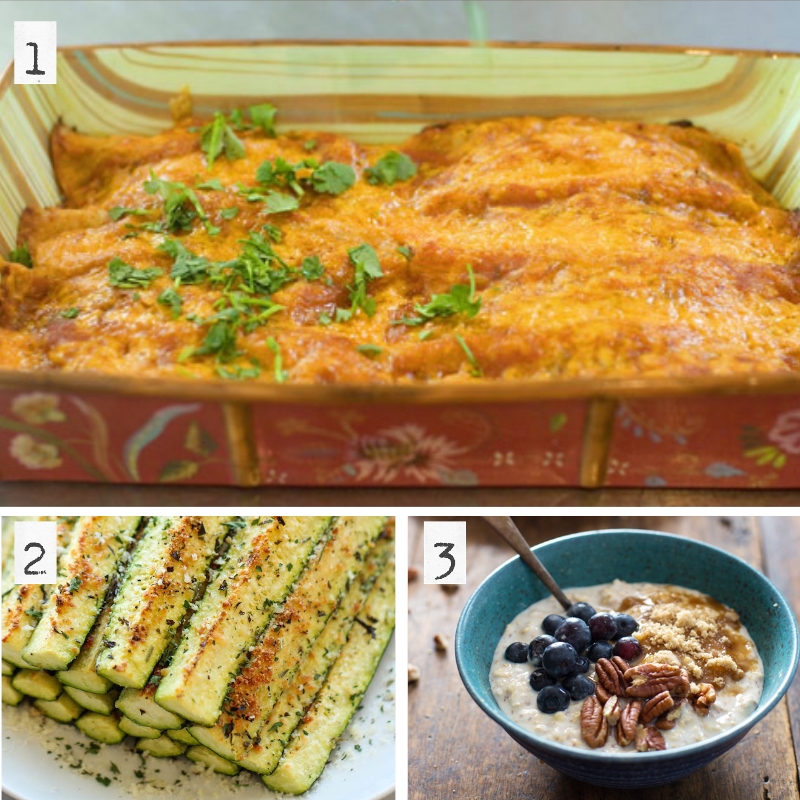
[ photo credits to [1] The Pioneer Woman [2] Damn Delicious and [3] Pinch of Yum ]

What is all of that yumminess you see, above? Here is the lineup of delicious recipes Mari put together this week:

  • Enchiladas
  • Baked Parmesan Zucchini
  • Flax and Blueberry Vanilla Overnight Oats  

Enchiladas

Mari says, “We call it Mexican lasagna. 😉 It’s so good! Not having grown up with this delicacy, I scoured Pioneer Woman’s vast and amazing recipe collection years ago and made this recipe one night while we had family visiting. Let’s just say its a real winner! I have also substituted chicken (and even stewing beef), which I put into the crock pot and then shred it — and its just utter comfort food deluxe. Do not skimp on the sour cream!”

INGREDIENTS NEEDED

  • Mexican red sauce
  • Low sodium chicken broth
  • Canola oil
  • Flour
  • Salt
  • Pepper
  • Cilantro
  • Ground beef
  • Onion
  • Canned diced green chilies
  • Corn tortillas
  • Chopped black olives
  • Sliced green onions
  • Freshly grated sharp cheddar cheese

INSTRUCTIONS

  • For the sauce, add 1 tbsp. each of canola oil and flour to a medium saucepan
  • Whisk these together over medium-low heat for about 2-3 minutes
  • Add in the red sauce and chicken broth then stir to mix together
  • Add in ½ tsp each of ground black pepper and salt
  • Simmer the sauce on low heat while cooking the rest
  • Dice the onions and place into a large skillet with 1 tbsp. of canola oil. Sauté the onions for a few minutes
  • Add ground beef and brown
  • Add two cans of green chilies
  • In a small skillet over medium heat, fry individual corn tortillas just until soft (about 30 seconds each side)
  • Place tortillas on a paper towel-lined plate and keep warm
  • Add 2-3 tbsp. fresh cilantro to the sauce
  • Assemble the enchiladas by dipping the corn tortillas into the warm sauce, lay them flat, and spoon the meat mixture, chopped olives, green onion, and cheese on the tortillas. Roll up the tortillas and place seam side down in a baking dish.  Continue until all tortillas are used.
  • Pour remaining sauce over rolled up tortillas and top it off with freshly grated cheddar cheese
  • Bake at 350 degrees Fahrenheit for about 20 minutes until cheese is melted and enchiladas are bubbly
  • Remove the pan and sprinkle chopped cilantro and green onions on top

Baked Parmesan Zucchini

When asked about this recipe, Mari wrote, “Just over a year ago, we moved onto our little farm… and we started a veggie garden. We planted 6 zucchini plants (in case they did not all ‘take’)… UMM OKAY… so, yep, we had an over-abundance of zucchini this summer! It’s such a versatile veggie, though, so I didn’t complain (you can use it in salads, cakes/bread, grilled on the BBQ, and more). This is one of my favorite ways to prepare and it looks so presentable and is absolutely delicious!”

INGREDIENTS NEEDED

  • 4 zucchinis, quartered lengthwise
  • 1/2 cup freshly grated Parmesan
  • 1/2 teaspoon dried thyme
  • 1/2 teaspoon dried oregano
  • 1/2 teaspoon dried basil
  • 1/4 teaspoon garlic powder
  • Kosher salt and freshly ground black pepper, to taste
  • 2 tablespoons olive oil
  • 2 tablespoon chopped fresh parsley leaves

INSTRUCTIONS

  • Preheat oven to 350 degrees F. Coat a cooling rack with nonstick spray and place on a baking sheet; set aside.
  • In a small bowl, combine Parmesan, thyme, oregano, basil, garlic powder, salt and pepper, to taste.
  • Place zucchini onto prepared baking sheet. Drizzle with olive oil and sprinkle with Parmesan mixture. Place into oven and bake until tender, about 15 minutes. Then broil for 2-3 minutes, or until crisp and golden brown.
  • Serve immediately, garnished with parsley, if desired

Flax and Blueberry Vanilla Overnight Oats

Mari was quite enthusiastic about this fabulous recipe! She told me, “OMG to die for! It’s like pudding… so good, and so so healthy. It’s also great for busy moms/dads because you can prep this ahead and let it work its magic in a mason jar.” I think you will agree with Mari after trying this!

INGREDIENTS NEEDED

  • 1/2 cup rolled oats OR quick oats
  • 2/3 cup water
  • 1/2 cup low-fat vanilla yogurt
  • 1 tablespoon flaxmeal
  • 1 baby pinch of salt
  • blueberries, pecans, brown sugar, and other goodies for topping

INSTRUCTIONS

  • In an individual food storage container, add the ingredients in the order listed (except for toppings). Do not stir. Refrigerate overnight.
  • In the morning, stir up the mixture; it should be thick and the oats should be completely soft. Add the toppings of your choice. Repeat forever.

Don’t these recipes look easy and fun to make? My kids were quite excited to try them all, after looking at the pictures!

Now, if you’re up for a challenge… come to the forum and check out our Recipe Book challenge, which is designed to help you create a quick-&-simple book of your favorite recipes — get this — in time to print it up and give it to friends and family members as a holiday gift later this year(!). Sound like fun? Come check it out HERE.

Meanwhile, it wouldn’t be a designer feature week without a fantastic sale and a special Free-with-Purchase offer… so you’ll be excited to see what Marie has in store for you! Not only is her entire shop marked down 30% OFF throughout her entire feature week (sale prices will be valid through 11:59pm ET on Thurs 11/2)… but she also has the following awesome deal available in her shop all week long, as well! Spend $10+ in the Mari Koegelenberg Creations shop and get the following FULL COLLECTION(!) completely FREE…


Robin

About the author  Robin is a member of the creative team here at The Digital Press. A wife of 25 years and a mom of 4 crazy children (3 in college and 1 still at home), she says that her life occurs mostly in the car as she transports said crazy kids to their many, many homeschool activities. When not driving, Robin loves to make her family cringe by pulling out her camera again (and again, and again…).

Foodie Friday | Jen C Designs

Hello everyone, and welcome to another edition of our Foodie Friday series here on The Digital Press blog!

Foodie Friday is our newest blog series… based on the amazing response we had to the “Mess Hall” activities during TDP’s Summer Camp back in July. As such, most every Friday throughout the rest of the year, we will be combining this fun feature with our weekly designer feature series — and having some fun in the kitchen with members of our team! Each week you will get to peek into the lives (and kitchens) of your favorite TDP designers and creative team members.

This week, you get to join Jen Cairns from Jen C Designs and TDP creative team member Astrid in the kitchen, where we’re cooking up a few delicious autumn-inspired recipes from Jen’s recipe books!

[ photo credits to Jen Cairns and tasteandtellblog.com (scones) ]

Here is the lineup of delicious recipes Jen put together this week (shown above):

  • Pancakes
  • Cheddar Biscuits
  • Yorkshire Puddings

Pancakes

About this recipe, Jen says… “they’re really simple and my kids love them! My 7 year old now makes her own pancakes!”

INGREDIENTS NEEDED*
—1 cup self rising flour
—1 cup milk
—1/4 cup white sugar
—1 egg

INSTRUCTIONS
—Combine all ingredients in a bowl and mix together.
—Heat a pan and melt some butter in the pan; pour desired amount of batter into the pan (depending on the size pancake you want to make).
—Wait until bubbles form across the top of the pancake, and then flip over. Let cook for another 2-3 minutes.
—Serve with topping of choice; we use syrup (and/or more sugar on top for extra sweetness!).

*makes 2 large or 4 small pancakes

Cheddar Scones

INGREDIENTS NEEDED
—200g self-raising flour (plus a little more for dusting)
—50g butter (chilled)
—75g grated cheese (plus extra for topping; optional)
—150ml milk

INSTRUCTIONS
—Preheat oven to 220 C (about 425 F)
—Place the flour in a large bowl, and then grate in the butter.
—Stir in the cheese, then the milk. If it feels like it might be too dry, add a touch more milk… then bring together to make a soft dough.
—Lightly dust your work surface with a little flour. Roll out the dough no thinner than 2cm. Using a 4cm plain cutter, cut out the scones.
—Transfer to a non-stick baking sheet, dust with a little more flour (and/or grated cheese topping), and then bake for 12-15 mins until well-risen and golden.


Yorkshire Puddings

INGREDIENTS NEEDED
—140g plain flour (this is about 200ml/7 oz)
—4 eggs
—200ml milk
—sunflower oil

INSTRUCTIONS
—Preheat oven to 230 C (about 450 F).
—Drizzle approx 1-2 TBSP sunflower oil evenly into 2 x 4-hole Yorkshire pudding tins or a 12-hole non-stick muffin tin and place in the oven to heat through.
—To make the batter, add 140g plain flour into a bowl and beat in four eggs until smooth.
—Gradually add 200ml milk and carry on beating until the mix is completely lump-free. Season with salt and pepper.
—Pour the batter into a jug, then remove the hot tins from the oven. Carefully and evenly pour the batter into the holes.
—Place the tins back in the oven and leave undisturbed for 20-25 mins until the puddings have puffed up and browned. Serve immediately with lots of gravy!


Here’s a fun photo Jen provided of her two kids eating the Yorkshire Puddings (left) and pancakes (right)… two of their favorites!

Doesn’t that all look delicious?!

If you’re up for a challenge… come to the forum and check out the latest edition of our Recipe Book challenge, which launched this month and is designed to help you create a quick-&-simple book of your favorite recipes — get this — in time to print it up and give it to friends and family members as a holiday gift later this year(!). Sound like fun? Come check it out HERE.

Meanwhile, it wouldn’t be a designer feature week without a fantastic sale and a special Free-with-Purchase offer… so you’ll be excited to see what Jen has in store for you! Not only is her entire shop marked down 30% OFF throughout her entire feature week (sale prices will be valid through 11:59pm ET on Thurs 10/26)… but she also has this awesome deal in her shop all week long, as well! Spend $5+ in the Jen C Designs, and get the following BRAND NEW template set that just launched in her shop today — completely FREE!


blogfotoAbout the author Astrid is a member of the creative team here at The Digital Press. She lives with her husbandand her 2 teenage/adult kids in Germany. As a mini-jobber with only 10 hours/week, she has plenty of time for her digital scrapbooking hobby. She has Netflix and Amazon Prime, and is addicted to nearly all series. Vampires, zombies, vikings… it doesn’t matter; she likes everything. She loves the ocean and the summer heat, but lives in the opposite: mountains. Therefore, she loves visiting her family in Algeria or the south of France.

Foodie Friday | Little Lamm & Co.

Hello everyone, and welcome to another edition of our Foodie Friday series here at The Digital Press!

Foodie Friday is our newest blog series, and is based on the amazing response we had to the “Mess Hall” activities during TDP’s Summer Camp, back in July. As such, most every Friday throughout the rest of the year, we will be combining this fun feature with our weekly designer feature series — and having some fun in the kitchen! Every week you will get the chance to peek into the lives (and kitchens) of your favorite TDP designers and creative team members.

This week… we have the awesome Amie from Little Lamm & Co. joining me (Sabrina, from the creative team here at TDP)… and we’re cooking up a few delicious autumn-inspired recipes from Amie’s kitchen!

[all photo credits to Amie Lamm of Little Lamm & Co.]

Amie loves to cook and photograph her yummy food. She said that if she had more time on her hands, she would definitely be a food blogger. Amie is also a big fan of autumn… and had the followoing to say about her recipes: “I cannot wait for autumn each year — just for all the soups! I have a bucket list of soups and stews to make each season.”

Here is the line up of delicious recipes Amie put together this week (shown above):

  • Sunday Night Roast Loin of Pork with Fall Vegetables
  • ‘Autumn is Here’ French Onion Soup
  • Mini Carrot Cupcakes

Sunday Night Roast Loin of Pork with Fall Vegetables

Amie says: “There is something about how the mustard, wine and herbs in this dish meld together to make the most delicious sauce. If your sauce ends up a bit lacking, because roast times can lengthen depending on the size of your loin, you can add low sodium chicken broth to thin it out. I do make this dish on a week night occasionally, only because once you put it in the oven, there isn’t anything to do until it’s ready. I just have to be home at least two hours prior to dinner to start preparing.”

INGREDIENTS NEEDED
—2 pounds boneless pork loin roast
—1 tablespoon olive oil
—1 tablespoon Dijon mustard
—1 tablespoon fresh sage (finely chopped)
—1-1/2 teaspoons fresh rosemary (finely chopped)
—1-1/2 teaspoons fresh thyme (finely chopped)
—1/2 teaspoon kosher or coarse sea salt + 1/2 tsp black pepper(for meat)
—4 medium carrots (washed and peeled, cut on the bias into slices 1/4-inch thick)
—2 medium yellow onions (large diced)
—1 fennel bulb, stems removed (rough cut into large pieces)
—2 tablespoons olive oil
—1/2 teaspoon kosher or coarse sea salt + 1/2 teaspoon black pepper (for vegetables)
—1 cup dry white wine

INSTRUCTIONS
—Preheat oven to 400 degrees F.
—In a small bowl, combine the finely chopped sage, rosemary, and thyme with salt and pepper and set aside.
—Heat a frying pan with 1 tablespoon olive oil over medium-high heat. Once the pan is hot, brown the pork on all sides until golden brown all over, about 2 minutes per side with a little extra time on the top layer. Set aside to cool for a couple of minutes.
—Brush the top of the roast with an even layer of Dijon mustard, and follow that with an even coating of the fresh herb mixture.
—In a separate frying pan, heat 2 tablespoons of olive oil over medium heat and then saute the carrots, onions and fennel until slightly brown, about 3 to 5 minutes. Add salt and pepper and toss to coat.
—Place the roast in the center of a roasting pan or baking dish and surround with the sautéed vegetables. Pour one cup of dry white wine over the vegetables and bake in a 400-degree oven for about 50 minutes, until golden brown with an internal temperature of 160 degrees.
—Let pork rest for 3 to 5 minutes (maximum), and then cut into half-inch thick slices and serve.

[serves 4 to 6]

‘Autumn Is Here’ French Onion Soup

About this soup recipe, Amie says: “This recipe today is by far my favorite. Probably because we don’t make it super often (it’s a tad labor intensive). My second favorite, though, is Zuppa Toscana. It’s the only way I get my boys to eat kale!”

INGREDIENTS NEEDED
—3 tablespoons unsalted butter, cut into 3 pieces
—6 large yellow onions (about 4 pounds, halved and cut pole to pole into 1/4 inch-thick slices)
—table salt
—2 cups water (plus extra for de-glazing)
—1/2 cup dry sherry
—4 cups low sodium chicken broth
—2 cups beef broth
—6 sprigs fresh thyme (tied with kitchen twine)
—1 bay leaf
—ground black pepper

ADDITIONAL INGREDIENTS NEEDED FOR CROUTONS
—1 small baguette (cut into 1/2 inch slices)
—8 ounces shredded Gruyère cheese (about 2 1/2 cups)

INSTRUCTIONS

—Adjust oven rack to lower-middle position and heat oven to 400 degrees.
—Generously spray inside of heavy-bottomed large (at least 7-quart) Dutch oven with nonstick cooking spray.
—Place butter in pot and add onions and 1 teaspoon salt. Cook, covered, 1 hour (onions will be moist and slightly reduced in volume).
—Remove pot from oven and stir onions, scraping bottom and sides of pot.
—Return pot to oven with lid slightly ajar and continue to cook until onions are very soft and golden brown, 1-1/2 to 1-3/4 hours longer, stirring onions and scraping bottom and sides of pot after 1 hour.
—Carefully remove pot from oven and place over medium-high heat. Using oven mitts to handle pot, cook onions, stirring frequently and scraping bottom and sides of pot, until liquid evaporates and onions brown, 15 to 20 minutes, reducing heat to medium if onions are browning too quickly.
—Continue to cook, stirring frequently, until pot bottom is coated with dark crust, 6 to 8 minutes, adjusting heat as necessary (scrape any fond that collects on spoon back into onions).
—Stir in 1/4 cup water, scraping pot bottom to loosen crust, and cook until water evaporates and pot bottom has formed another dark crust, 6 to 8 minutes.
—Repeat process of de-glazing 2 or 3 more times, until onions are very dark brown.
—Stir in sherry and cook, stirring frequently, until sherry evaporates (about 5 minutes)
—Stir in broths, 2 cups water, thyme, bay leaf, and 1/2 teaspoon salt, scraping up any final bits of browned crust on bottom and sides of pot.
—Increase heat to high and bring to simmer. Then reduce heat to low, cover, and simmer 30 minutes.
—Remove and discard herbs, then season with salt and pepper.
—For the croutons: while soup simmers, arrange baguette slices in single layer on baking sheet and bake in 400-degree oven until bread is dry, crisp, and golden at edges, about 10 minutes. Set aside.
—To serve: adjust oven rack 6 inches from broiler element and heat broiler. Set individual broiler-safe crocks on baking sheet and fill each with about 1-3/4 cups soup. Top each bowl with 1 or 2 baguette slices (do not overlap slices) and sprinkle evenly with Gruyère. Broil until cheese is melted and bubbly around edges, 3 to 5 minutes. Let cool 5 minutes before serving.

[serves 6]

Mini Carrot Cupcakes

About this recipe, Amie says, “I am all about vegetables in my desserts. I love pumpkin everything! But because you might be sick of PSLs by now, here is my favorite carrot cake recipe. And I always try to do dessert in miniature. It makes portion control so much easier! Until you eat 6 at a time.”

INGREDIENTS NEEDED
—1 1/4 cups all-purpose flour
—1/2 cup chopped walnuts
—1 teaspoon baking powder
—1/2 teaspoon baking soda
—1/2 teaspoon salt
—1/2 teaspoon ground cinnamon
—1/2 teaspoon ground nutmeg
—1/2 teaspoon ground ginger
—1/4 teaspoon ground allspice
—1 1/2 cups grated carrots
—2/3 cup vegetable oil
—1 cup granulated sugar
—3 large eggs
—1 teaspoon vanilla extract

ADDITIONAL INGREDIENTS NEEDED FOR FROSTING
—2 1/2 cups confectioner’s sugar
—8 ounces cream cheese, softened
—2 tablespoons unsalted butter, softened
—1 teaspoon lemon juice
—1/4 teaspoon almond extract
—1/4 cup toasted chopped walnuts

INSTRUCTIONS
—Preheat oven to 350 degrees F.
—Line two 24-cup mini-muffin pans with paper liners.
—Put the flour, walnuts, baking powder, baking soda, salt, and spices in the food processor and pulse until the nuts are finely ground.
—Whisk the grated carrots, vegetable oil, granulated sugar, eggs and vanilla in a large bowl until combined.
—Stir in the flour mixture until just combined.
—Divide amoung the muffin cups, filling each three-quarters of the way.
—Bake until a toothpick comes out clean, 10-15 minutes.
—Transfer to a rack and let cool 5 minutes, then remove cupcakes from pans to cool completely.
—Meanwhile, for the frosting: beat the confectioner’s sugar, cream cheese, unsalted butter with a mixer until fluffy. Beat in the lemon juice and almond extract.
—Pipe or spread the frosting onto the cupcakes and sprinkle with chopped walnuts.

[makes 48 mini cupcakes]

Does’t that all look delicious?!

If you’re up for a challenge… come to the forum and check out the latest edition of our Recipe Book challenge, which launched this month and is designed to help you create a quick-&-simple book of your favorite recipes — get this — in time to print it up and give it to friends and family members as a holiday gift later this year(!). Sound like fun? Come check it out HERE.

Meanwhile, it wouldn’t be a designer feature week without a fantastic sale and a special Free-with-Purchase offer… so you’ll be excited to see what Amie has in store for you! Not only is her entire shop marked down 30% OFF throughout her entire feature week (sale prices will be valid through 11:59pm ET on Thurs 10/19)… but she also has this awesome deal in her shop all week long, as well! Spend $10+ in the Little Lamm & Co. shop, and get the following BRAND NEW KIT that just launched in her shop today — completely FREE!


my head shot

About the Author  Sabrina is married to a hard-working man and has two rambunctious kids, nicknamed Captain and Sunshine. She spends every free minute creating at her crafty space. Digital layouts, hybrid layouts, project life and just anything memory keeping. She also loves to read, kickbox and go a bike ride.


Foodie Friday | Anita Designs

Well hello again, and welcome to another edition of our Foodie Friday series here on The Digital Press blog!

As you have likely already caught on throughout this past month… Foodie Friday is a new series based on the amazing response we had to the “Mess Hall” activities during TDP’s Summer Camp, back in July. As such, every Friday throughout the rest of the year, we will be combining this fun feature with our weekly designer feature series — and having some fun in the kitchen! Every week you will get the chance to peek into the lives (and kitchens) of your favorite TDP designers and creative team members.

This week’s fabulous recipes are coming to you from the spectacular Anita of Anita’s Designs. If you did not know already, Anita loves to cook… so she was very excited about sharing these recipes with you this week. I really enjoy cooking as well — and I love trying out new recipes — so I was super excited to see some new things here that I have not tried before!

Today we are sharing a series of recipes that Anita cooked one weekend this month for her family. In a way, this is “A Day in the Kitchen with Anita” documented! 🙂

[all photo credits to Anita ]

So, what are these delicious things you see pictured above?

  • Sunday Soup (a.k.a. Meatball Veggie Soup)
  • Waldorf Salad and Tarragon Oil
  • Pork Filet (Minute Steaks) in White Wine Sauce
  • Ice Cream with Chocolate Dipped Strawberries

Sunday Soup (a.k.a. Meatball Veggie Soup)

Anita says, “this is a soup most people in Holland know and eat. My grandma used to cook this on Sunday for all kids and grand-kids. My husband’s mom makes it too sometimes, and hers is just as delicious as the one my grandma made. We call it ‘Groentesoep’.”

INGREDIENTS NEEDED
—4 liters (about 1 gallon) water
—broth to make 4 liters of soup
—500 gm (about 1 lb.) minced meat
—500 gm (about 2 cups) finely chopped mixed veggies ( carrots, cauliflower, leek, celery, white cabbage, etc)
—a handful of vermicelli
—flavor enhancers for soup (optional)

INSTRUCTIONS
—In a large pot bring the water to a boil.
—In a bowl add seasoning to the meat (salt, pepper, paprika, etc. to taste).
—Mix the seasoning into the meat and then form small meatballs.
—Add the meatballs to the boiling water and reduce the heat to low.
—Cook the meatballs in the water for about 60 minutes, removing the foam that collects on top every 10 to 15 minutes.
—Add the broth to the soup and cook for an additional 60 minutes.
—Add the chopped veggies to the soup.
—If desired, add the flavor enhancers to the soup and cook for additional 55 minutes.
—Add the vermicelli and cook until the vermicelli is soft, then remove from heat.
[serves: 8-12 people]


Waldorf Salad and Tarragon Oil

INGREDIENTS NEEDED
—3 Granny Smith apples, thinly sliced
—2 celery stalks, leaves picked, stalks thinly sliced
—1 red onion, thinly sliced
—100g (1/2 cup) walnuts, toasted and chopped
—170g (1 cup) raisins or a bunch of purple grapes
—50g (1/4 cup) tarragon leaves, roughly chopped
—1/2 Tb white wine vinegar
—60ml (1/4 cup) extra virgin olive oil
—a bunch of radishes
—juice from 1 lemon
—150 gm (about 3/4 cup) mayonnaise

INSTRUCTIONS
—Combine lemon juice and mayonnaise in a bowl and season to taste with salt and pepper.
—Place the apple, celery stalks and leaves, onion, nuts and raisins in a large bowl and toss with the dressing.
—Make the tarragon oil by combining the tarragon, vinegar, olive oil in a bowl.
—Serve the Waldorf salad and drizzle with tarragon oil on top.

[serves: 6-8 people]


Pork Filet (Minute Steaks) in White Wine Sauce

About this dish, Anita says… “I served the pork filet and Waldorf salad with pomme duchess (duchess potatoes).”

INGREDIENTS NEEDED
—8 thin pork filets
—4 Tbs flour
—100gm (1/2 cup) butter
—4 cloves of garlic
—250 ml (about 1 cup) white wine
—200 ml (about 1 cup) broth
—20gm (3/4 cup) fresh chopped parsley

INSTRUCTIONS
—Mix the salt and and pepper into the flour and dip the pork filets in the mixture.
—Shake off excess flour and saute them in 50 gm (1/4 cup) of butter for about 4 to 6 minutes, turning over once in the middle.
—Remove from skillet, cover with foil and let rest.
—Add in remain butter and saute the garlic for about 1 minute.
—Add the wine and broth.
—Bring to a boil and let it boil for about 10 minutes or until it is 1/3 reduced.
—Place the meat back in the pan, and warm it on a low heat for about 7 minutes with the lid on the pan.
—Remove from heat and plate filets.
—Add parsley to the butter wine sauce and give it a good stir. Serve the sauce in a bowl, or over the meat in the plate.
[serves: 8 people]


Ice Cream with Chocolate Dipped Strawberries

INGREDIENTS NEEDED
—200 ml (1 cup) semi-skimmed milk
—2 tbs liquid honey
—250g (1 and 1/4 cup) fine sugar
—600 (3 cups) ml crème fraîche
—250 grams  strawberries
— 2 icecream waffles per person
—100 ml (1/2 cup) water
—additional fresh strawberries (to coat with chocolate)

INSTRUCTIONS
—Put the milk, honey and 1 cup of sugar in a pot on low heat and whisk until the sugar dissolves.
—Remove from heat and let cool slightly.
—In a bowl, add the cooled milk/honey sugar mixture to the fresh cream. whisk until blended.
—Place cream mix in an ice cream machine and let it work 1.5 to 2 hours (if you don’t have a ice cream machine, put the mix in a container and put in freezer and stir it gently every 15-20 minutes).
—Remove the green from 250gm of strawberries and slice in half.
—Add strawberry halves, 100ml water and 50gm sugar to a pot and bring to boil on med/high heat.
—reduce heat and crush the strawberries let the mix thicken for about 20-25 minutes (it should be syrup like).
—Remove from heat and let cool.
—Once cooled, mix the strawberry syrup into the freezing ice cream mixture with a fork and return to freezer for at least 20 minutes.
—Skewer the remaining strawberries from the top.
—set a bowl above a pot of boiling water and add chocolate to the bowl, stirring regularly until the chocolate is melted.
—Holding your skewer, dip the strawberries into the chocolate and twist to coat evenly.
—Place dipped strawberries on a baking sheet to cool, then store in the fridge until needed.

TO SERVE
—You can simply serve the ice cream in a bowl, and garnish it with the chocolate-dipped strawberries… OR…
—You can also place a waffle on a plate, and put a scoop of ice cream on top; add a second waffle on top and do another scoop; top with some chocolate sauce, sprinkled chopped nuts, and some whipped cream; serve with chilled chocolate dipped strawberries on the side.
[servings: 1 liter/10 people]


I don’t know about you, but just reading through those recipes and looking at the photographs got me ready to hit the kitchen (or at least have a nice snack!). Everything looks so amazing!

If you’re up for a challenge… come to the forum and check out our Recipe Book challenge, which launched this month and is designed to help you create a quick-&-simple book of your favorite recipes — get this — in time to print it up and give it to friends and family members as a holiday gift later this year(!). Sound like fun? Come check it out HERE.

Meanwhile, it wouldn’t be a designer feature week without a fantastic sale and a special Free-with-Purchase offer… so you’ll be excited to see what Anita has in store for you! Not only is her entire shop marked down 30% OFF throughout her entire feature week (sale prices will be valid through 11:59pm ET on Thurs 9/28)… but she also has this awesome deal in her shop all week long, as well! Spend $10+ in the Anita Designs shop, and get the following brand-new FULL COLLECTION (!) that just launched in her shop today — completely FREE!


Erin is an artsy crafty kind of girl who is currently dabbling in far too many things, but is working hard to enjoy every moment of it, while avoiding the rain, which is difficult due to living in the land of many rains. She is slowly learning to use her smart phone to capture all the fun little bits of life that would otherwise go unremembered in the busy craziness that is raising a family!

Foodie Friday | LJS Designs

Welcome to another edition of Foodie Friday here on The Digital Press blog!

Continuing with our new series on “what’s cooking on the homes of our design team and creative team members”…I had fun chatting with Lorie Starcher of LJS Designs to see what she has going on in her kitchen! Lorie is currently on a journey to better health and is following the ketogenic (or keto) food program, so we thought it might be fun to show you some of her favorite recipes. If you’re not sure what keto is… basically, you eliminate all sugars and you really (and I mean really!) reduce carbohydrates. If you like bacon and cheese, however, you’re definitely in for a treat!

Check out the following photos. Doesn’t this all look yummy? I think even if I made this and it didn’t look quite as pretty as the photo… well …did I say bacon and cheese?!

photo credits: [1] Pinterest, [2] Pinterest, [3] The Grass Fed Girl

So, what is all of this deliciousness you see above?

  • Parmesan Crusted Chicken with Bacon Cream Sauce
  • Loaded Cauliflower
  • Pumpkin Spice Keto Fat Bombs

Parmesan Crusted Chicken with Bacon Cream Sauce

Says Lorie: “Crispy bacon, creamy sauce, and juicy chicken will make you sing keto praises!” I’m thinking to myself, cheese, bacon and cream …how could this possibly be “diet” food?! There are a few versions of this recipe, and a lot of keto recipes on the internet (just do a Google search, or head over to Pinterest — but do so on a full stomach, otherwise you’ll end up hungry!), but this is the version that Lorie loves…

INGREDIENTS NEEDED

—1 lb chicken breasts
—1 tablespoon avocado oil mayonnaise
—4 tablespoons shredded parmesan cheese
—3 slices of bacon (cooked and crumbled; reserve the fat)
—1/2 cup of heavy whipping cream
—1 tablespoon cream cheese
—1/2 teaspoon garlic powder
—salt and pepper to taste

INSTRUCTIONS

—Preheat oven to 400 degrees. Rinse and pat dry the chicken. Using a basting brush, coat the top of each chicken breast with the mayonnaise. Top the chicken with 3 tablespoons of the parmesan cheese (reserve 1 tablespoon – you’ll need it later).
—Bake uncovered for 40-50 minutes. Using a meat thermometer, you’ll be looking for an internal temperature of 160 degrees, and the juices should run clear.
—When the chicken has about 10-15 minutes to go, start making your sauce.
—In a skillet, warm up the reserved bacon fat, but be careful to not overheat – the fat should not be sizzling or bubbling. Whisk in the heavy cream until well combined, and continue whisking until it starts to foam up on the edges of the skillet.
—Add the cream cheese and whisk until smooth. Add the remaining parmesan cheese and garlic powder. Whisk. Add some bacon crumbles, but reserve some for garnishing.
—To plate, drizzle the cream cheese sauce over the chicken, and top with bacon crumbles.

[ recipe adapted from Keto in Pearls ]

Loaded Cauliflower

Says Lorie: “I usually pair this with a cheeseburger patty with relish and mayo. Made with butter, sour cream, chives, cheddar cheese and bacon, it’s the ultimate in low-carb comfort food.”

INGREDIENTS NEEDED

—1 lb cauliflower florettes
—4 oz sour cream
—1 cup grated cheddar cheese
—2 slices cooked bacon, crumbled
—2 tablespoons snipped chives
—3 tablespoons butter
—1/4 teaspoon garlic powder
—salt and pepper to taste

INSTRUCTIONS

—Cut the cauliflower into bite-sized pieces and add them to a microwave safe bowl. Add 2 tablespoons of water, cover and microwave for 5-8 minutes until completely tender. Drain the excess water and let sit uncovered for a minute or two.
—Add the cauliflower to a food processor and process until fluffy. Add the butter, garlic powder, and sour cream and process until it resembles the consistency of mashed potatoes. Remove the mashed cauliflower to a bowl and add most of the chives, saving some to add to the top later. Add half of the cheddar cheese and mix by hand. Season with salt and pepper.
—Top the loaded cauliflower with the remaining cheese, remaining chives and bacon. Put back into the microwave to melt the cheese or place the cauliflower under the broiler for a few minutes.

[ recipe adapted from Low Carb Maven ]

Now, after your fill of cheese and bacon, you may ask “What’s for dessert?” Many times, we’ll reach for something sweet — but how do you do that on a keto program when you’ve eliminated all sugars and processed foods? You have a “fat bomb.” I know! I thought the same thing! How is that a dessert?! (that name scares me!) Although sugar is a no-no, snacks or treats that are high in good fats are allowed; they help fuel your body. Lorie hasn’t tried any fat bombs yet, but we both love pumpkin… so I went in search of a pumpkin recipe, which we both thought would be appropriate as we head into the fall season. These look so easy to make…

Pumpkin Spice Keto Fat Bombs

INGREDIENTS NEEDED
—1/2 cup coconut oil
—3/4 cup pumpkin puree
—1/3 cup golden flax
—1 teaspoon cinnamon
—1/2 teaspoon nutmeg (optional)
—1/4 teaspoon sea salt
—1/3 teaspoon Stevia

INSTRUCTIONS

—Mix all ingredients in a bowl and place in the freezer for about 30 minutes.
—Roll into balls and place in the refrigerator for about 1 hour before eating.

[recipe adapted from The Grass Fed Girl ]

I’d love to hear what you think of the pumpkin spice fat bombs! 🙂 If you make them, leave a comment here and let us know what you think!

Meanwhile, it wouldn’t be a designer feature week without a fantastic sale and a special Free-with-Purchase offer… so you’ll be excited to see what Lorie of LJS Designs has in store for you! Not only is her entire shop marked down 30% OFF throughout her entire feature week (sale prices will be valid through 11:59pm ET on Thurs 9/28)… but she also has this awesome deal in her shop all week long, as well! Spend $10+ in the LJS Designs shop, and get the following brand-new product that just landed in the shop today — completely FREE!


KatAbout the Author Kat Hansen is a creative team member here at The Digital Press. A Director of Human Resources by day, she loves the opportunity to spend a few hours each evening being creative. Vacation memories feature pretty heavily in Kat’s scrapbooking pages, as do her son and “daughter” (of the four-legged furry kind). Kat has quite the sense of humor (she “blames” her father for this), which she incorporates into her journaling and memory-keeping.

Foodie Friday | Dawn by Design

Happy Friday, all… and welcome to the most recent edition of Foodie Friday here on The Digital Press blog!

As you have likely already caught on throughout the month so far.. this is a new series based on the amazing response we had to the “Mess Hall” activities during TDP’s Summer Camp back in July. As such, every Friday throughout the rest of the year, we will be combining this fun feature with our weekly designer feature series — and having some fun in the kitchen! Every week you will get the chance to peak into the lives (and kitchens) of your favourite TDP designers and creative team members.

This week, I have joined forces with the always-fun Dawn of Dawn by Design — and we’re sharing two recipes from her kitchen and one from mine! My recipe is an easy salad (a recipe garnered from my oldest son’s fiancee)… and Dawn has added a scrumptious chicken pasta dish along with a blueberry cream cheesecake to finish everything off sweetly!

Food

So, what are these delicious things you see pictured above?

  • Strawberry and Feta Salad
  • Creamy Tuscan Garlic Chicken
  • Blueberry Cream Cheesecake

Strawberry and Feta Salad

INGREDIENTS NEEDED

—2-3 cups (250–400g) strawberries, washed and quartered
—1/2 tub (or 2 rounds) of feta cheese, drained and cubed
—1 small head of lettuce (cos, romaine, or rocket/arugula all work nicely)
—pumpkin seeds (optional)

INSTRUCTIONS

—Tear the washed lettuce into bite-sized pieces and layer into the salad bowl
—Add the strawberries and cubed feta cheese and sprinkle pumpkin seeds on top
—Add dressing of your choice. That’s it! I, myself, have served this with a strawberry-based vinaigrette (yum!)


Creamy Tuscan Garlic Chicken

INGREDIENTS NEEDED

—1 – 1/2 lbs boneless skinless chicken breasts (sliced into cutlets)
—2 tablespoons olive oil
—salt and pepper (to taste)
—1 cup heavy cream
—1/2 cup chicken broth
—1 teaspoon garlic powder
—1 teaspoon Italian seasoning
—1/2 cup parmesan cheese
—1 cup spinach, chopped
—1/2 cup sun-dried tomatoes

INSTRUCTIONS

—Season the chicken with salt and pepper, and then saute in a large skillet on medium-high heat for 3-5 minutes on each side (until browned and thoroughly cooked). Set chicken aside on a plate.
—Bring the heat down to medium. In the same skillet, whisk in the heavy cream, chicken broth, garlic powder, Italian seasoning, and parmesan cheese for a few minutes (until mixture thickens slightly).
—Add spinach and sun-dried tomatoes. Simmer for a minute or two, until spinach wilts. Return chicken to pan and flip a few times, so that it is thoroughly coated in sauce.

[recipe adapted from Cooking Panda]

Blueberry Cream Cheese Danish

INGREDIENTS NEEDED

DOUGH
—1/2 cup almond flour
—1/4 cup coconut flour
—1/4 cup confectioner’s (powdered) sugar
—6 ounces shredded part-skim mozzarella cheese
—5 tablespoons butter
—1 large egg

FILLING
—4 ounces cream cheese
—1/4 cup whipping cream (at room temperature)
—2 tablespoons white sugar (granulated)
—1 teaspoon lemon zest
—1 cup blueberries
TOPPING
—3 tablespoons sliced almonds
—1 tablespoon white sugar (granulated)

INSTRUCTIONS

DOUGH
—Preheat oven to 350F degrees and line a large baking mat with parchment paper or a silicone liner.
—In a medium bowl, combine almond flour, coconut flour, sugar, and baking powder. In a large saucepan, melt cheese and butter over low heat until it can be stirred together.
—Add egg and vanilla extract and stir to combine. Stir in almond flour mixture until dough comes together (keep heat on low). It will still have some large streaks of cheese. Turn out dough onto a silicone mat or directly onto a kitchen counter and knead until uniform (this only takes a little kneading).
—Cover with parchment paper and roll out to about a 14×8 inch rectangle. On the diagonal, cut 1 inch wide, 1 ½ inch long strips along both sides, leaving a solid rectangle of dough in the center.

FILLING
—In a medium bowl, beat together the cream cheese, cream, sugar, and lemon zest until well combined. Spread down the center of the dough, leaving about ½ inch all around. Sprinkle with blueberries.
—Fold the strips of dough over the filling so that the ends overlap. Pinch the dough at the ends to seal.

TOPPING
—Sprinkle with sliced almonds and granulated sugar and press gently to adhere.

Bake 20 to 25 minutes, until pastry is golden brown and firm to the touch. Remove and let cool completely, then slice into strips to serve. Serves 8 to 10.

[recipe adapted from Carolyn Ketchum]

We’re betting that you’re hungry just reading through these recipes, and that you can’t wait to try them out!

Well, if you’re up for a challenge… come to the forum and check out our Recipe Book challenge, which launched this month and is designed to help you create a quick-&-simple book of your favorite recipes — get this — in time to print it up and give it to friends and family members as a holiday gift later this year(!). Sound like fun? Come check it out HERE.

Meanwhile, it wouldn’t be a designer feature week without a fantastic sale and a special Free-with-Purchase offer… so you’ll be excited to see what Dawn of Dawn by Design has in store for you! Not only is her entire shop marked down 30% OFF throughout her entire feature week (sale prices will be valid through 11:59pm ET on Thurs 9/21)… but she also has this awesome deal in her shop all week long, as well! Spend $10+ in the Dawn by Design digital Scrapbooking shop, and get the following brand-new / just-released full kit, Trick or Treat, completely FREE!


Stefanie

About the author Stefanie is a member of The Digital Press creative team and a stay at home mother of three older children living in Cape Town, South Africa with her hubby of 29 years, two of their three children and 2 cats. She loves photography, travel and digital scrapbooking the good and the ordinary everyday.