Tutorial Tuesday | Create a Color Palette From a Photo


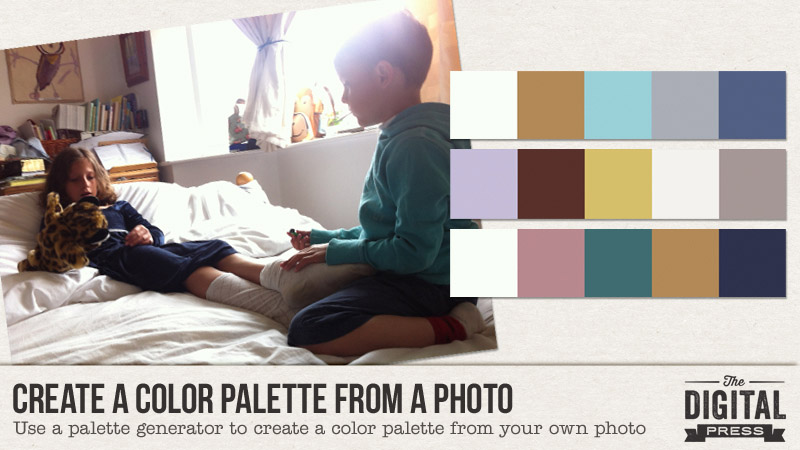
Every now and then, I come across a photo that I want to scrap… but find that it is hard to work with because it has lots of colors in it. Or maybe it does not have many colors in it; or maybe even colors I don’t really want to focus on (I am not much of an orange and brown person!). In these tricky instances, I don’t always know what to do with it! There is nothing that kills my scrapping mojo faster. To solve this problem, I have found a way to create customizable color palettes from my photos — which helps me determine the color palette I should use — which, in turn, helps me find a kit to use!

I know there are a few programs/websites around that can do this (if you google “color palette generator” you will find lots of options), but the one I find easiest to use is Adobe Color. Thus, it’s the one I will focus on for the purposes of this tutorial. If you want to try using it too, here is my process…

Adobe Color’s homepage looks like this (see the image that follows), and you’ll begin by using the little camera icon that you’ll find in the upper-right-hand corner…

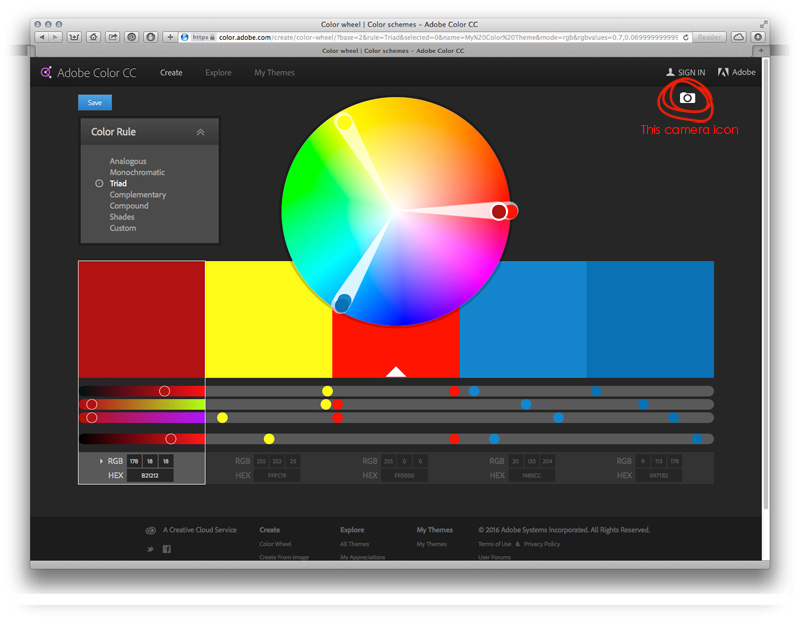
You will either (1) click on that camera icon, and then load your photo, or (2) drag your photo from your computer onto that icon.

Next, the program will give you a color palette using the colors from your photo, like this…

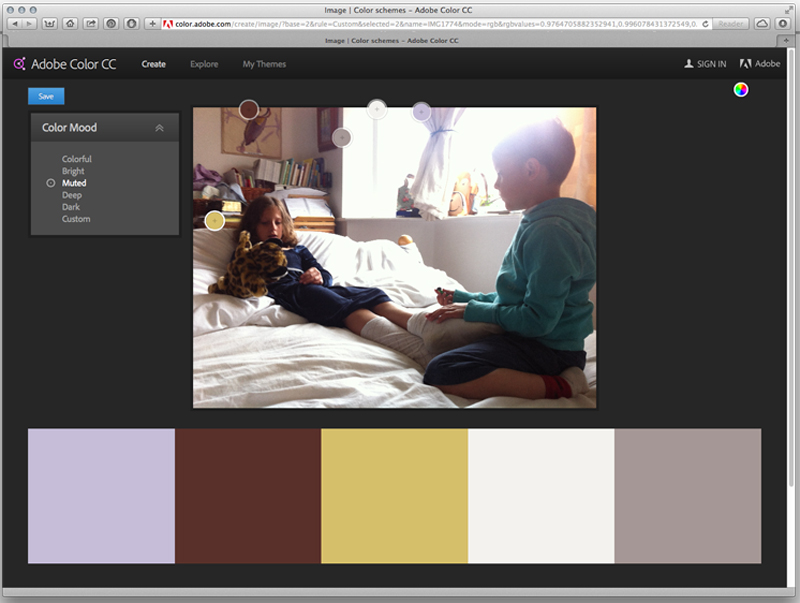
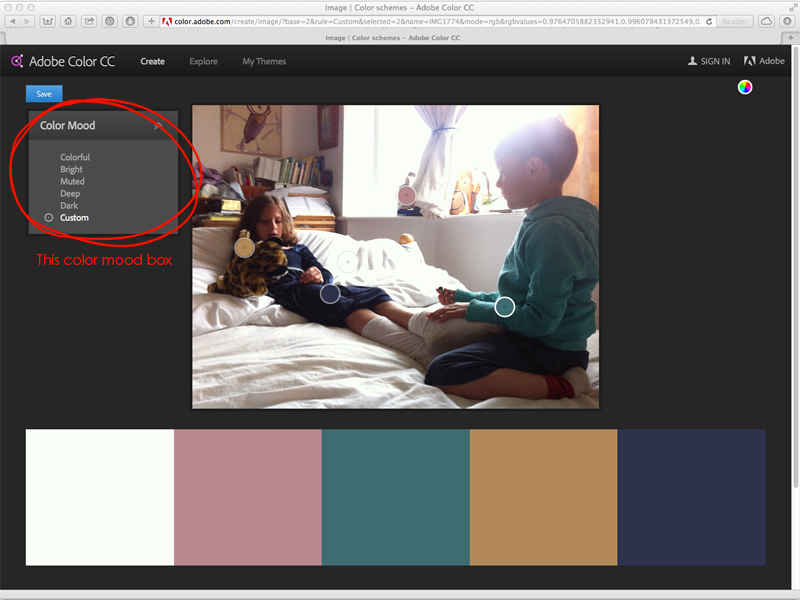
Now, if you aren’t 100% happy with the first palette it generates… you can choose from the options on the left — “Color Mood” — and play around until you like one of those options better. Alternatively, you can even customize any of the palettes yourself by moving the little targets around on your photo, until you get something you like, as I’ve done here…

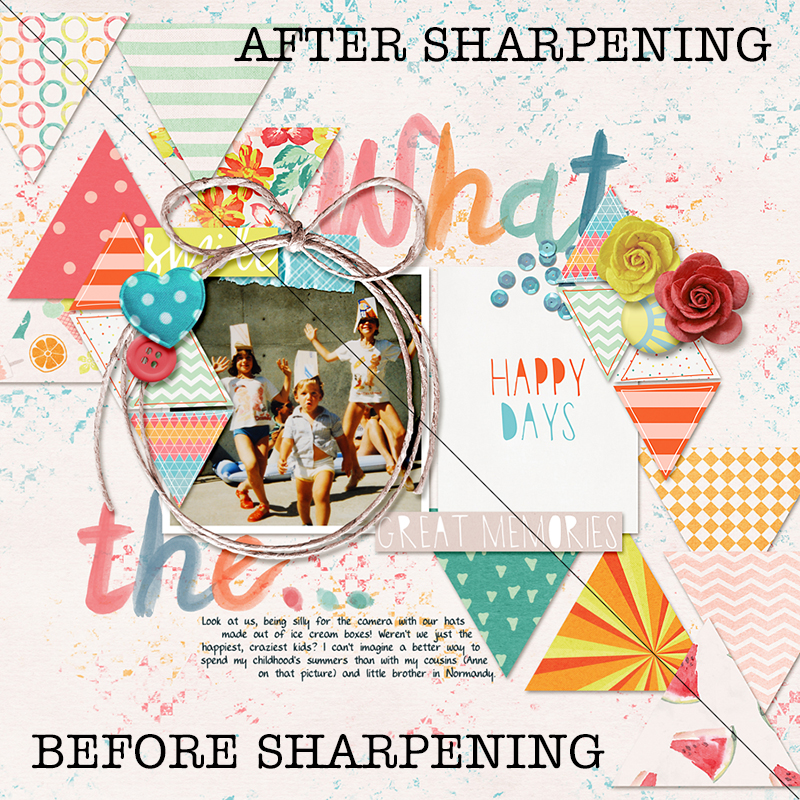
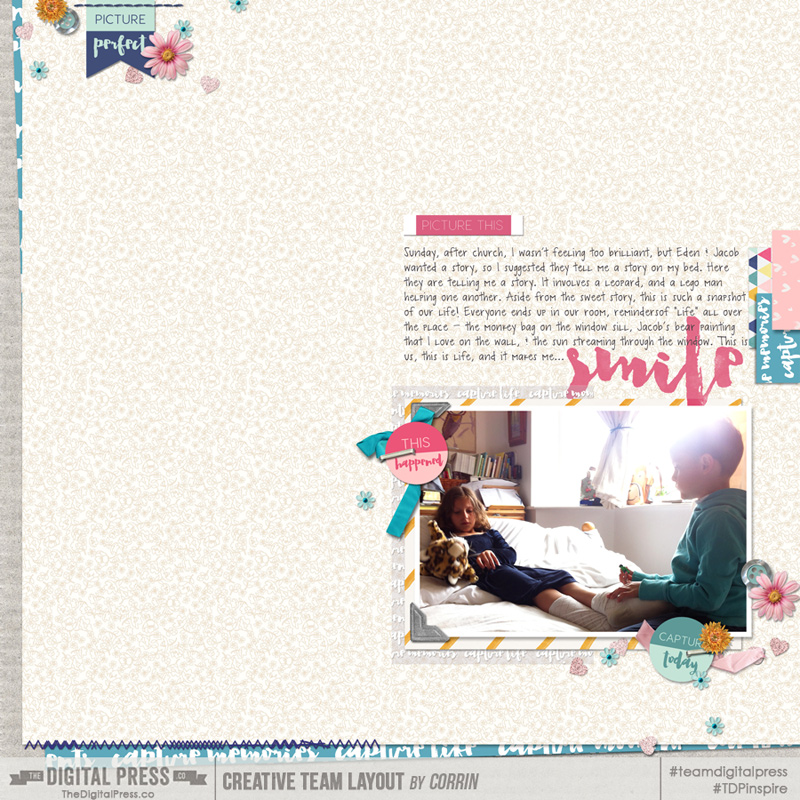
Once you have a palette you are happy with, all you have to do is choose a digital kit that uses those colors… and off you go! I chose to use the Capture | Kit by Little Lamm & Co., found here at The Digital Press, for my page (as well as a template from MEG Designs’ H2O Templates set). Here’s a look at my finished page…

I find this process to be infinitely helpful when I am feeling “stuck” while scrapping. For instance, I wouldn’t have thought to bring out the pink in the photo, but once the palette generater showed me that it was there… I really liked the idea of using that color as an accent!

I hope this simply tip will help you next time you are stuck, or at least it might be something new and fun for you to try!


CorrinAbout the Author  Corrin is on the creative team here at The Digital Press. She is a fan of the Big Bang Theory and a lover of cozy pajamas. She lives in the currently-sunny but breezy South of England with her husband and 4 crazy kids, who regularly discover & plunder her secret chocolate stashes! She is still trying to get the house straight after moving 2 years ago. Who knows… maybe this will be the year she reaches the bottom of the laundry pile!

Feature Friday | Laura Banasiak


Once again, it’s Feature Friday… and this week, we are featuring the designs of the lovely Laura Banasiak!

Laura’s kits are full of colorful and funky elements, loads of doodles, and various hand-crafted artsy elements. In addition to digital kits, she also creates awesome fonts, alphas and word art setc… all of which have a very special style that is all her own, and you can recognize her products without even seeing her name on the packaging. I love working with her products, because Laura creates all kind of goodies for cool boys and sweet girls, alike!

I picked some of my favorite products to share with you from Laura’s store (which was not easy, as I love all of  her work!)…


And now, let’s get to know Laura a little better! We asked her to answer a few questions so we could learn more about her…

Where do you live?
About an hour from Chicago, Illinois.

When you’re not designing, what do you do with your time?
As of right now, I am keeping pretty busy nursing a newborn (come check out her baby announcement in The Digital Press forum! cute baby pics! yay!), changing diapers, and passing him from one excited sibling to the next. 😉

What are 5 tidbits of trivia we might not know about you?
— I have about 15 tattoos
— My boyfriend is a police officer
— My stepmom and I share the same first name
— I was once a librarian
— I’m a cat lady… but am allergic to cats

Which of your products is your favorite?
This always changes. I love all of my Scouting-themed products, but there’s also a special place for my Walking Dead inspired kit, Apocalypse


Laura Banasiak’s products are super versatile and easy to use for all kinds of projects. Here is a sampling of some of my favorite projects using Laura’s designs…


If you haven’t already browsed through Laura’s shop here at The Digital Press… definitely check it out HERE! You will definitely want to take a peek this week, because her entire shop will be 30% OFF through the end of next Thursday (sale will end at 11:59pm ET on Thurs 6/16)!


Miranda

About the Author  Miranda is mom of two teenage boys, aged 13 and 15 years old, and is also a fur-mummy for her 3 Bernese Mountain Dogs. She lives in the South of the Netherlands, close to the beach where she loves to walk with her dogs. In real life she is HSE-responsible for few companies in the construction industry. She loves to read Danielle Steel novels, long walks at the beach and she loves Italy; and has been digiscrap-addicted since 2007.

Tutorial Tuesday | Save for Web


I often say that Photoshop is like our brain: we only use 10% of it. Well, “save for web” is probably one of those features that we don’t put to as good of a use as we should! It’s a simple tip… yet it can change the way you share your pages online!

As is often the case with Photoshop, there are several ways to get to the same end result… so I will simply share my own process (I use PS CS6), but keep in mind it’s definitely not the only process.

First, I always save 3 versions of the same file:

  1. My original layered file. I used to save it in .PSD format, but I’ve recently switched to .TIF format as they are non-proprietary (hence readable by software other than PS), smaller in file size, and can be previewed in my windows folders.
  2. The high definition .JPG file. This is the file that I use for printing (at 300dpi).
  3. The web version. This is a low-resolution .JPG file (72dpi), but it’s still nice and crisp.

When my layout is finished, I save the .TIF file first. Then I flatten it and save the high-resolution .JPG file. Then, I start my “save for web” process.


Here are my “save for web” steps

First, I go to  Image>Image size  or  Alt+Ctl+I  and change the resolution to 72 dpi (from the printing resolution of 300 dpi) for screen use, and I re-size the file. The file size/image size settings that I need are different from one gallery to another. The Digital Press gallery allows layouts from 600px to 900px in size (900px preferred), so when I re-size my layout I switch to 900px (because I scrap square layouts, I re-size my file to 900px x 900px). If your page isn’t square, just keep the proportions of your original but make sure the longest side is set to 900px.

Next, to ensure that my layout looks fantastic when displayed online, my file often needs to be sharpened. Now is the time! Again, there are various ways to do it. I simply use Filter>Sharpen>Accentuation (you could also use Smart Sharpen or a Highpass filter). Here are my settings when I sharpen — but pick whatever suits your own taste and your page, using the preview window to help you…

Here’s a small comparison of the before and after of my layout; it’s a subtle difference, but it gives my page a really nice oomph (you can really tell the difference if you look at the string frame… look how nice and sharp it is on the right side)!


Next, I will save this web version using… wait for it… “save for web” (in the File menu)! Ha! The shortcut in my version of Photoshop is Ctrl+Alt+Caps+S. Then I use the following settings…


I make sure to set a file size limit using the “optimize for image size” option. Here’s where the menu is located, in the top right corner (click the little 3-lines/arrow icon at top right, and you’ll get the following drop-down menu)…

A pop-up window allows me to pick the maximum file size I wish to allow, which I choose according to the online gallery’s requirements/guidelines. In The Digital Press’s case, the max size allowed is 400kb — so I could increase the 350 you see in the following image to 400…

The quality level of the layout will automatically adjust to fit within this size limit you just set. Use the preview window to make sure it still looks good, then click “save”.

This tip is super simple, but it will help your layouts take up less space online (including helping you adhere to different gallery limits/requirements), while still looking nice, beautiful and sharp! You can even create an action to record the steps you end up using to do this… and make it even quicker/easier! I hope this info will help you out; don’t hesitate to ask if you have any questions!


In case you’re wondering the layout I used for the examples in this tutorial, above, was made using several items from the new June 2016 Special Edition that launched this past weekend!


ChloéAbout the author  Chloé is in charge of PR and communication for her small town by day, is a digiscrapper “by night,” and a photographer whenever the light is beautiful. She lives with her man and fur-babies in a small town of Alsace (in the northeast of France), where she loves to read, watch good TV shows (TWD being her absolute favorite), and just hang out with her friends — no matter if they are close by, online, or away in her Swiss hometown.

Hybrid How-To | Cushion Covers


I know most of the world is coming into summer now, but where I live we have the most beautiful autumns and I wanted to make some decor to celebrate that.

I make a lot of my cushion covers; they are so easy to do. Today, I will show you how!

First, I design the cushion cover in Photoshop. My printer prints up to A3, so that’s the size of the page I start with. For this project, I used Grateful Papers by Little Lamm & Co. and Wondrous Stamp Sheet by Karla Noél.

After creating the design, I cut fabric to A3 size. Make sure your fabric is ironed completely flat and stuck to the paper with double sided tape. The top edge should be stuck right to the edge of the paper. Print your design onto the fabric.

*NOTE* The ink will not be colorfast, so if it gets wet… it WILL run. You can use transfer paper if you want your design more colorfast, but I change mine around often, so its not a big deal for me. If mine gets wet, I just make a new one!

You will also need to cut a back for your cushion cover. I purchased a small cushion from IKEA that already had a pattern on it and wanted to make sure the pattern didn’t show through on the front, so I cut an extra piece of calico. Cut them slightly larger than your design to allow room for seams.

hybrid cushion covers

To make my cover look a bit more quilted I decided to sew where the different papers meet. Do this on the front so you can see where you need to sew.
IMG_4933

When you are happy with your design, put the ‘right’ sides of your fabric together and sew around the edges, making sure you leave a large enough gap to put the cushion in.

IMG_4937

Turn your cover inside out, paying attention to the corners, stuff your cushion inside and hand stitch up the gap.

Untitled-5

Voila!

IMG_4941


Amanda

About the Author  Amanda found digital scrapbooking in 2006 as a paper scrapper who was frustrated with the limitations of paper scrapping products. She now loves to combine paper and digital products and techniques for her pages and projects. She is the wife of a Naval Officer and has two teenage children. She lives in Australia, and has also lived in the U.S and Malaysia and loves that she has had the opportunity to travel the world with her family.

Feature Friday | Little Lamm & Co.


Today, I am excited to kick off a brand new blog series here at TDP! Each Friday, we will be featuring one of our awesomely-talented designers… helping you get to know each of them a little bit better… and also giving you a chance to enjoy a 1-week-only sale in each of their shops!

This week, we’ll be featuring the designs of Amie of Little Lamm & Co.  Amie creates digital products that have a distinct pocket-scrapping style and feel. She creates custom designs that you can print yourself at home, if you’re interested in “going hybrid” and ending up with physical cards and other products. You’ll find lots of flat stickers and brushes/stamps in her kits, mixed with digital versions of the types of dimensional items you tend to find used on traditional paper scrapbook layouts. Additionally, she creates some great photo templates for not useful to pocket scrappers, but for the everyday “traditional” scrapbooker, as well.

It was tough to narrow down, but here are just a few of my favorite products by Amie…


Meanwhile, let’s get to know Amie a little better! We asked her to answer a few questions so we could learn more about her…

Where do you live?
Fargo, ND and Vergas, MN

When you’re not designing, what do you do with your time?
Trying to keep up with a 4 year old, reading, cooking, and cleaning up after my 2 cats and hubby.

What are 5 tidbits of trivia we might not know about you?
— no bag of dill pickle potato chips is safe around me
— I once won a log throwing competition
— I have psoriatic arthrits and in 2008, I was bedridden and couldn’t even go to the bathroom by myself most days
— Justin Timberlake once complimented me on my singing and I had no idea who he was
— I went to Woodstock ’99. The one with the riots. I did not participate. LOL

Which of your products is your favorite?
It’s a hard choice, but I love Blink


I love creating with Amie’s designs! Here’s a sampling of some of my favorite layouts that I’ve made with her lovely goodies…


If you haven’t already browsed the gorgeousness in Amie’s shop here at The Digital Press… definitely check it out HERE! It’s a great time to go take a look, because her entire shop will be 30% OFF throughout this entire week (sale will end at 11:59pm ET on Thurs 6/9)! Also — don’t forget to check out her lovely new releases this week, which coordinate perfectly with the June Special Edition.


Amie


About the Author  Amie is a craft-loving dental hygienist who lives in Washington state. She loves her husband, her two kids (ages 8 & 5), and her English Bulldog… as well as coffee, baking cupcakes, daffodils, glitter & sprinkles, reading a good book, and lip gloss — not necessarily in that order.

June 2016 at The Digital Press | Adventure


It’s June… and here at The Digital Press, we’re getting ready to jump into summertime with both feet!

This is such a fun time of year. School is ending for the summer, people are planning their activities and creating their Summer Bucket Lists, and the possibilities seem endless. It’s truly a time of ADVENTURE — which, very fittingly, is our new Word of the Month for June 2016 here at TDP!


image credits [1] [2] [3] [4] [5]


Looking for ADVENTURE this month? Come join us at TDP! We’ve just revamped our Challenge System, and there are a lot of fun new things in store for you throughout the month of June.

We have 9 new challenges waiting for you in the forum’s challenge section, which is newly-branded as THE CROSSWORD SECTION — a fun play on words that we love because (a) #WeAreNerdyThatWay, (b) our challenges have always been loosely connected to our Word of the Month at TDP (get it? “crossword” haha)… and (c) it fits nicely into TDP’s news/press theme.

Here’s a peek at the challenges you’ll find throughout June 2016…


Get more information about our monthly challenge system HERE.

Meanwhile, make sure you check out our newest TDP collaborative collection, Family Man, which launched today in the shop. The design team really knocked it out of the park with this collection (I think it might be my all-time favorite TDP collaboration!), and with 45+ papers, 110+ elements, 20+ journal cards, layered templates, cutting files, and more… it’s a must-have!


We look forward to spending June with you at The Digital Press!


Laura Passage

About the Author  Laura Passage is the owner of The Digital Press, and also the designer behind Wishing Well Creations by Laura Passage (WWC). She works now as a graphic designer in both the digital and paper scrapbooking industries, but previously spent over a decade working as a college soccer coach. She lives in the Pacific Northwest with her husband and two young sons (affectionately referred to as The Tiny Terrorists), and will rationalize eating coffee ice cream for breakfast to anyone who questions it.