Hybrid How-To | Custom Canning Labels

Hello everyone! Kate here, bringing you another edition of our Hybrid How-To series on The Digital Press blog!

Today I want to show you how easy it is to make custom labels for all of your jars. 🙂 August and September are canning months where I live. I mostly can tomatoes (I have 48 tomato plants this year!), but I love doing relishes and pickled vegetables as well. It really helps stretch the budget for our big family.

Supplies

  • digital scrapbooking kit of your choice (I used Homemade by Anita Designs)
  • cardstock OR printable sticker paper
  • cutting machine or scissors
  • hot glue (if not using printable sticker paper)

Instructions

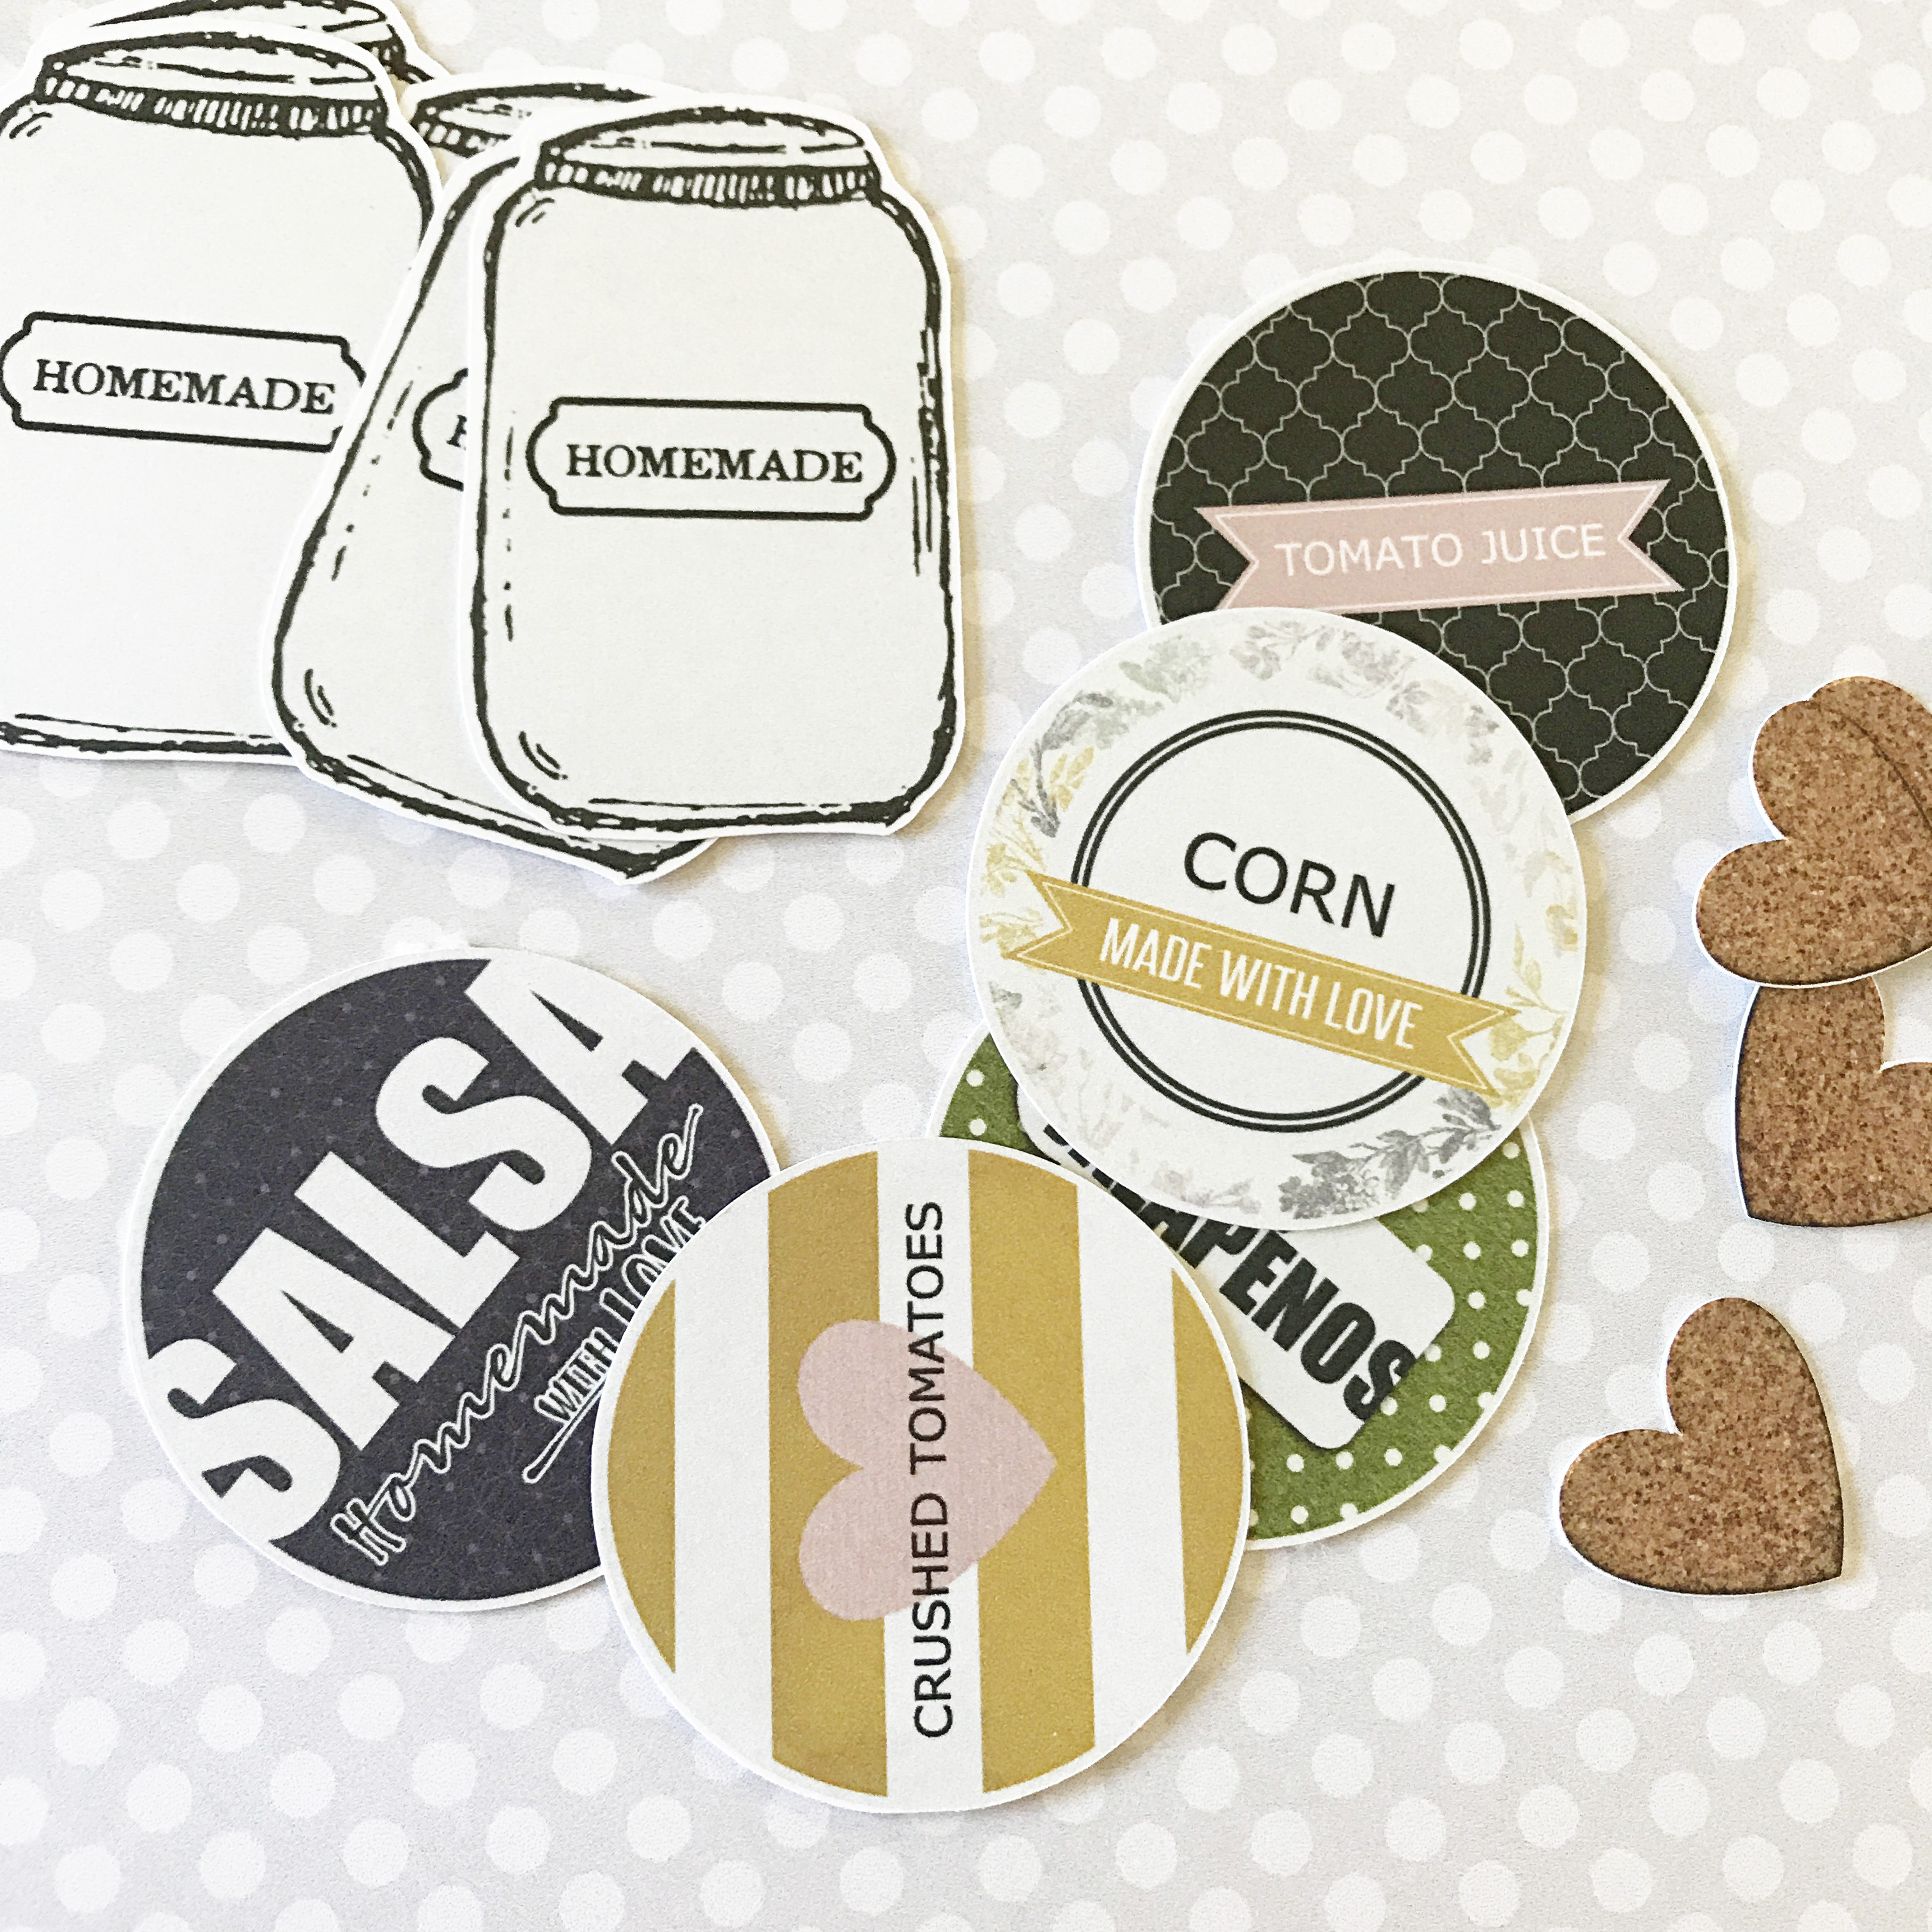
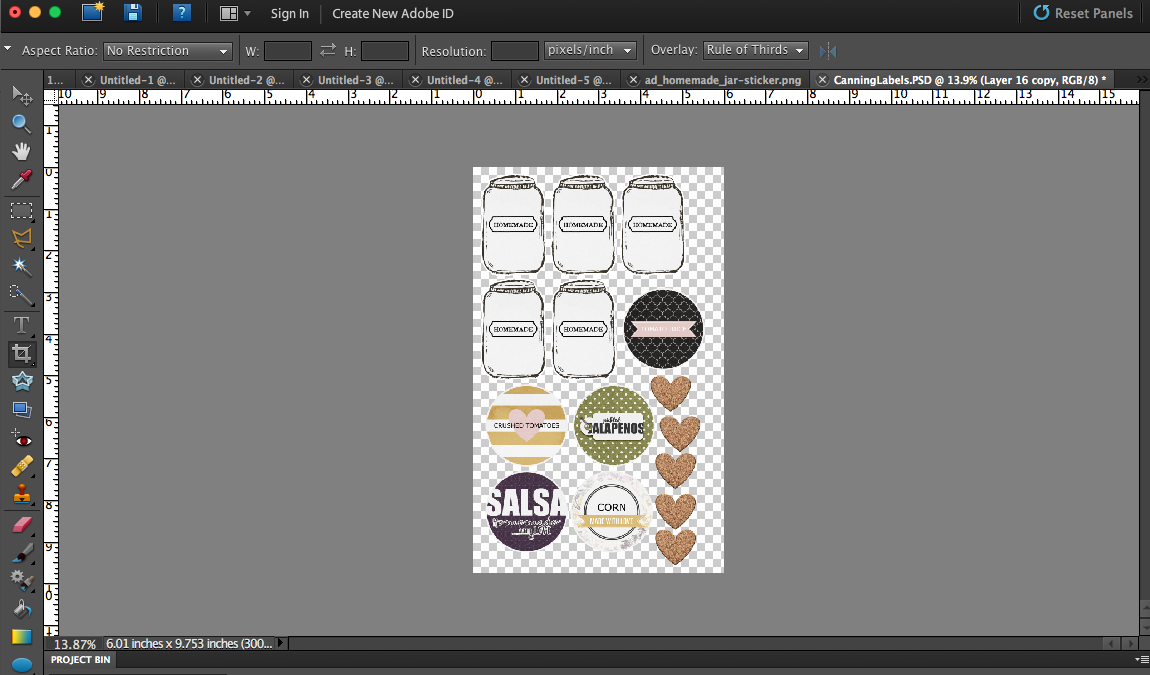
First, you’ll design your labels in a photo-editing program like Photoshop (PS) or Photoshop Elements (PSE). For regular-mouth jars, start with a 2″ circle as a template. If you’re just doing the labels (not the extra decorative tags), I recommend sticker paper. It’s so easy to copy the design for however many jars you have and fill the page with your labels, with no other adhesive necessary.

Next, you’ll print and cut your labels…

After that, you simply need to adhere the labels to your jars (and/or create hang-tags to tie onto jars with string, etc.). If you’re not using sticker paper — I have found hot glue to be the best choice for adhering the labels straight to the lid.

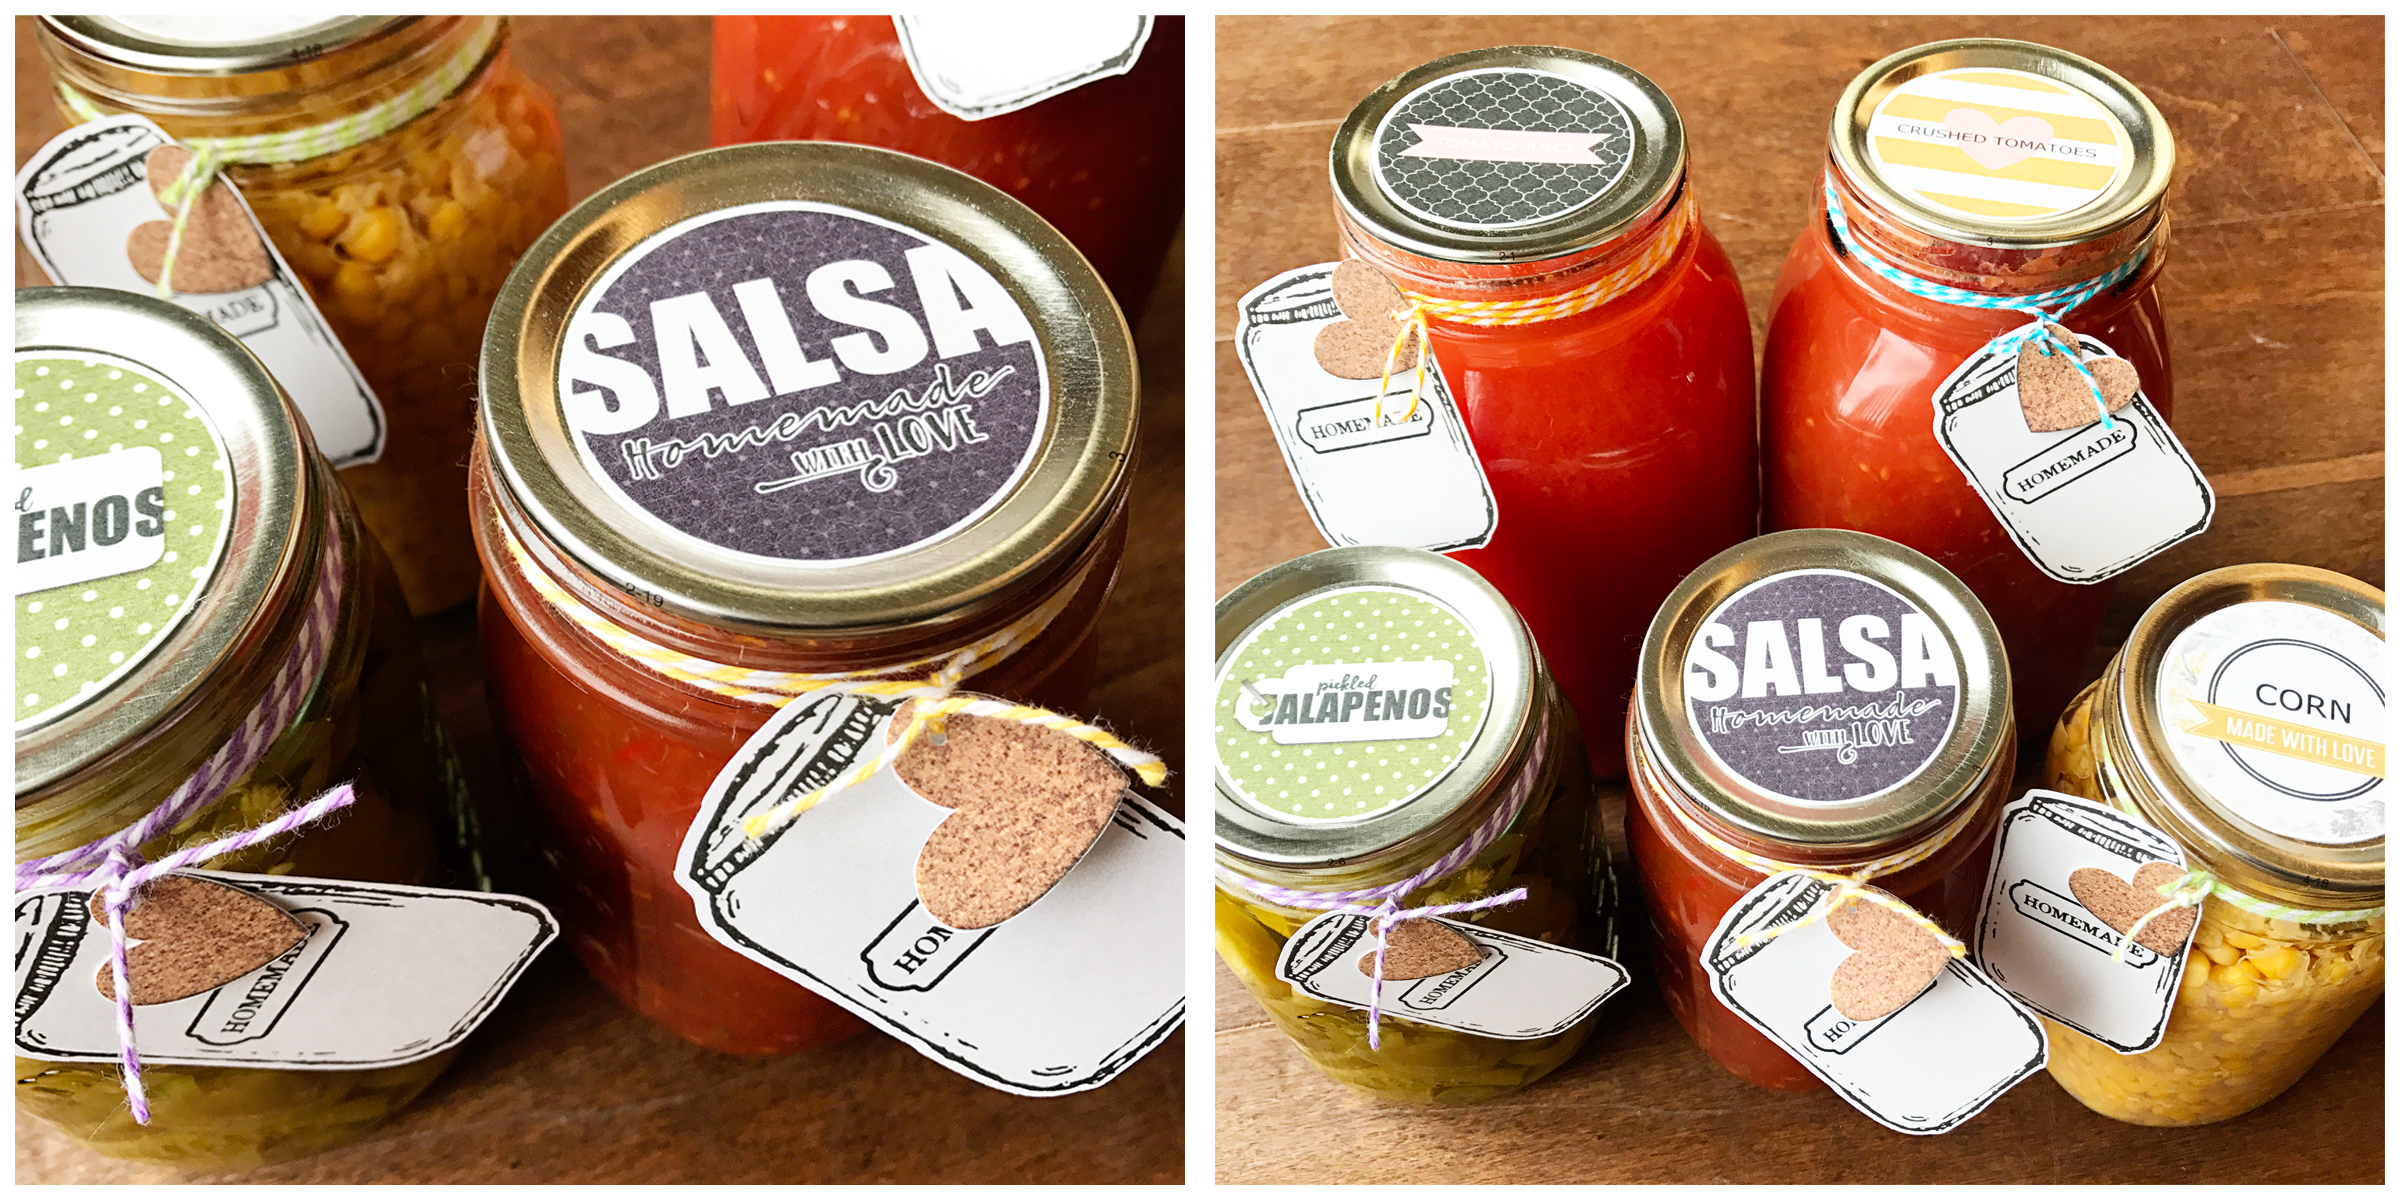
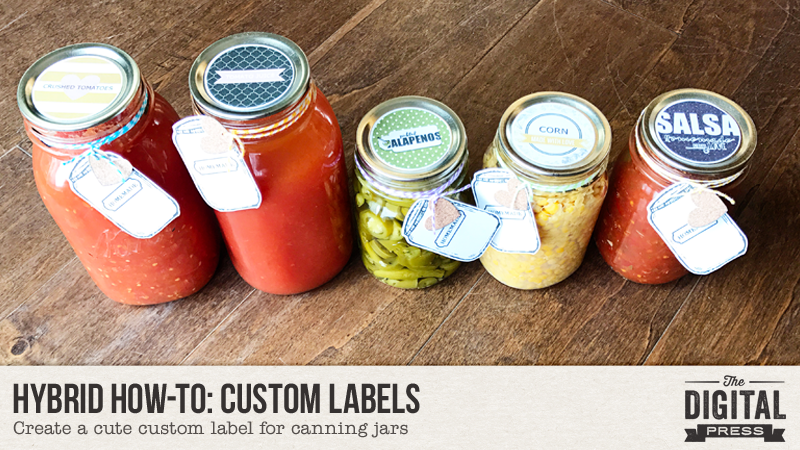
Here’s a look at a finished batch of my jars with labels…

Aren’t those cute? And so easy!

I hope you’ll give these a try! If you’re interested in earning points in The Digital Press’s challenge system (good toward earning everything from discounts to free kits!)… come to the forum and jump into this month’s hybrid challenge!


Kate About the Author  Kate is on the hybrid team here at The Digital Press. She lives on the Utah/Colorado border with her husband, 5 kids, 10 chickens, and a dog named Gracie. She’s a city-born girl who found she’s really a country girl at heart. She can be found outside, barefoot, and probably in her garden.

Foodie Friday | Dawn by Design

Happy Friday, all… and welcome to the most recent edition of Foodie Friday here on The Digital Press blog!

As you have likely already caught on throughout the month so far.. this is a new series based on the amazing response we had to the “Mess Hall” activities during TDP’s Summer Camp back in July. As such, every Friday throughout the rest of the year, we will be combining this fun feature with our weekly designer feature series — and having some fun in the kitchen! Every week you will get the chance to peak into the lives (and kitchens) of your favourite TDP designers and creative team members.

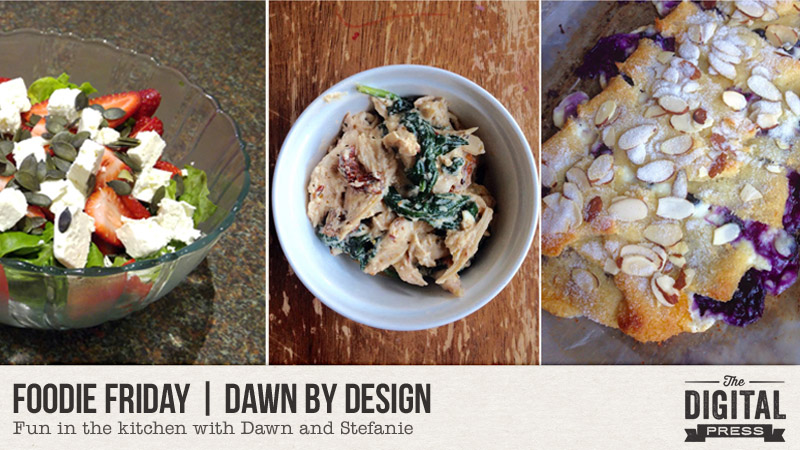
This week, I have joined forces with the always-fun Dawn of Dawn by Design — and we’re sharing two recipes from her kitchen and one from mine! My recipe is an easy salad (a recipe garnered from my oldest son’s fiancee)… and Dawn has added a scrumptious chicken pasta dish along with a blueberry cream cheesecake to finish everything off sweetly!
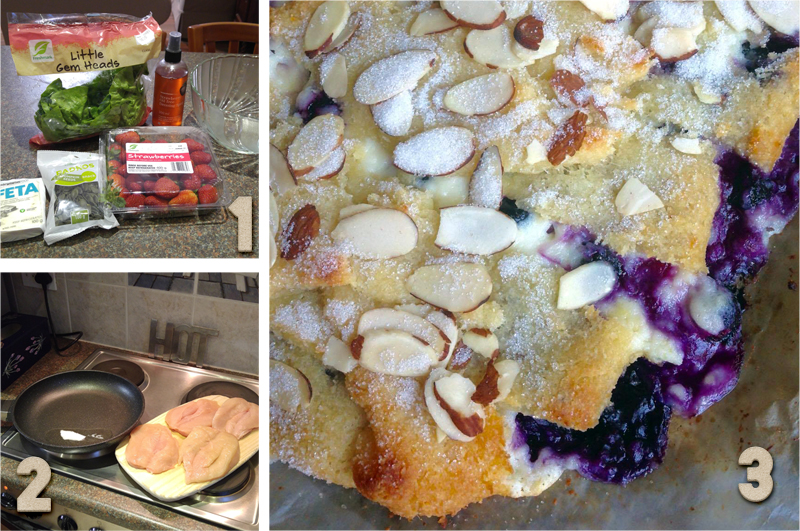
Food

So, what are these delicious things you see pictured above?

  • Strawberry and Feta Salad
  • Creamy Tuscan Garlic Chicken
  • Blueberry Cream Cheesecake

Strawberry and Feta Salad

INGREDIENTS NEEDED

—2-3 cups (250–400g) strawberries, washed and quartered
—1/2 tub (or 2 rounds) of feta cheese, drained and cubed
—1 small head of lettuce (cos, romaine, or rocket/arugula all work nicely)
—pumpkin seeds (optional)

INSTRUCTIONS

—Tear the washed lettuce into bite-sized pieces and layer into the salad bowl
—Add the strawberries and cubed feta cheese and sprinkle pumpkin seeds on top
—Add dressing of your choice. That’s it! I, myself, have served this with a strawberry-based vinaigrette (yum!)


Creamy Tuscan Garlic Chicken

INGREDIENTS NEEDED

—1 – 1/2 lbs boneless skinless chicken breasts (sliced into cutlets)
—2 tablespoons olive oil
—salt and pepper (to taste)
—1 cup heavy cream
—1/2 cup chicken broth
—1 teaspoon garlic powder
—1 teaspoon Italian seasoning
—1/2 cup parmesan cheese
—1 cup spinach, chopped
—1/2 cup sun-dried tomatoes

INSTRUCTIONS

—Season the chicken with salt and pepper, and then saute in a large skillet on medium-high heat for 3-5 minutes on each side (until browned and thoroughly cooked). Set chicken aside on a plate.
—Bring the heat down to medium. In the same skillet, whisk in the heavy cream, chicken broth, garlic powder, Italian seasoning, and parmesan cheese for a few minutes (until mixture thickens slightly).
—Add spinach and sun-dried tomatoes. Simmer for a minute or two, until spinach wilts. Return chicken to pan and flip a few times, so that it is thoroughly coated in sauce.

[recipe adapted from Cooking Panda]

Blueberry Cream Cheese Danish

INGREDIENTS NEEDED

DOUGH
—1/2 cup almond flour
—1/4 cup coconut flour
—1/4 cup confectioner’s (powdered) sugar
—6 ounces shredded part-skim mozzarella cheese
—5 tablespoons butter
—1 large egg

FILLING
—4 ounces cream cheese
—1/4 cup whipping cream (at room temperature)
—2 tablespoons white sugar (granulated)
—1 teaspoon lemon zest
—1 cup blueberries
TOPPING
—3 tablespoons sliced almonds
—1 tablespoon white sugar (granulated)

INSTRUCTIONS

DOUGH
—Preheat oven to 350F degrees and line a large baking mat with parchment paper or a silicone liner.
—In a medium bowl, combine almond flour, coconut flour, sugar, and baking powder. In a large saucepan, melt cheese and butter over low heat until it can be stirred together.
—Add egg and vanilla extract and stir to combine. Stir in almond flour mixture until dough comes together (keep heat on low). It will still have some large streaks of cheese. Turn out dough onto a silicone mat or directly onto a kitchen counter and knead until uniform (this only takes a little kneading).
—Cover with parchment paper and roll out to about a 14×8 inch rectangle. On the diagonal, cut 1 inch wide, 1 ½ inch long strips along both sides, leaving a solid rectangle of dough in the center.

FILLING
—In a medium bowl, beat together the cream cheese, cream, sugar, and lemon zest until well combined. Spread down the center of the dough, leaving about ½ inch all around. Sprinkle with blueberries.
—Fold the strips of dough over the filling so that the ends overlap. Pinch the dough at the ends to seal.

TOPPING
—Sprinkle with sliced almonds and granulated sugar and press gently to adhere.

Bake 20 to 25 minutes, until pastry is golden brown and firm to the touch. Remove and let cool completely, then slice into strips to serve. Serves 8 to 10.

[recipe adapted from Carolyn Ketchum]

We’re betting that you’re hungry just reading through these recipes, and that you can’t wait to try them out!

Well, if you’re up for a challenge… come to the forum and check out our Recipe Book challenge, which launched this month and is designed to help you create a quick-&-simple book of your favorite recipes — get this — in time to print it up and give it to friends and family members as a holiday gift later this year(!). Sound like fun? Come check it out HERE.

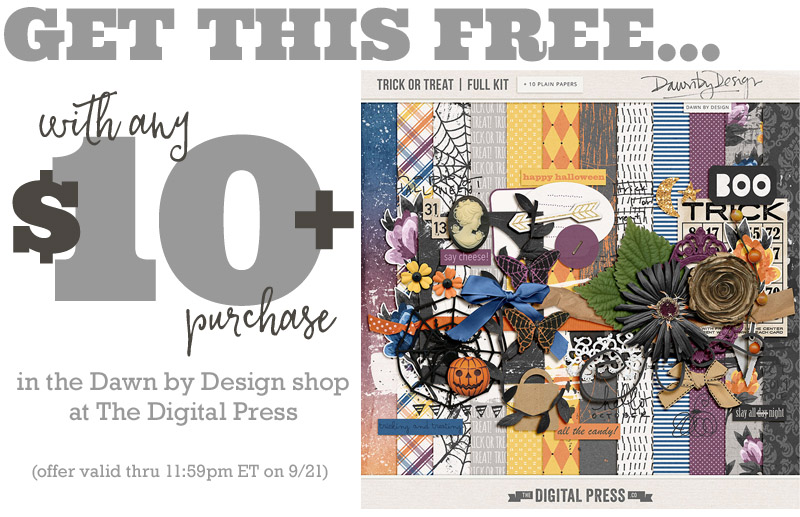
Meanwhile, it wouldn’t be a designer feature week without a fantastic sale and a special Free-with-Purchase offer… so you’ll be excited to see what Dawn of Dawn by Design has in store for you! Not only is her entire shop marked down 30% OFF throughout her entire feature week (sale prices will be valid through 11:59pm ET on Thurs 9/21)… but she also has this awesome deal in her shop all week long, as well! Spend $10+ in the Dawn by Design digital Scrapbooking shop, and get the following brand-new / just-released full kit, Trick or Treat, completely FREE!

Stefanie

About the author Stefanie is a member of The Digital Press creative team and a stay at home mother of three older children living in Cape Town, South Africa with her hubby of 29 years, two of their three children and 2 cats. She loves photography, travel and digital scrapbooking the good and the ordinary everyday.
Tutorial Tuesday | The “Little Planet” Effect

Hi everyone! I’m happy to present another edition of our Tutorial Tuesday series here on The Digital Press blog! This week, we will learn how to create a “little planet” with our pictures — also known as a “polar panorama.”

I’ll go through the process of doing this in Photoshop (PS), but there’s probably a similar procedure in other photo editing software programs, as well.

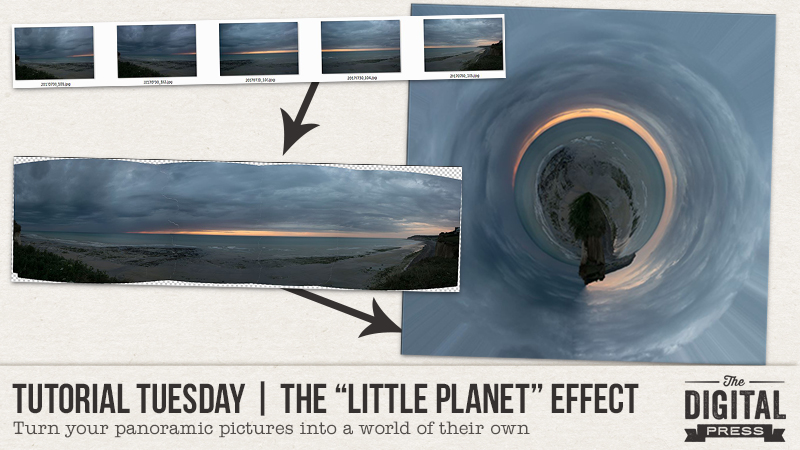
The first step is to create or find a panorama, ideally one that is 360 degrees. If you take the pictures yourself, try to stay constant in all your pictures — or in other words, stay at the same spot, use the same settings and same focal length (don’t zoom in or out), and stay level (have the horizon horizontal and about at the same place in your pictures). It’s easier to do with a tripod, but not mandatory. My example pictures, below, were taken in a handheld fashion.

Here are the images I used to create my panorama…

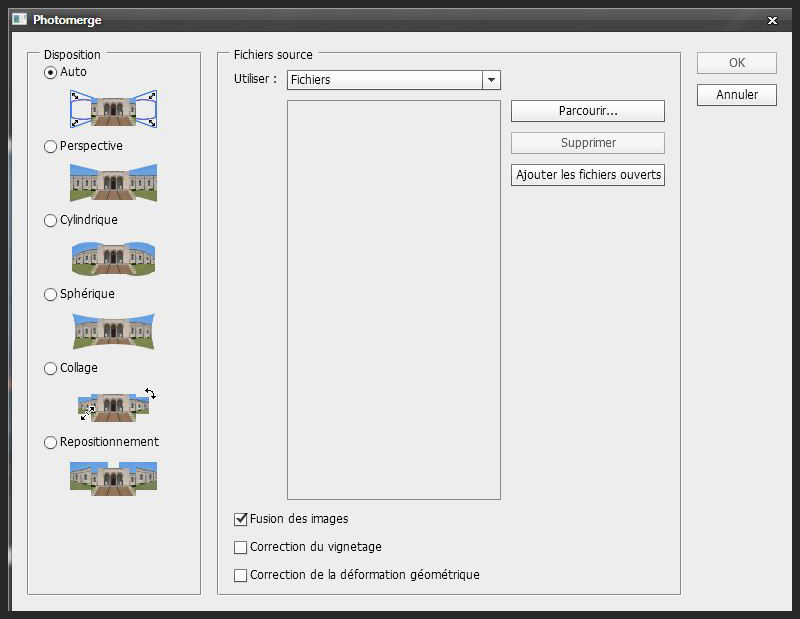
To create the panorama in Photoshop, try using the “photomerge” feature — which can do it automatically. This feature is located in File > Automate > Photomerge. You can either browse through your files, or use images that are already open. Here’s a look…

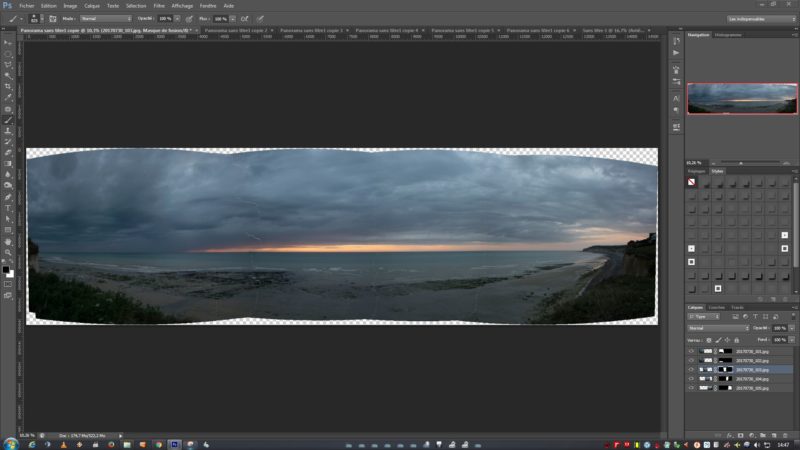
Here’s the result of the photomerge process for my example photos. As you can see, it’s pretty good as-is! I just had a little spot to correct (the water/sky line wasn’t properly aligned), but it was easy to do because each picture is on its own layer with masks (i.e. independent from the others).

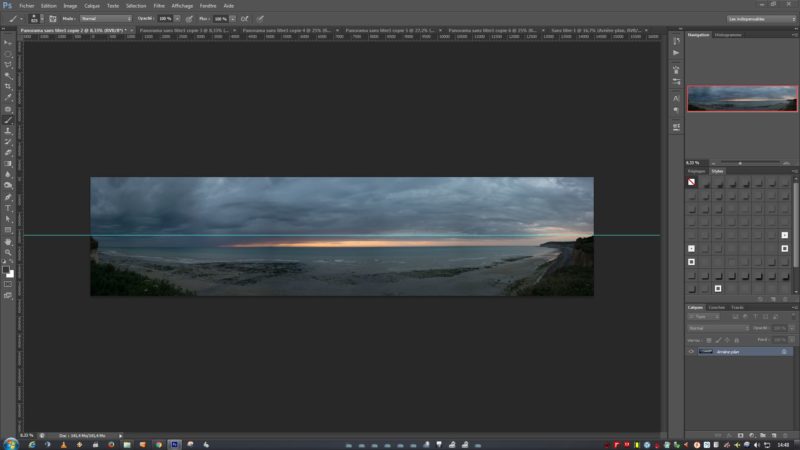
Next, I cropped the image to get a long rectangle. Because my photos were about 180 degrees and not a full 360 degree panorama, I made sure to try and align the left and right sides of the pictures. Those will get “connected” when we create the circle (below), so I wanted to make my job easier by making sure that the cliffs are cropped at about the same height…

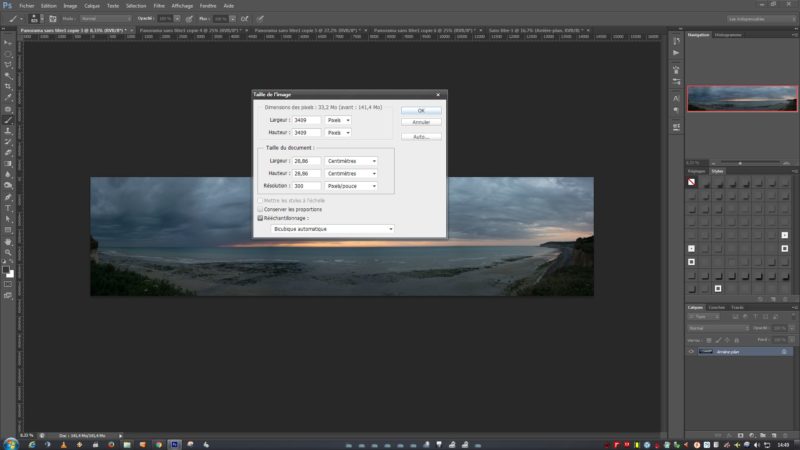
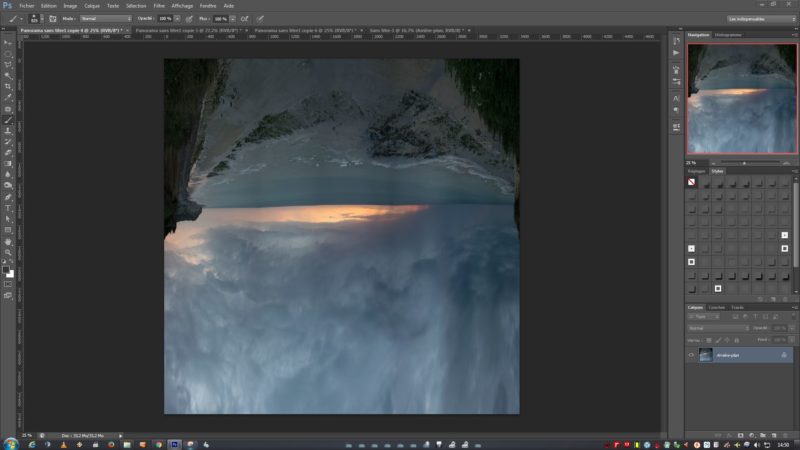
Now we finally start the real “little planet” effect. First, shrink the photo to create a square image. I know, I know, we should never distort an image… but this is actually a case in which you don’t want to respect the original proportions. Use the Image > Image size from the menu… or else use the Alt+Ctrl+I  keystroke function. Unlock the proportions, and then type the same number in the width as in the height.

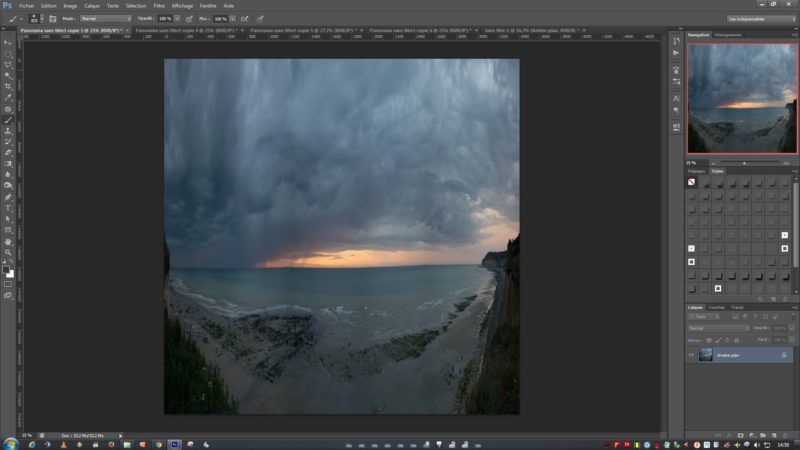
Here’s the result of that last step (it looks super weird right now, but it’ll get better, I promise!)…

Next, turn the image upside down by using Image > Rotate > 180 degrees (and now it looks even weirder)…

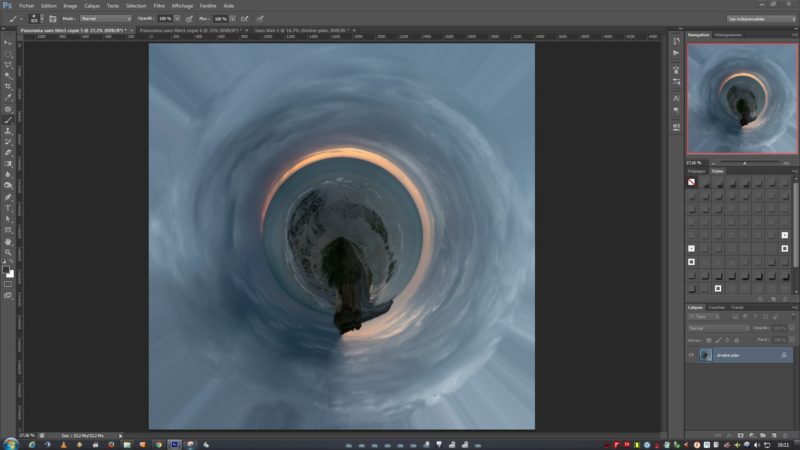
Next, you’ll create your “little planet” by using Filter > Distort > Polar Coordinates. Make sure the “Rectangle to Polar” box is checked, and then click OK.

And… tada(!), your little planet is born!

You can now edit the junction and blend the two sides of the image together. This is why I cropped a few pixels away to help match the sides, I just had to use the “patch” tool and it was easily done. I also chose to turn the photo upside down again (with the Rotate > 180 degrees tool) because it made more sense to me, but it’s optional.

And you’re done!

I think this special edit can produce really unique images, perfect to represent how your world revolves around someone, or how somewhere is the center of the world for you, etc.

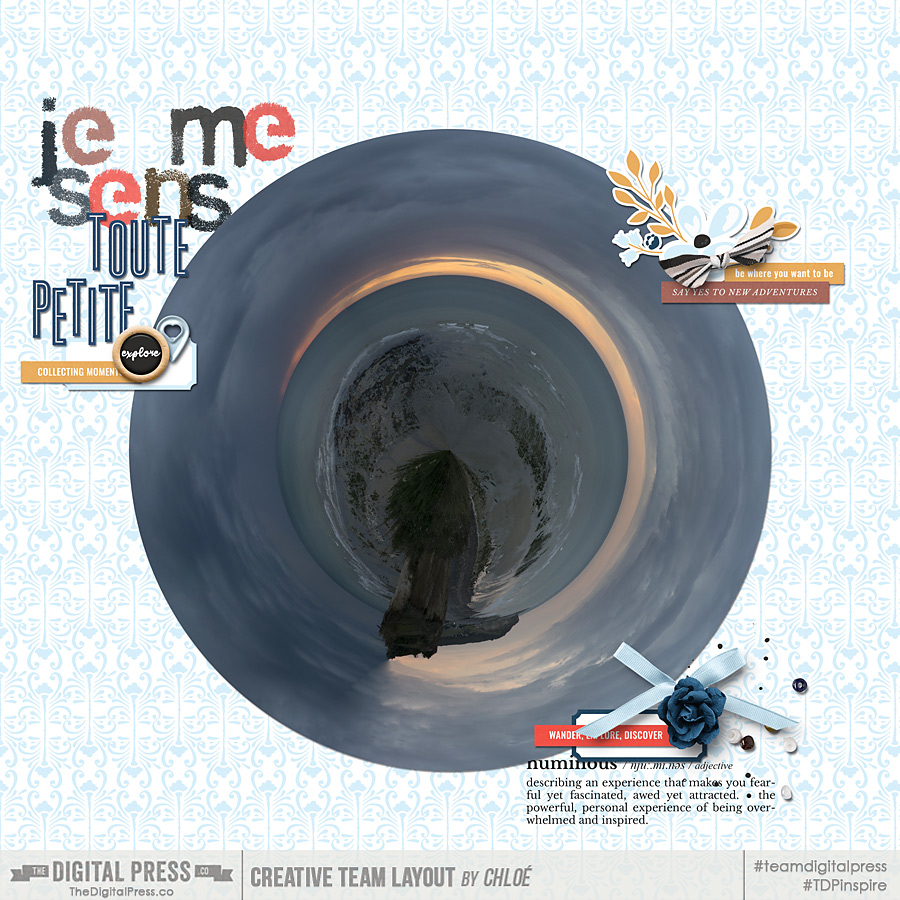
With my example. I wanted to scrap about how little I feel in front of the sea… how magnificient this view is(!)… etc. I used Jaunt by Sahin Designs and the Lanky and Stamped alphabets by Dawn by Designs to create the following scrapbook page…


I hope you’ll give this fun technique a try! You could also experiment with a person in the frame? I haven’t done it yet, but it’s on my photography “to-try” list. Don’t hesitate to ask any questions you have (in the comments, below), and I’ll do my best to help!


ChloéAbout the author  Chloé is in charge of PR and communication for her small town by day, is a digiscrapper “by night,” and a photographer whenever the light is beautiful. She lives with her man and fur-babies in a small town of Alsace (in the northeast of France), where she loves to read, watch good TV shows (TWD being her absolute favorite), and just hang out with her friends — no matter if they are close by, online, or away in her Swiss hometown. She recently became quite obsessed with Bullet Journaling, FLyLady and Zero Waste.

Foodie Friday | Sahin Designs

Happy Friday, everyone… and welcome to the second edition of Foodie Friday here on The Digital Press blog!

As you likely read last week — this is a new series that is based on the amazing response we had to our “Mess Hall” activities during TDP’s Summer Camp back in July (everyone loves food! haha). As such, each Friday for the rest of the year we’ll be combining our weekly designer features with some fun in the kitchen! Every week, you’ll get the chance to peek into the lives (and kitchens!) of your favorite TDP designers and creative team members.

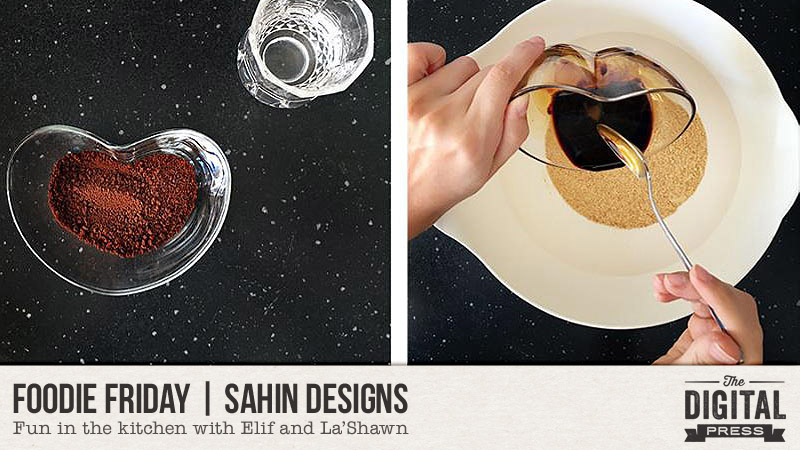
This week, we are featuring a few yummy recipes from the kitchen of both Elif Sahin of Sahin Designs and TDP creative team member La’Shawn (that’s me!). This is Elif’s third feature on The Digital Press blog (you can find her first feature article from July 2016 HERE, and her second feature from March 2017 HERE, if you want to learn even more about her).

Today, we have three delicious recipes for you: we will start with a easy main dish that will taste like you spent hours in the kitchen, and then we will end with a nice cold coffee drink and a sweet dessert. You wont be disappointed!

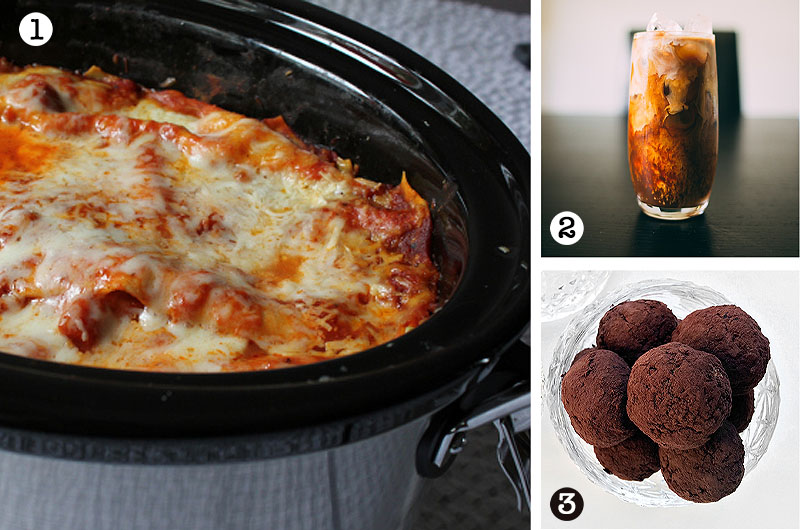
photo credits to [1] freerecipebox [2] TDP creative team member La’Shawn Castings [3] TDP designer Elif Sahin

So, what are these delicious things you see pictured above?

  • Crock Pot Lasagna
  • Homemade Iced Coffee
  • Tiramisu Truffles

Crock Pot Lasagna

INGREDIENTS NEEDED

—1 lb lean ground beef
—1 onion, chopped
—2 garlic cloves, smashed
—1 (28 ounce) can of tomato sauce
—1 (6 ounce) can of tomato paste
—1-1/2 tsp salt
—1 tsp dried oregano
—12 ounces cottage cheese
—1/2 cup grated parmesan cheese or 1/2 cup asiago cheese
—12 ounces lasagna noodles, uncooked
—16 ounces shredded mozzarella cheese

INSTRUCTIONS

—Brown the ground beef, onion, and garlic in a frying pan
—Add tomato sauce, tomato paste, salt and oregano
—Cook long enough to get it warm
—Spoon a layer of meat sauce onto the bottom of the slow cooker
—Add a double layer of uncooked lasagna noodles (break to fit) and top with cheeses
—Repeat with sauce, noodles and cheeses until all are used up
—Cover and cook on low for 4 to 5 hours

*Note* You can replace the hamburger meat with italian sausage or a mixture of both. I also mix half ricotta and cottage cheese. This recipe is so easy to make. It will taste like you spent 4 to 5 hours slaving over the stove and oven, instead of it cooking away in the slow cooker. My husband is not a pasta eater… but he loves and requests this often.


Homemade Iced Coffee

INGREDIENTS NEEDED

—1 pound ground coffee (good-quality rich roast)
—8 quarts cold water
—fine mesh strainer
—cheesecloth

INSTRUCTIONS

—In a large container (tea pitcher will work) mix the ground coffee with the water
—Cover and sit at room temperature for 8 hours (I let it sit overnight)
—Line a fine mesh strainer with cheesecloth (you can use coffee filters, but I find the cheesecloth works best)
—Pour the coffee and water mixture through the strainer & allow all the liquid to run through (it can take some time)
—Discard the grounds
—Place the coffee in the fridge to cool
—Add your favorite dairy/sweetener
—Pour over ice; drink and enjoy!


Tiramisu Truffles

INGREDIENTS NEEDED

—200gr ladyfingers
—200gr labneh cheese
—2 table spoon powdered sugar
—5gr powdered vanilla
—3 desert spoons of granule coffee
—5 table spoon hot water
—Cocoa powder and/or ground pistachio

INSTRUCTIONS

—Crush the ladyfingers into fine crumbs with blender
—Mix labneh cheese with powdered sugar and vanilla in a bowl
—Dissolve coffee in hot water
—Mix it well with crushed ladyfingers until you have homogeneous mix
—Let both mixes cool in the fridge for 10 minutes
—Mix together labneh and ladyfinger mixes together
—Make small balls from this paste
—Roll the balls in cocoa or pistachio to serve


We’re betting that you’re hungry just reading through these recipes, and that you can’t wait to try them out!

Well, if you’re up for a challenge… come to the forum and check out our Recipe Book challenge, which launched this month and is designed to help you create a quick-&-simple book of your favorite recipes — get this — in time to print it up and give it to friends and family members as a holiday gift later this year (!). Sound like fun? Come check it out HERE.

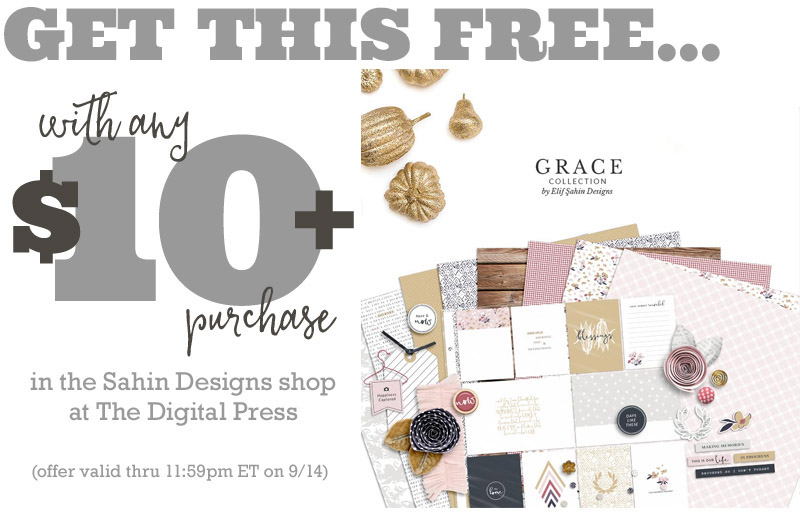
Meanwhile, it wouldn’t be a designer feature week without a fantastic sale and a special Free-with-Purchase offer… so you’ll be excited to see what Elif of Sahin Designs has in store for you! Not only is her entire shop marked down 30% OFF throughout her entire feature week (sale prices will be valid through 11:59pm ET on Thurs 9/14)… but she also has this awesome deal in her shop all week long, as well! Spend $10+ in the Sahin Designs shop at The Digital Press, and get her full “Grace” Collection completely FREE!


IMG_20160814_144851_e

About the Author  La’Shawn Castings is a creative team member here at The Digital Press. She is a 30-something, full-time working, nerdy, somewhat lazy, digi-scrapping, photo taking, college football loving, panda obsessed, yellow wearing, Harry Potter nerding, Doctor Who watching, historical fiction reading, southern wife & mom.

Tutorial Tuesday | Creating a Cut-Out

Hello, and welcome to another edition of our Tutorial Tuesday series on The Digital Press blog!

I have recently been playing with cut-out shapes on my digital pages, and I’ve really been enjoying the new layer of depth it can add to the pages. There are two different ways to create a “cut-out” look… and I will talk you through them each today!

For the purposes of this tutorial, I am using Photoshop CS5.1 — but the process should be similar for many other versions of Photoshop, as well.

METHOD #1

The first method works if you already have a journal card or shape on your page that you want to make appear as though it’s been cut out. For example, I used a template from Sahin Designs that uses a lot of circles (see below), and I wanted to make some of them appear to be cut out, rather than having all of them layered on top of the background paper.

So, looking at the top-left circle, I (a) clipped my paper to the circle, and then (b) with the circle layer (NOT my clipped paper layer) selected, I used the “Inner Shadow” (rather than the “Drop Shadow”) from the shadow menu. You can find this option by going to your menu and selecting LAYER –> LAYER STYLE –> INNER SHADOW.

After you’ve changed the shadow to an “Inner Shadow,” all you have to do is adjust the depth, angle, and size of the shadow as you wish.

*NOTE* If your shape already has a shadow applied, like this particular circle on my template did, then you will need to de-select that shadow style before you select the new inner shadow. I am sure you knew that already, but it is possible I forgot to do that once or twice, and ended up with something that looked a little odd!

Then I repeated that same shadow style on a few other circles (one on each row), and here is the end result… 🙂

METHOD #2

The second method will actually cut a hole out of your backgound paper, but it is also very simple to do.

Here are a couple of screenshots of my process, along with the steps I used listed along the right-hand side…


tut4

See how easy? And it’s such a fun effect, that adds some variation to a digital page!

I hope you will find these easy tips to follow, and that you will have fun creating cut outs on your pages too!


CorrinAbout the Author  Corrin is a member of the creative team here at The Digital Press. She is a fan of the Big Bang Theory and a lover of cozy pajamas. She lives in the breezy South of England with her husband and 4 crazy kids, who regularly discover & plunder her secret chocolate stashes! She is still trying to get the house straight after moving 3 years ago. Who knows… maybe this will be the year she reaches the bottom of the laundry pile!
Hybrid How-To | Back To School Bookmarks

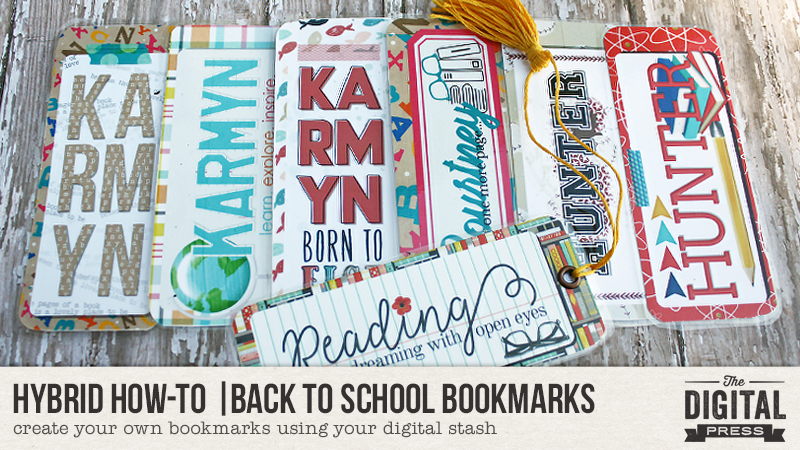
Hello everyone! It’s Tanya here, and I’m excited to share another Hybrid How-To post here on The Digital Press blog! Our team took the month of August off from blogging during TDP’s bi-annual Pennysaver event, so it’s been a while since I’ve posted… but can you believe that it’s Back To School time already? And what better time to show you how make these super cute bookmarks using your digital stash… 🙂

When planning out this project, I originally started with digital kits that have a “book” theme. Once I got started, though, I began to think… why not do something more personal for the person I am making them for?” My kids are grown, so I always tend to make things for my friends’ kids — and as you can see, below, Karmyn loves fishing and Hunter loves baseball! So I added those themes into the mix of products I was choosing, as well.

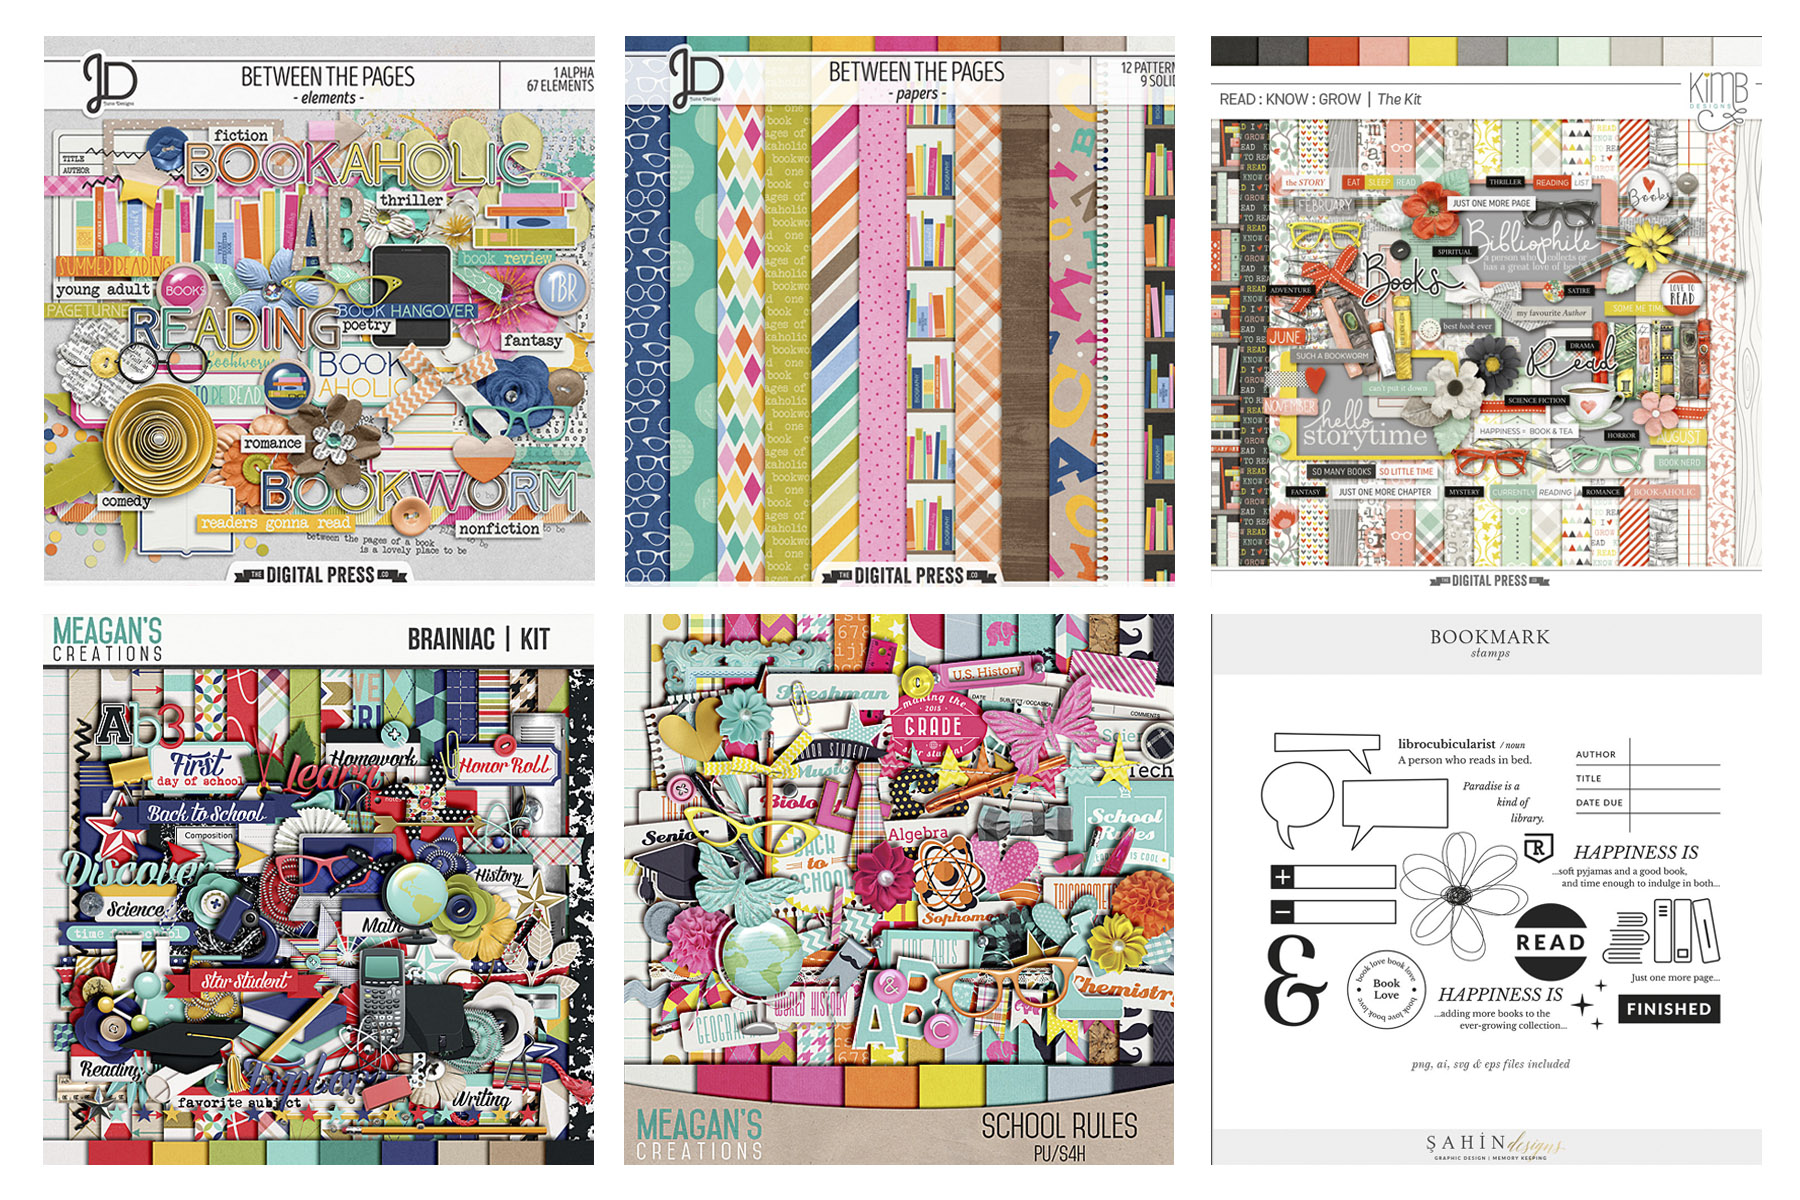
In the end, I used the following digital kits from The Digital Press to create my bookmarks:

OTHER SUPPLIES NEEDED:

  • Card stock
  • Printer
  • Corner punch
  • Scissors
  • Paper trimmer

I used Silhouette Studio to create my bookmarks, but you can use any photo editing program.  I find that Silhouette Studio is pretty simple to use, and you can do almost anything in it that you can do in other photo editing software (I haven’t fully figured the shadowing out quite yet… still working on it!).

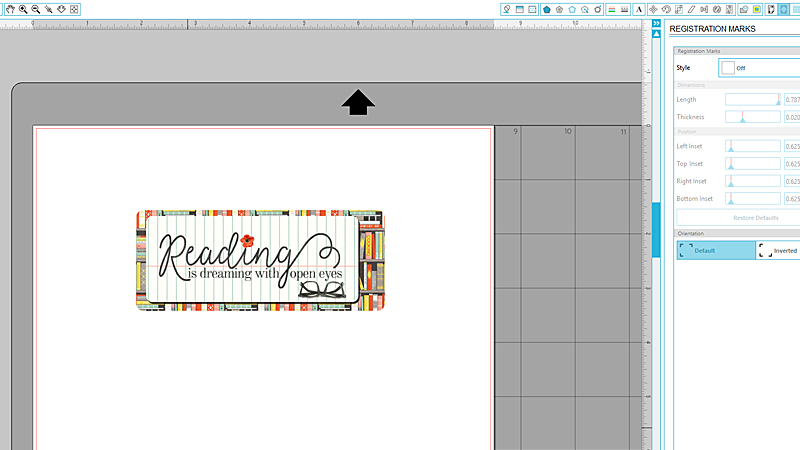
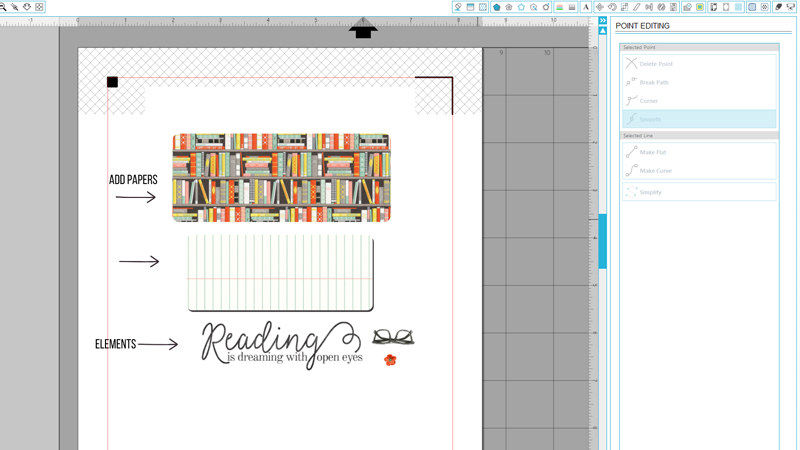
The first thing that I did was to draw out two rounded rectangles using the drawing tool. One is 4.5″ x 2″ and the smaller one is 4″ x 1.6″.  Then, I added papers and elements that I wanted to use for each bookmark…

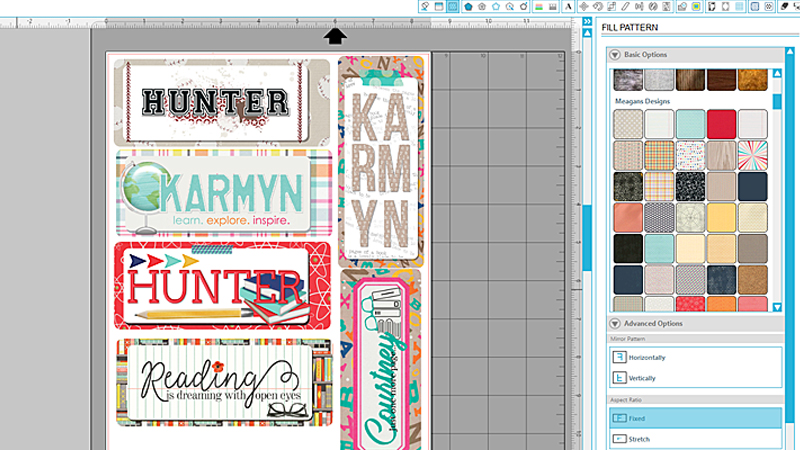
Next, I moved my layers on top of each other and arranged the elements, as shown below…

At that point, I actually decided that it would be just as easy (if not easier?) to simply cut these with a paper trimmer instead of doing a print and cut… mainly because the shapes are so simple. Thus, I turned off the registration marks in the Silhouette software so that I could fit more bookmarks to a page…

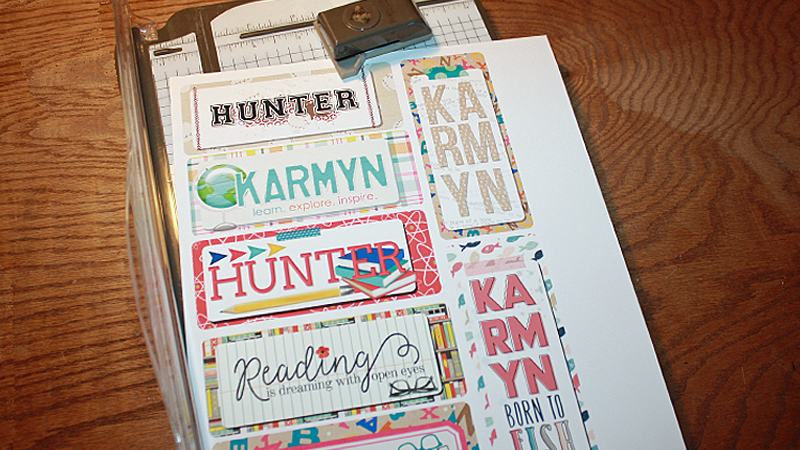
Once everything was printed, I used my paper trimmer to cut out the bookmarks, as described above (instead of doing a print-and-cut with the cutting machine)…

*NOTE* If you do not have a paper trimmer, you can simply use scissors and then use a corner punch to create the rounded corners.

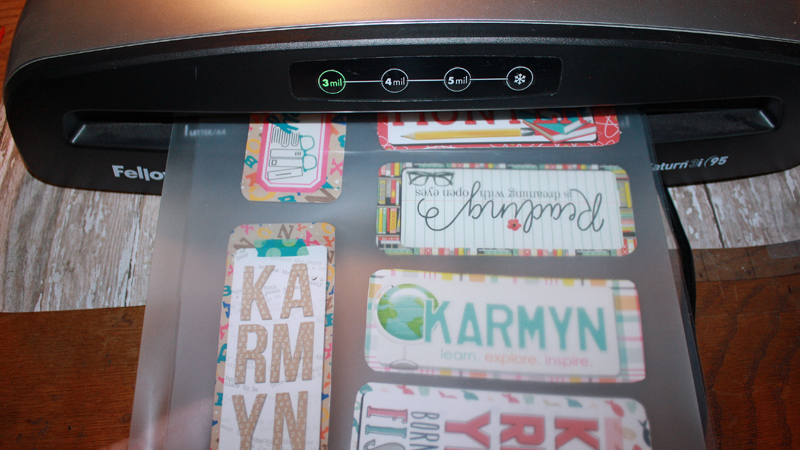
I  decided to laminate the bookmarks that I made, but it’s not a must. I have a laminating machine, so why not use it, right? 🙂 I figured that the bookmarks will probably last longer this way…

*NOTE* If you make bookmarks for the kids in your child’s classroom, many schools usually have a laminating machine and you can probably have them laminated that way.

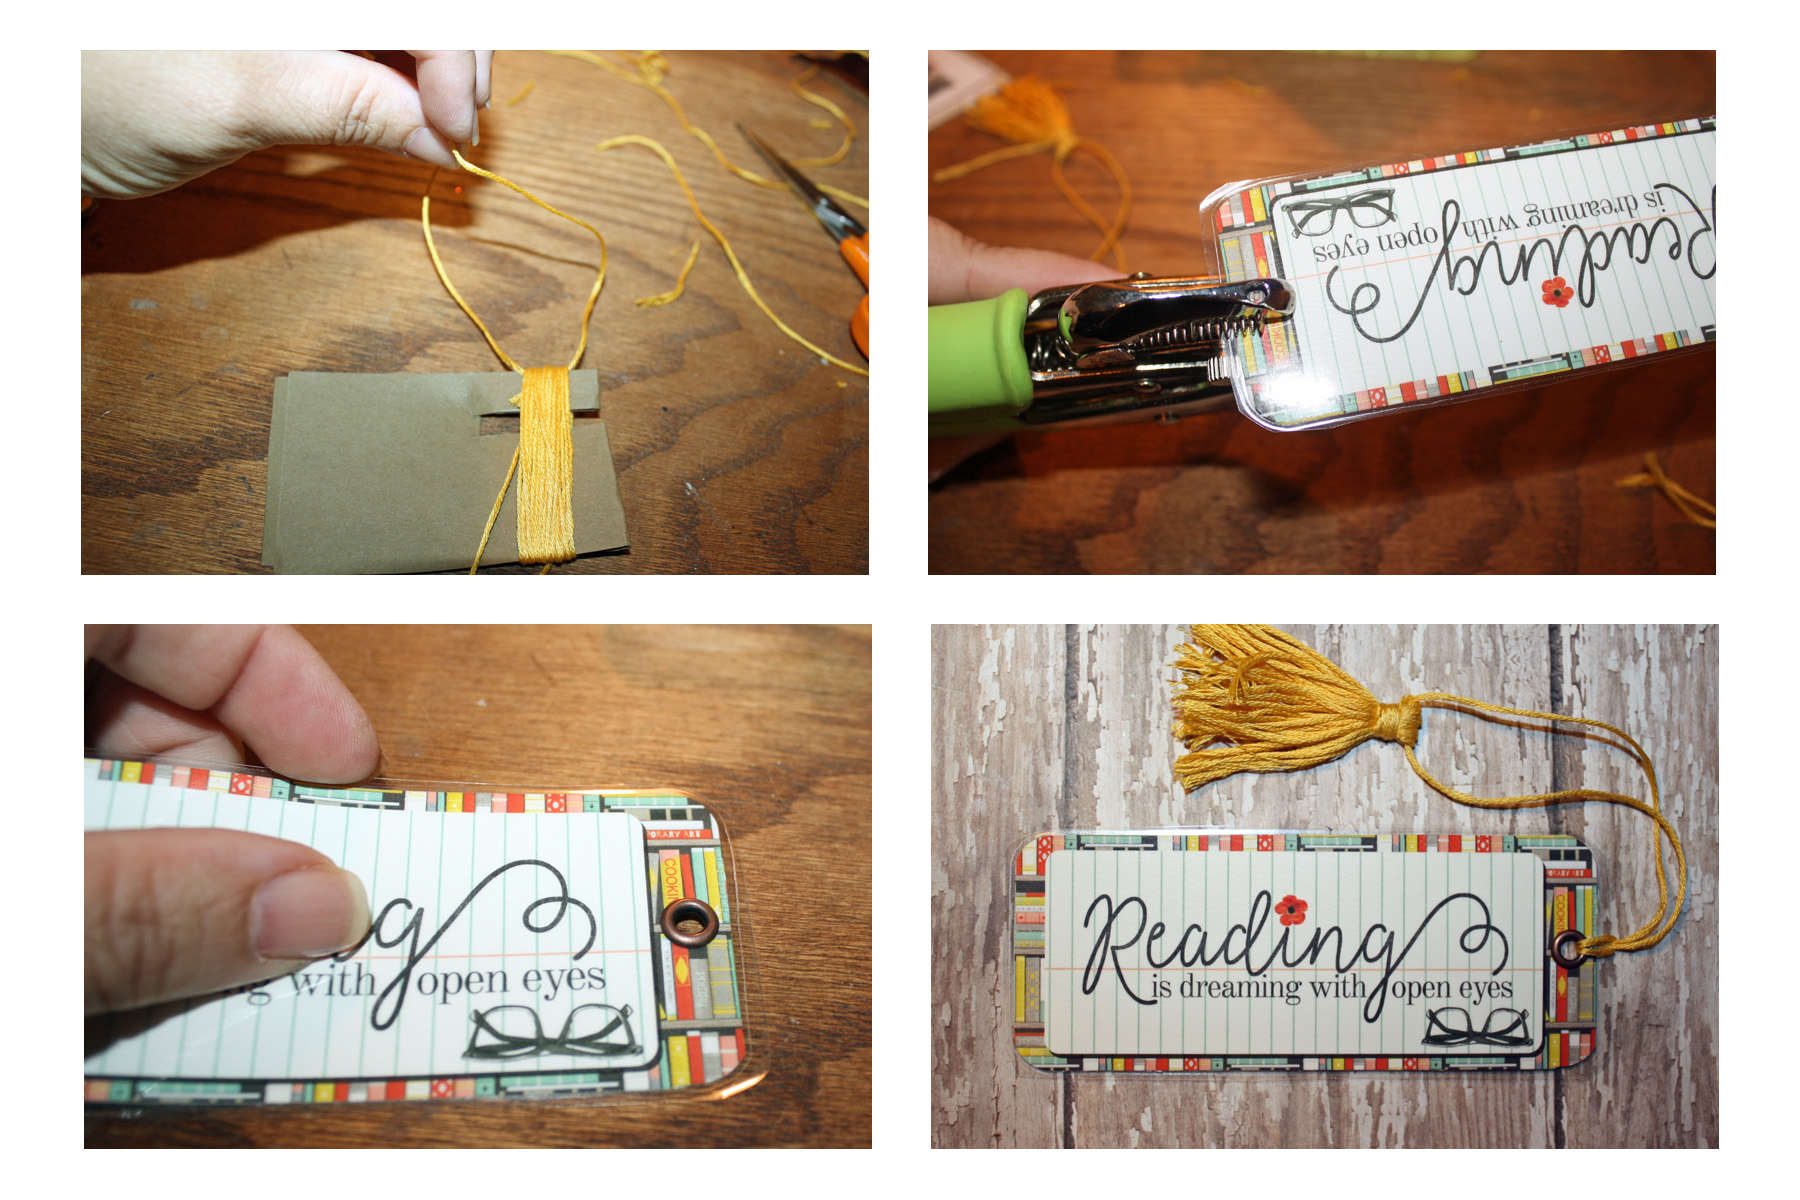
The following images show some of the features I added to my bookmarks. First, I made a tassel to go on one of them, using yellow floss. Oh… and while I was going through tons of craft supplies I have stashed everywhere, I found my crop-a-dile tool! The crop-a-dile is so much fun! You use it to punch a hole and add an eyelet, and then you use the tool to crimp it down. It gives your project a polished look. This particular bookmark is for a friend, so I thought it would be a nice touch; however, if you make them for younger kids, I probably wouldn’t do this.

Here’s a look at that finished bookmark, in use…
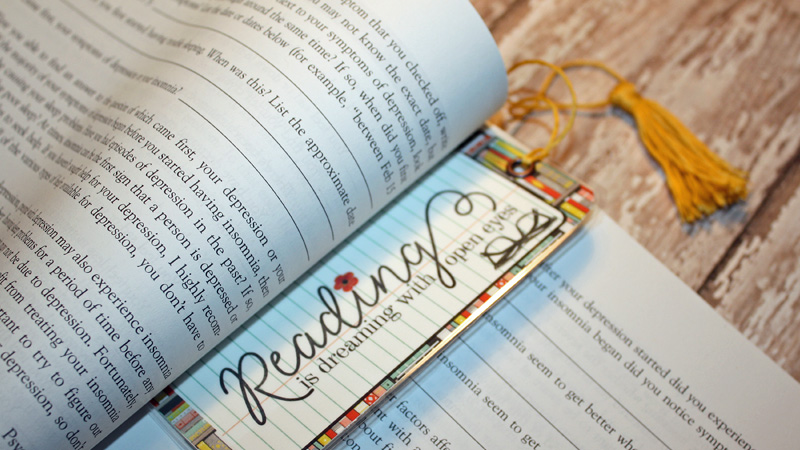
Can you believe the only book I could find to photograph the bookmark with is a book about insomnia? I haven’t read it yet, but I desperately need to!

I hope that you have enjoyed this edition of Hybrid How-To, and that you will give this a try and come up with some of your own bookmarks. Don’t forget to visit the CROSSWORD SECTION in The Digital Press forum, and jump into this month’s Hybrid Challenge if you are thinking of trying this project. You can earn points toward discounts & FREEBIES! I hope that you will join in!


Tanya

About the Author  Tanya is a part of the hybrid team here at The Digital Press. She has been hybrid crafting for at least 14 years now, and loves creating and sharing those creations with others. Her all-time favorite tool is her Silhouette Cameo. She has been married for 28 years to her high school sweetheart, Richard and has two sons: Chris, 25 and Chance, 20. She also enjoys crocheting, photography and woodworking.