Author: The Digital Press

Feature Friday | Juno Designs

Hey there! It’s Friday and I am super excited to bring you a new Featured Designer… Juno Designs!

I asked the designer behind Juno Designs, Jill, to talk to me about herself and her designs, and here is what she had to say about her work…

“My designs have a realistic paper style. I also create products that are suitable for both digital and hybrid scrapbooking (especially pocket scrapping). I love creating large collections that include a variety of products. And my color palettes are usually quite bold and bright.”

Here are some of my favorite products created by Juno Designs…


I asked Jill to answer a few questions so we could get to know her better…

Where do you live?
I live in Geleen, the Netherlands

When you’re not designing, what do you do with your time?
When I’m not designing, I like to go hiking and geocaching, play video games (my current obsession is Fallout 4), binge-watch TV shows on Netflix (Stranger Things, Orange is the New Black, Fargo, Gilmore Girls, Sherlock, Orphan Black), and read.

What are 5 tidbits of trivia we might not know about you?
—I have 2 pet rabbits named Abby and Ozzy
—I studied History and Psychology at University
—Besides digiscrapping, I also like to paper scrap (especially pocket-style pages)
—I love to buy books, but don’t read nearly enough to keep up with my book-collecting obsession LOL
—I love yoga and try to practice at least 5 times a week

Which of your products is your favorite?
I love all of my My Zodiac collabs with Amanda Yi… but if I had to pick just one favorite, it would have to be My Zodiac | Gemini. I love the colors we used, combined with the gold elements…


Here is a sampling of layouts using Juno Designs’ products…


I am so glad to have had the opportunity to help you get to know Jill of Juno Designs a little better today! She is a wonderful designer (and person). If you haven’t had a chance to take a look at her shop here at The Digital Press, you will definitely want to check it out this week, as there will be a 30% OFF SALE IN HER SHOP all week long (sale will end at 11:59pm ET on 9/15)!


Krista


About the Author  Krista Lund is a mom of 3, married to her high school sweetheart and living in the San Francisco Bay Area. Some of her favorite things are brownies, chips ‘n’ dip, taking pictures, and documenting her family’s story.

Tutorial Tuesday | PART 2: Use Products from TDP to Scrap on Your Phone


A few weeks ago, we showed you how to use products from The Digital Press on your mobile device (using the Project Life app) to make quick and easy Pocket Pages on your phone using your own digital stash. If you missed that post, be sure to check it out HERE; it’s full of a ton of great tips to get you started with mobile scrapping, and we promise you will not regret it!

Today, we’re here to share PART 2 of this 3-part series… and show you how to add journaling and/or other text to any journal cards you import into the app from your own digital stash (again, that part is covered in PART 1 — and now we’ll cover the addition of text here in PART 2).


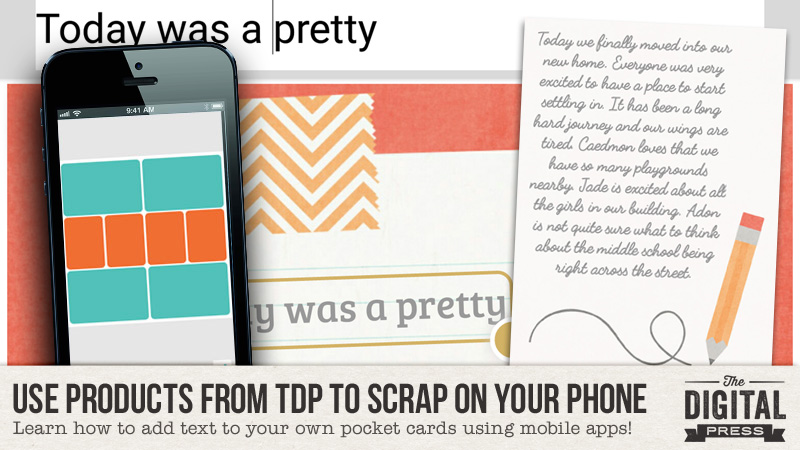
PART 2 — ADDING TEXT TO A JOURNAL CARD ON YOUR MOBILE DEVICE

If you already read PART 1 of this tutorial series, you know that the Project Life app allows you to journal directly onto the cards that come pre-installed in the app itself (and/or the cards that are purchased as in-app purchases)… but when we import cards from our own digital stash, the app treats those cards the same as “photos” and does not provide the options to add text. In order to add journaling to our own imported cards, we need to add the text to the card in a separate app before importing that card into our layout within the app.

There are a number of different apps out there that allow you to add text to images (just do a search in your app store for “adding text to photos”)… but there is no way we can cover all of them in this article, so today we will highlight just a few of our favorites and give you a step-by-step snapshot of how we do it.

Textgram App

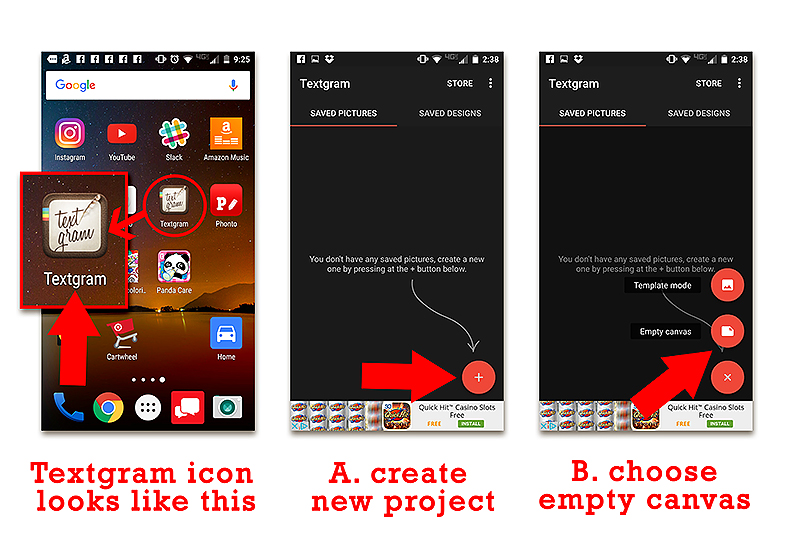
Erin uses Textgram, which is a free app that anyone can use. If you check out PART 1 of our series, you’ll see that she added journaling to her card for the layout she created in that post. The Textgram app is simple to the point of being somewhat limited in terms of design choices… but it’s definitely adequate for most things, and fairly straightforward to use. Below, she walks us through her process.

  1. To begin using Textgram, open the app, start a new project using the red plus sign button on the bottom right, and choose the empty canvas option…
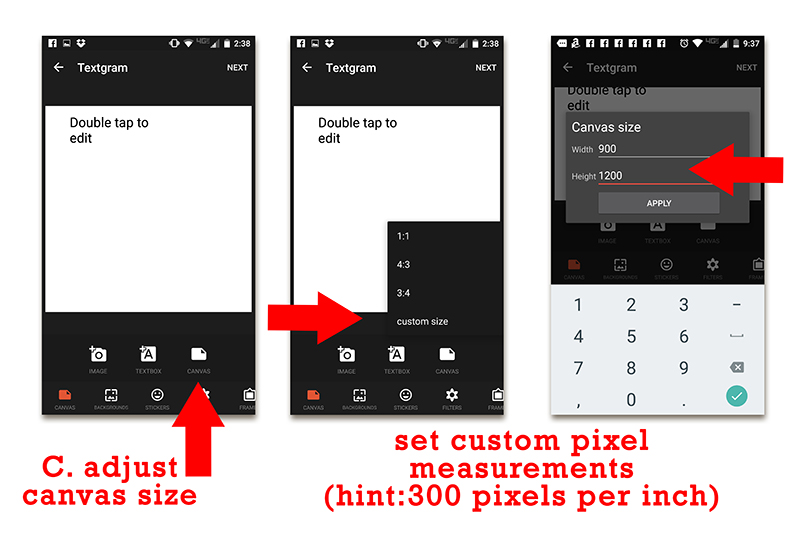
  2. Select your canvas size. You can choose pre-set sizes, or build a custom size using pixels. I have found that the presets are actually bigger than my journal cards, so I prefer to use the custom size option and build my canvas in the exact measurements. **NOTE** Most 3×4 pocket cards (without bleed) are going to be 900px x 1200px… 4×3 cards are 1200px x 900px… 6×4 cards are generally 1800px x 1200px, and 4×6 will be 1200px x 1800px.  
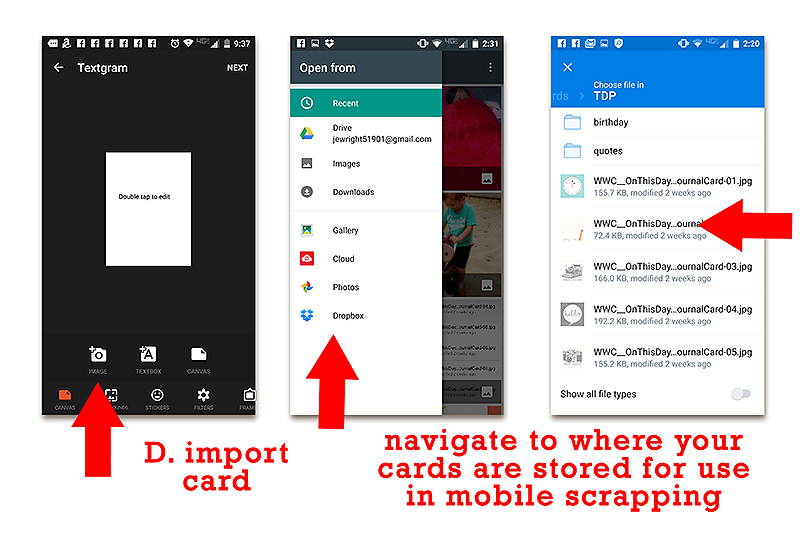
  3. Now you can add your card by selecting the +image button. Choose the folder where your cards are stored (in my case, it’s Dropbox), and select a card.  
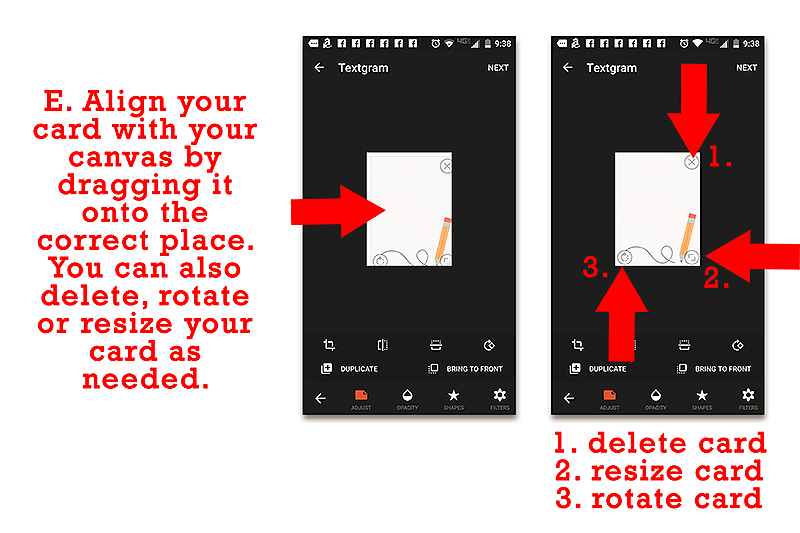
  4. Once your card is on your canvas you can move it around and adjust it as needed. 
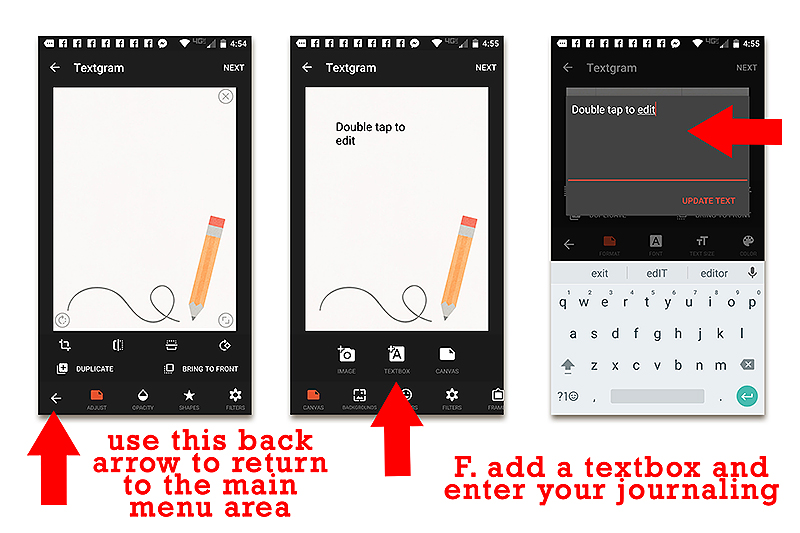
  5. Next, you will have to navigate back to the main menu area by using the back arrow. Once there, you can add a text box to your card with the +textbox button. Double-tap to add your journaling.
  6. Once you have added all of your desired text, drag the resize corner out to fit the text area of your card. You can format your text as needed. There are options for choosing a font, font size, color, and even for adjusting your character spacing and paragraph alignment. **NOTE** I suggest choosing your font first, as this can change the size and spacing of your text dramatically. The sliders for font size and character spacing are a bit difficult to control and you don’t want to have to keep adjusting them.  
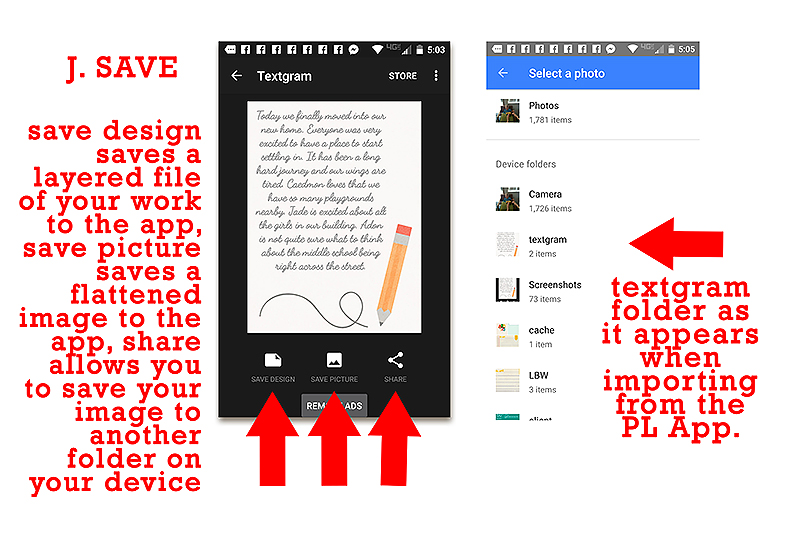
  7. When you have your text the way you want it, hit “next” at the top of your screen and save your card. If you would like to keep a layered project in case you need to make further adjustments later, you will also need to save the design. Both of these options save your work to the textgram app itself. If you want to export your work to another folder (for example, to Dropbox), you will need to use the share button. This is not necessary, however, if you are using your newly-finished card in the Project Life app, because a Textgram folder should appear within your gallery files, and you will be able to access it from the Project Life app pretty easily.  
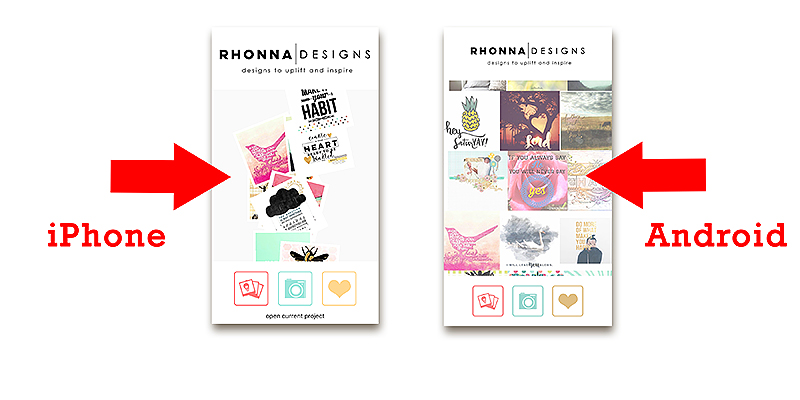
Rhonna Designs App

Jen typically uses the Rhonna Designs app to add text to her journal cards from her phone. You have to pay for this app, but if you are really interested in scrapping on your phone… it is a pretty good investment, as it has a lot of great options for enhancing your photos, adding text, adding stickers and stamps to your cards, and even creating your own cards.  It is also pretty intuitive and easy to use… which is always a plus, right?

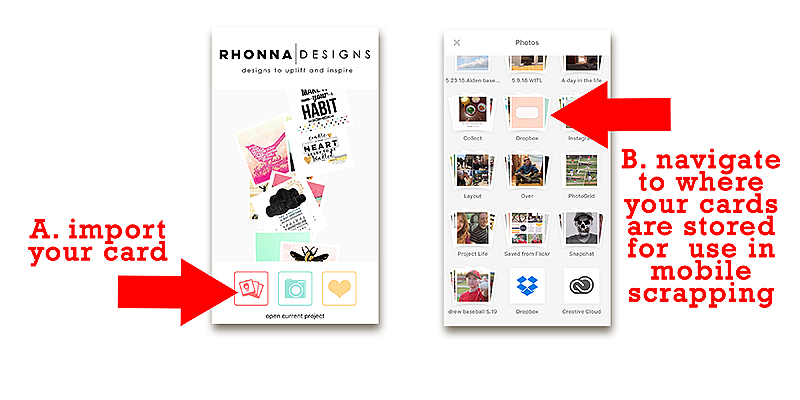
    1. The process for adding text in the Rhonna Designs app is pretty similar to that of Textgram, which we just covered. You will start by importing your card.
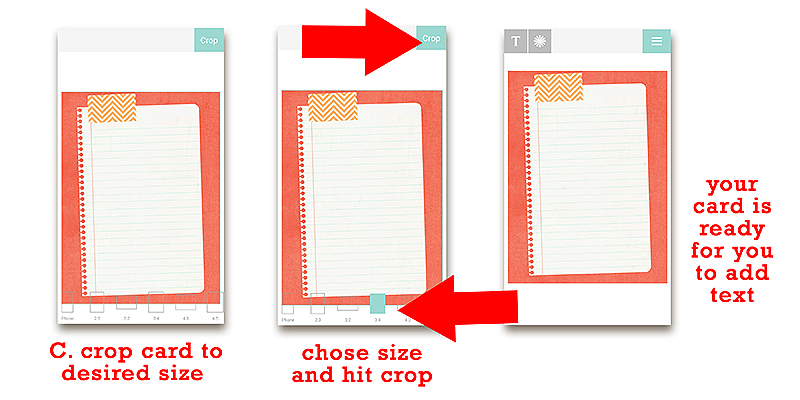
    2. Because the Rhonna App is designed with pocket cards in mind, it provides you with a good selection of preset sizes. Choose the correct size for your card (in this case 3:4), and hit “crop”.
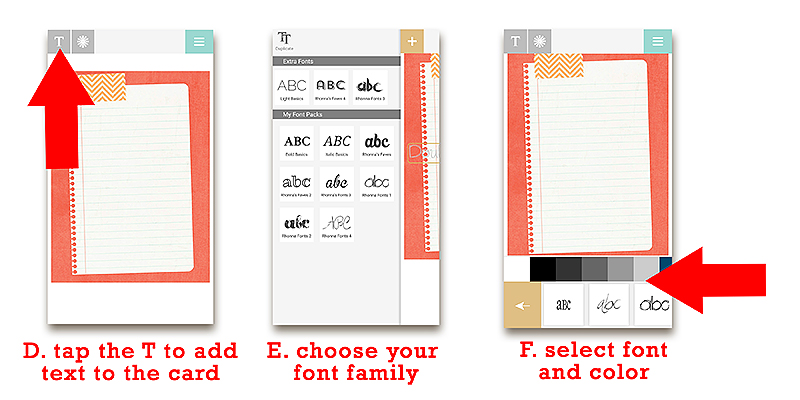
    3. Now, there are a lot of things you can do with this app, so feel free to play around… but for our purpose of adding text, you will select the “T” in the upper left corner, which will pull up your font choices. Some are free on the app, and others you will have to purchase. Each little icon is actually a set of fonts, so you chose a font set and it will pull those fonts up for you to scroll through.
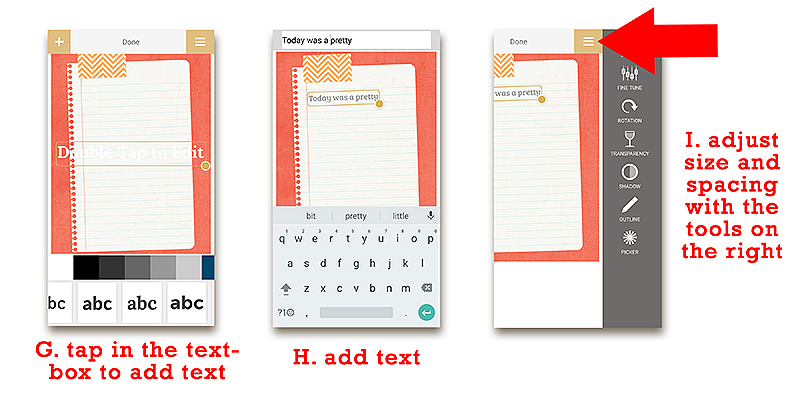
    4. When you chose a font, your text box will pop up and you can start adding the text. You can switch the font and color using the panel at the bottom. The tools for adjusting spacing, tilt, and a multitude of other aspects are found by tapping the triple line icon on the top right.
    5. Once you have your text just the way you want it, tap on DONE at the top of your screen and you will return to the main screen where you can save or share your work. Just like Textgram, the Rhonna Designs app creates a folder in your gallery where your projects are stored, and these are easily found within the Project Life app, as well.


And that’s it! …just a quick look at a couple of simple apps out there that will enable you to add text and journaling to your own pocket cards from your mobile device. Now, with the combined information from PART 1 and this new PART 2 post… you should be able to create an entire pocket-style page, complete with journaling, on your mobile device! How exciting is that?! 🙂

And don’t forget, we will have one more installment in this 3-part series coming in just a couple of weeks (late-September), in which we will show you how to use what you create in the App to make a non-pocket style page. Stay tuned!

Enjoy, and happy scrapping!


Laura Passage

About the Authors

Laura Passage is the owner of The Digital Press, and also the designer behind Wishing Well Creations by Laura Passage (WWC). She works now as a graphic designer in both the digital and paper scrapbooking industries, but previously spent over a decade working as a college soccer coach. She lives in the Pacific Northwest with her husband and two young sons (affectionately referred to as The Tiny Terrorists), and will rationalize eating coffee ice cream for breakfast to anyone who questions it.

Erin


Erin is a work from home mom of three now living in Oregon. She loves playing with her kids and anything artsy. She can often be found knee deep in toys with paint on her face. She is slowly learning the meaning of living an authentic life, and enjoying every minute of the adventure.


Jennifer Hignite

Jennifer Hignite is a mom of three boys and new homeowner with her fiance in the mitten state of Michigan. When she is not scrapbooking, she enjoys photography, decorating, and shopping at Target.

Hybrid How-To | Chipboard Elements

Supplies

  • Digital kit of your choice. I used the Jaunt Collection (papers, elements) by Sahin Designs.
  • Photo editing software (I’m using PSE)
  • Printable sticker paper
  • Chipboard (old cereal boxes work!)
  • Cutting machine (optional, but you’ll need to choose simple designs that can be cut by hand)
  • For the key ring charms: jump rings and split rings (in the jewelry-making aisle of the craft store)

Directions

Open the designs of your choice in photo editing software and resize to whatever you need.

If you’re doing the key ring charms and using a cutting machine, go ahead and make the holes for the rings now. Might as well let the machine do the work for you! If you’re not using a cutting machine, you’ll need to punch the holes after assembling the final product.

Now make a mirror copy of each non symmetrical design. In my case, I also changed the back of two designs to be coordinating paper. Just for fun. 🙂

The next step is to print a set of images on sticker paper and cut them out.  You’ll also need to cut the image shapes out of chipboard. I used my Silhouette for this part. The chipboard provides support for the element, and if you’re planning on using it on a layout or other project, it’ll pop off the page a bit for some added dimension.

After everything is printed and cut, all you need to do is peel the images off the sticker paper and place them on the front and back of the chipboard shape. If you’re making the charms and doing it by hand, now is the time to punch holes in them. I used a hook tool to do this on the sun element.

Next, open a jump ring. Attach a split ring and the chipboard element then close the jump ring.

Now you can add the charms to your key ring!


About the Author  Kate is on the hybrid team here at The Digital Press. She lives on the Utah/Colorado border with her husband, 5 kids, 10 chickens, and a dog named Gracie. She’s a city-born girl who found she’s really a country girl at heart. She can be found outside, barefoot, and probably in her garden.

Feature Friday | Dunia Designs


Happy Friday, gang! This week, here at The Digital Press. we are featuring the fabulous Dunia of Dunia Designs! Dunia designs beautiful kits and collections that are perfect for Project Life and pocket layouts, whether you are documenting everyday life, holidays, or vacations. Not only does she create kits for these everyday projects, but her journal cards, stamps, washi tapes, alphas, and photo overlays are ideal additions to put together a complete project. If you’ve ever browsed her store, you’ve likely noticed that her templates are just as creative and unique as her designs, which ensures that making a stunning layout will always be a breeze. Her style definitely lends itself to a paper-scrapping/hybrid feel, which I know a lot of us gravitate towards. If you like to stack, shadow, and document your life in the most unique way possible, Dunia’s designs are exactly what you are looking for!

Here are just a few of my favorite items from Dunia’s shop

I asked Dunia some questions so we could all get to know the gal behind these awesome designs just a little bit better. Here’s what she had to say…

Where do you live?
I’m from Brazil, but this year I moved to Ann Arbor, Michigan.

When you’re not designing, what do you do with your time?
When I’m not designing, I’m taking care of my kids, photographing things, reading books, and watching TV series.

What are 5 tidbits of trivia we might not know about you?
—I’m turning 40 on September 5th
—I lost my two dogs this year (one was 17 years old, and other was 16)
—I’m addicted to Coca-Cola and chocolate
—I’m a photographer
—I smoke (I’m trying to quit, but it’s so freaking difficult!)

Which of your products is your favorite?
I love to make pocket scrapbooking products, and I really like this one… the Documenting Everyday 2016 Bundle

Dunia Designs has so much to offer to our creative community. Her designs are versatile, unique, and so fun to create with! Here are a few samples of projects that use her work…

Now is your chance to run right over to Dunia’s store and grab a deal! You will be able to grab her beautiful designs at 30% OFF all week long during her feature week! If you need some extra inspiration, her designer gallery is filled with some awe-inspiring layouts and projects. Thanks for joining me to learn about Dunia, and have a great weekend!


Heidi Nicole

About the author  Heidi Nicole is happily married to an amazing man, a step-mama to 2 wonderful kiddos, and mama to 3 sweet and sassy furbabies. She’s a radiation therapist by day, and creator of pretty things by night (she’s pretty confident that she’s hit superhero status, but refuses to wear a cape). She loves cats and huskies, coffee, audio books, Friends reruns, St. Louis Blues hockey, cooking, baking, and traveling. Oh, and wine… she really likes wine. She lives a normal and happy life, and enjoys all the absolutely extraordinary people she gets to share it with on a daily basis!

Tutorial Tuesday | Creating Star Bursts


When I first started out in photography, I was always amazed when I managed to capture camera lens artifacts such as star bursts, sun flares, or bokeh in my photos. They seemed to appear randomly and I had no idea when and why they were occurring. Eventually I took a look back through my photos, studied the camera settings, and then started experimenting. I now have a few tips on how you can capture star bursts such as the one in the photo below (taken at the beach just after sunrise)…


So what causes these star bursts? Simply put, star bursts are caused by the diffraction of light hitting the blades of your lens. The effect is magnified the smaller the opening through which the light passes into your camera. That is why it is easier to get this effect using a wide angle lens with a small aperture opening (i.e. higher F-setting). You can use any light source — including the sun, of course — or you can experiment with other light sources such as street lamps, night lighting, car headlights, Christmas tree lights, etc.

For those who are more technically-inclined, it is interesting however to note that the number of rays on the star burst is usually directly related to the number of blades of your lens. For lenses with an even number of blades, the number of star rays will be that number (that is — an 8 blade lens can create a star burst with 8 rays, etc.). For lenses with an odd number of blades, the number of star rays will be double the blade number (so a lens with 5 blades will create a star with 10 rays).


The following tips will help you to create star bursts…

1. Camera and lens

You can achieve this result with a simple point and shoot camera… but it is easier with a DSLR (I am not sure what is possible with all different models of phone cameras). Also, try experimenting with different lenses. The effect is usually easier to obtain with smaller focal lengths… so the wider the view the better.

2. Time of Day

It is possible to achieve this at any time of day… but I have found it is easiest early in the morning or late in the afternoon when the sun is not too overwhelming. If you shoot during the day, however, you should always make sure that you do not look directly into the sun — even through your camera’s view finder.  🙂

3. Camera Settings

You will ideally need an aperture setting smaller than f9 (i.e. f9 and above). Also you will want a wider focal length… so use your 50 mm,wide angles lens or telephoto lens at the widest angle.

4. Angle to the Light Source

This is where you will need to experiment and move about. Look through your view finder or screen while moving around and changing angles. You will be surprised at the difference a few degrees up or down or a few feet to the left or right will make. Walk around until you get the effect you desire. As a final tip, you may find it easier if you partially block the sun as I have done in some of these photos.

Here are another couple of recent photos of mine (with the camera settings I used listed on them)…


I have been experimenting trying to get star bursts in my portrait photography… but still need more practice, as you can see. 😉


To finish off, here is a page for my Word of the Year book (my word is “breathe”), which I created with one of my starburst photos…


AvatarAbout the author  Carolyn lives with her partner, eldest daughter and 3 rescue dogs on 5 acres of paradise in the hinterland of the Sunshine Coast, Australia. Her camera, along with an assortment of lenses, is never out of sight. When not taking photos, she loves cooking and gardening and of course scrapbooking.


Feature Friday | Tracie Stroud


I’m super excited to introduce you to another one of our designers here at The Digital Press… Tracie Stroud. Tracie is a designer who has a unique style that is all her own. Working from a mixed media background, Tracie creates fun products that look like real-world papers and elements from an art journal. She’s been designing for over eight years, and she loves the flexibility that digital offers — letting her incorporate her art into her designs. And the best part is that Tracie’s designs let customers play and express themselves!

Here are some of my favorite products from Tracie’s shop at The Digital Press…


And now… to find out more about Tracie. I asked her a few questions, and here’s what she had to say…

Where do you live?
Shreveport, Louisiana

When you’re not designing, what do you do with your time?
I homeschool two of our kids, so that takes up pretty much all my non-designing time. I’m also very involved in my daughter’s American Heritage Girls troop. I’m an avid reader and art journaler, so those are usually my first choice of “me” time. 🙂

What are 5 tidbits of trivia we might not know about you?
—I love to sing. I received lessons as a teenager and I was a worship leader in a couple of churches we’ve attended.
—Along the same lines, my sister is a professional opera singer.
—I have a degree in Elementary Education and Library Science and I taught in public school for several years before our daughter was born.
—Our middle child has moderate autism and we’re vocal advocates for rights for kids and adults with disabilities.
—My daughter and I are learning Latin together this school year.

Which of your products is your favorite?
My favorite kit is Sorrow, although it was a difficult one to create. I designed it in the months following the very sudden passing of my Dad. Although it’s a reminder of a difficult time, it’s also been a blessing to receive messages from others who have gone through loss, telling me how the kit has helped them document their struggles with grief as well.


Here are some fabulous layouts featuring Tracie’s gorgeous designs…


I hope you all can see why I love Tracie’s products (and the pages that are created with them!). There are just so many options and different ways to express yourself creatively.

There are ton of great pages using Tracie’s designs (check them out in the gallery here at TDP)! And while you’re at it, run off to check out her shop, too, because all of Tracie’s gorgeous products will be 30% OFF through the end of next Thursday night (sale will end at 11:59pm ET on Thurs 9/1)!


KimberleeAbout the Author  Kimberlee is a lover not a fighter; a stay-at-home gran, a poet, and a lifelong learner. She grooves on saturated colors, Tuesday dance parties, optimism, glitter and sunshine. She colors outside the lines.  She is a dreamer. She is a collector of moments.  She is all about the story. She completed her MFA in Creative Writing and recently finished her M.Ed. in Instructional Design, but still can’t figure out what she wants to be when she ‘grows up.’