Category: Photography Tips

12 Days of December – Day 8 – Simple Holiday Photography Tips

decblog

The holiday season is full of color, scents, and lights. The Christmas season is one of my favorite times to photograph my home. I have learned over the years that some of the memories start to fade, especially the ones involving seemingly inconsequential things like your decorations.

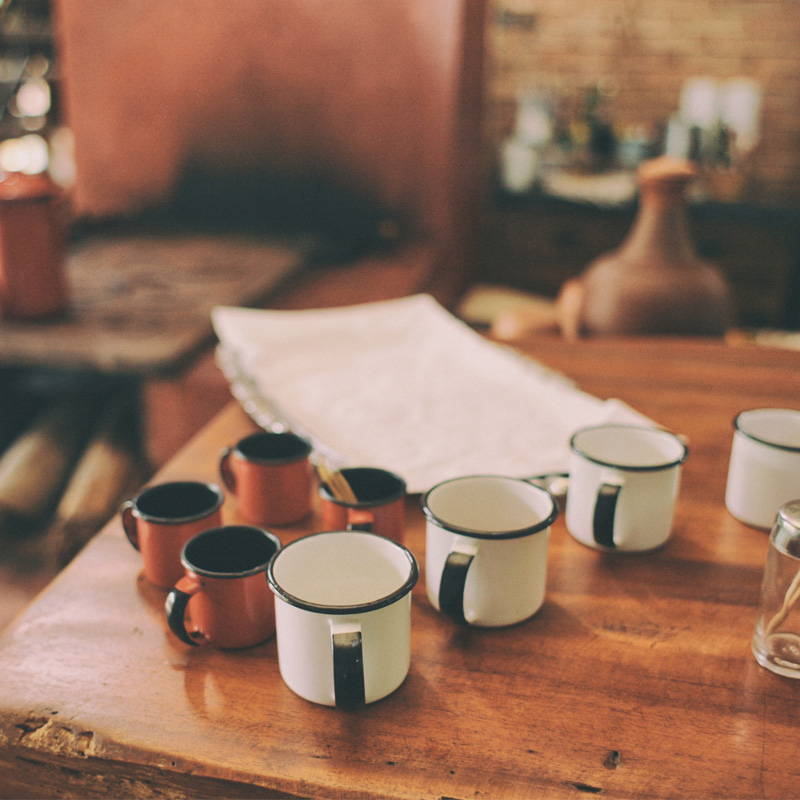
Over the years, we have had many different Christmas trees, ornaments, garland, etc. I wish I had photographed them years ago… as it would be fun to look at what was trendy during previous years, what things I really liked at the time, and what those memories evoked (such as getting a kiss under the mistletoe, or my early morning coffee in a Christmas mug as I enjoyed a quiet moment before the kids came barreling into the room, etc.). So many of my old photos were of my family, or of what gifts we gave or received, or of our family pet. In some photos, you could glimpse bits of the decorations — the tree in the background, or the lights around the window, etc. — but they were never prominent in my photos. These last few years, however, I have made a point of photographing our holiday decor because seeing it really does evoke memories at a later date!

day8_decor


About Lighting

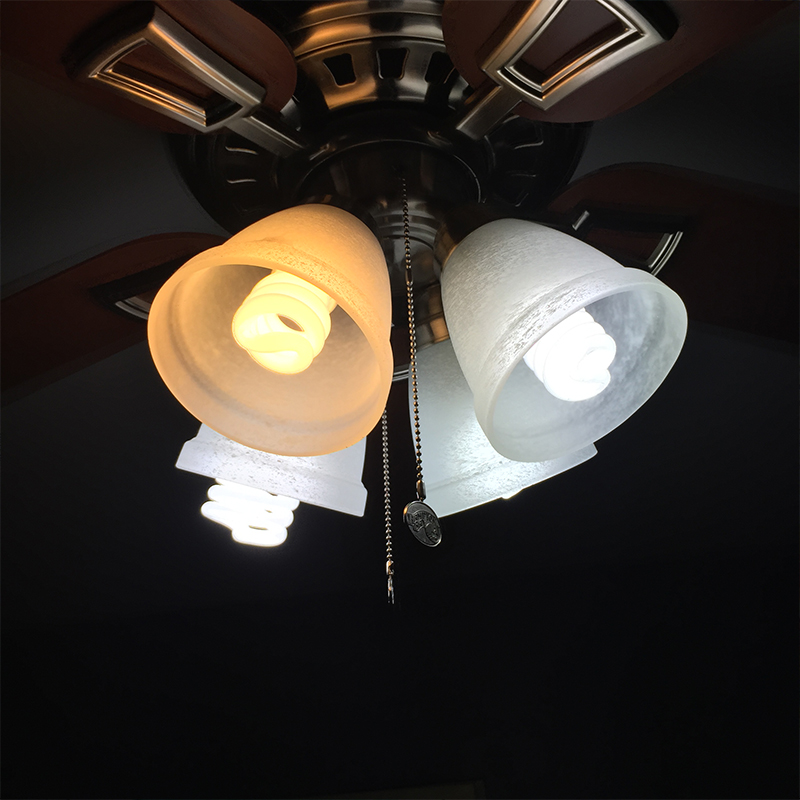
Lighting plays a big role in the look of your image. Decide what lighting best suits the mood of your photo. Indoor light bulbs generally are a warmer temperature such as with tungsten lights… but nowadays, more and more lights are being made with a cooler color temperature such as the fluorescent/daylight balanced bulbs. To keep it simple, when looking for light bulbs, remember that the higher the number (5000 K), the cooler the color temperature so the output is more of a blue, cooler tone. Conversely, a low number (2800 K) it will be a warmer, more yellowish hue. Neither light is better than the other; they are just a different color temperature on the Kelvin scale and will produce a cooler or warmer tone in your photo.

You may not always have a choice of what color temperature the lighting is in the room you are shooting… so instead, you may be able to adjust the color temperature in your photo editing software. I use Lightroom, and it is very easy to tweak the temperature. If I am shooting during the day, I leave the lights off and open the windows and doors to let in some natural light. If I am shooting later in the day, however, then I will need some help with lighting… so I turn on a few lights or use a speedlite. Most of my lights are daylight-balanced, but the temperature varies with different manufacturers. If I am utilizing lights in the room I am shooting, I try to shoot with that light either behind me, bounced off the ceiling (speedlite), or off to the side.  If there is limited light available, a flashlight or video light will also work in a pinch. I keep a couple handy for photographing food or small items.

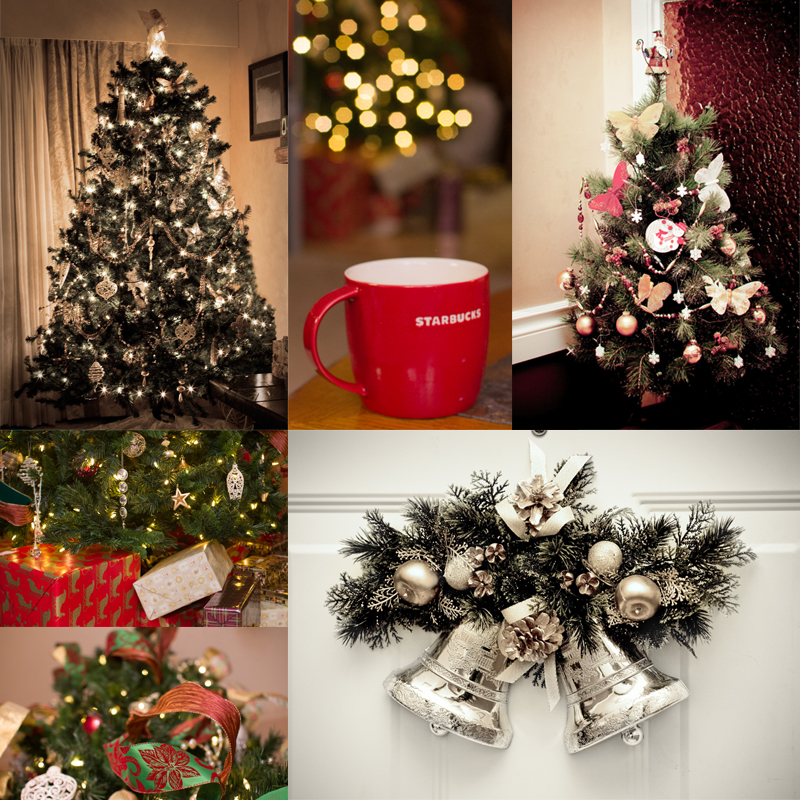
Other Tips and Ideas

  • Photograph with some wide shots, taking in a lot of detail around the room. Don’t worry if the room is cluttered — if there is a coffee cup or beer can on the side table, or toys are scattered around the floor, because these all tell the story of that moment and of what was happening in that room.
  • Photograph with some close-ups, as well… capturing some of the details of your ornaments, cards, food, etc. Try varying your position…up, below, sideways…as not only do they each provide a different view, but also can vary the lighting which also provides a different look. I’m a big fan of shooting upwards or downwards (as in my sample image of the ribbon) which eliminates whatever else would be in the framing, had I shot it straight on.
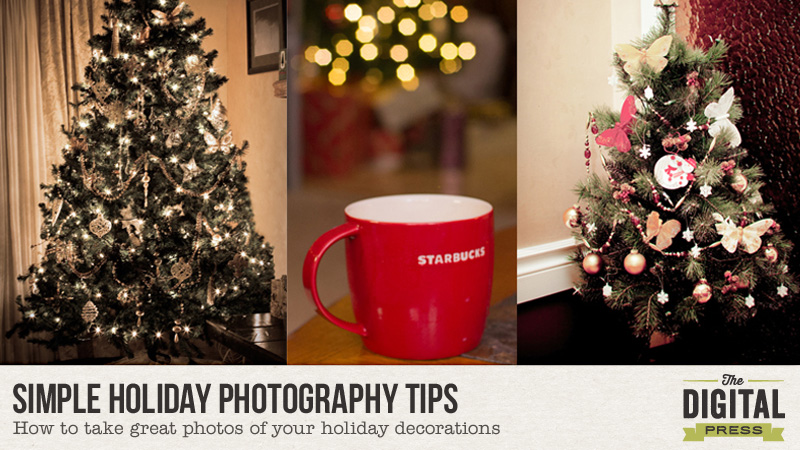
  • If there are Christmas lights in your shot, adjust the aperture if possible (depending on the camera you use) to achieve different looks. For instance — open up the aperture to a low number (such as 1.8), which will blur the lights (as in two of my sample photos). Conversely, close down the aperture to a higher number (such as 14) to produce a starburst effect (as in the upper left sample photo).
  • Use a tripod, if available. If you are opening up the aperture (F-Stop) then I recommend using a tripod to keep the camera steady as it takes longer for the light to pass through and capture the image, so you want your camera to be steady. Alternatively, you can place your camera on a flat surface to minimize movement, and, even better, use a timer. The steadier the camera, the less chance of blurring your image.
  • Staging a shot can be fun, utilizing something as a backdrop. Don’t throw away old blankets, pillowcases, cloth napkins, etc… keep them for this kind of staging. I go to garage sales and pick up these types of cloth items really cheap — usually for under a buck.  Another great find is cloth placemats (or any material that isn’t shiny, which can cause glare in your shot). I found some small bamboo woven mats last year which I use to position small items on top of — such as 1-2 cookies. As a paper scrapbooker years ago, I collected a lot of paper, which also makes a great backdrop for small items.

I hope that I have inspired you to grab your camera and photograph your holiday decor so you’ll have those photos to look back on and remember for years to come. Enjoy the holiday season and keep that camera handy!


RaeAbout the Author  Rae is part of the creative team at The Digital Press and has been a scrapbooker and photographer for many years. She lives on the west coast with her hubby and her labradoodle, Taz. She’s addicted to chocolate, TV shows, and books!

Capture movement with your photography

blogtemplateSept


There are several ways to capture motion in photography. To capture motion, you must understand how to control your camera’s shutter speed.

What is Shutter Speed?

Shutter speed is the amount of time it takes for light to enter your camera. Adjusting the shutter speed changes how quickly or slowly the shutter opens and closes again.

There are two main purposes of controlling shutter speed. The first is to adjust the exposure when shooting in manual.  A faster shutter speed will let in less light, the image will be darker.  A slower shutter speed and the image will be brighter. The second is for a more creative purpost: To capture motion. This is achieved by freezing motion with a fast shutter speed or by allowing continued motion with a slow shutter speed.

Methods to capture motion:

  1. Stop action: use a fast shutter speed to capture a moment in time. This is ideal for capturing sports shots, fast moving kids and pets.
  2. Motion blur: use a slow shutter speed to capture motion. This is ideal for catching a waterfall, a city scene, fireworks, or a ride at the fair.
  3. Panning: use a slow shutter speed whilst following a moving subject. I find this technique a little tricky but has such fun results. Try following a car or child on a bike.

Here are some fun examples:

web fireworks web flag web swim


I’m hosting a challenge over on the forums at The Digital Press so grab your camera and come play along! Check it out at The Drawing Board: Challenges. See you there!


Farrah About the Author:  Farrah Jobling is a member of the Creative Team here at The Digital Press.  She lives in Denver with her amazing family, Mike, Nicholas (8), Claire (5) and Hope (1 yr old puppy).  She works from home as a photographer and enjoys scrapping her personal photos.

Taking Photos of Your Hybrid Projects

blog


As a hybrid and paper scrapper, one of the questions I am asked most often is how I take pictures of my projects. It has taken me a good portion of my scrapping life to finally get the process streamlined and to a point that I am happy with it. To save you all the lengthy process of trial and error, I have a few tips that might help you. Today, my layout I’m working with is made using Little Lamm and Co.’s It’s My Party

Natural Light

Obviously, natural light will be your greatest ally when photographing your projects. You do not want direct sunlight because of the harsh tones and glare, but if you are able to find a place within your home with the most natural, indirect sunlight, you’ll be well on your way to good photos. I recently moved from my dungeon-dark old house to a house bursting with natural light (at least by contrast), so photographing my projects has become infinitely easier. In the library/computer room, I have set a chair just underneath the window for taking my photos.


Taking Photos of Your Hybrid Projects


White Foam-Core Board

One of my secret weapons is a white foam-core board like you can find in the school presentation section at craft stores and office supply stores. They cost approximately $3 and last as long as you can keep them white. I place the board on top of the chair and then lay my project on top. I find that this allows the natural light to reflect off of the crisp white board without any weird color casts. Plus, if I need to adjust the temperature of the photo in post-processing, I have a true white neutral I can select for automatic temperature correction.


Taking Photos of Your Hybrid Projects


On occasion, I use an additional white board on the opposite side of my light source. So for me, it goes window, white board laying down with project on top, white board standing up against the edge of the bottom white board, and then me as the photographer. If I find I am not getting enough light on my project, I use the standing white board to bounce the light back on to my project.

Page Protectors

If I am photographing a pocket page, I take my cards out of the page protectors and lay them directly on top. This way, I still get the look and feel of the page protectors themselves without any of the glare of the plastic sleeves.

Taking Photos of Your Hybrid Projects


Camera

I do not use my DSLR for taking photos and this is probably mostly due to laziness, but also because I have found that my iPhone 6 Plus camera works perfectly. When photographing 12×12 layouts or pocket pages, I set my iPhone to the square setting. If the coloring still seems a little dark, tap on the screen until the sun icon pops up. Then slide your finger up while this icon is on the screen to bump up the brightness. Conversely, you can swipe your finger down if you want it to be darker.

Position

When photographing my projects, I try to stand directly above the project with my camera. I try to make the camera completely parallel with the project so there are no weird angles or distortion with the photo. I usually end up taking about 5-10 photos just to make sure I get one that will work. Then I’ll take a few closeups if I’ll be doing a blog post. I typically keep the camera on the square setting when taking closeups, but that is just personal preference.

Processing

I have used both my computer and my phone for post-processing the photos. On my iPhone, I use the app PicTapGo. My go-to filters for project photos are Brightside (increases brightness), Auto Color, Crispity (sharpness), Cool it Down (I use only if I deem the photo to have too much of a yellow overtone), and Sweet Tooth or Sugar Rush (depending on the colors of my project) to increase the saturation. The fun thing about PicTapGo is that all of these filters are on a sliding scale. I hardly ever use any filter at its full strength, so it’s just a matter of playing around with the levels until you find what looks best. However, once you discover a combination of all these filters that works best for your lighting situation, you can save the recipe within the app and apply it to all future photos with the click of a button. For computer processing, I use the RadLab add on for Photoshop (it’s also compatible with PSE). RadLab is made by the same people who make PicTapGo so my method is very much the same. I bump up the brightness, decrease the warmth, and increase the sharpness, contrast, and saturation.

Ottlite

I mentioned before that my previous house had next to no natural light. Additionally, I am usually a late-night, last-minute type of scrapper so sometimes my photos have to be taken when there’s no natural light. Typical lightbulbs have a very yellow color cast and even with post-processing, I cannot make my photos look right. I discovered Ottlite, which is a brand of light bulbs and lamps that is supposed to be the closest to natural light you can get from an artificial light source. I have a desktop Ottlite Lamp that I scrap with and have attempted to use for the purpose of nighttime photos, but it is not quite bright enough. Ott lamps themselves can be quite costly, even with the use of a coupon but they also offer light bulbs that you can use with your own light fixtures. I went to my local big box craft store and bought three Ottlite bulbs for my ceiling fan. I waited for a sale and got all three bulbs for under $25.

Taking Photos of Your Hybrid Projects


As you can see, the Ott bulbs  give off much less yellow light compared to a traditional bulb. My husband jokes that it looks like an operating room when these bulbs are in use, but I find it provides the right color and brightness of light needed for my photos.

Here is a photo of my layout taken under regular light and without using any of the tips mentioned above:

Taking Photos of Your Hybrid Projects


And here is the photo of the same layout following all the tips shared above:

Taking Photos of Your Hybrid Projects


I am by no means a professional photographer but this is the process that works for me. If you have any tips to add, please share in the comments. I would love to hear your tried and true methods.


Brenda

About the Author: Brenda Smith is a mother of two littles and wife located in Southern California. When she is not scrapbooking, you can find her working full-time, trying to finish up her college degree with online classes, or sleeping because there are never enough hours in the day. Hybrid scrapping satisfies her addiction to technology and her addiction to paper and glue.

Flourish in your Photography

blogtemplateApril


Everyone is at a different skill level when it comes to taking photos, but no matter how many skills we posses, we always strive for more. More knowledge, more inspiration, more mojo to try something new. Here’s that little push you didn’t even know you were waiting for. It’s time do some spring cleaning…of the mind. Get out of the darkness of winter and into the spring light. Grab your camera and try something new. Try that technique or skill you’ve been meaning to try for months now, or look up something new. Either way, it’s springtime and that means a fresh look at things. It’s time to really flourish in your photography.

I’ve been meaning to try to make an enchanted book photo, and this is the perfect time to give me a push.  I can’t wait to see what you all come up with, not only your photos, but how you scrap them as well.

Having trouble thinking of something?  Here are a few ideas to get started, but don’t feel limited to this list- anything goes.

  • Shoot at a wide aperture
  • Capture motion
  • Shoot a macro shot
  • Try a new editing style
  • Change your perspective or frame of reference


Now for the rules:

  • Scrap a page using a photo that you’ve taken with a new-to-you photo skill.
  • Pages must be created using 100% TDP Products and loaded in the gallery no later than midnight EST on April 30, 2015.
  • Leave a Comment in this thread with your gallery image/link.
  • Link your Comment in this thread in your spot in the Monthly Challenge Tracker Thread. You can find it here: April’s Tracking Thread.

04.02.15-Enchanted-book


FarrahAbout the Author:  Farrah Jobling is a member of the Creative Team here at The Digital Press.  She lives in Denver with her amazing family, Mike, Nicholas (8), Claire (5) and Hope (7 mo puppy).  She works from home as a photographer and enjoys scrapping her personal photos.

Listen with Your Eyes

listen


When I take my camera out and about, I always start out with the best intentions. I always plan to take my time and focus, pay attention to lighting or the rule of thirds or whatever, trying to get the best picture possible. But I have a weird confession to make. For some reason, I am totally self-conscious when I’m out in public taking photos. Even starting with the best intentions, I find myself rushing as fast as I can and taking quick pictures without spending time on getting the shot I really want. Sometimes I barely even take time to focus the camera. Isn’t that crazy? I know. It totally doesn’t make any sense at all. But unfortunately that is how I roll. Hahaha. Please tell me I am not the only one who feels like this? Actually I hope I am. I really hope that no one else has this quirk in their photographer persona.

I am always impressed by photos that make you feel like you are part of the scene. Photos so rich with story that you can imagine the smells, the sounds, the energy in the air surrounding them. I really believe that to capture shots like those, you have to know what you are looking for. You have to listen with your eyes. You have to take your time and find the moment. The moment that captures the feeling.

In this photo, the focus is on the sparkler and hands in the foreground. The woman is out-of-focus, but definitely still important… right down to the comfortable baggy sweater. But your eyes tell you to focus on the magic the sparks of light offered as well as the cupping of her hands around the base. You can almost hear the little pops and hisses as it burns.

Listen with Your Eyes
by Morgan Sessions


In this photo, the moment is captured as the wave slams into the rock, splashing into the air. You can definitely hear this with your eyes. You can also see the wetness of the rock and it is almost tangible to know how it feels to be standing there, taking the picture.

Listen with Your Eyes
by Justin Leibow


Here is a photo that also provides a very auditory experience through the visual. You can hear squawking of the gulls, the flapping of wings, and even the gentle lapping of the water onto the shore. You might even imagine a foghorn or a ship’s motor in the distance. There is a lot going on here.

Listen with Your Eyes
by Patryk Sobczak


And finally, this photo gives us a glimpse into another sort of story all together. Looking at the picture, you might be able to hear the clatter of silverware against plates, hushed conversations, a waitress taking an order, or the sounds of the cash register totaling someone’s bill. There is a lot of story here, from the worn wood of the table, the metal mugs, the toothpick holder and all of the other soft details. What do you hear?

Listen with Your Eyes
by Andre Freitas


Pictures like these make me want to overcome my inhibitions so I can step out and find some confidence behind my camera. I want to seize upon the small, visceral details that help to tell a story. I want to capture rich specifics in a scene. I want to take pictures that cause people to lean in and listen with their eyes.

Now I want you to head on over to the Challenge Forum and discover your mission.


Kimberlee

About the Author: Kimberlee is a lover not a fighter; a stay-at-home gran, a poet, and a lifelong learner. She grooves on saturated colors, Tuesday dance parties, optimism, glitter and sunshine. She colors outside the lines.  She is a dreamer. She is a collector of moments.  She is all about the story.  Kimberlee completed her MFA in Creative Writing and is currently working toward a M.Ed. in Instructional Design.