Category: Photography Tips

Tutorial Tuesday | Importing Photos into Lightroom

How many times have you opened your new Lightroom (LR) software and shut it because you found it too daunting? How many times have you tried to drag images over to LR, like we so easily do in Photoshop (PS), only to realize nothing happens? If you are anything like me, your answer is more than a few times! 🙂

We’ve all heard it time and again — Lightroom is a powerful program. It’s a game changer. And… it truly is. But how do we harness its power if we can’t even complete the initial step of getting started? Well, this post is here to do just that — to help you get your pictures into LR.

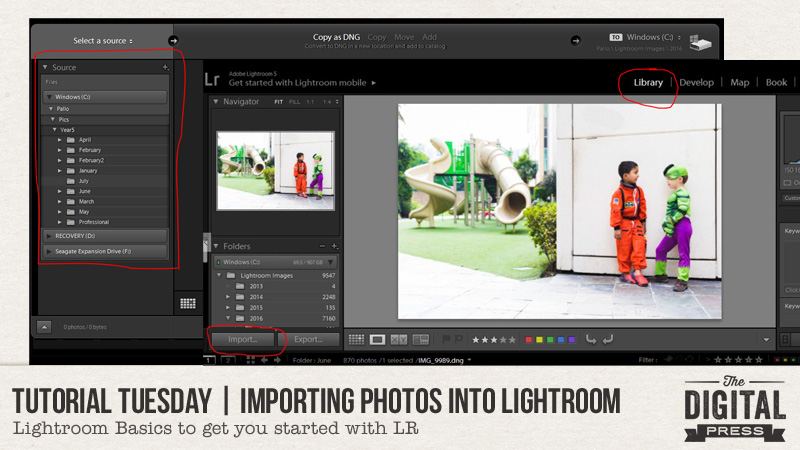
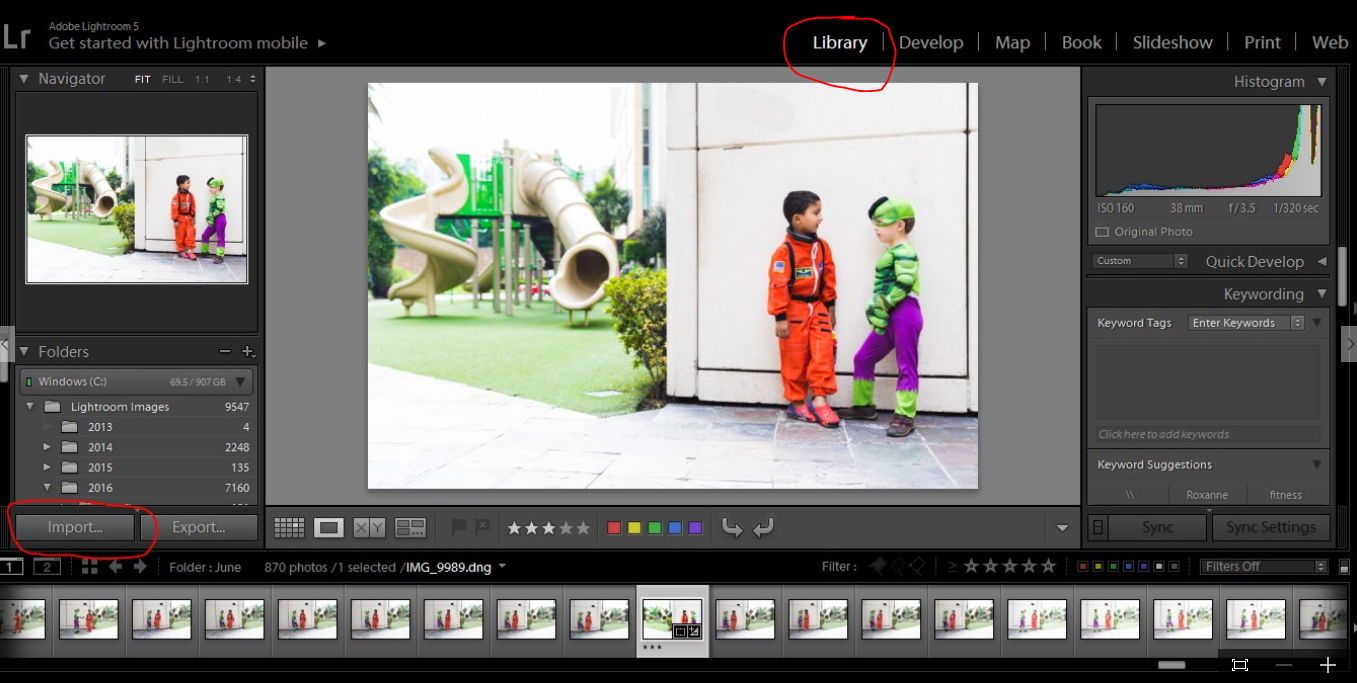
The first thing you need to do to get started is open the program. Once you have it open, click on the “Library” button at the top (see image, below). Then, press the “Import” button.

[Please note that my screen (shown above) might look a little different than yours… as I already have pictures in my LR.]

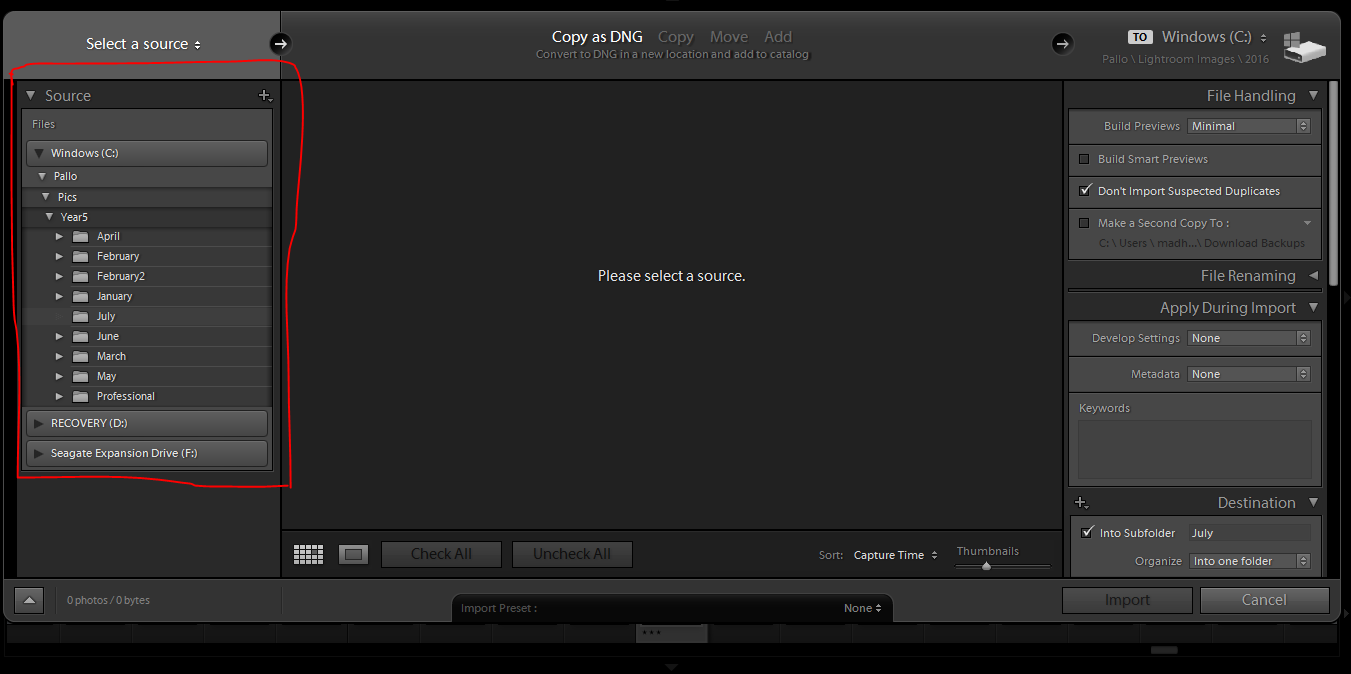
Next, from the left side panel, you will now need to select the photos that you want to import into LR. Photos can be on your hard drive… or on an external hard drive… or on a memory card. Wherever your photo is, you need to browse on this left side panel and select that source (as shown below)…

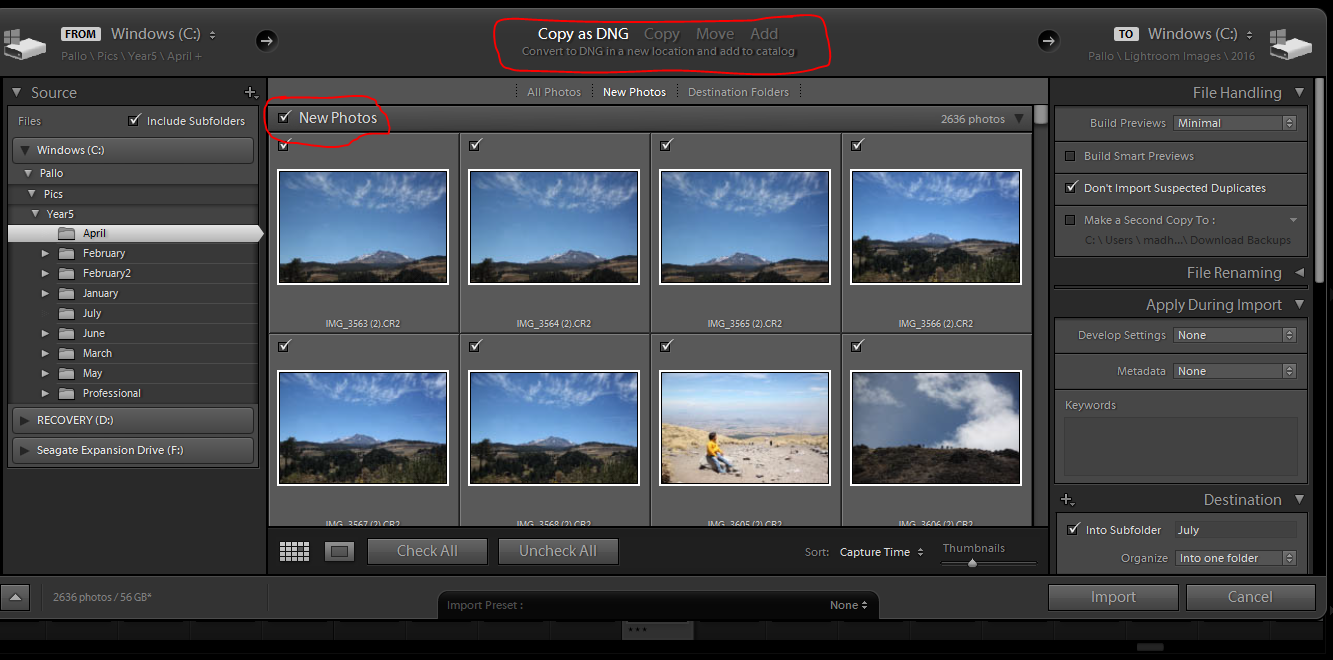
Using the image above as an example… suppose I were to select “Year 5 — April” as the source. LR will now show me all pictures contained in that folder. This is where you can select the specific photos you want to import. You can choose to select one photo… or a few photos… or even all photos in the folder.

Another thing to note — that top panel (see next image). I shoot in Raw, so I choose the “copy as DNG” option… which is the suggested option for Raw files. For JPEG images, I always choose the “Add” option.

Now we come to the right side panel (again, see next image). Here, there are two steps that I usually complete. First is to select the “Don’t Import suspected duplicates” box. You don’t want to import the same photo twice, right? 🙂

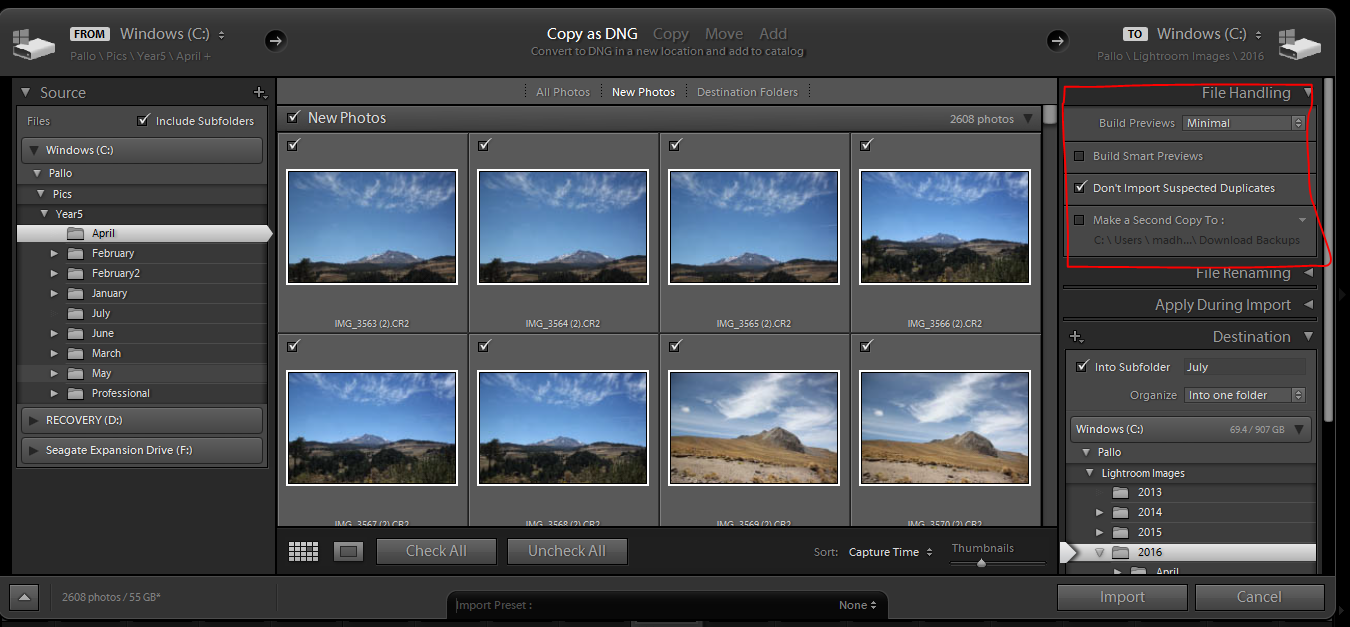
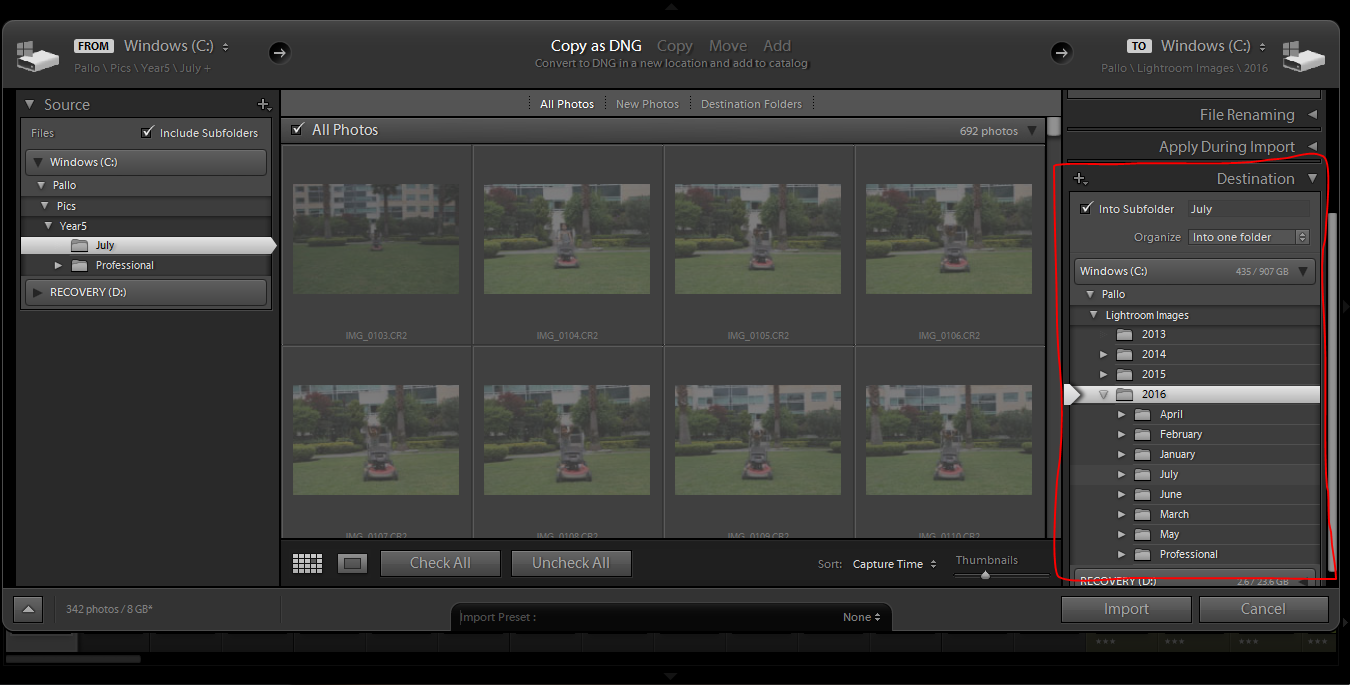
The other step I complete using the right side panel is very important — the destination step. This is where you tell LR where (and how) to save your images. I save my images chronologically… so my files are saved by year and by month. You can organize your files however you like, creating a filing system that works for you.

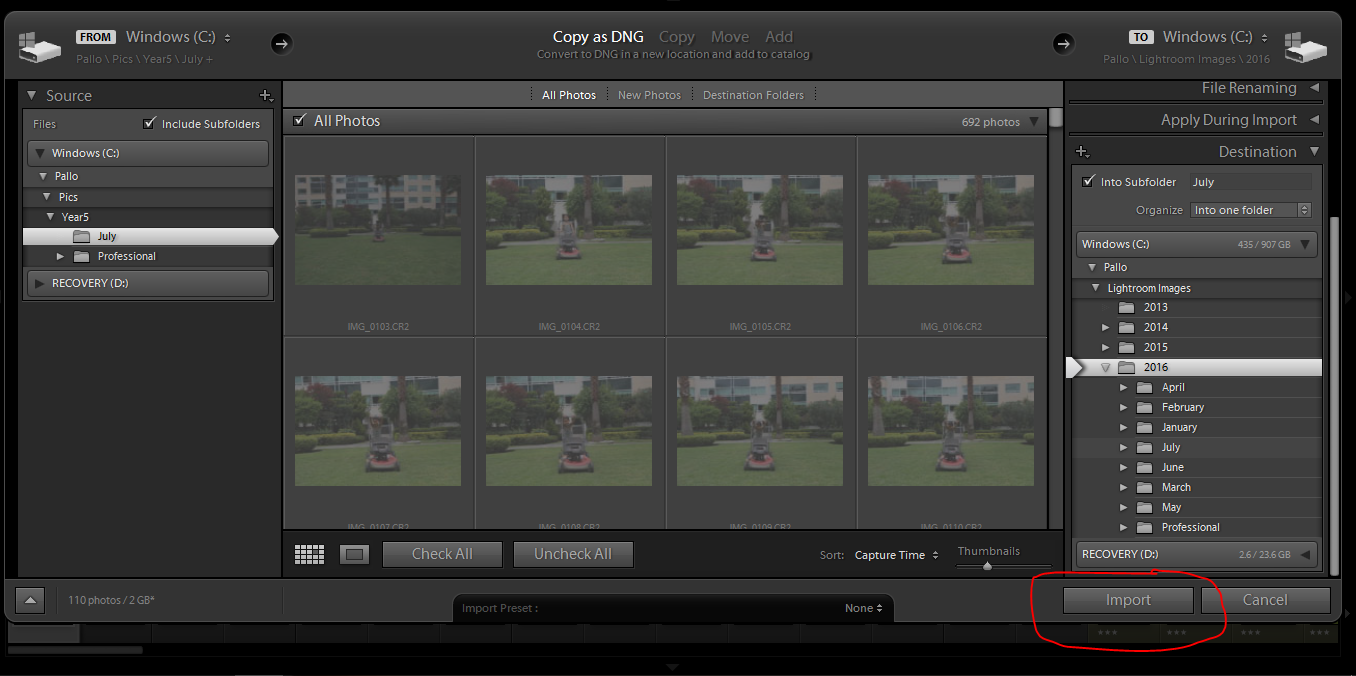
Now you come to the very last step. You can just press “Import” (as shown below) and tada ….. your photos should start uploading in LR. At that point, once the photos are imported, you are all set and can start playing with the program more! 🙂

Hopefully this “first step” tutorial is helpful in getting you out of the starting blocks, and on your way to using Lightroom. If you have any questions, definitely feel free to reach out to me using the comments on this post, and ask away!


PallaviAbout the Author  Pallavi resides in Mexico City with her husband and her ever-growing little son, Rajveer. She has previously lived in Calcutta, Pune, San Francisco, Chicago, and London. She reflects all these places in her pages as she captures her everyday stories. She is an alumnus of Northwestern University. Currently, she is learning photography and working towards getting to a healthy weight. Her days are full and she loves it that way!

Tutorial Tuesday | Capture the Everyday

I’ve been following a few photography challenges this year, and even if I don’t do them every week (or at all, let’s be honest!), they are slowly influencing me and helping me see my daily world with new, creative eyes. A few days ago I was doing our laundry and decided to capture this everyday, mundane task as artistically as possible, and in as many different ways as I could think of. And it was so, SO fun!
Capture the Everyday

Of course, some of my images didn’t turn out… but that’s OK because experimenting was part of the fun. I decided to implement various photography techniques — like macro, changing angles and perspectives, long exposures, purposeful blurs, compositional “rules” like leading lines, centered compositions, repetition/pattern, texture, rule of thirds, etc.

Capture the Everyday

This was truly an eye-opening experience and I never thought photographing something as mundane as the laundry would be so fun and could bring so much variety in the images.

Capture the Everyday

To add some cohesiveness to the photos I took, I edited them all with The Basics Lightroom Presets (#1) by Dunia Designs.

If you, too, want to see — and document — your everyday life with new eyes, why not try something similar?

  • Grab your camera and focus (pun intended!) on some daily aspect of your life — a task (like my laundry), an object, a place, etc. You don’t need much time to do this; 5-10 minutes is plenty to do this sort of creative exercise
  • Try to look at your everyday event like an explorer would when discovering a new civilization. Forget everything you know about this thing and try to see it with fresh eyes, as if it were the first time you laid your eyes on it
  • Then… simply grab your camera and start playing! Change your angles, take a wide shot to capture the whole environment (or the opposite — come closer and do a close-up shot), play with light and shadows, experiment with the composition rules and have fun. Maybe you won’t produce a masterpiece but you will definitely start seeing your world with new eyes!

I hope you’ll have fun experimenting and being creative, and I’d LOVE to see the result if you try your hand (and eye) at it! You can leave links to photos in the comments, below… or if your photos actually result in the creation of a scrapbook layout, you can post it in TDP’s gallery and then link me up here!


ChloéAbout the author  Chloé is in charge of PR and communication for her small town by day, is a digiscrapper “by night,” and a photographer whenever the light is beautiful. She lives with her man and fur-babies in a small town of Alsace (in the northeast of France), where she loves to read, watch good TV shows (TWD being her absolute favorite), and just hang out with her friends — no matter if they are close by, online, or away in her Swiss hometown. She recently became quite obsessed with her BuJo (bullet journal) and can’t wait to discover how much it’ll help her improve her (so far non-existent!) organisational skills!

Tutorial Tuesday | Playing with Color to Change the Mood of Your Photos

Playing with Color to Change the Mood of Your Photos


This tutorial is about playing with color in post-processing to change the mood of your photos… but first, I want to give you a basic idea of white balance.

White balance measures the color of the light. DSLR cameras have the ability to preset various white balances. White balance is the setting on your camera that is telling the camera what kind of light you are shooting in. It’s called white balance because the goal with this setting is to make anything white (or neutral) actually look pure white with no other color contaminating it. The color temperature is how white balance is measured — in degrees kelvin. For a lot of my shooting scenarios, Auto White Balance (AWB) is just fine. If I need minor changes, I can always do that in Photoshop’s Adobe Camera Raw (ACR) when I open my photos, so I will save the in-camera discussion for another day, and for now, we’ll just stick with AWB.

Once we have a photo, we can use color to change the mood of our photos (and/or scrapbooking layouts). We can create a fun, bright, white-light look for a summer afternoon… or a dark, moody feel for Halloween… etc.  An over-saturated, high-contrast look could give the feel of an urban travel layout, while a de-saturated portrait might draw attention to the subject’s soulful eyes. The warmth of an image can even change the feel of the season — a warm tone is perfect for the beach, while a cooler tone works best for the winter scenes.

Easy ways to change the mood of your photos with color

1. Increase/decrease the saturation & contrast — The degree of saturation in your photo can give a feel for a location. Urban scenes tend to have a more dramatic look, using higher saturation and contrast… while a more rural setting tends to have lower saturation & contrast. To change the saturation and contrast in Photoshop, use Layer –> New Adjustment Layer –> Hue/Saturation and/or Contrast.

Playing with Color to Change the Mood of Your Photos

2. Turn your photo to black & white — Ted Grant once said, “when you photograph people in color, you photograph their clothes. But when you photograph people in black & white, you photograph their souls!”  Sometimes our subjects (specifically, my daughter; choose your battles, right? hee hee) are wearing mismatched outfits and/or obnoxiously bright colors… and yet, that smile gets us every time. If you want to eliminate distracting backgrounds, you can change the photos to black and white! It’s an easy way to focus on the important parts. Black & white photos can also work really well when you’re scrapbooking and you’re using elements and papers that have different colors than in your photo, but happen to have just the right sentiment for your overall layout. There are many different ways to turn a photo to black & white, so feel free to use your favorite method. For a quick and easy method, just click on Image –> Adjustments –> Black & White.

For instance, looking at the picture below — ok, really?!  Neon green and hot pink? MY EYES! Who buys them these clothes, anyway? 😉  BUT… by changing the image to black & white, we lose the distraction of the bright colors and instead see a sweet moment between brother and sister.

Playing with Color to Change the Mood of Your Photos

3. Change the temperature, change the season — The warmth/coolness of a photo says a lot about the season. Warmer tones indicate summer, while cooler tones feel like winter. Sometimes AWB can be fooled (especially in the winter). Snow is white, not blue… correct? Or maybe, on occasion, we actually want an overall blue tone for our whole scrapbooking layout, as we journal about the long winter months, etc. A summer evening sunset can be full of vivid colors, but might look a little dull when we pull the photo into Photoshop.

Sunsets can be tricky; they can go from bright and glowing to dull in less than a minute.  I missed the best of this sunset, below, by a minute or two when I was photographing it. Not to worry, though. To change the temperature of the photo, I simply used a photo filter. To do this, click on Image –> Adjustments –> Photo Filter (I used warming set at 85).

Playing with Color to Change the Mood of Your Photos

4. The proper use of selective color — I have a love/hate relationship with selective color. There are times in which selective color can really make or break a photo. To create a photo that is partially black & white, open your image in Photoshop and then duplicate the image onto a new layer. Use the tip from #2 (above) to turn the top layer to black & white. Then, use a layer mask to selectively add color back to your image.

Playing with Color to Change the Mood of Your Photos

5. Bam…..whhaatttttt? Mix it up and do something unexpected — Play around with different color overlays, seasons, or a combination of all of the above to create a photo for your AMAZING layout. There really are no rules, so just have fun!

Here is a layout I created using photos from a series… in which the kids were in the bright green and pink shirts. I changed the photos to black & white, because I love the more muted yellows and how the black & white photos help to tell the story instead being a distraction with clashing colors.

Playing with Color to Change the Mood of Your Photos


And here is another layout I created. I added a soft yellow layer over the photo to really highlight the poem by Robert Frost…


Playing with Color to Change the Mood of Your Photos


FarrahAbout the Author  Farrah Jobling is a member of the creative team here at The Digital Press. She lives in Denver with her amazing family — Mike, Nicholas (9), Claire (6), Hope (1.5 yr old puppy) & Kringle (3 mo old bunny). She works from home as a photographer and enjoys scrapping her personal photos.

Tutorial Tuesday | Intentional Blur in photography

Tutorial Tuesday | Intentional Blur in Photography

In many cases, blurry photos are a bad thing: photos are supposed to be in focus and sharp to be considered good. I usually follow this “rule” but I’ve been trying to be more creative recently and I’ve decided to create intentional blur in my photos. And I found out that the result could be awesome, fun, and creative (as is often the case when you break an artistic “rule” on purpose!).

Let’s discover the 3 types of blur you can have in photography (all images are retouched with Dunia Designs‘s The Basics Lightroom Presets):

Camera shake: when your shutter speed is too slow to handheld your camera, you get camera shake. It can be “bad” when it’s distracting from the subject of your picture, but it can also be a fun technique when done on purpose. I took this very abstract image, for example, with a 3 seconds exposure and while spinning my camera in front of Christmas lights.

Tutorial Tuesday | Intentional Blur in Photography

Cynthia Haynes is a photographer I discovered recently who is known for her long exposure / intentionally blurry pictures, and she has some pretty inspiring shots!

Bokeh: this type of blur is created by using a very big aperture (very small f/number, like f/1.8 for example) and it’s usually in the backgound of something sharp, but you can also create bokeh “by itself”, on purpose. Last week we had some spectacular sunsets, and I obviously had to snap some pix after work. I started with the classic, in focus, shot.

Tutorial Tuesday | Intentional Blur in Photography

Not bad, but not very original either, right? Then I decided to manually un-focus and create bokeh with the sun reflection on the river. You can’t see the landscape any more, but you get an abstract picture where light and colors are the most important things.

Tutorial Tuesday | Intentional Blur in Photography

Here’s a more classic example of bokeh, that I created by focusing on the puddle right in front of me with a very big aperture, so that the background (and a bit of the foreground too, since the depth of field is very small) is out of focus.

Tutorial Tuesday | Intentional Blur in Photography

Movement blur: this happens when your camera is steady (because your shutter speed is fast enough for you to handheld it or because it’s on a strong support like a tripod, a table, etc.) but that your subject moves faster than your shutter speed. This is the technique you use to photograph fireworks, for example, that’s how you create those gorgeous “flowers”.

Tutorial Tuesday | Intentional Blur in Photography

You can also use this technique to show movement and gives a sense of speed. That’s what I did (without even knowing, I was just starting to take pictures and had absolutely no idea what I was doing! LOL) while photographing the Tour de France in our little town in 2005. I got on the first floor of a building, right above the road, and since the day was cloudy and dark, my camera (in auto mode) selected a shutter speed too slow for those speedy athletes.

Tutorial Tuesday | Intentional Blur in Photography

If I had do take that picture again, knowing what I know now, I’d definitely try to use a technique called panning where you follow your moving subject with the camera. That way, your subject will look sharp and the environment around it will become blurry, kinda the opposite of the image above.  It’s a perfect technique for races of all sorts because of how much it materializes speed.

I hope you’ll enjoy playing with intentional blur and find these tips helpful! Don’t hesitate to comment with your questions or post in the forums!


Chloé

About the author  Chloé is in charge of PR and communication for her small town by day, is a digiscrapper “by night” and a photographer whenever the light is beautiful. She lives with her man and fur-babies in a small town of Alsace (in the northeast of France), where she loves to read, watch good TV shows (TWD being her absolute favorite), and just hang out with her friends — no matter if they are close by, online, or away in her Swiss hometown

Tutorial Tuesday | Better in Black and White

I love the look of black and white photos on a scrapbook page. They have the aura of looking “artistic” and work particularly well when mixed with colored photos.

If you are wondering how can you improve your black and white photography to make your photos pop… today’s Tutorial Tuesday is for you! 😉

Here are a few simple tips:

1. Take your photos in color.

Don’t use your camera’s black and white conversion option. Your favorite photo editing program (whether it be Lightroom, Photoshop, or some other similar program) provides a lot of flexibility to convert a color image into a black and white image. These options are much more limited, however, if the original photo is taken in black and white.

2. Look for contrast.

The best black and white images are taken by those who know how to look in black and white. Look for contrast in light and shadows. Look for a large range of lightness or darkness. Look for lines.

Black and white images are often more effective if they contain a true black, true white or both. What does this mean? It means that you need a part of the image to be “white” or “black” to ground the image. If this is not possible, you will definitely still need a wide range of grey; otherwise, the image will appear flat.

If you look at the following two image examples… the first contains black to ground the image, while the second contains white…


3. Look for patterns and texture.

Textures and patterns often look far better in black and white, because color does not compete for attention.

In the following photo, you can see the wonderful texture in the foreground sand and the shape of the old tree threatened by the rising ocean…

Likewise, the texture of the sand and geometric pattern of the wheel actually look more clear without color in this next image…


4. Try not to over or underexpose.

You can use your photo editing software to recover areas that are underexposed or overexposed, but it often creates noise in the photo which has the appearance of splotches or grains of discoloration. Noise will also appear in photos taken at high ISO settings. These defects are more visible in black and white than in color. It really does help to get the correct exposure in camera before taking the photo (and if necessary, using a tripod to steady your camera in low light).

For the following image, I used a tripod and long exposure (6 seconds) to soften waves at the beach…

It helped that my partner had no idea I was taking the photo. 😉

I hope that these tips can help you to take some better black and white photos. Please have fun experimenting with black and white! I’d love to see what you can do, so definitely feel free to link me up to any of your photos in the comments below. Next month, I’ll follow-up today’s post with another that will give some tips on using your photo editing program to convert color photos to black and white (and how to make these images really pop!).

I have one last photo of mine to share today… and this is one of my favorites. It shows our darling 12-year-old rescue greyhound, Zsazsa. She is good in any color.


About the author  Carolyn lives with her partner, eldest daughter and 3 rescue dogs on 5 acres of paradise in the hinterland of the Sunshine Coast, Australia. Her camera, along with an assortment of lenses, is never out of sight. When not taking photos, she loves cooking and gardening. Her new organic vegetable garden has been well photographed.

Tutorial Tuesday | All About Bokeh

Tutorial Tuesday | All About Bokeh


It’s beginning to look a lot like Christmas! Most people have their trees up, sparkling with lights… and now they’re wondering about the best way to get some great photos. Getting great photos of holiday lights is easier than you might think! Here is a simple tutorial to get those great shots.

First, I need to tell you a little about bokeh.

Bokeh is defined as “the way the lens renders out-of-focus points of light.” So what does this mean, exactly? In general, it means that while the in-focus parts of a photo are beautiful, the parts that are out-of-focus are just as beautiful. How do we apply this to our holiday lights? Easy peasy… we do what we never plan to do: we take a purposely out-of-focus shot.

The secret to shooting bokeh lies in its definition: out-of-focus points of light. You need four things to shoot great holiday bokeh: (1) pin-point highlights (twinkly lights on the tree), (2) low ambient light (your only light source should be the tree lights themselves), (3) a lens able to open to a large aperture (f/2.8 or wider), and (4) a short focal distance (or rather — enough distance between the lights and where your lens is actually focused).

TIPS:

  1. If you have a tripod, use it; if not, rest your camera on a steady surface.
  2. Turn off all other lights and use a higher ISO. I recommend ISO 800.
  3. Use your widest aperture. I recommend f/2.8 or wider.
  4. Keep your shutter speed high enough to avoid camera shake if you aren’t using a tripod. This will vary based on the amount ambient light available. I used SS 1/400.
  5. MANUAL focus! The key here is to manually take your lens out of focus to force your lens to a shorter focal distance.


Here is my example:

bokeh8


Don’t have a DSLR? No worries! You can still get great bokeh photos with a point and shoot camera (or even a cell phone camera). The key here is to trick your P&S (or phone) into taking a photo at a shorter focal distance. The answer? Put your camera on macro mode. Macro mode has a little tulip icon. I have an iPhone 6S and use the Camera+ app, which also has a macro mode.

Here is an example using my iPhone:


bokeh4


BONUS TIP:

Want to get even more creative? Try making shaped bokeh!

To do so, I dug out my paper punches and punched a few shapes into black paper. I also used my DSLR and lens, as I haven’t figured out a way to do this with my phone’s camera.


bokeh1


First, cut out a circle of paper the same size as your lens…


bokeh2


Punch a shape in the middle of the circle (fold the paper circle in half if your punch is short and you can’t reach the middle).

Next, tape the circle to your lens as shown below… and then follow the same instructions listed up above for “normal” bokeh photos.


bokeh3

Here’s a look at the result… isn’t it fun?


bokeh6


You can try some other fun shapes too…


bokeh7


Hopefully, this will help you capture some great bokeh photos this holiday season. Give it a try!


FarrahAbout the Author  Farrah Jobling is a member of the creative team here at The Digital Press. She lives in Denver with her amazing family — Mike, Nicholas (8), Claire (6) and Hope (1.5 yr old puppy). She works from home as a photographer and enjoys scrapping her personal photos.