Author: The Digital Press

12 Days of December – Day 9 – Holiday Cards and Teacher Gifts


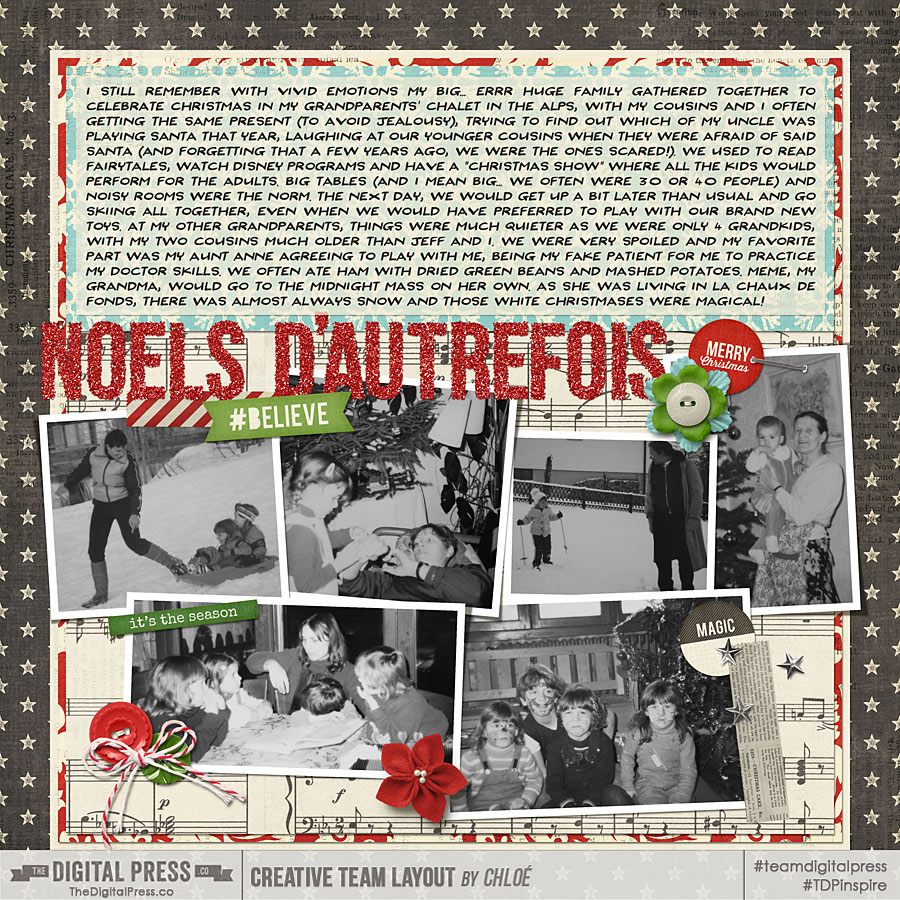
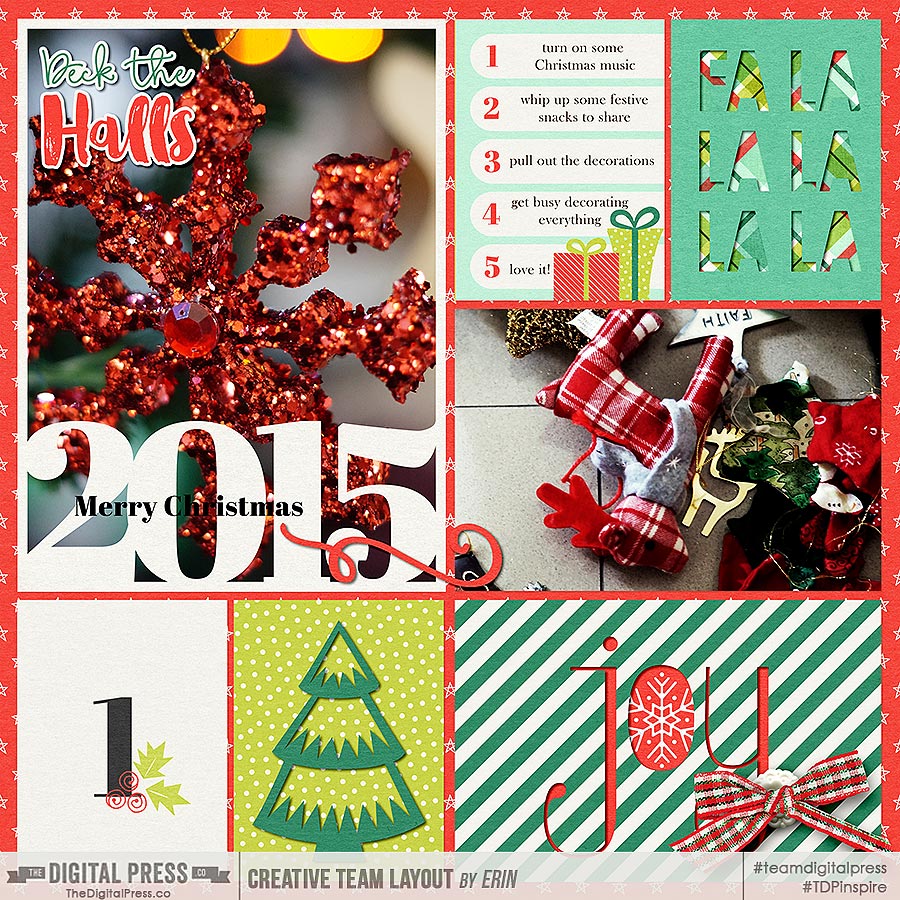
Can you believe it?! It’s December 9th already, and we are into our 2nd week of December. The Christmas holiday is rapidly approaching and we are gearing up for a very fun (but busy!) couple of weeks.

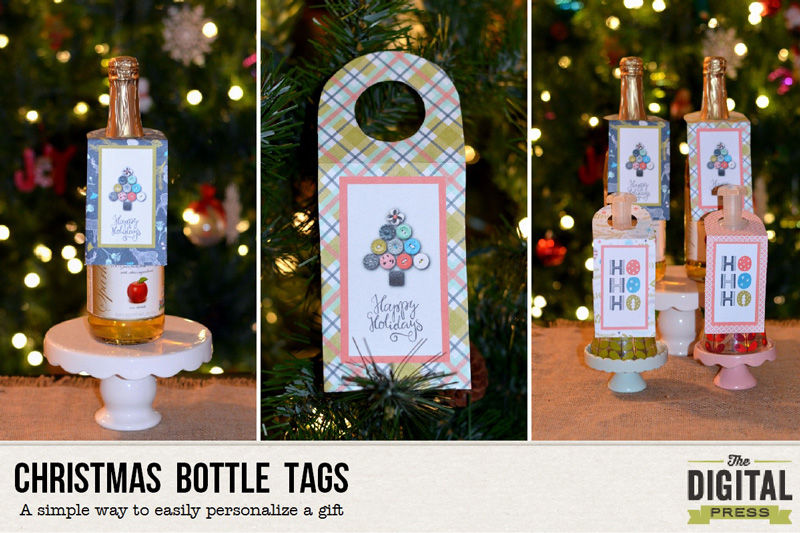
For us expats living and working abroad (our family is in Shanghai, China), it can be also a difficult time due to the many farewells, as lots of families and their children relocate in December. It’s tough to say goodbye to dear friends so the moment our kids began attending the International School, I made it a habit to have little holiday gifts and personal cards ready for them to give to their classmates. Today, I want to share one of these gift ideas with you… and show you how to use your digital holiday kits to the max.

As an added bonus (because this month can be really busy with work, school activities, winter concerts, cultural activities, and parties), it’s great to be able to create these little gifts with minimal effort. This is a “quick and dirty” way to have something special and custom to give to loved ones. 😉

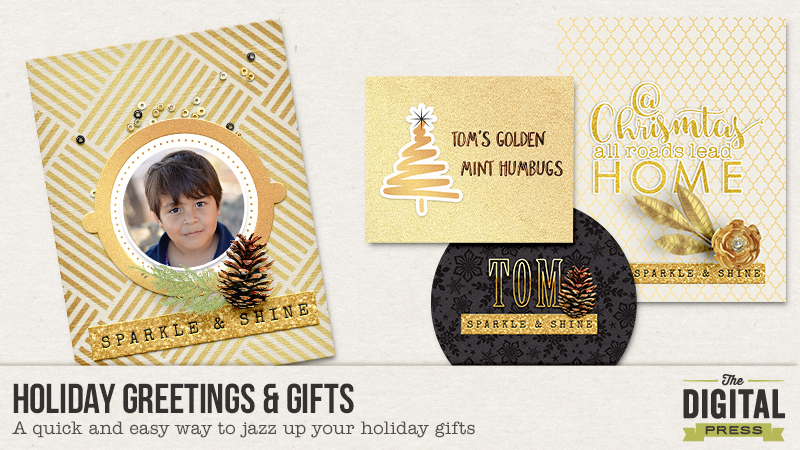
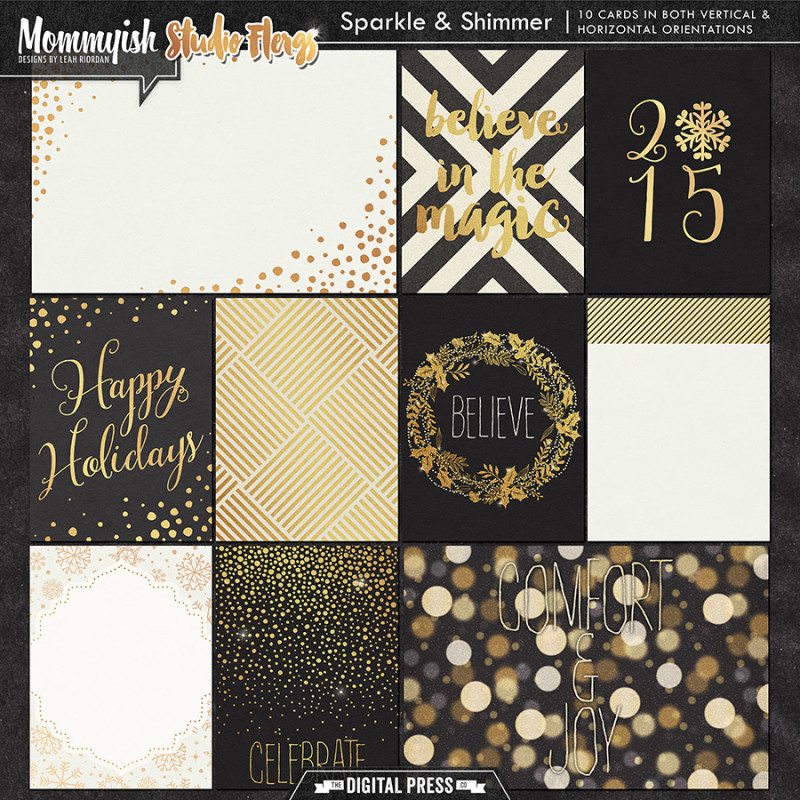
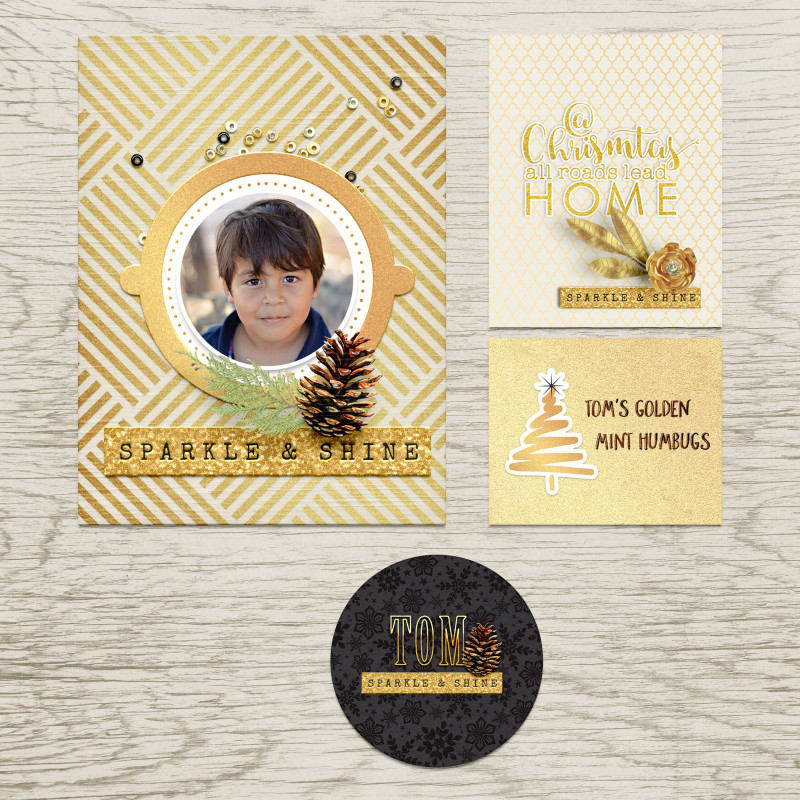
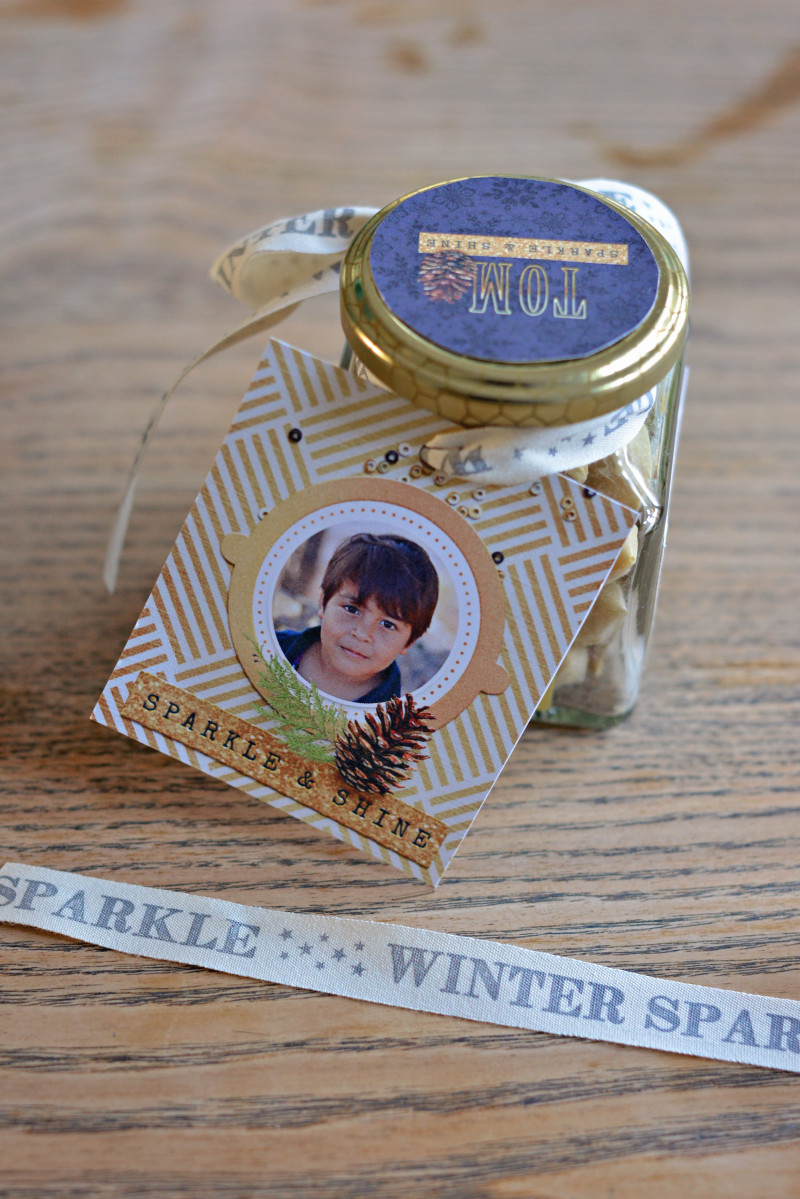
To get started, you will want to choose a digital kit/collection to work with. Lately, I have been loving the look of golden bling… and I couldn’t resist using the gorgeous Sparkle & Shimmer collab by Mommyish and Studio Flergs. This kit has so many awesome papers, journal cards, and elements that are perfect for adding some holiday sparkle…

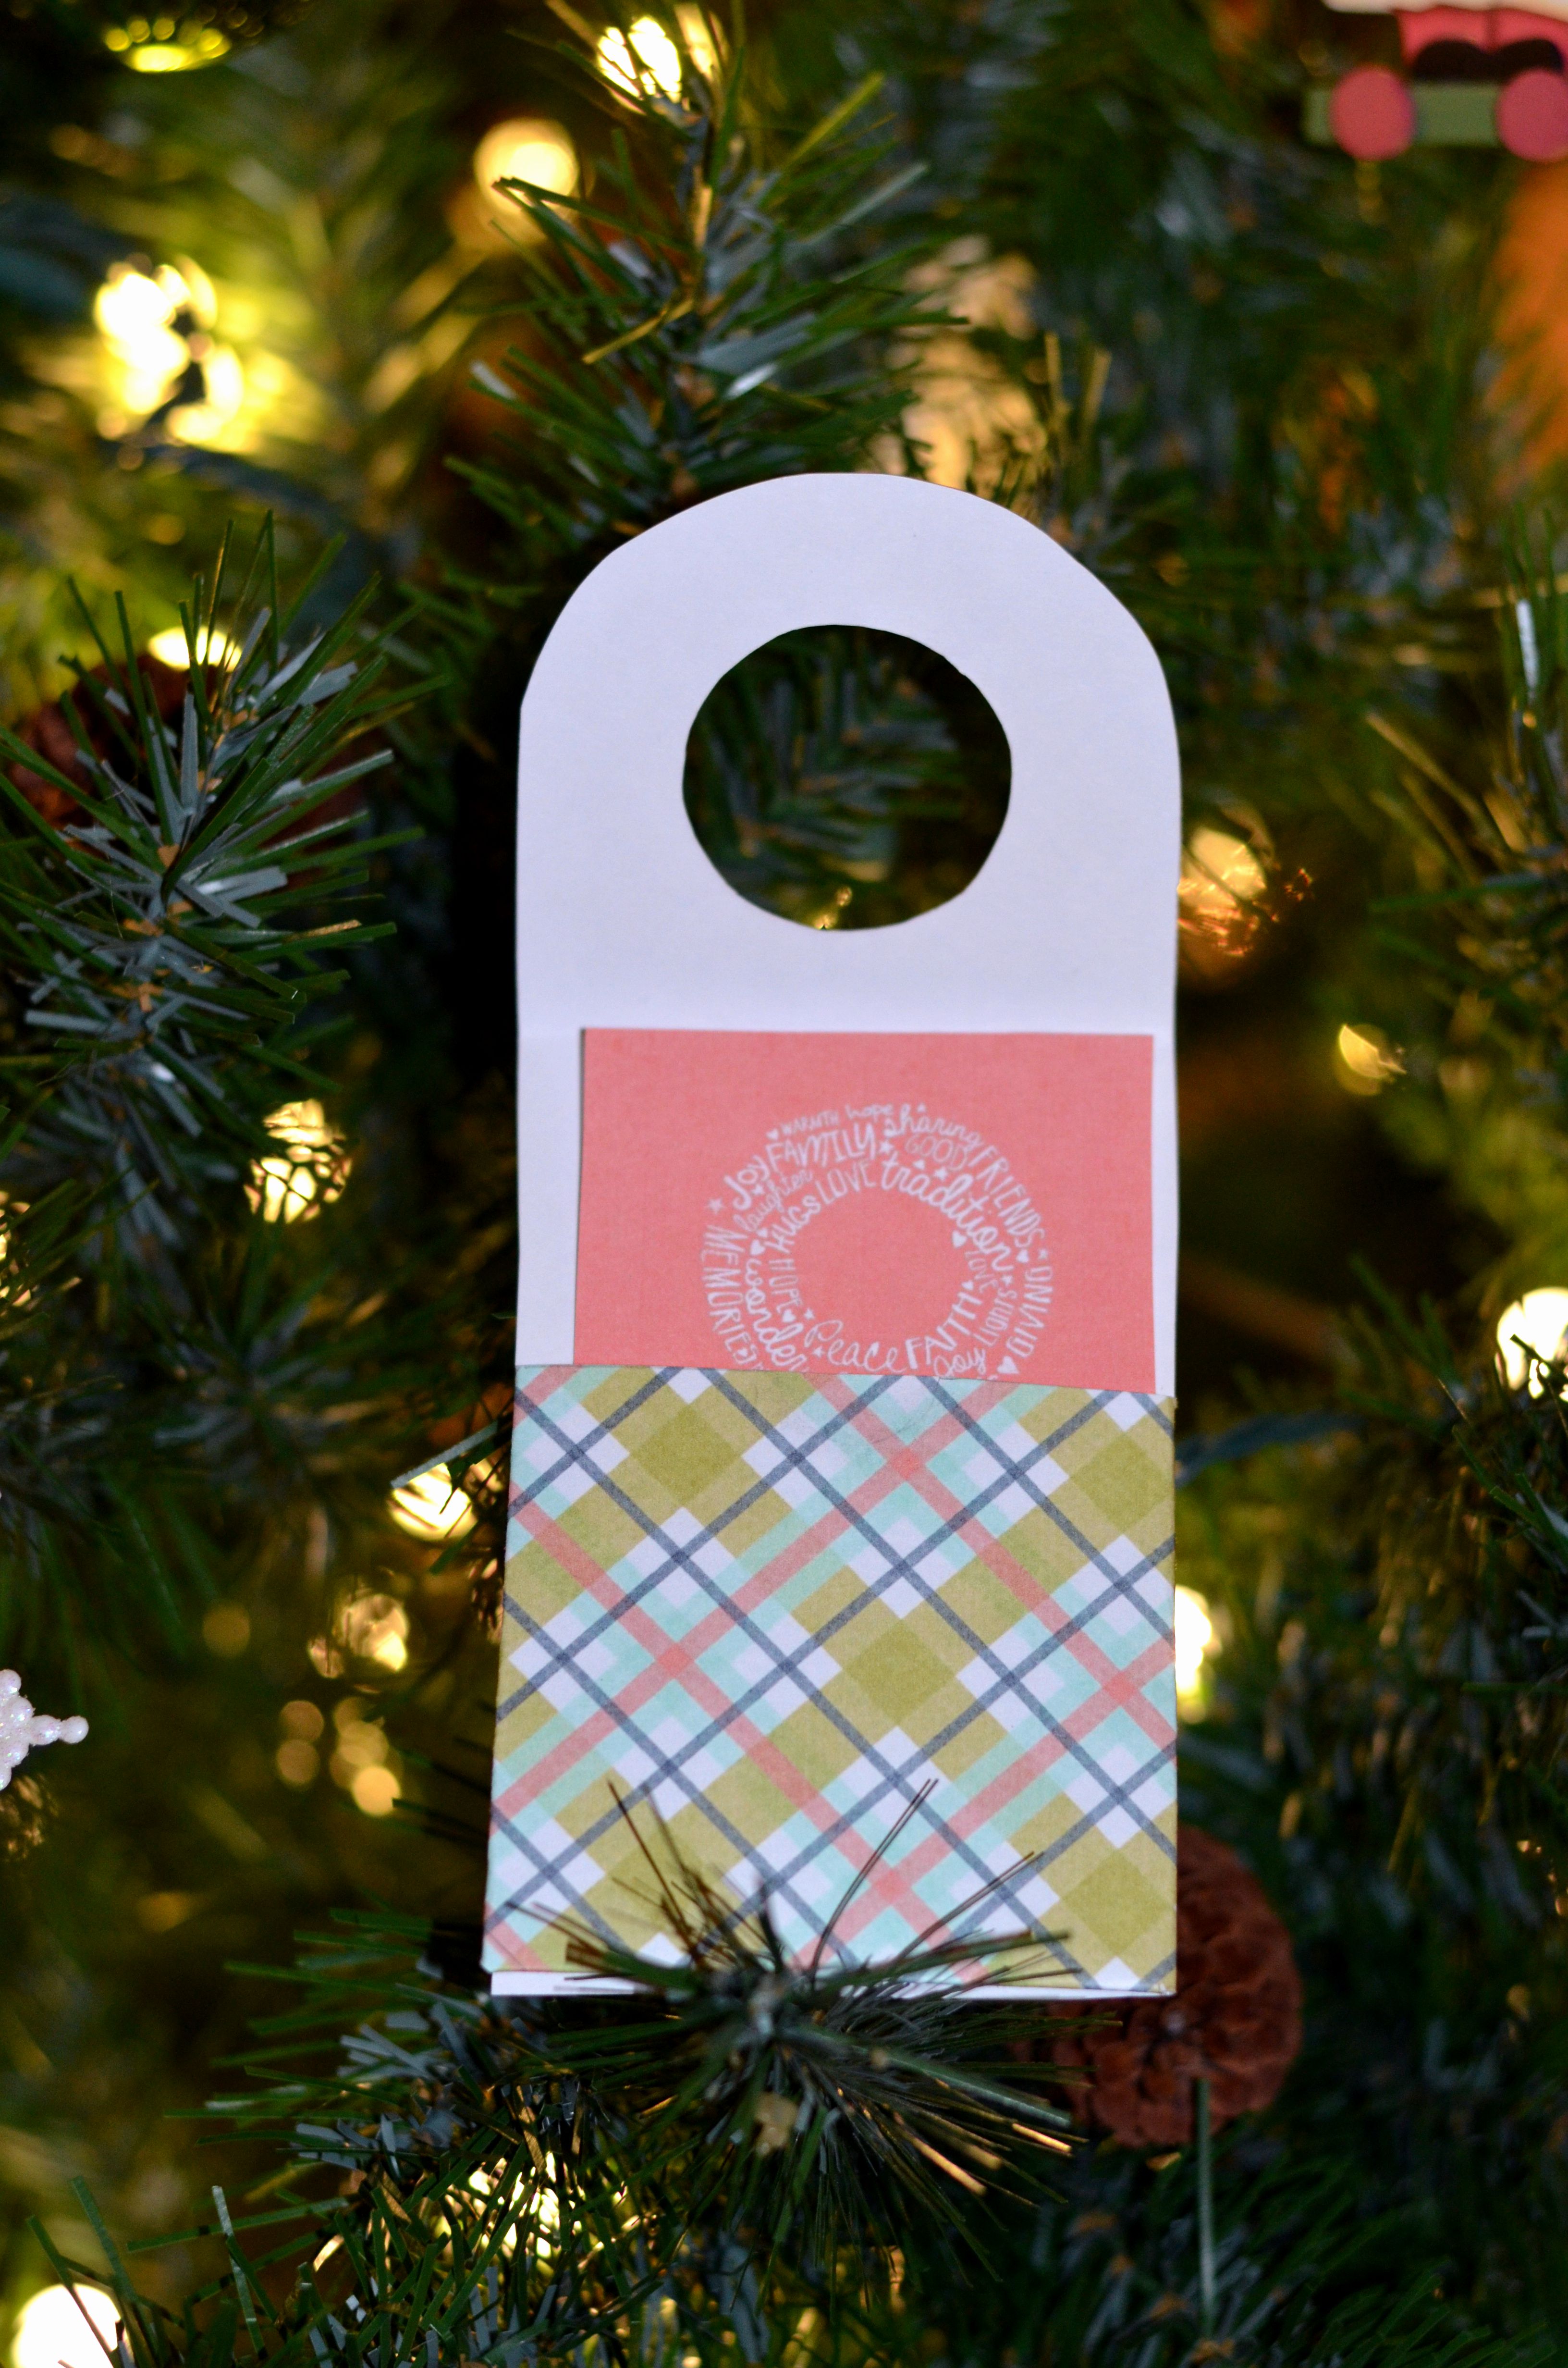
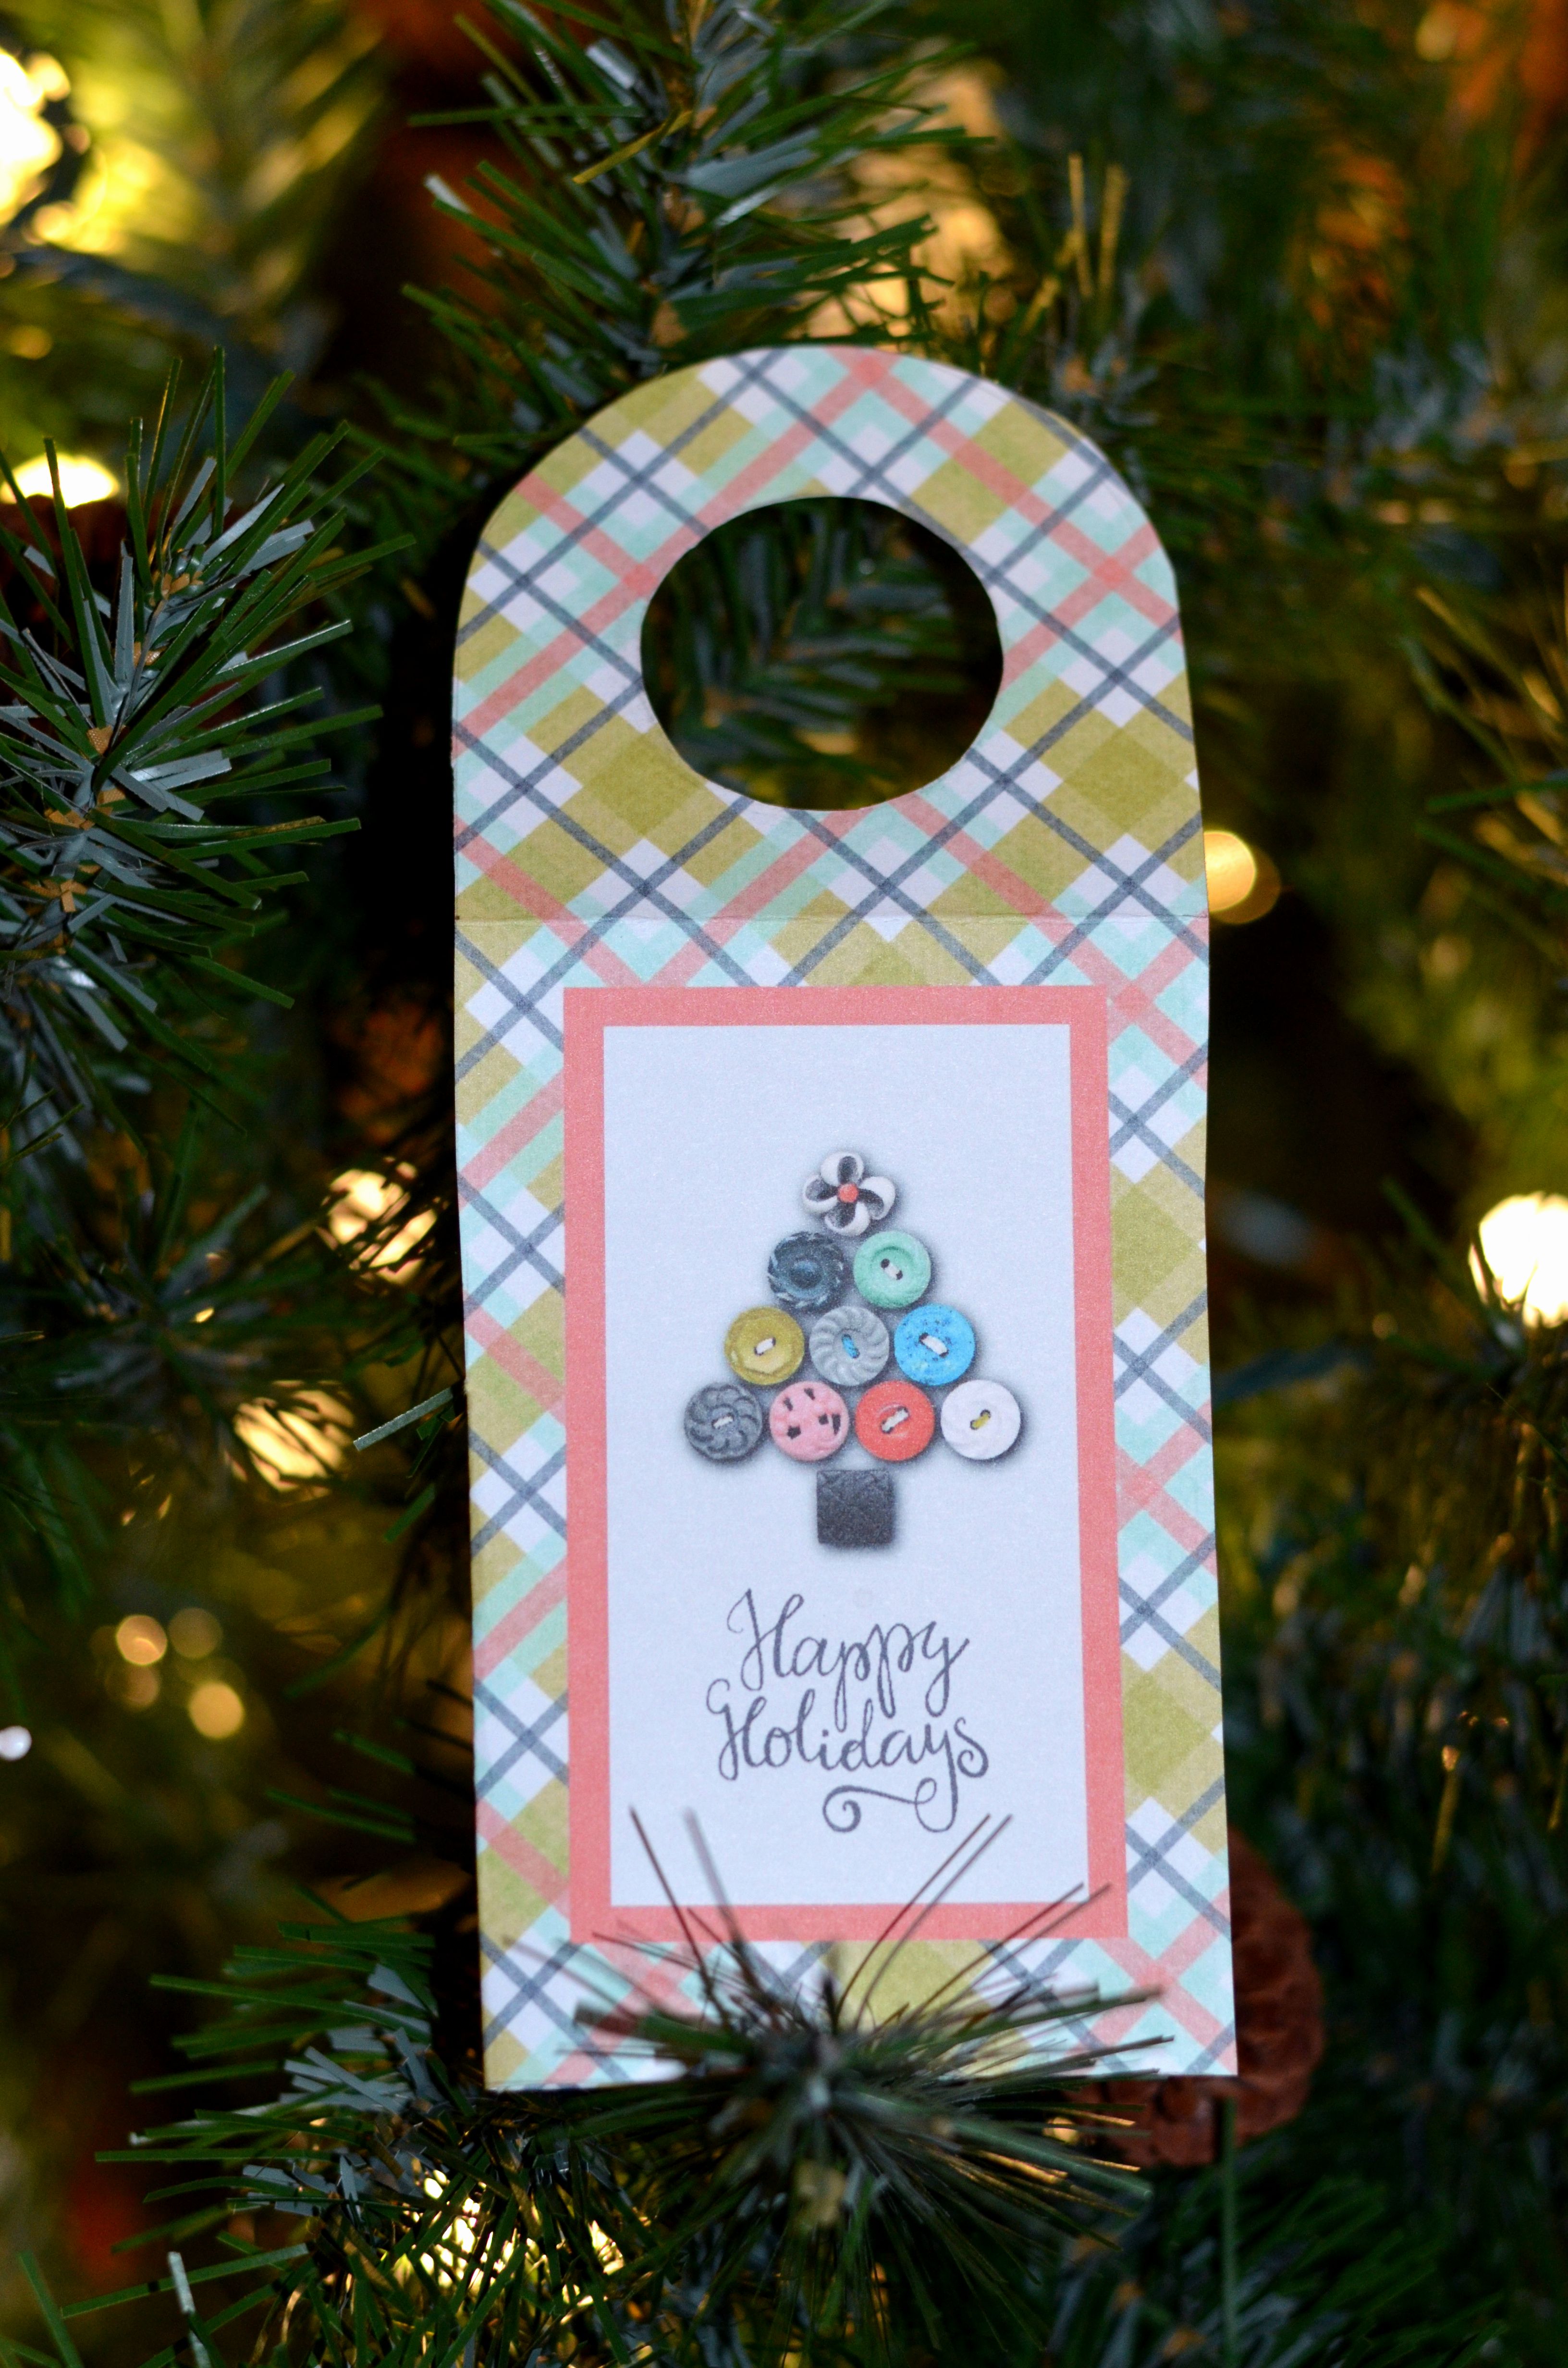
For the little tags I love to use journal cards/pocket cards, because most of the time they are the perfect size and you just have to add elements or word arts to make the tags your own. I chose to use these…

I also used an element (the little pine cone you see in the image below this) from the kit Traditionally Festive by KimB Designs (coming to TDP on Friday!).

For this tutorial, I will be showing you how to decorate little candy jars. You can either buy the ready-made ones (pre-filled with goodies), or find yourself some mason jars & fill them yourself. For this blog post I am using ready-made versions.

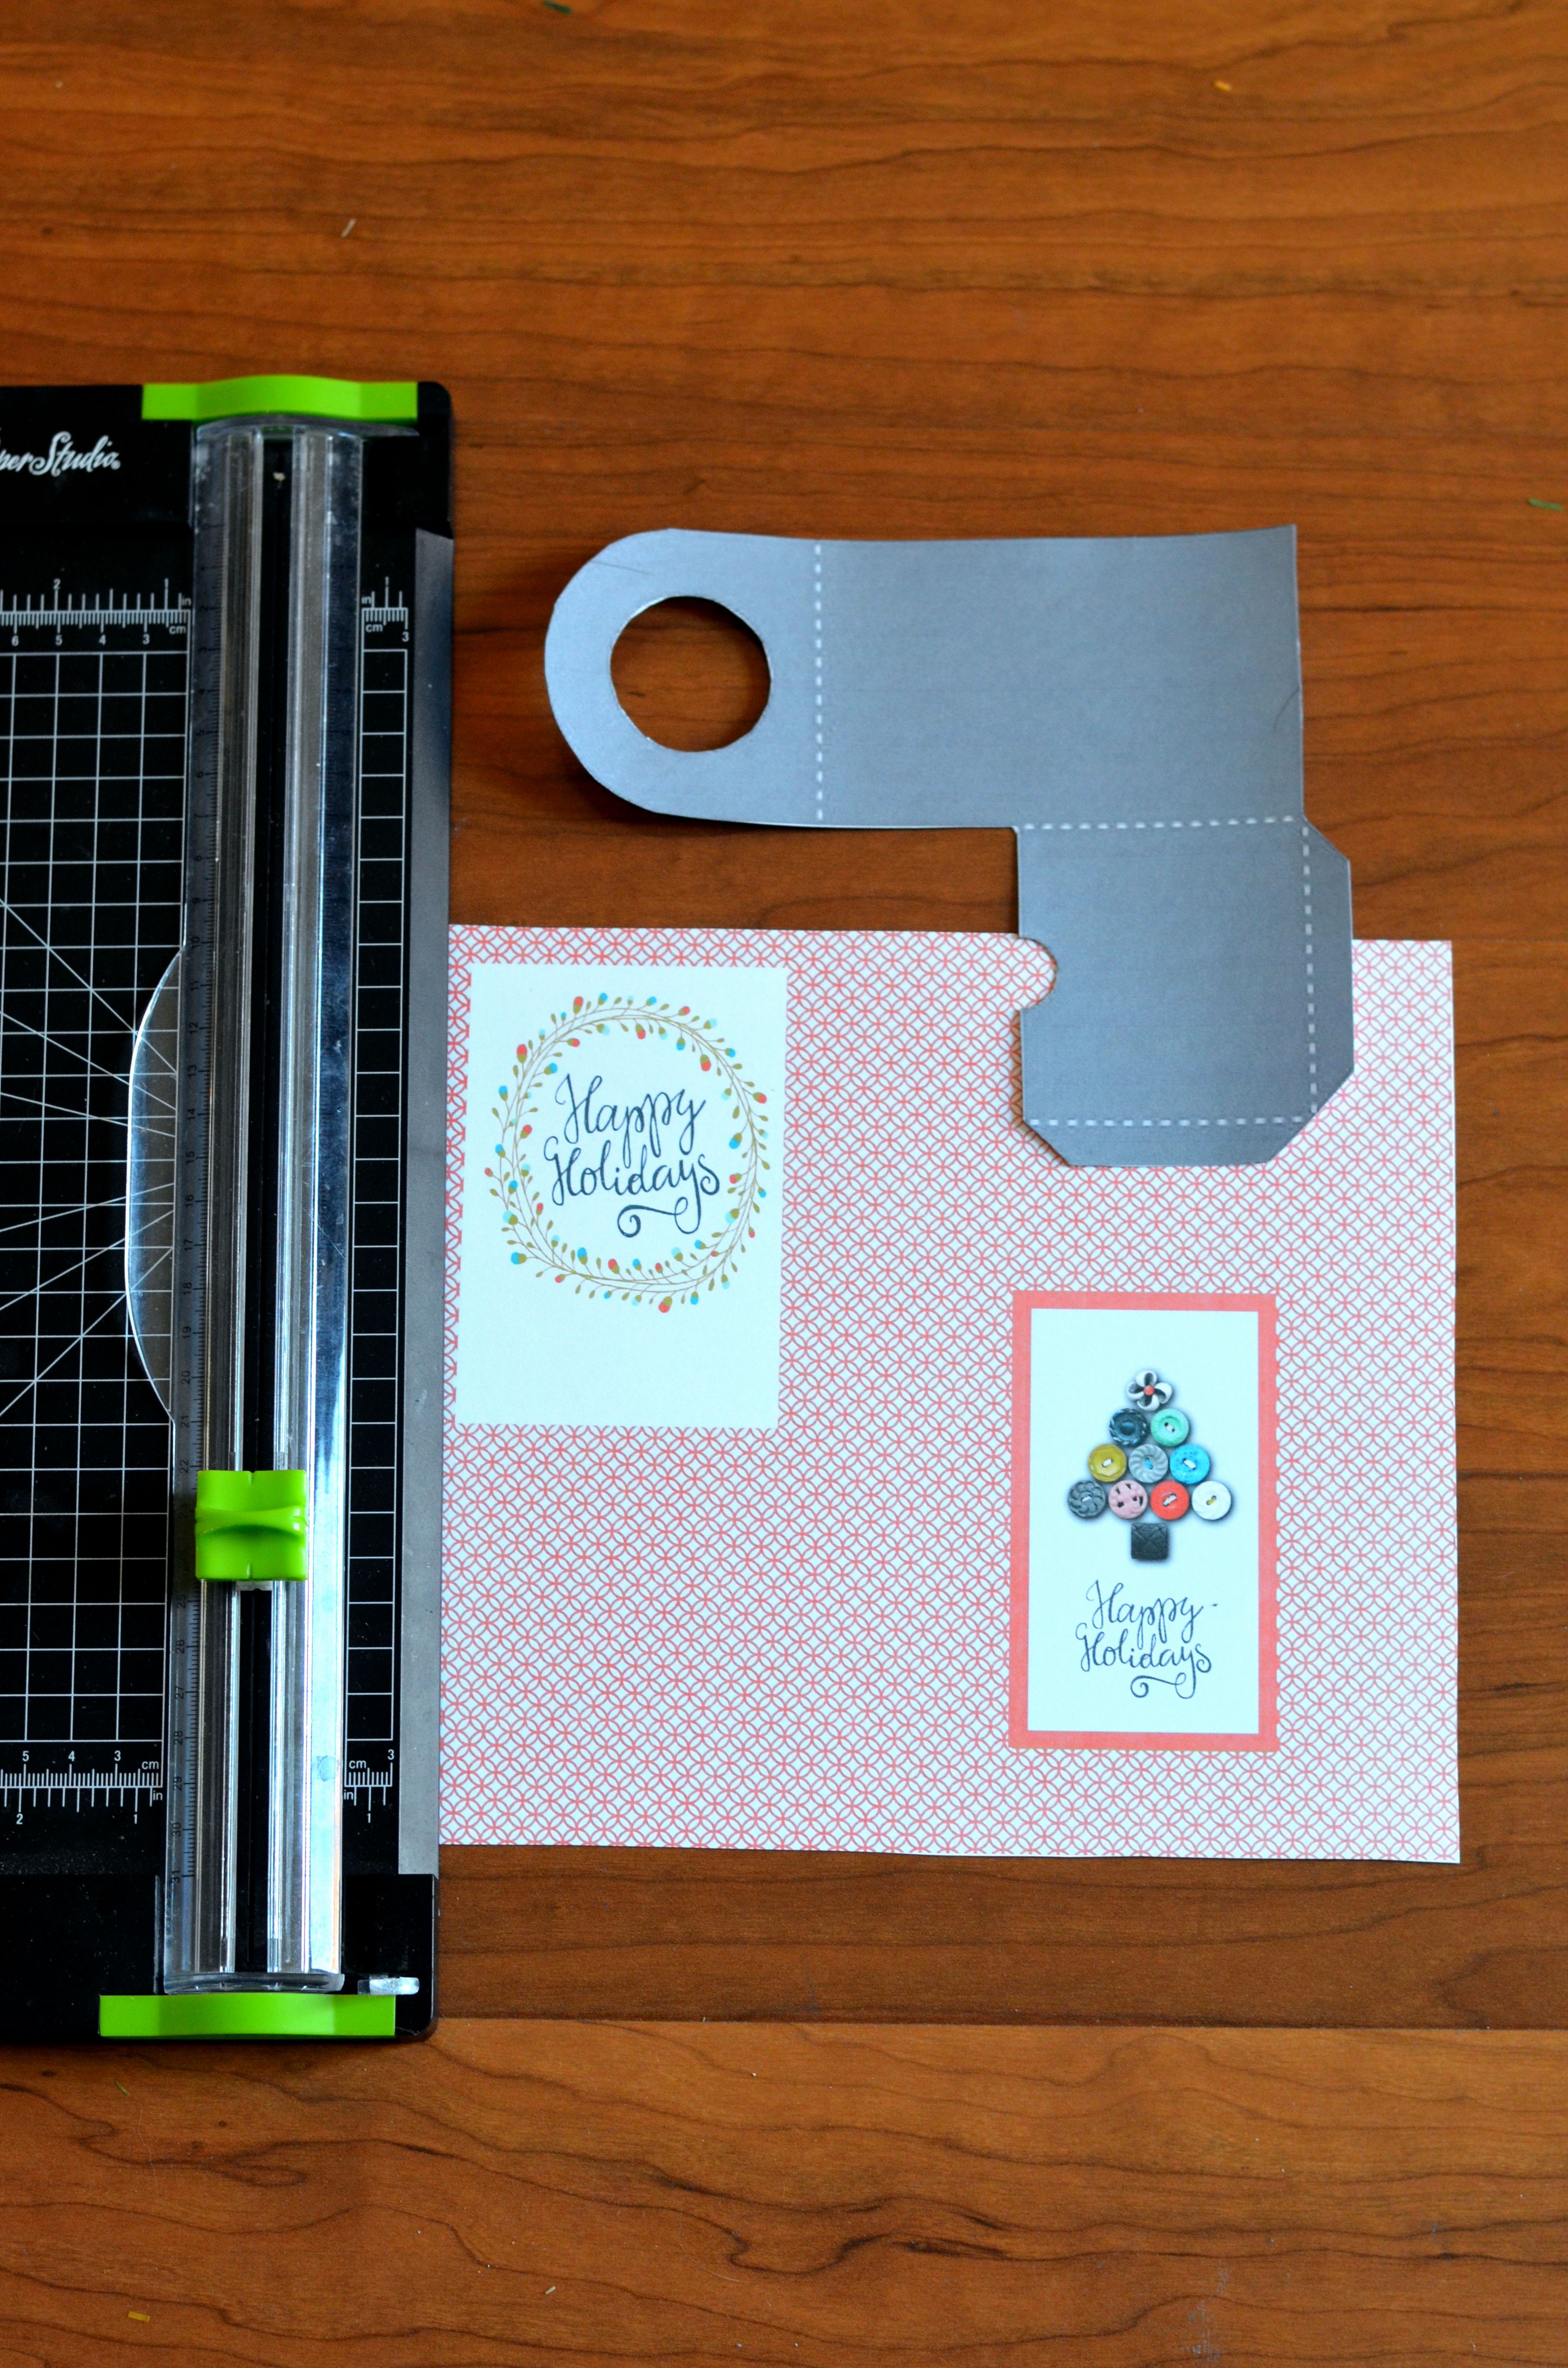
Before I started to make each tag, I first measured the dimensions of the space I wanted to cover. For the candy jars (see below), I wanted a rectangle for the front & one to cover the back (I want to leave the ingredients list untouched). I also want to have something covering the cap as well.

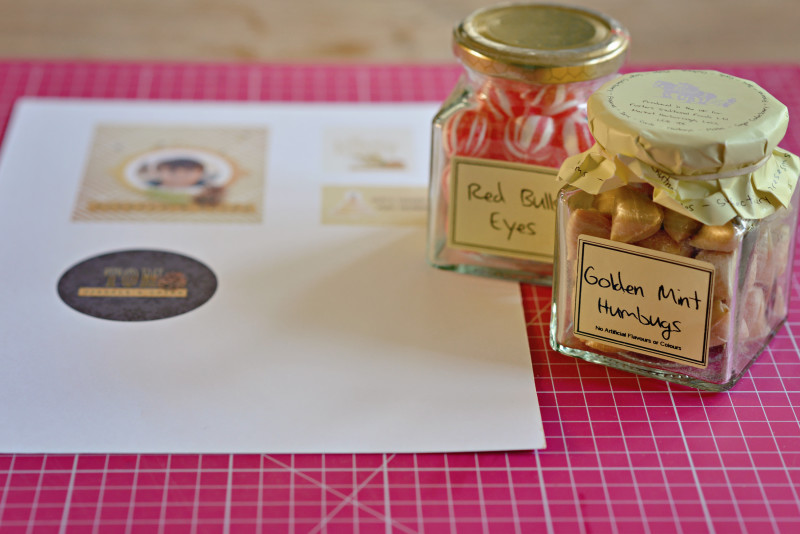
Once you have measured/planned and you are happy with your designs on the computer screen, print them out and then the magic can start. Here’s a look at a circle I printed out for the cap…

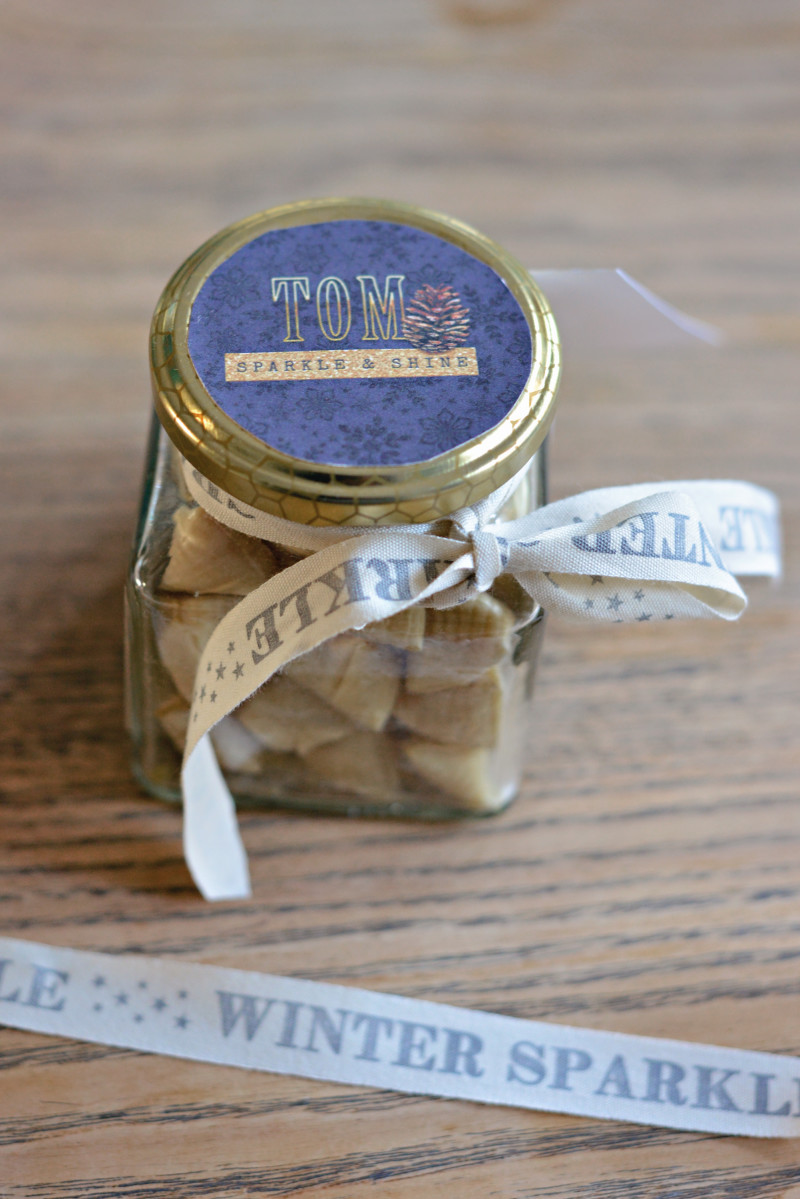
Here’s a look at the rectangle I used on the back, along with the tag I created to hang around the “neck” of the jar…

When I tried to add the gift tag I realized that it was a tad too large… so I ended up eventually cutting some from the top and the bottom.

Another option for small/simple gifts that I love to use… peppermint candy canes. Kids love them, and it’s a really easy item to tie a little tag onto (and then place all together in a bowl; I love to use the little Chinese steamer baskets — it looks awesome and makes it easy to share for my youngest).

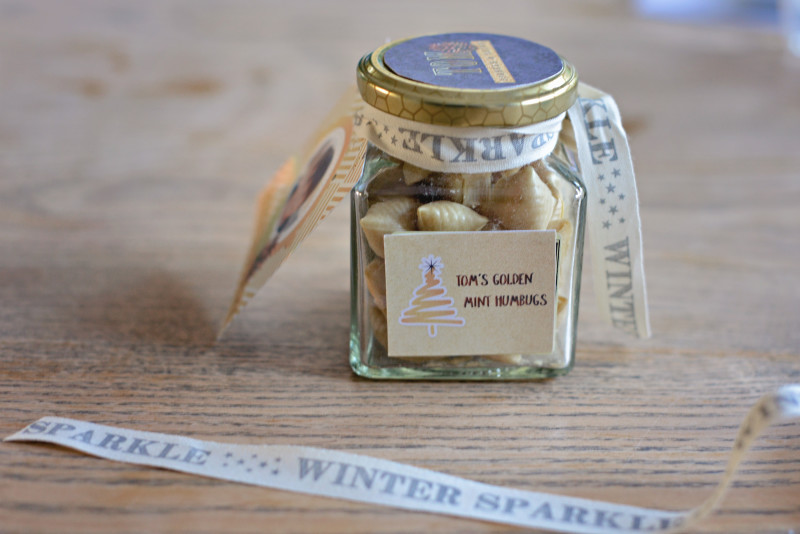
It took me about 15 minutes to design the labels & tags. I printed them on 120 gr white paper, added some pretty ribbon, and in 30 minutes max I finished these cute little gifts for their teachers and good friends.

Hopefully I have inspired you to create some wonderful holidays gifts, as well. If you give it a try… please come show them off in the gallery or forum here at TDP, because I would love to see what you create and get inspired as well!


Cecilia About the author Cecilia (aka MissK) is a member of the creative team here at The Digital Press. This Dutchie is at the moment living and working in Shanghai, China as a photographer. Together with her husband, Udo, and kids Lana (7) and Tom (5), she loves to explore the world and enjoy life to the max. Carpe Diem!

12 Days of December – Day 8 – Simple Holiday Photography Tips

decblog

The holiday season is full of color, scents, and lights. The Christmas season is one of my favorite times to photograph my home. I have learned over the years that some of the memories start to fade, especially the ones involving seemingly inconsequential things like your decorations.

Over the years, we have had many different Christmas trees, ornaments, garland, etc. I wish I had photographed them years ago… as it would be fun to look at what was trendy during previous years, what things I really liked at the time, and what those memories evoked (such as getting a kiss under the mistletoe, or my early morning coffee in a Christmas mug as I enjoyed a quiet moment before the kids came barreling into the room, etc.). So many of my old photos were of my family, or of what gifts we gave or received, or of our family pet. In some photos, you could glimpse bits of the decorations — the tree in the background, or the lights around the window, etc. — but they were never prominent in my photos. These last few years, however, I have made a point of photographing our holiday decor because seeing it really does evoke memories at a later date!

day8_decor


About Lighting

Lighting plays a big role in the look of your image. Decide what lighting best suits the mood of your photo. Indoor light bulbs generally are a warmer temperature such as with tungsten lights… but nowadays, more and more lights are being made with a cooler color temperature such as the fluorescent/daylight balanced bulbs. To keep it simple, when looking for light bulbs, remember that the higher the number (5000 K), the cooler the color temperature so the output is more of a blue, cooler tone. Conversely, a low number (2800 K) it will be a warmer, more yellowish hue. Neither light is better than the other; they are just a different color temperature on the Kelvin scale and will produce a cooler or warmer tone in your photo.

You may not always have a choice of what color temperature the lighting is in the room you are shooting… so instead, you may be able to adjust the color temperature in your photo editing software. I use Lightroom, and it is very easy to tweak the temperature. If I am shooting during the day, I leave the lights off and open the windows and doors to let in some natural light. If I am shooting later in the day, however, then I will need some help with lighting… so I turn on a few lights or use a speedlite. Most of my lights are daylight-balanced, but the temperature varies with different manufacturers. If I am utilizing lights in the room I am shooting, I try to shoot with that light either behind me, bounced off the ceiling (speedlite), or off to the side.  If there is limited light available, a flashlight or video light will also work in a pinch. I keep a couple handy for photographing food or small items.

Other Tips and Ideas

  • Photograph with some wide shots, taking in a lot of detail around the room. Don’t worry if the room is cluttered — if there is a coffee cup or beer can on the side table, or toys are scattered around the floor, because these all tell the story of that moment and of what was happening in that room.
  • Photograph with some close-ups, as well… capturing some of the details of your ornaments, cards, food, etc. Try varying your position…up, below, sideways…as not only do they each provide a different view, but also can vary the lighting which also provides a different look. I’m a big fan of shooting upwards or downwards (as in my sample image of the ribbon) which eliminates whatever else would be in the framing, had I shot it straight on.
  • If there are Christmas lights in your shot, adjust the aperture if possible (depending on the camera you use) to achieve different looks. For instance — open up the aperture to a low number (such as 1.8), which will blur the lights (as in two of my sample photos). Conversely, close down the aperture to a higher number (such as 14) to produce a starburst effect (as in the upper left sample photo).
  • Use a tripod, if available. If you are opening up the aperture (F-Stop) then I recommend using a tripod to keep the camera steady as it takes longer for the light to pass through and capture the image, so you want your camera to be steady. Alternatively, you can place your camera on a flat surface to minimize movement, and, even better, use a timer. The steadier the camera, the less chance of blurring your image.
  • Staging a shot can be fun, utilizing something as a backdrop. Don’t throw away old blankets, pillowcases, cloth napkins, etc… keep them for this kind of staging. I go to garage sales and pick up these types of cloth items really cheap — usually for under a buck.  Another great find is cloth placemats (or any material that isn’t shiny, which can cause glare in your shot). I found some small bamboo woven mats last year which I use to position small items on top of — such as 1-2 cookies. As a paper scrapbooker years ago, I collected a lot of paper, which also makes a great backdrop for small items.

I hope that I have inspired you to grab your camera and photograph your holiday decor so you’ll have those photos to look back on and remember for years to come. Enjoy the holiday season and keep that camera handy!


RaeAbout the Author  Rae is part of the creative team at The Digital Press and has been a scrapbooker and photographer for many years. She lives on the west coast with her hubby and her labradoodle, Taz. She’s addicted to chocolate, TV shows, and books!

12 Days of December – Day 7 – Holiday and Gift Albums

Hello! I hope everyone is enjoying the start of the most magical month — December. I love this month! The lights, the decorations (and making DIY decorations), the family traditions, the picking out of a tree… the list goes on and on.

Of all of the magic of the holiday season, a definite favorite of mine is making homemade gifts and giving photo albums as gifts. Thus, I wanted to share a few projects I have going on this year for Christmas. 🙂

The first project is a 4×4 photo album using my favorite photos of me with my best friend. We have been friends for nearly 13 years, so there were a lot of photos to choose from! After I collected the photos I wanted to use, I loaded them into Picasa where I made collages (see images below for examples; another method would be to use digital templates instead of a program like Picasa). For my absolute favorite photos I did a full 4×4 photo… and I also made several filler pages using digital papers and elements (for most, I used a variety of products from Scotty Girl Design; you could choose your favorite products/designers for these types of pages).

Here is a collage of the filler pages I made and the collage pages. For the empty spaces I am going to go back and add some journaling.

0-blog-12-7-one

Finally, once it was all planned out — I had everything printed and then I assembled it using a small 4×4 album with page protectors:

0-blog-12-7-two

Another album I am (finally!) making is a Christmas Favorites photo album. I chose an 8×8 format for this one, and began by choosing my favorite memories from each Christmas (all the way back to 2009). Again, I created digital pages (using Another 25 Days Templates by Sabrina’s Creations. Once the digital pages are ready, I print them out at an 8×8 size and put them into an album using page protectors.

Here’s a look at the finished project (so far… because I still have a few more years to finish and print)…

0-blog-12-7-three

And there you have it! Two simple ways to document Christmas and share your love of memory-keeping with others by using your favorite digital scrapbook products and tools!


TDP-blog-nov-sabrinaAbout the author Sabrina spends her days chasing a ferocious toddler (Sunshine) and an angry and sassy kid (Captain). She loves to spend her rare quiet moments escaping in lots of books and also loves a good dance party in the kitchen.

12 Days of December – Day 6 – Scrapping Your Favorite Recipes

12dodecday6

Well, the end of the year has crept up on us once again. Can you believe it is already December? November flew by way too fast for my tastes, and now Christmas is just around the corner. It’s that time of the year when everybody is feeling festive and getting into the holiday spirit. It’s also that time of the year when you won’t be able to resist the holiday goodies.

Holiday parties, cookie exchanges, holiday meals with friends and family… why is it we always schedule our social events around FOOD? It’s because we LOOOOVE to eat, of course! As an added bonus, it’s always fun to include this time of year in our scrapbooks. I love to document the parties… but even more than that, I love to scrap my recipes! One of my ongoing projects is to create a family recipe book. I’m always printing off recipes from the web, and I also have a lot of old, handwritten recipe cards that have been passed down for generations.

Here are some tips to creating recipe pages and recipe books:

  1. Add recipe pages to your books or create a dedicated album with divided sections for main entrees, sides, desserts, etc.
  2. Take photos along the way as you cook. Everyone loves to see the progression, so photograph the steps as well as the final product.
  3. Handwritten recipes are a bit more sentimental, so scan the original cards in to add some of that old-time charm.
  4. Keep it simple. I LOVE using this template album from Anita Designs. The pages of my book look coordinated and easy to read.

So, in the spirit of the holidays, let’s share some of our favorite holiday recipes! I will be posting more of my favorite recipes, ranging from side dishes to cookies to cocktails in the forum. Head on over to share your favorite recipes.

Banana-bread1 Banana-bread2


FarrahAbout the Author  Farrah Jobling is a member of the Creative Team here at The Digital Press.  She lives in Denver with her amazing family — Mike, Nicholas (8), Claire (6) and Hope (1.5 yr old puppy). She works from home as a photographer and enjoys scrapping her personal photos.


12 Days of December – Day 5 – Christmas Bottle Tags

header-blog2PS

I love the holiday season! It’s a great time to share gifts with friends and family. Today I’m here to show you a simple way to dress up a gift with bottle tags! I plan on making quite a few of these tags this month to add to my neighbor gifts this year — things such as bottles of sparkling cider or hand soap. To make mine, I used elements from both the All Spruced Up Kit and and All Spruced Up Journal Cards by KimB Designs…

All Spruced Up Kit by KimB Designs

All Spruced Up Journal Cards by KimB Designs

Supply list:

  • Digital kit of choice
  • 1.5 inch circle punch
  • Scissors
  • Glue dots
  • Hand soap / sparkling cider (or other bottled gift)
  • Optional: digital template for a bottle label tag pocket (or you can approximate yours using the following image as a guide)

tag

To begin, I started with a canvas sized at 11″ x 8-1/2″. I  used the Christmas tree element cards and word brushes from the All Spruced Up Kit.

template

If you choose to freehand a simplified template and don’t use a cutting machine… measure a rectangle 9″ x 3″, and then make a scored fold line at 2.75″ from the top. You can leave a square edge or round the edges.

Now, for those of you who are using a template similar to mine (shown above)… I loaded the template image into my digital program. I centered the Christmas tree and word art inside my transparent 9″ x 3″ template, and then I designed the image on the front of the tag as 2.5″ x 6″.  If you choose to add the pocket card on the back, you will need to create a journal card  2.5″x 6″ to slip inside. It will be the same dimensions as the image on the front of the tag.

As you can see on my image above, the right side is the front of the tag. On the left is the card for the back. In the photo, my template is on the side you will straighten the template to fit over the Happy Holidays image.  Once you have your page ready, you can print it on card stock from home or send it off to your local printer. Trace the template and cut it out by hand, or use your cutting machine. Punch a hole with a 1.5″ circle punch (or freehand it with scissors like I did). Score the dotted lines and fold, and then secure the back of the pocket with glue dots.

KimB back

I have included the front and back view of my completed bottle tag with the hole punched. Scored edges and pocket tag are shown on the back.

front

Here’s a look at the bottle gift tags attached to apple cider and hand soap… ready for gift giving!

KimB bottles

So simple to create… and you now have a personalized gift for friends and neighbors.  Join us in the forum for a fun challenge!

Merry Christmas and happy gifting!


TerresaAbout the Author Terresa is a mother to 5 beautiful children. She loves capturing memories with her digital camera and then creating a visual family memory book to be enjoyed and treasured. She also loves to design and create personalized items for her home and children. Other interests are crafting and gardening, and you will often find her enjoying the outdoors and soaking in the beauty of nature.

12 Days of December – Day 3 – Reminiscing Past Holidays

12 Days of December - 12/3 - Reminiscing past Holidays


When you are a kidless family like my man and I, Christmas doesn’t hold exactly the same magic as it does when you have kids around (or as it did when you were a kid, yourself). Looking back at my childhood, I still remember with vivid emotions my huge family gathered together to celebrate Christmas in my grandparents’ “chalet” in the Alps. My cousins and I often got the same present (to avoid jealousy)… we tried to figure out which of my uncles was playing Santa that year… and we laughed at our younger cousins when they were afraid of said Santa (forgetting that a few years before that, we were the ones who were scared!). We used to read fairy-tales, watch Disney programs, and have a “Christmas show” in which all the kids would perform for the adults. Big tables (and I mean BIG… we often were 30 or 40 people) and noisy rooms were the norm. The next day, we would get up a bit later than usual and go skiing together, even when we would have preferred to play with our brand new toys. In my dad’s family, things were much quieter with only 4 grand kids, and my cousins were much older than my brother and I. We ate the same Christmas dinner almost every year: ham with dried green beans and mashed potatoes. My grandparents lived in a small town in the mountains, so every Christmas was a white Christmas… and it was beautiful.

If you want to remind yourself of past Christmases (or memories in general!), try to use all your senses. We all have various ways to remember things, and even though visual memory is usually the strongest one — don’t forget to also use the smells, the tastes, the sounds, the feelings to bring back memories. Think of that itchy (and ugly!) wool sweater; those shiny shoes and velvet dress you wore on Christmas eve; your favorite dish from the Christmas feast; the first time you stole a sip of hot cider; the smell of fire in the chimney, or the smell of tangerines; the sound of Christmas carols; the sound of church bells ringing for midnight mass. Use all those bits and pieces as tools to jog your memory, then save those precious moments in a layout. That’s what I did here, using the fabulously-vintage kit Twenty-Five by Mari Koegelenberg.


Here are two other examples by talented TDP creative team members that show you how using all of your senses is a good way to jog your memory, even for more recent events. First, this gorgeous page by Erin (miimsgirl) using Season of Joy by Scotty Girl Designs…


12 Days of December - 12/3 - Reminiscing past Holidays


Here, Erin doesn’t write about a specific past Christmas — just the Holidays in general — but she uses the same tip of putting her senses into action: the sound of Christmas music, the taste of festive snacks, the view of decorations. It’s a great way to put yourself in a Christmas-y mood!

Another example is this beauty by Heidi, using Tidings of Joy by River~Rose…


12 Days of December - 12/3 - Reminiscing past Holidays


Here, again, the journaling isn’t about a specific year — but about the holiday season in general. She describes all of the pleasures of Christmas using various senses. She even added an additional dimension to her journaling by adding feelings and love, which is really the icing on the cake… or the star on top of the tree! LOL

I hope these tips will help yout dive into your memories and, using your five senses, help you document all of those precious little details which aren’t really all that little after all. 🙂

Merry Christmas in advance, everyone!


Chloé

About the author: Chloé is in charge of PR and communication for her small town by day, and “by night” is a digiscrapper and photographer whenever the light is beautiful. She lives with her man and fur-babies in the small town of Alsace (in the northeast of France), where she loves to read, watch good TV shows (TWD being her absolute favorite), and just hang out with her friends — no matter if they are close by, online, or away in her Swiss hometown.