Author: The Digital Press

Tutorial Tuesday | Lengthen Your Elements

Lengthen Your Elements

Are you ready for another tutorial from me?? I am a scrapper who always resizes the elements and from time to time that means that the element that I resized isn’t big enough to be visible on my layout. I’m really not sure how to describe it so I’ll just start with my tutorial and hope it will make sense to you.

I’m pretty much finished with my layout but I want to add a ribbon so I am opening the ribbon and it is way too big.

Lengthen Your Elements

It just isn’t in proportion with the rest of the elements so I need to resize the ribbon until I am happy with the size of it.

Lengthen Your Elements

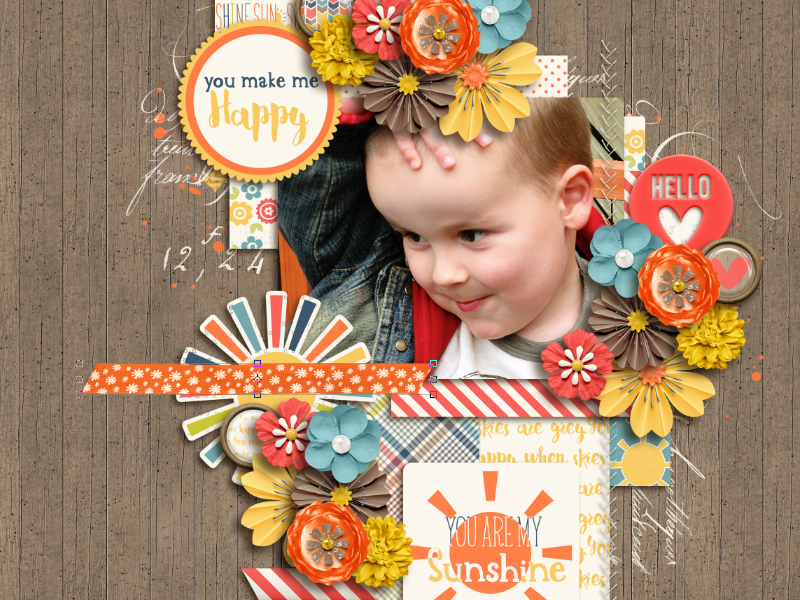
Now that it’s the right size I am going to rotate the ribbon and put it in the right place.

Lengthen Your Elements

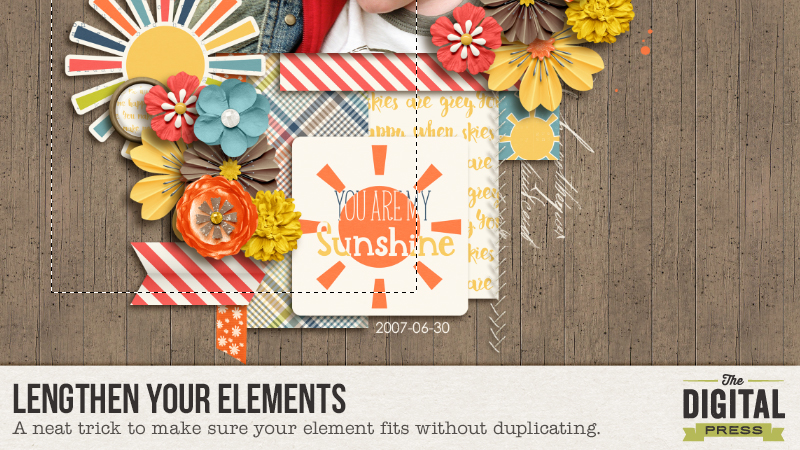
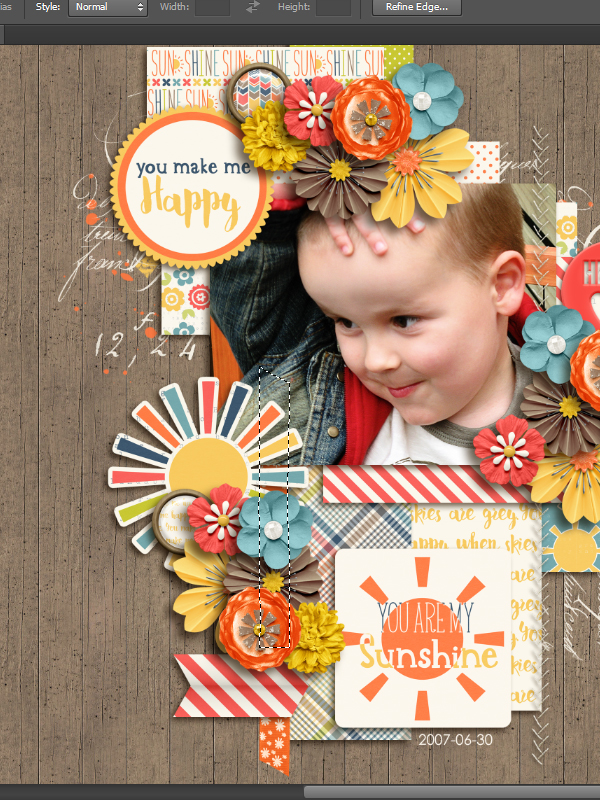
It’s in the right place but it’s too small and it doesn’t pop out on the top, as I would like. There are two ways you can make the ribbon pop out on top. You can duplicate the layer and move it to the top and you’re done. I’d rather avoid duplicating layers if I meant to use the element just one time. Flowers, I duplicate all the time (as you can see) but to lengthen my ribbon….I use this method:

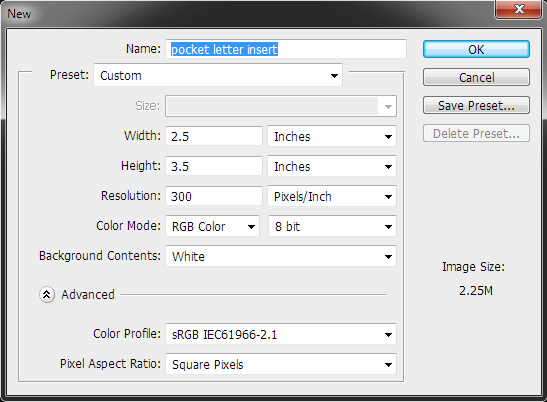
Select the rectangular marquee tool:

Lengthen Your Elements

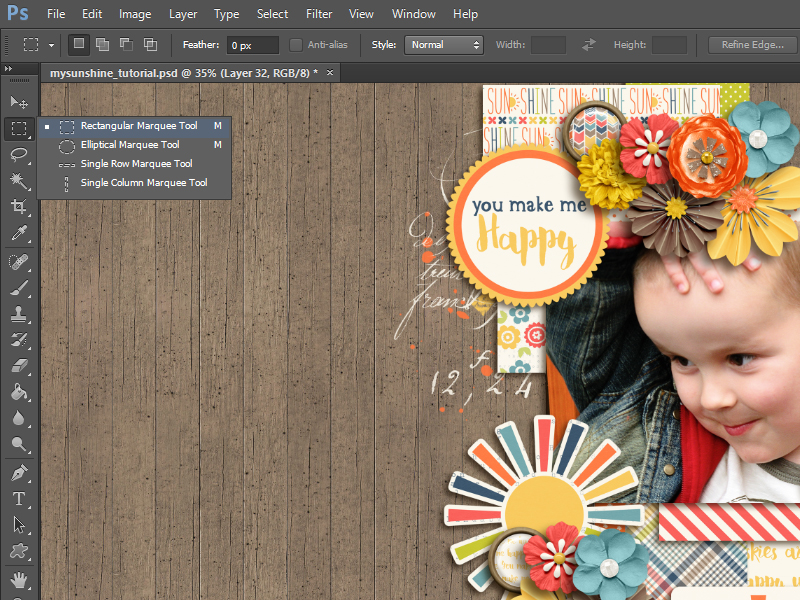
Make sure the layer of the element you want to lengthen is selected…

Lengthen Your Elements

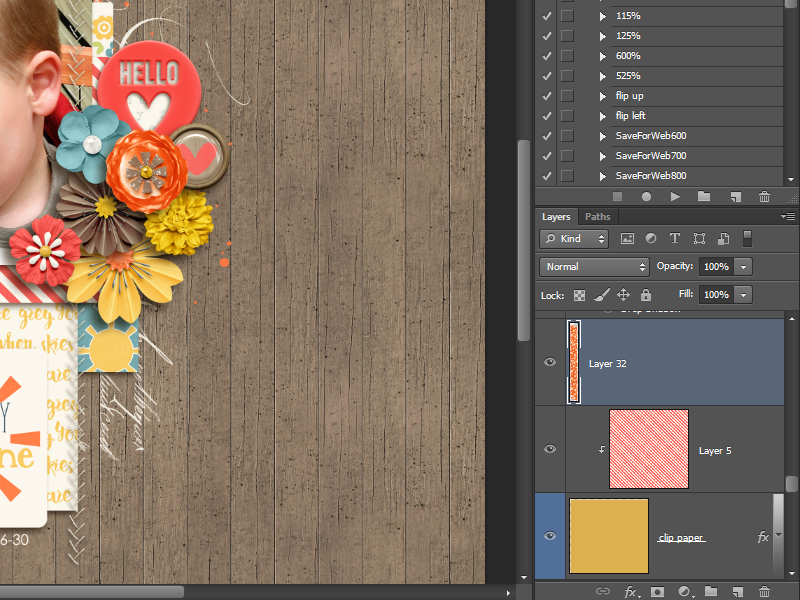
Now select the part of the ribbon you want to move/lengthen…

Lengthen Your Elements

I select a large area so I’m sure I’ve selected the entire ribbon. Now hold down the ctrl-button (CMD on Mac) on your keyboard and tap on the arrow of your keypad on your keyboard. 🙂

Lengthen Your Elements

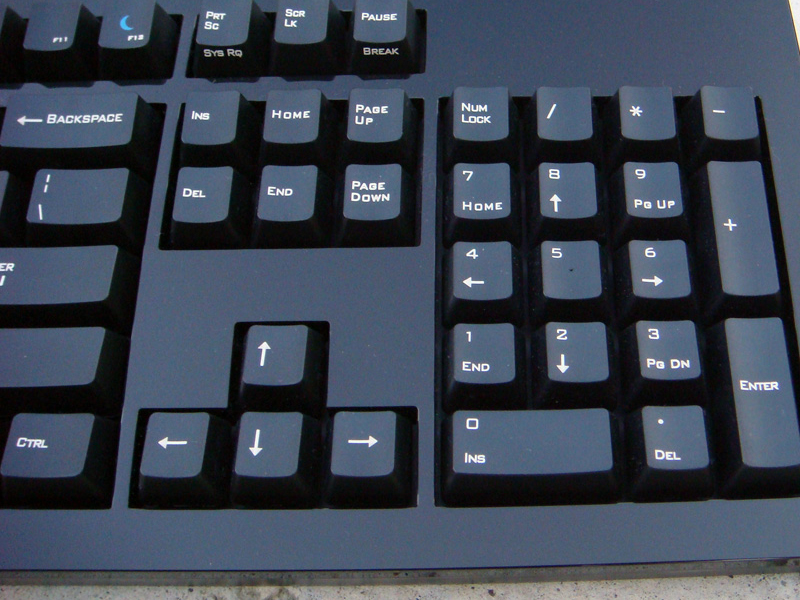
As you can see, the marching ants are now around the ribbon and you can move your ribbon in place with the arrow keys from your keyboard.

Lengthen Your Elements

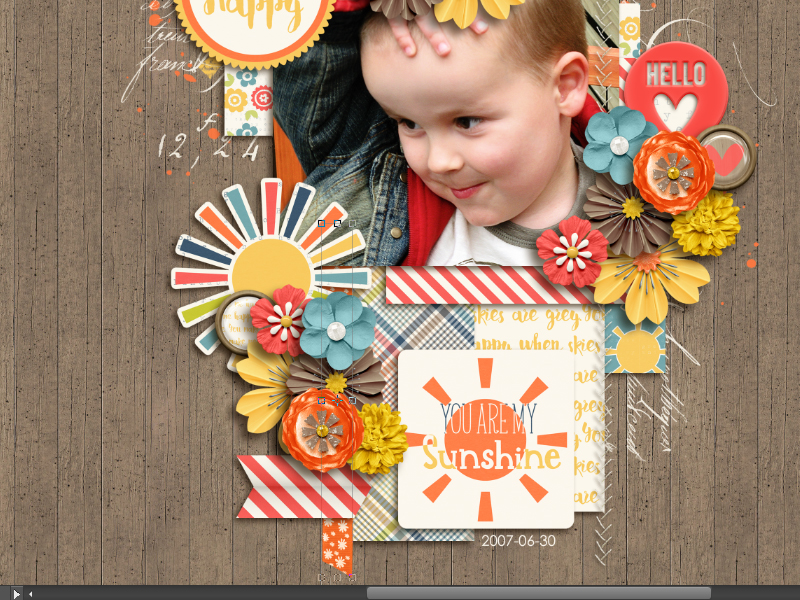
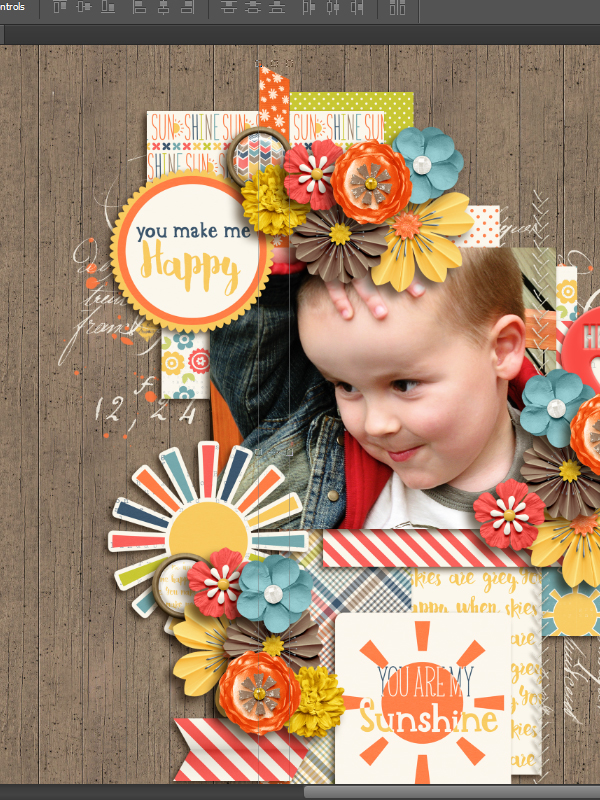
When the ribbon is in place….click ctrl-d (CMD-D) and there you go. You’ve lengthened the ribbon and now it also shows on the top.

Lengthen Your Elements

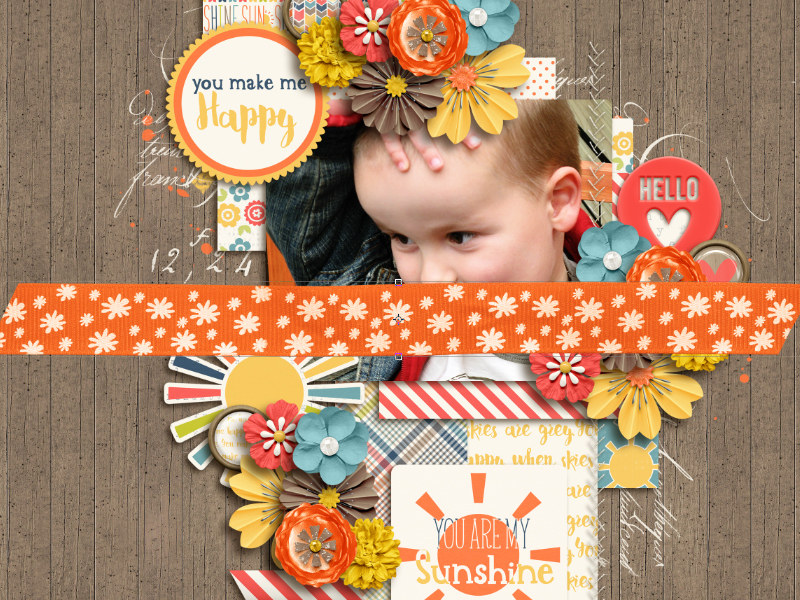
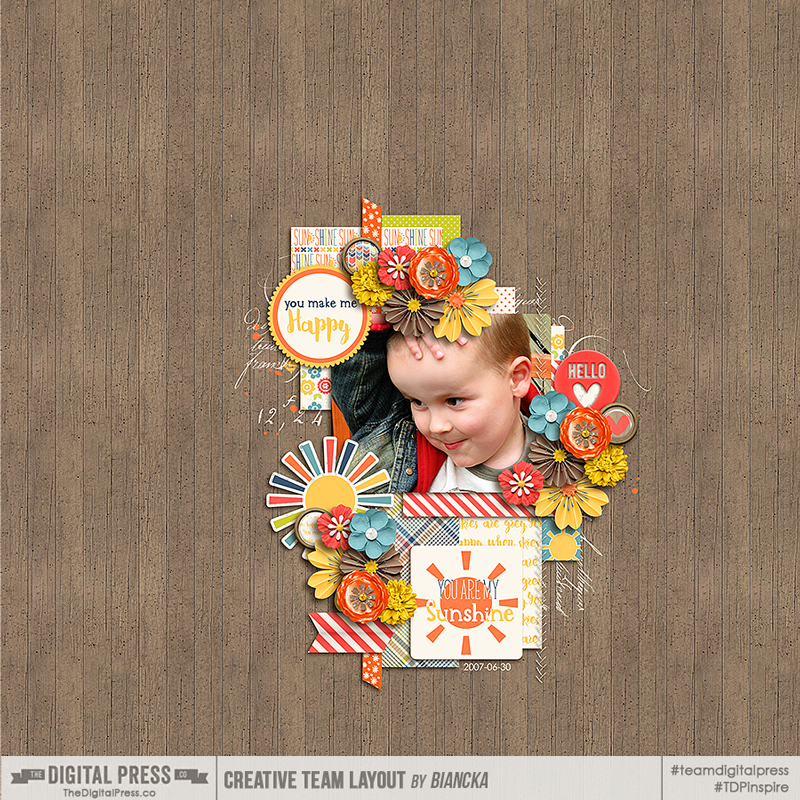
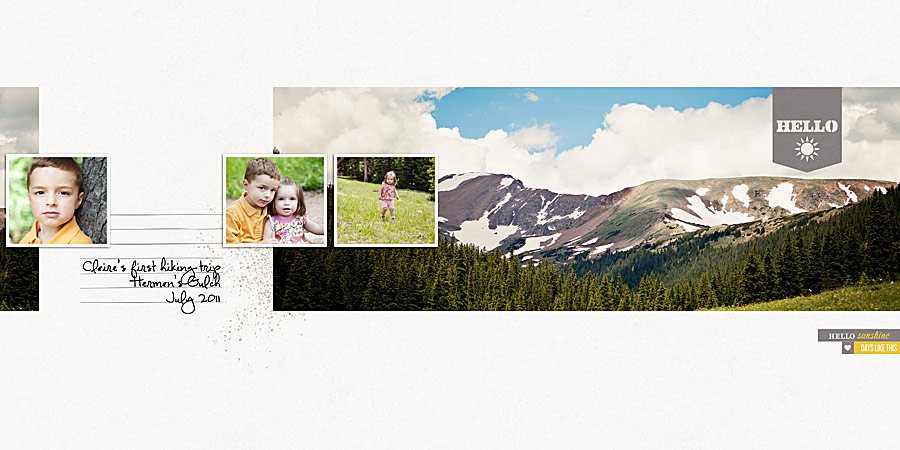
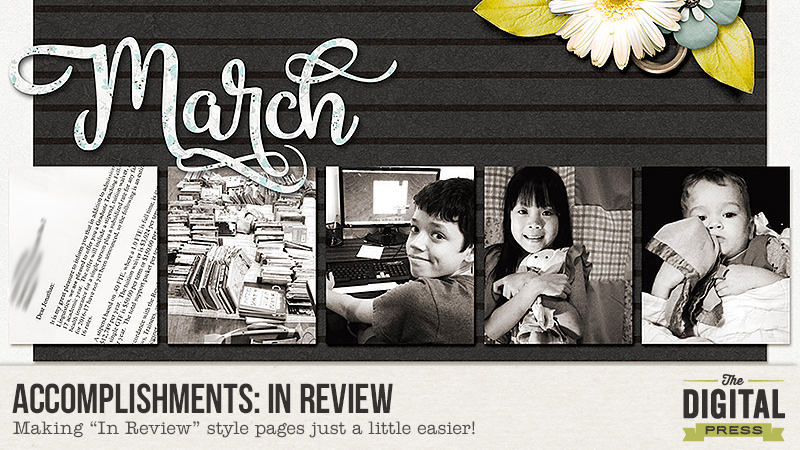
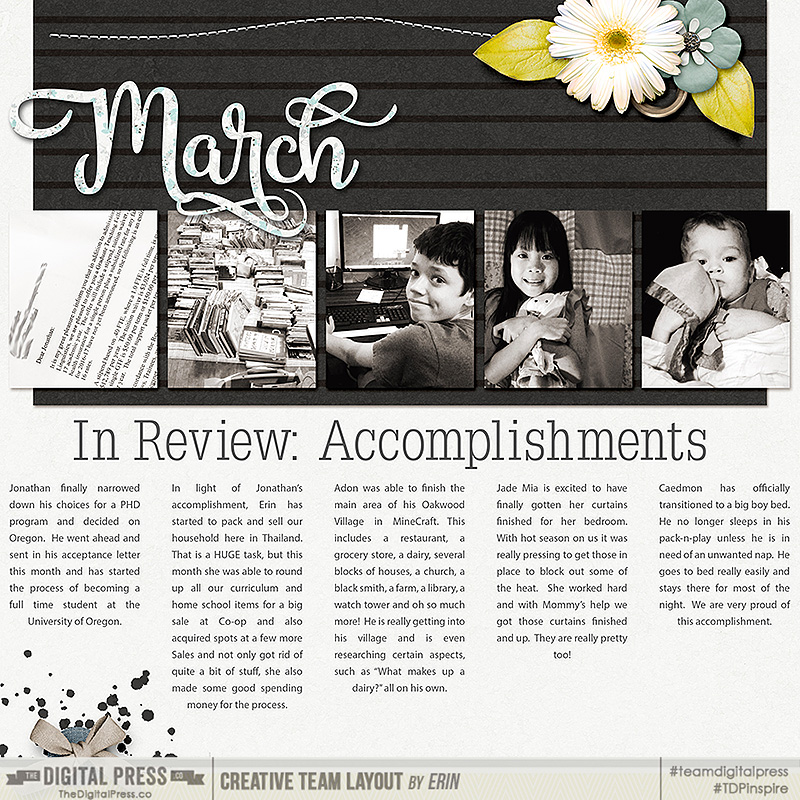
Now just add a shadow and you can continue with your layout. For me, this ribbon was the last element that needed to be added to my layout to be done. Here’s the finished layout….

Lengthen Your Elements

I hope you’ve learned something new and you’ll be able to use this when you’re scrapping.

Have a great day !!!


bianckaAbout the Author  Biancka is a creative team member here at The Digital Press. She is a stay-at-home mom (SAHM), a wife to Edwin, and mom to Jasper. She lives in the east of The Netherlands (about 30 minutes from the German border). She is addicted to scrapping, but also enjoys baking, reading books (mostly thrillers), watching her favorite TV shows, and photography.

Accomplish More | Bullet Journaling & Pretty Pages

Accomplish More - Bullet Journaling & Pretty Pages


We all need more time in life to do the things we really want to do, and not all of us are stellar at organizing our time.

Enter the recent “planner craze” that is sweeping the planet. I’m sure you’ve all seen zillions of pretty planners all over the internet.

I love the idea of all of the pretty planners that are out there along with subscriptions, clubs, and Facebook groups. In fact, The Digital Press has a wonderful array of planning supplies in the store here. Among them, you’ll find such gems as Miss Tiina’s great annual line of planner supplies… Mari Koegelenberg’s gorgeous planner-specific goodies… Hat of Bunny’s planner printables… Laura Passage’s scrapping planner products… and more!

I’ve bought planners, downloaded some others, and played around with a lot of different planning ideas. Unfortunately, so far none of them have worked well for me. And then… I stumbled across the idea of a bullet journal. To me, a dated planner just doesn’t fit my needs because I don’t have that many things going on in a given month that I need to track. For me, it is all about lists and keeping ideas & projects from falling through the cracks.

The basic idea of the bullet journal is to keep a small notebook in which you can maintain a regular stream of tasks and lists. You can find out more about bullet journaling at the bullet journal site, and there are literally thousands of links on Pinterest. But it is a generally simple method of using an index — “collections” — that are sort of over-arching categories… and then “rapid-logging” your ideas/thoughts — which is where the bullets come into play. Under categories you create your logs, lists, charts, graphs or other items. Then, as a final step, you simply migrate those tasks into action by moving them to a calendar. To me, it is a far simpler method of tracking and planning. You don’t spend so much time on the planner itself — and instead, spend more on completing the tasks themselves. I don’t end up migrating because I keep things pretty simple, and that is how it works for me.

There are a lot of people who are hard-core serious about their bullet journals (or bujo) and some dedicate hours upon hours to their journals, hand-drawing lots of fancy dividers, headers, sketches and everything else you can imagine. People use fountain pens or other fancy writing instruments, do calligraphy or other elaborate writing, etc. I love that idea, but have no time or patience to do something like that.

In terms of the more elaborate style of bullet journaling… here is a sample page spread from Kara at Boho Berry (someone I follow who is also a fellow bullet journaler)…

Accomplish More - Bullet Journaling & Pretty Pages
I love this. But at the same time, for myself, I feel that if I spent that much time “planning,” I wouldn’t have time for the actual “doing.”

But I do find that I want pretty pages like these (which our very own TDP team member Amanda created in a previous blog post).

Recently, it dawned on me that I can just use regular ol’ digital scrap supplies and create my own “pretty” bullet lists with those. Pretty and practical all at once. I am not as detailed or prettified as I could be, but it is a quick and easy page that gets me doing instead of planning. And if I want to get wild and crazy, I can shift it slightly, print it out and paste it into my physical bullet journal. If not, I can keep it on my desktop, send it to Evernote, or put it onto my phone.


See… easy peasy. A simple way to get my to-do list done — and add some color and fun while I’m at it. I used the pie chart as my version of the “Level 10 Life” (but because I’m not currently working or dealing with much in the way of finances, I left those out and added some of my own). I can track and see what needs adjusting and where I should put more emphasis week to week. I can accomplish more, but still give a little bit of style and prettiness. Win-win!

How do you plan out your week? Do you worry about making it “pretty” or just stick to functional? I invite you to come join us in TDP’s forum for this week’s challenge related to this post!


me

About the Author  Kimberlee is a lover not a fighter; a stay-at-home gran, a poet, and a lifelong learner. She grooves on saturated colors, Tuesday dance parties, optimism, glitter and sunshine. She colors outside the lines.  She is a dreamer. She is a collector of moments.  She is all about the story.  Kimberlee completed her MFA in Creative Writing and recently finished her M.Ed. in Instructional Design but still can’t figure out what she wants to be when she ‘grows up.’

Tutorial Tuesday | Accomplish Albums Faster

Do you every feel like working on an album is an endless endeavor? Do you ever think to yourself “How can I get more pages done in the same amount of time?”  Using double page spreads is a great way to accomplish your goal!  Even though I usually upload single layouts (LOs) at a time to make them easier for viewing online, I always end up making double spread layouts.  I prefer the double spread for a single event/theme.  I know there are some who agree with me and I know many disagree; either way, it’s ok.  Sometimes you might want to throw in a double spread, even if most of your LOs are single pages.

Here are some tips for using double spread layouts

  1. Make it simple – Start out with a double sizes base, (i.e.: 24×12).  You might be thinking “Wow…that’s a lot of space,” but, a double spread doesn’t have to be intimidating, and it doesn’t have to be 2 separate full layouts.  By spreading out, you can include larger photos/elements, more journaling, or even some white space.  Templates are a great place to start.  Many designers offer 24×12 sized templates, or 12×12 sized template sets that coordinate well.  Many project life templates/ layout styles are double spread as well.
  1. Make it cohesive – My double page spreads are almost always made using the same kit and photos from the same event/day.  On occasion, I will mix it up, but only if the final spread is cohesive.  I might use black and white photos on both sides, to keep a similar mood, or maybe even the same kit, but with photos from different events.
  1. Make it big – Another of my favorite ways to make a double page spread is to use BIG photos.  If there is a photo from a set that I am in love with, then I won’t hesitate to have that photo take up at a whole 12×12 side.  I might even use a 24 inch wide panorama photo spanning the entire spread.
  1. Make it to the end – It’s important to keep your end goal in mind.  Whether your goal is a year, or a certain number of pages, or some other “album-defining” moment.  Try not to over think it, and when you’re ready, go ahead…push that print button!

Here are a couple of examples of my own double spread LOs:


Here are some links to check out to get started on double spreads:

TEMPLATES HERE

GALLERY INSPIRATION


Farrah


About the Author  Farrah Jobling is a member of the creative team here at The Digital Press. She lives in Denver with her amazing family — Mike, Nicholas (9), Claire (6), Hope (1.5 yr old puppy) & Kringle (3 mo old bunny). She works from home as a photographer and enjoys scrapping her personal photos.

Tutorial Tuesday | Hybrid Pocket Letter

pocketletters
Hi everyone! Indah here today with a tutorial for creating a trendy pocket letter that I have seen all over the internet.

What is a pocket letter? Pocket letters are penpal letters in pocket format… using pocket scrapping supplies. Basically, you fill all of the pockets of a page protector (most commonly used for this is likely the 9-pocket size), and send it to your penpal! Too fun. 🙂

I have made one as an example using my digital scrapbooking supply stash — it’s so easy and fun! All you need, apart from your digi supplies, is a pocket sleeve. I couldn’t find a standalone pocket sleeve, so I tore one up from a pocket sleeve album. My samples shown here were all made using the digital collection As You Wish designed by Scotty Girl Design.

The first step is to print out your digital papers. This can be done with your digital imaging software by resizing or creating a document sized to fit your pockets (mine were printed/cut at 2.5″ x 3.5″ for my 9-pocket page).

Tutorial Tuesday | Hybrid Pocket Letters

Tutorial Tuesday | Hybrid Pocket Letters

You can also use your digital pocket cards — just re-size accordingly. Often, this means cutting off part of the card slightly… but it’s still doable.

Tutorial Tuesday | Hybrid Pocket Letters

Next, print out your digital embellishments and start putting together your pocket letter inserts…

Tutorial Tuesday | Hybrid Pocket Letters

I used a combination of sequins and seed beads in the center space of my pocket letter. To secure this, I first sealed it with clear tape… followed by a strip of adhesive… before putting on a strip of washi tape to cover up the other adhesive steps and also act as decoration.

Tutorial Tuesday | Hybrid Pocket Letters

Tutorial Tuesday | Hybrid Pocket Letters

Here is my completed project.

Tutorial Tuesday | Hybrid Pocket Letter

Easy right? Now it’s your turn to do one, too! Give it a try… and don’t forget to upload your creations to our gallery!


IndahAbout the Author  Indah is on the creative team here at The Digital Press.  She has been a hybrid crafter for over 8 years, and loves making cards and paper crafts. She also loves collecting stamps and stickers.

Accomplishments: In Review

In Review: Accomplishments

I confess, I hate making “In Review” pages!  While I like the idea of summing up my year in one layout, it is just not feasible for me.  So much happens in our family during the course of any given year, that remembering it all and then paring it down to a few events just completely overwhelms me. The few pages I have tried in the past were frankly pathetic.

So this year I decided to do some preemptive thinking. If I change the time table from a whole year in review to something smaller it might be more doable. For instance, a month in review, a week in review, or on a crazy week, simply a weekend in review is easier for me to sort through and summarize.  If you look at life on that scale it really is not all that different from a Project 52 or Project 12. That is much more manageable to my frazzled mommy brain. Then come the end of the year, I can just pull information from those layouts, or put all those pages into an “in review” mini book, or simply include them as is in my main yearly album. The possibilities are almost endless.

I decided to do an “In Review” page for each month this year.  Since our word for April is Accomplish, I decided to use that idea to further narrow down my  “in review” thoughts for March. After thinking those two thoughts through for a bit I found that the rest of this layout came together really easily for me.

In Review: Accomplishements

credits: Talkative Templates by Scotty Girl Designs, Hello March by Anita Designs

Some of these accomplishments for March are huge, and others are just little everyday things that would go missed in a yearly round up, but it really sums up our March and I like that.

But more importantly, I am happy to finally be able to utilize an idea that has always been hard for me.

If you are a pocket scrapper, “In Review” pages are even easier.  There are so many great kits and cards already available to create “In Review” layouts. Check out the Pocket Scrapping Section at the store HERE.

If you are interested making some of your own ” in review” page(s) head on over to the Challenge Forums and check out the Challenge I have for you.


Erin 1About the Author: Erin is a work from home mom of three living in Thailand. She loves playing with her kids and anything artsy. She can often be found knee deep in toys with paint on her face. She is slowly learning the meaning of living an authentic life, and enjoying every minute of the adventure.

Tutorial Tuesday | How to Create Actions in PS or PSE (Video)

Create Actions in PS and PSE

I don’t know about you, but my time to scrap is sometimes limited. When I’m busy with work, family and life in general, I want to optimize my scrapping time and I prefer to spend it actually scrapping than doing repetitive tasks like resizing layouts (LOs), retouching photos, etc.

In Photoshop (PS) and Photoshop Elements (PSE), there is an amazing tool to help with that: actions. If I’m correct, something similar exists in Paint Shop Pro (scripts) and maybe even in Gimp (macros?).

What is an action? It’s a record of various steps from a process that you can then play and replay whenever you need the exact same process. Let’s use the example of saving your LOs for TDP’s gallery. To do so, you first need to resize your LO to 900 pix wide. Then, you might add some sharpening and maybe some color enhancements to make it pop. Finally, you’ll need to save for web in the file of your choice, at a maximum size of 350kb. Rather than doing all those steps “by hand” for each of your TDP LOs, why not create an action that will automatically perform those tasks just as you like them?

How do you create an action? I’ll show you the process in PS CS6 but it works the same way in other versions of PS or in PSE (ETA: unfortunately you can only load and edit actions in PSE, not create you own! Sorry about my mistake!).

  1. Think about the steps of your process to know in advance what you’ll need to record and in what order. You can correct the mistakes done while recording your action, but it’s easier if you don’t record them in the first place! Don’t forget to think if you want to duplicate the file to start with (so that you don’t risk overwriting the original one), to close the file once you are done, where you want to save it, etc.
  2. Open your actions panel by using Alt+F9 or in the menus: Window -> Actions
  3. Create a new actions folder (by clicking on the folder icon in the actions panel) for your homemade actions and name it. You’ll get addicted, trust me, and you’ll create more and more actions to simplify your life, so get ready to store them all in one place!
  4. Create a new action and name it. It will automatically start recording, as the red dot indicates. All you do now will be recorded in this new action. If you don’t want to start recording right now, just click on the square to stop recording, the red dot will turn gray again.
  5. Perform all the tasks you defined in step one, in the correct order. The action will record everything you did and you will be able to see each step as a new line in the action panel.
  6. Once you’re done, press the square to stop recording. Your action is now ready to be played over and over again and to make you save some precious scrapping time! Woo hoo! Don’t forget to save your actions’ folder as it would be too bad to lose them!

Here’s a video showing how I recorded my “resize and save for TDP” action (Click on the image below to view in YouTube.):

Create Actions in PS and PSE

Let us know if you’re interested to learn more about actions, I’d be happy to do a follow-up post on how to personalize and tweak them further!


ChloéAbout the author  Chloé is in charge of PR and communication for her small town by day, is a digiscrapper “by night” and a photographer whenever the light is beautiful. She lives with her man and fur-babies in a small town of Alsace (in the northeast of France), where she loves to read, watch good TV shows (TWD being her absolute favorite), and just hang out with her friends — no matter if they are close by, online, or away in her Swiss hometown