Author: The Digital Press

Tutorial Tuesday | Text Boxes


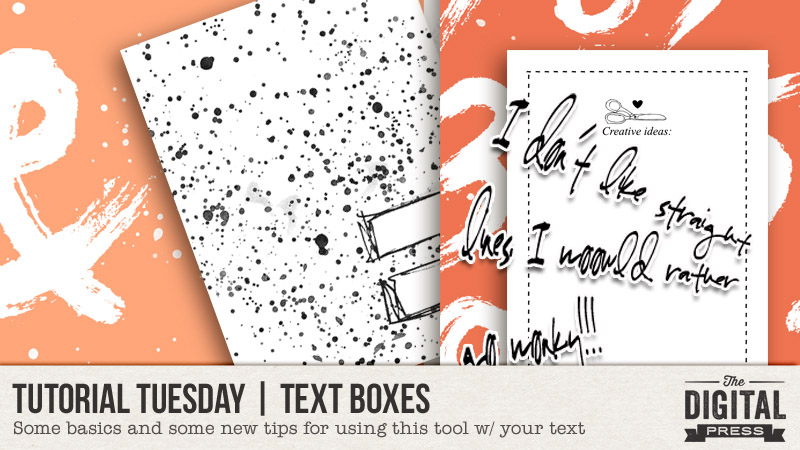
Hello everyone! Today I’m here with you on the blog to go over some of the basics of using text boxes, while also exploring some of the lesser-known functions. I will also share some thoughts on how journaling doesn’t always need to be about documentingsomething; it can very well be simply used as a design element.

I will be demonstrating the methods shown in today’s tutorial in Photoshop Elements 11 (PSE11); the information should translate very similarly to other versions of PSE and/or to Photoshop (PS) itself.

So… let’s get started!

1. Using a basic rectangular text box

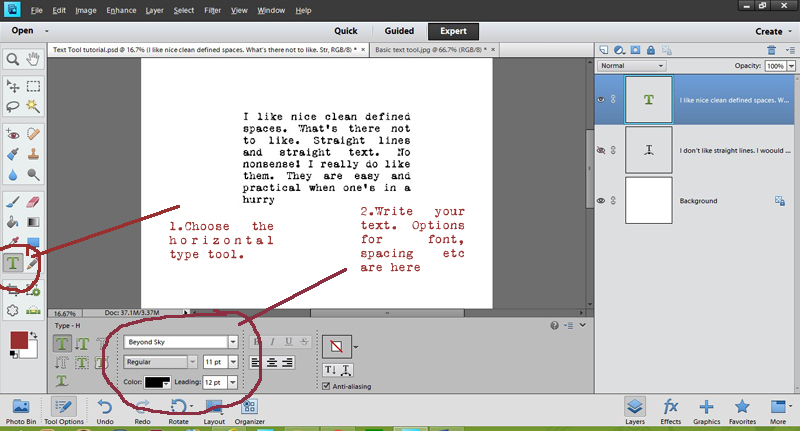
Choose the text type tool on your tools panel and draw the boundary of the size of the text box that you would like. Once you have done that, you will see the flashing point of the cursor inside the box. Any text you add will be automatically wrapped to fit the boundaries of this box.

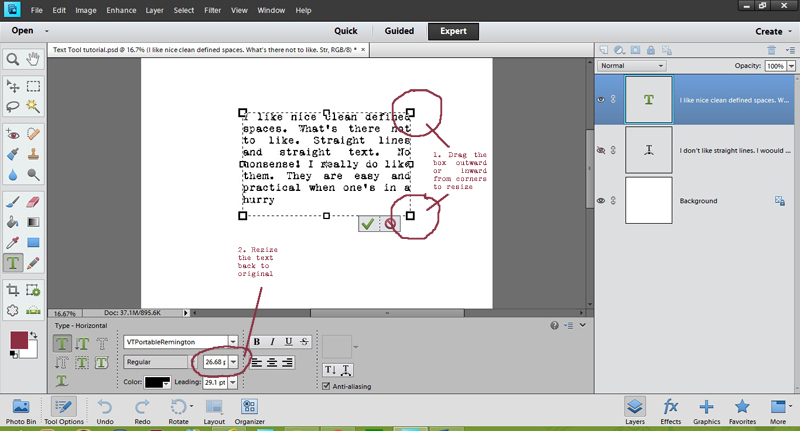
Re-sizing: Once you start your journaling, you may realize that you need more (or less) space that you initially thought when you created the text box. Fear not! Simply drag the diagonal corner of the box outward or inwards to the desired size. Note that the default settings in PSE will either make the text smaller or larger to fit proportionally into the newly-sized text box. You will simply need to change the font size back to what it was originally… and then carry on!


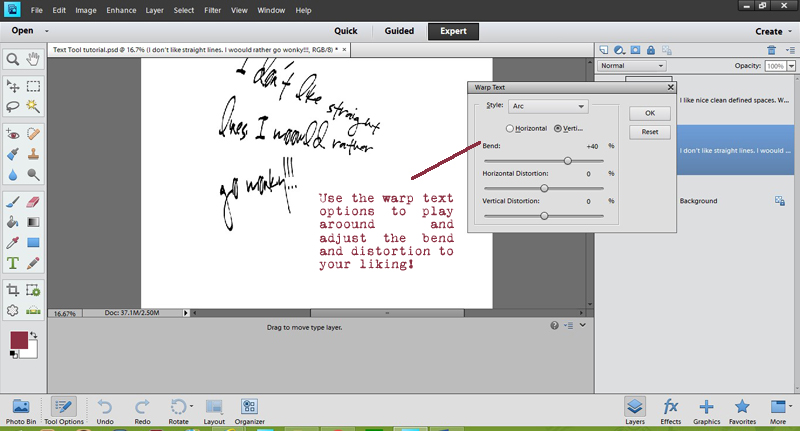
2. Adding a bit of flair to the text box

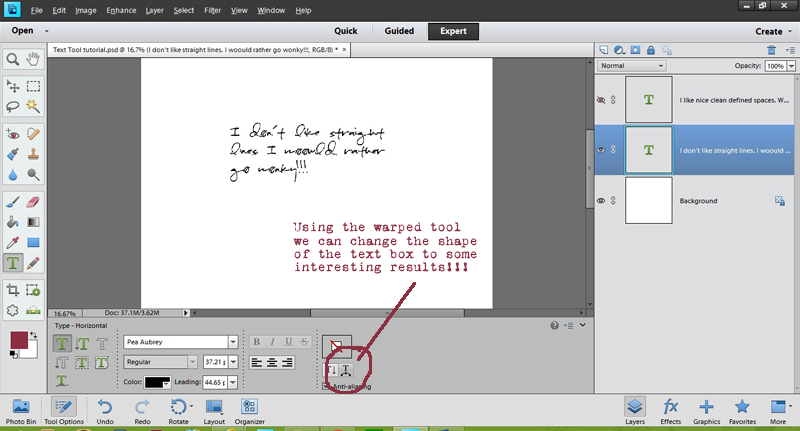
Imagine that you don’t want your text box to be nice and clean (straight lines, etc.). There are some very simple ways to add a bit of a ‘zing’! Consider the warp text tool; it changes the shape of the box (and in the process, the text within it) to create some very unique results. What better way to add some playfulness to your layouts!


3. Using other shapes as text boxes
Text does not have to be limited to the rectangular or square shapes; we can use other custom shapes too. There are many ways to do this… one of which is to actually create a path that follows your shape. Not all versions of PSE have this capability, however, so I came up with a “hack” that allows you to create a faux-text-path, of sorts. 🙂

To do this… choose the shape you want to use, put it onto your page (temporarily), and then with the text type tool selected… follow the same steps as described above. Because the text is on a separate layer from the text, you can approximate the shape you chose with the text itself. Then, once the underlying shape is hidden (something you can do by clicking the “eye” shape to the “off” position in the right-hand layers palette area)… you will have an interesting shape of journaled text…


4. Using Text as a design element

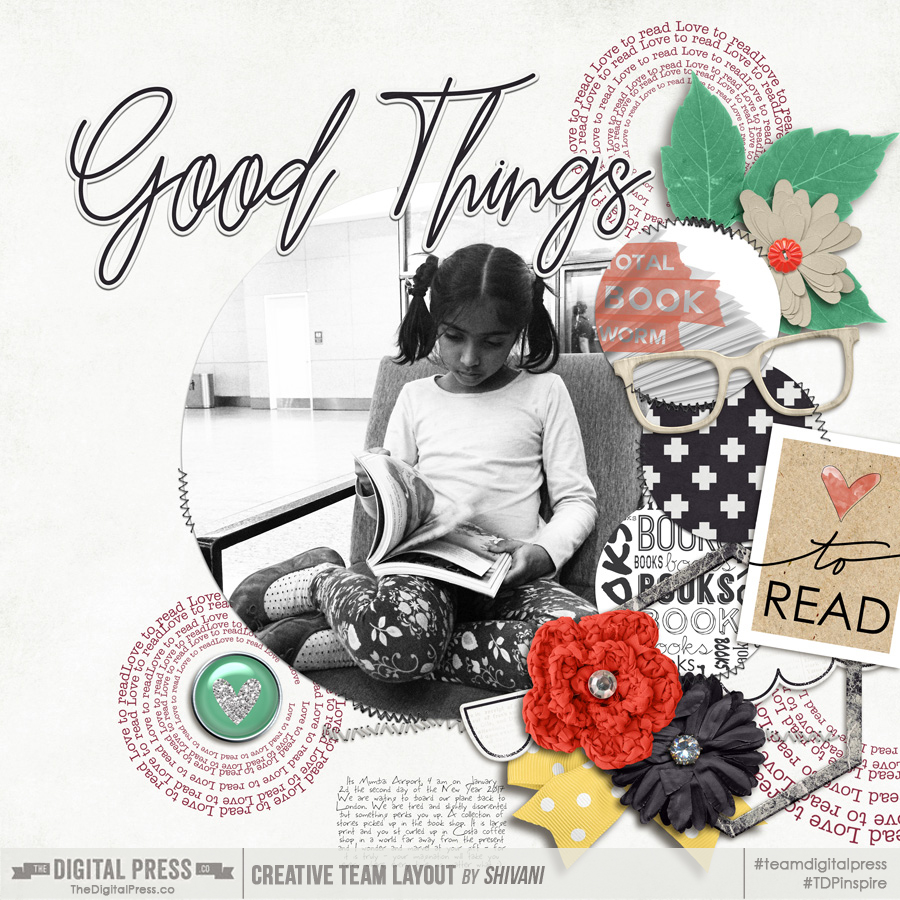
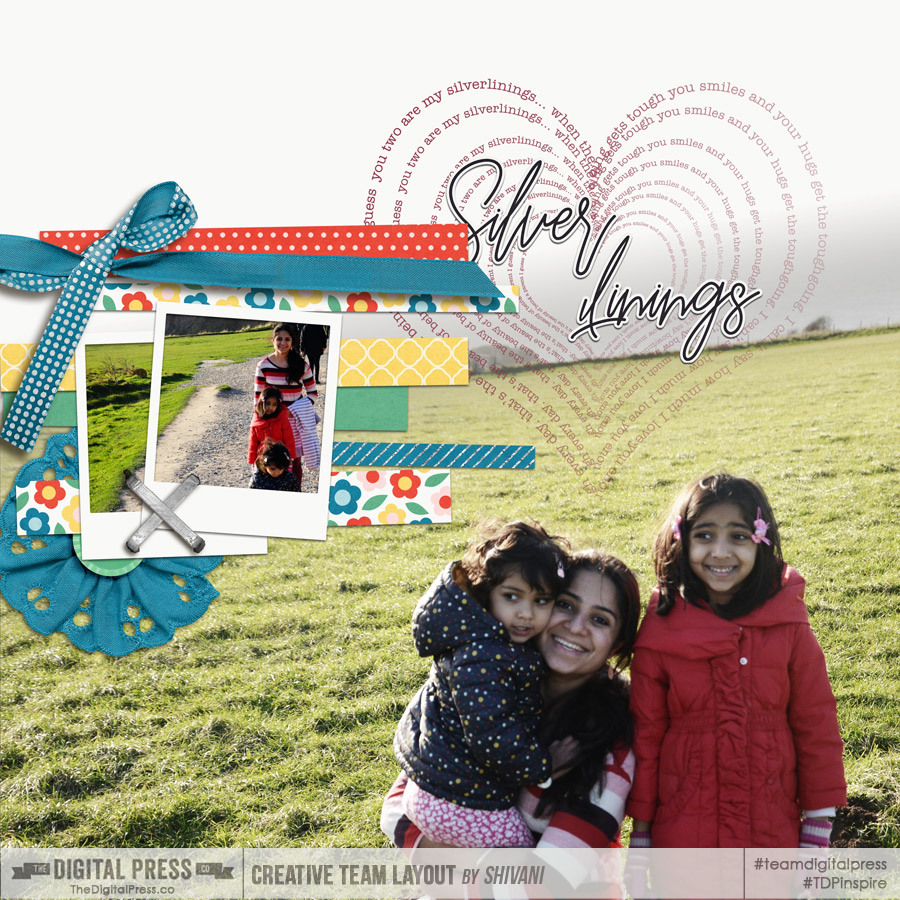
Another way in which text boxes can be used is as a design element. There are quite a few ways to do it. Repeating captions or phrases in an interesting shape, warping text to fit in with the design of the layout, blending it with the photo, etc.

I’ve created a few examples for you here. In the first layout shown below, I have used the text “on a shape” option to write a few phrases in a circular path. Copying this multiple times and nesting the circles within each gives a nice effect…

In this second layout, I have followed he same approach… but instead, I merged all the various text in the shape of the heart and blended it with the background…

As you can see, there are lots of uses for the text box… and fun little tricks you can use to open up its many possibilities and realize the many different ways it can be put to use. If you try some of these tricks or your own, please share your finished project with us in TDP’s gallery!

‘Till next time… keep scrapping and keep sharing. 🙂


Profile pic avatar small

About the Author Shivani Sohal is a donner of many alter-egos. A finance professional by day in busy London, she morphs into a seemingly normal mum of two in the evenings and weekends. She is constantly found with her fingers in too many pies and juggling the metaphorical balls. That is living on the edge for her; aided by the two ankle biters and a darling hubby who define the warm and mushy for her. She is ferociously dedicated to memory keeping — almost immune to any nay-sayers (or equally-disruptive crying children or annoying house fires!); keeping her head down and forging ahead at all times.

10 Holiday Tips & Tricks | Day Nine

Hey there everyone! Kate here today, and it’s Day Nine of our 10 Holiday Tips & Tricks series here on The Digital Press blog.

Today I have a super simple hybrid project to share with you (along w/ a couple of free templates to download, below). It’s a great way to use digital supplies to dress up your gift card-sized packages!

Gift Card Envelopes

Aren’t these so fun?! 🙂

To create these gift card envelopes… simply open the envelope template (see the end of this blog post for the free download)… clip a digital paper (or papers) to the template… print… and cut.

There are options in the template file for adding a digital paper pattern to the inside of the envelope… as well as for adding coordinating paper(s) to the front flap, bottom flap, and also to the back — if you want to do so. I added some digital art to the front flap, a woodgrain paper to the other outer surfaces, and the cute coffee mug/cup pattern to the inside.

Tip: before printing the envelope, I printed a full 8.5 x 11 page of the coordinating cardstock (the coffee cups) that I wanted to use on the inside. Then, I printed the finished envelopes on the other side of the full sheet of patterned paper. This made it easier to line everything up for perfect cutting.

It’s possible to fit two per sheet. I cut mine by hand, and then cut the slit with a craft knife.

To finish it off, you just fold in the flaps, add your gift card, and slip the front flap into the slit. You can adhere the bottom flap to the side flaps if you want, but it isn’t necessary (OMG is anyone else tired of reading the word flap?! haha).


Cash (or Whatever) Envelopes

If you’ve just tried the first envelope project, above, then the process for this one will be pretty self-explanatory. It’s almost the same! Simply clip a paper or two… print… cut… decorate… ta-da! You have an envelope. Fold in the flaps (*cringe* LOL) and adhere, leaving the top flap open.

That’s really all there is to it!

Tip: I know they make special glue for DIY envelopes; when you’re ready to send it, you just have to wet it and fold it down to make it stick. For myself, however, I just used washi tape. It’s cute, and easy!

You can use these for cash or checks… or even tickets (as you can see I did, above).

I am not going to lie — something about this second envelope template was a giant pain to fix up nice (and I’m still not 100% totally happy with it, but shhh! don’t tell anyone)… so someone had better download it and use it and post pretty pictures of it! (*crying*) …it would make me so happy!

If you’d like to give either of these projects a try… you can download the templates I created to make these envelopes HERE.

Happy holidays! 😉


Kate About the Author  Kate is on the hybrid team here at The Digital Press. She lives on the Utah/Colorado border with her husband, 5 kids, 10 chickens, and a dog named Gracie. She’s a city-born girl who found she’s really a country girl at heart. She can be found outside, barefoot, and probably in her garden.

10 Holiday Tips & Tricks | Day Eight

Hey everyone! It’s Day Eight of our 10 Holiday Tips & Tricks series, and I’m here to share my latest project / passion… Zero Waste or ZW (although “zero” seems very extreme, any action in the right direction is a good thing!).

I’ve always been green, but I recently read Béa Johnson‘s book and started to implement some tips to reduce the amount of garbage we create. Minimalism, simplicity and Zero Waste go hand in hand, and I’m happy to share some ways you can help save the planet while still enjoying Christmas and giving gifts to your loved ones!

The best way to have a ZW Christmas is by picking immaterial or consumable gifts. Here are a few examples for kids (or grown ups, too!) :

  • Lessons (music, dance, sport)
  • Passes (zoo, natural park, amusement park)
  • Subscriptions (to a magazine, for example, or to a software *ahem… Photoshop!*)
  • Events (concert, sport competition)
  • Activities (even better to do as a family or as a one-on-one activity with a parent or special adult: mini-golf, bowling, skating, cinema, game night)
  • Crafting (and the material you need to create the art piece)
  • Coupons (for a movie night at home with popcorn and they pick the movie, a pass on one of their chores, permission to stay later than usual, etc.)
  • Gift card to their favorite store, so the recipient gets the pleasure to choose in addition to the pleasure of the gift itself
  • “recipe in a jar” for cookies, muffins, hot chocolate, sauces and more
  • Money (the ultimate consumable gift). You could try to fold the bills origami-style to make it more fun!

If you want to give a material gift, here are a few ideas:

  • choose second-hand gifts
  • pick environmental-friendly and long-lasting materials: wood, metal, sturdy plastic (Legos are virtually immortal!), fabric, glass (not for kids, obviously)
  • create DIY gifts like homemade soap, candy, jam, caramel or chocolate sauce, beauty products or home decor

The wrapping can be the perfect ZW final touch to your eco-friendly gifts. Avoid metallic paper which can’t be recycled. Why not use newspapers or plain kraft paper on which you (or your kids) can draw or stamp? Use cute jars, wooden boxes or baskets to store your gifts. Last but not least, fabric is a great way to wrap and can be re-used over and over again by the recipient. Simple bags (DIY or bought) can be re-used for grocery shopping, for example. A nice piece of fabric (or even a scarf, so that the wrapping is a gift too!) can make stunning gifts using the japanese furoshiki technique.

Here are two examples of my ZW gift giving this year.

For my brother and SIL, I offered them a photo session of their newborn baby girl when she was born in October and created the birth announcements. They think they’ll pay me back for the printing of the announcement but I’ve decided will be their Christmas gift. As I still want to physically give them something, I’ve created a cute card that matches the CD cover for their newborn pictures. This card can be recycled once it has fulfilled its purpose.

For my parents in law, I’ve bought wine and cooked homemade jam. They have everything they need and DEMANDED that we don’t give them any gift. Well, I’m a rebel and I know they will enjoy the fact that I made the effort to create something for them. To wrap this up I decided to try furoshiki with a scarf I don’t use very often and that I think my mother in law would like. Maybe she’ll re-use it, maybe not (in that case I’d take it back), we’ll see!

Here’s how I wrapped the jars and bottle: I started with the jars and the bottle on the scarf, pointing to opposite corners.

I covered the gifts with the scarf (the part that was closer to me) and folded the pointy end back in.

Then I rolled the gifts away from me and then folded the “roll” in the middle to put the jars and the bottle back up. Finally, I just had to tie a knot with the ends of the scarf and my wrapping was done!

It was very easy, even for Mrs-Two-Left-Hands here, and I just love how original it looks! Plus I don’t have to deal with tape, too short paper roll and ribbons… That’s a big win in my book!!

Here are the two cards I’ve created so far, one for my brother and SIL (on the left), the other one for my inlaws (on the right). I used the stunning Holiday Sparkle collab for those creations because I love its timeless elegant look. I simply added one of the already made journaling cards, created another one with a paper I liked, added a few elements, printed them, cut them out and adhered the elements on the cards, wrote my message and I was done. It took me no longer than 5 minutes. I used natural twine so that it can still be recycled.

I hope you enjoyed those tips to have a greener (and simpler) Christmas. Have fun celebrating with your loved ones!


ChloéAbout the author  Chloé is in charge of PR and communication for her small town by day, is a digiscrapper “by night,” and a photographer whenever the light is beautiful. She lives with her man and fur-babies in a small town of Alsace (in the northeast of France), where she loves to read, watch good TV shows (TWD being her absolute favorite), and just hang out with her friends — no matter if they are close by, online, or away in her Swiss hometown. She recently became quite obsessed with Bullet Journaling, Miracle Morning and Zero Waste.

10 Holiday Tips & Tricks | Day Seven


Hello everyone! It’s Day Seven of our 10 Holiday Tips & Tricks series this month… and I am here today to share a few delicious cocktails I created to help you celebrate the holidays with a little extra holiday spirit!

First, here is my version of a holiday Martini…

Tips: rim your glass with a thick layer of sugar to sweeten up your holiday. Want a kid-friendly alternative? Try a cherry limeade: add a splash of lime to a cherry 7-up. 🙂

Next… shake up your part with this festive peppermint candy cane-rimmed version of a White Russian…

Tip: kids will love this one if you adapt the most fun part of it by serving their milk in a candy cane rimmed glass this Christmas. Just skip the Baileys and Vodka!

And finally, I’m calling this holiday twist on a traditional grasshopper “The Grinch!” If you drink enough of this one, it will steal your Christmas… memories! Only kidding, of course! Please drink responsibly!

Tip: add green food coloring to egg nog for a non-alcoholic version.

I hope these tips will help you create some fun holiday beverages! Come join us in the forum and post your own images if you give any of these a try… 🙂


FarrahAbout the Author  Farrah Jobling is a member of the creative team here at The Digital Press. She lives in Denver with her amazing family — Mike, Nicholas (9), Claire (7), Hope (2 yr old puppy) & Kringle (9 mo old bunny). She works from home as a photographer and enjoys scrapping her personal photos.

10 Holiday Tips & Tricks | Day Five

Hello everyone! It’s Day Five of our 10 Holiday Tips & Tricks series this month… and I am here today to share a fun & inexpensive craft project/home decor idea.

December is usually a crazy month for me. It’s often hard to find a balance between work and family; as a photographer, I have a lot of photos to edit… but I want to make time to do fun things with my kids. This string art project was a fun and inexpensive craft that my kids just loved!

We’ve been crazy about string art lately, and I happened to find some inexpensive wood boards in the dollar section at Target. They are called “menu boards,” and even have their own stand built in. Once you have a board, all you need is some small flat-head nails, a hammer, and some string.

I used cut-out patterns I found on Pinterest to trace the shapes. I used a simple tree pattern for my 7 year old, and a more intricate deer pattern for my 10 year old, and they both did great! I helped some with the nailing, and I highly recommend using a small craft hammer instead of a big one from the tool box!

After the nails were in place, I tied the string around one of the nails and let them go to town winding the string all around. There’s really no wrong way to do it! I finished it off with a secure knot and voila! Here’s a look…

These make great decorations…

…or you can even give them as gifts!

I hope these tips will help you create some fun string art!


FarrahAbout the Author  Farrah Jobling is a member of the creative team here at The Digital Press. She lives in Denver with her amazing family — Mike, Nicholas (9), Claire (7), Hope (2 yr old puppy) & Kringle (9 mo old bunny). She works from home as a photographer and enjoys scrapping her personal photos.

Save

10 Holiday Tips & Tricks | Day Four

Hello everyone! It’s Day Four of our 10 Holiday Tips & Tricks series this month… and I am here today to share a fun & easy gift wrap idea.

One of the ways that I make the holidays easier is by simplifying my Christmas gift wrapping. Instead of having many rolls of different Christmas wrapping paper, each year I buy a huge roll of kraft paper. Then, I buy a different roll of pretty Christmas ribbon for each family member and use the ribbon to “color code” the gifts.

This process cuts down on clutter, in that I no longer need to have so many different rolls of wrapping paper… and it also simplifies things when I am doing my last minute wrapping on Christmas eve (even makes it possible to skip tags!). I adore the look of kraft paper, whether digital or in real life… so the style works for me. If you want to get even fancier, you could add stamps or custom tags to dress up your packages further.

Hopefully this tip of mine will help simplify your holiday season. However you choose to wrap up your gifts this year, though, I hope you have a wonderful holiday season with all the special people in your life!


About the Author  Katie is a member of the creative team here at The Digital Press. She lives in Central Florida with her husband and their four sweet but crazy boys. When she’s not dodging Nerf bullets or trying to dig out from under the never-ending pile of laundry, she enjoys photography, cooking, going to Disney World with her family, and, of course, digital scrapbooking.