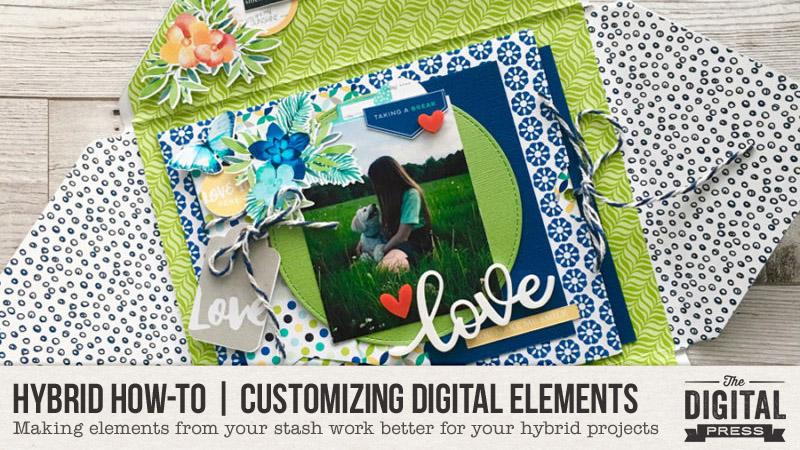
Hello everyone! It’s the third Saturday of the month, and therefore it’s time for another edition of our Hybrid How-To series here on The Digital Press blog!
Today, I’m going to show you how to use digital journal cards in a fun way — to help create non-pocket-style hybrid layouts!
Supplies Needed
12×12 white cardstock (or any other color and size, as you prefer)
Any physical supplies/embellishments you might want to add (I used enamel stickers, gold foam stickers, and little gold stars)
Stamps and spray paints
Digital kit of your choice (I used Limited Edition By Sahin Designs)
Instructions
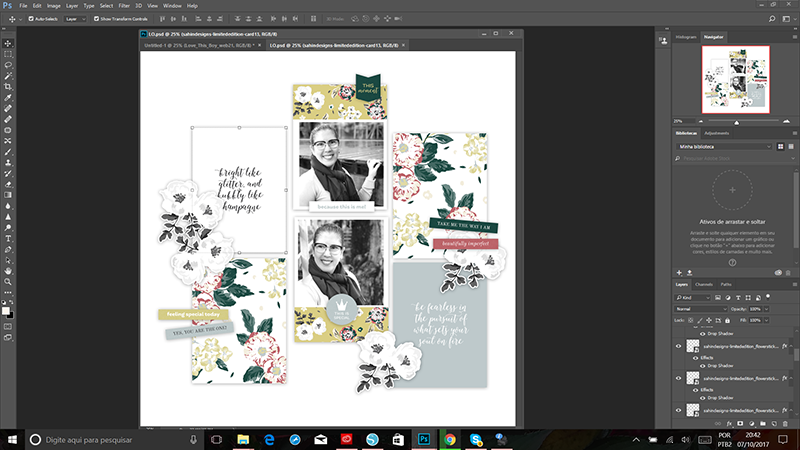
First, I always start my project in Photoshop. I opened a new document in Photoshop and used a canvas that was the same size (12×12) as my eventual physical layout.
Next, I chose to work with a grid design for my page. By dragging different cards and elements from my digital kit onto my canvas in Photoshop, I made a digital version of the layout. I love to work this way; it’s easy and quick, and a great way to see the final result before I actually glue things together.
Here is a screenshot of my workspace in Photoshop…
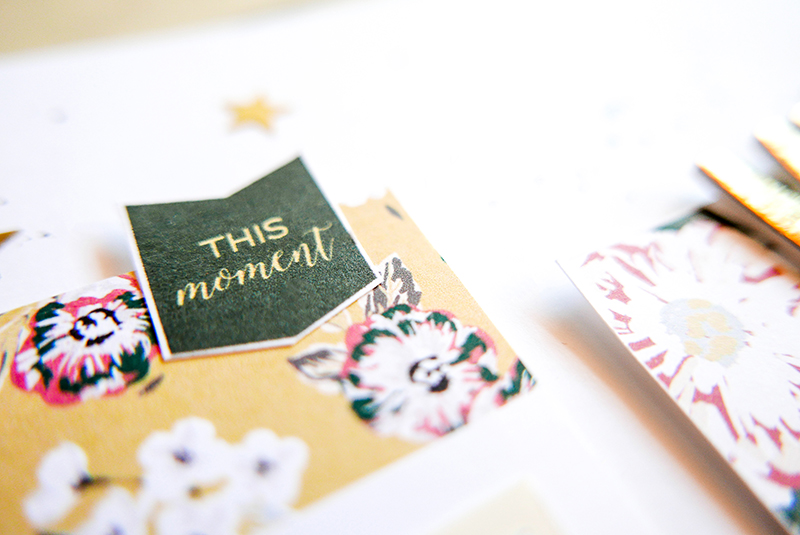
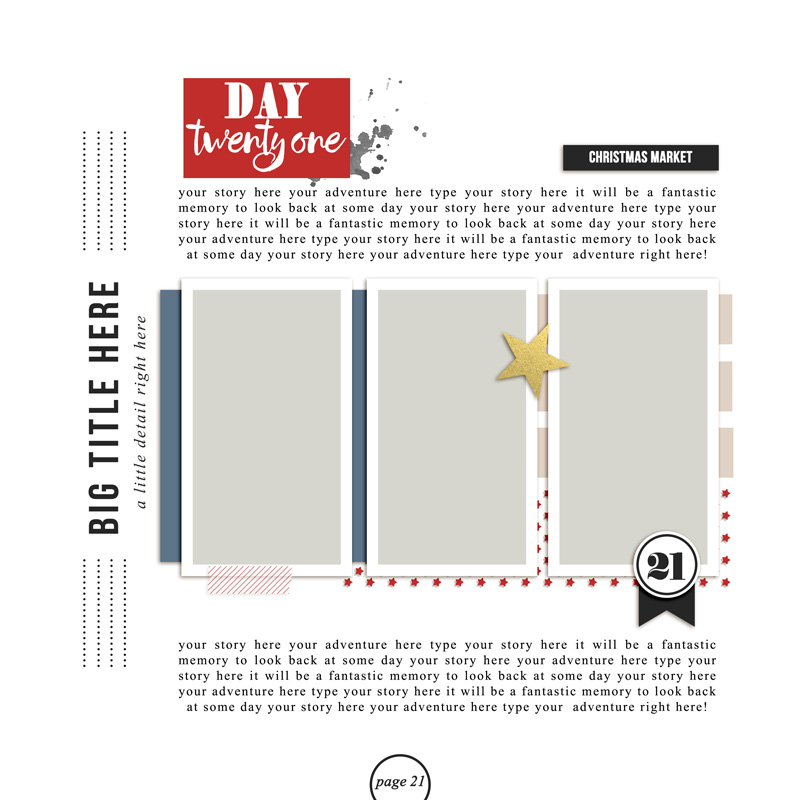
I had so much fun arranging my cards, photos and elements until I became happy with the result. I really love this process. But when the digital version is done, the even more fun part starts. It’s time to cut and paste!
At this point, we will have to use different adhesives and try to give dimension to our project. It really brings interest to the page. For some elements I used regular double sided tape, and for others, I used foam tape (raised/dimensional). I also used foam tape for the journal cards. I think it helps them to pop up on the page and have more focus.
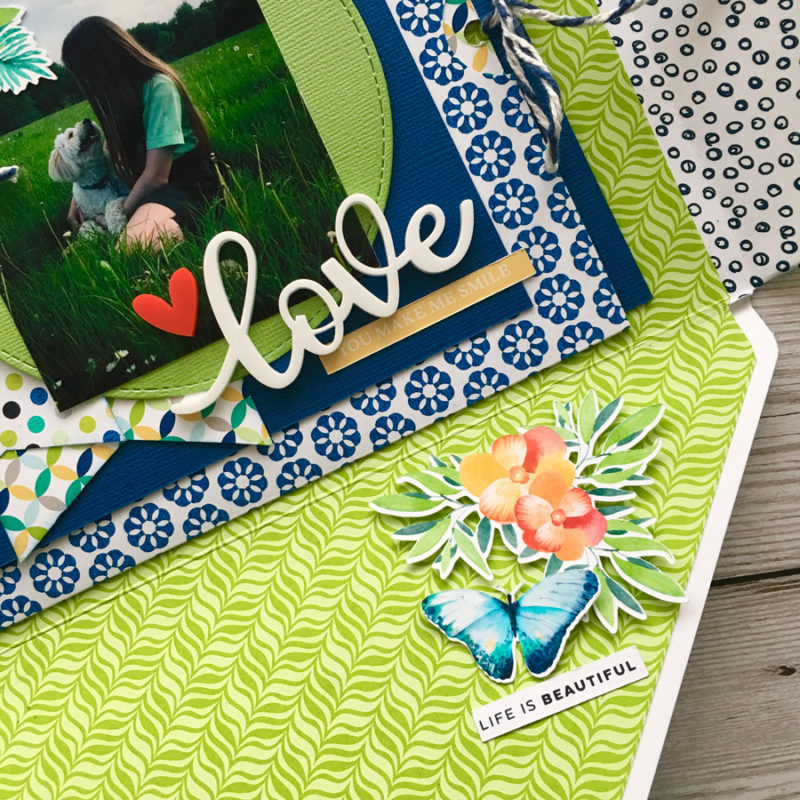
Here is a close-up look, showing these different dimensions in the layout as I worked…
Here’s another look…
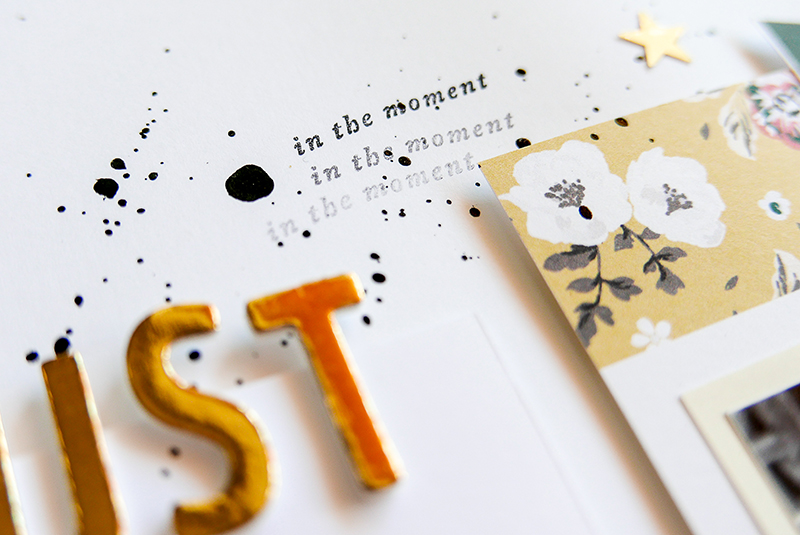
Once all things are glued, it’s time to bring our page to life and give it texture with some physical elements, stamps and paint splatters.
I love to use small stamps and use the ghosting technique which consists in stamp more than one time without put more ink on the stamp. It brings a lovely texture to the project. I also like to add contrast to the page by adding some paint splatters in black.
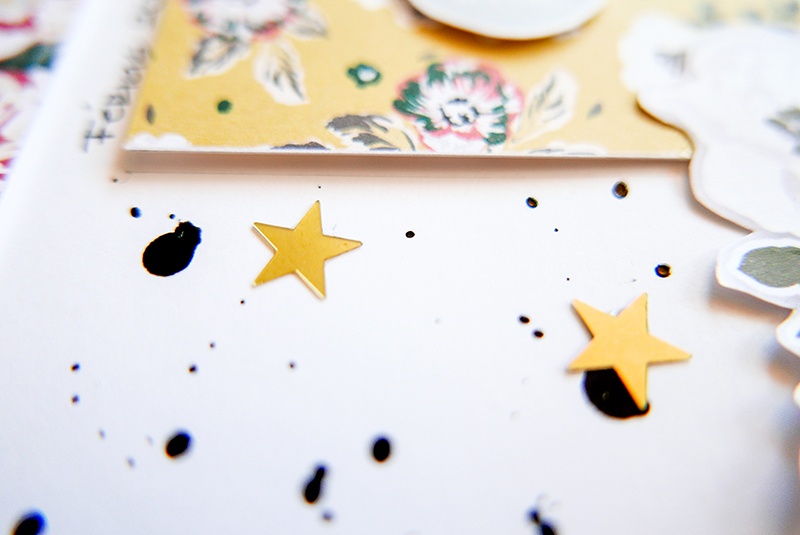
All these add-ons and the physical embellishments give more interest to the page. I really love this part of the process.
In order to embellish my page, I used some gold foam tickers for my title, an epoxi speech bubble, and some little gold stars.
Here is another close-ups view (note the stamps and paint)…
And here’s a good look at the pretty gold star embellishments I added…
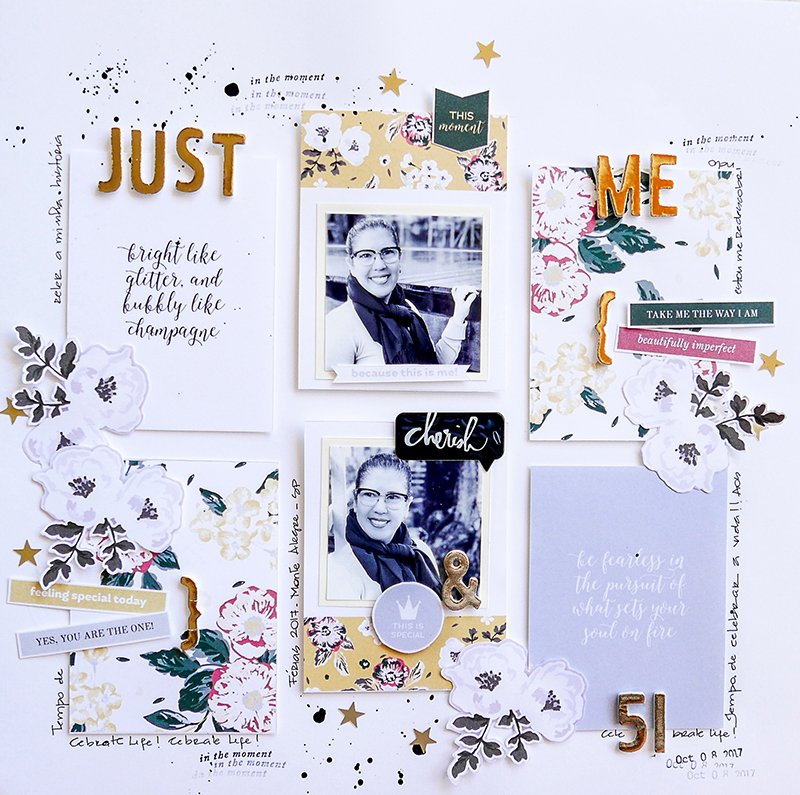
I chose to write my journalling along the cards to ensure that my page will be cohesive. Here is a look at the final result…
As you can see, using digital journal cards is a fun and easy way to make a beautiful, quick, and cohesive layout.
If you’d like to give this a try, too, don’t forget that you can earn challenge points at The Digital Press! Come visit the CROSSWORD SECTION in The Digital Press forum, and you’ll find this month’s Hybrid Challenge thread (*NOTE* for each month’s Hybrid Challenge at TDP, you get to choose one of the two (2) “Hybrid How-To” tutorial posts from here on the blog for that month, and then you get to make your own version of that chosen project). If you choose to give today’s project a try… all you have to do is make a hybrid layout using digital journal cards and elements that have been printed and cut into a physical format (similar to mine, but it doesn’t have to be identical in size or format — you can do what works for you!).
Give it a shot, and share your final results with us! We can’t wait to see what you come up with. 🙂 Have a great weekend… and happy scrapping!
About the Author Andrea Albuquerque is part of the Hybrid Creative Team here at Digital Press. Andrea has been a scrapper since 2010 and a photographer since 2012. Although she adores the flexibility and creativity of digital, she can’t resist playing with paper, paint, and embellishments… so hybrid scrapping is the perfect medium for her! She lives in Brazil with her hubby.
Hello everyone, and welcome to another edition of our Foodie Friday series here on The Digital Press blog!
Foodie Friday is our newest blog series… based on the amazing response we had to the “Mess Hall” activities during TDP’s Summer Camp back in July. As such, most every Friday throughout the rest of the year, we will be combining this fun feature with our weekly designer feature series — and having some fun in the kitchen with members of our team! Each week you will get to peek into the lives (and kitchens) of your favorite TDP designers and creative team members.
This week, you get to join Jen Cairns from Jen C Designsand TDP creative team member Astrid in the kitchen, where we’re cooking up a few delicious autumn-inspired recipes from Jen’s recipe books!
[ photo credits to Jen Cairns and tasteandtellblog.com (scones) ]
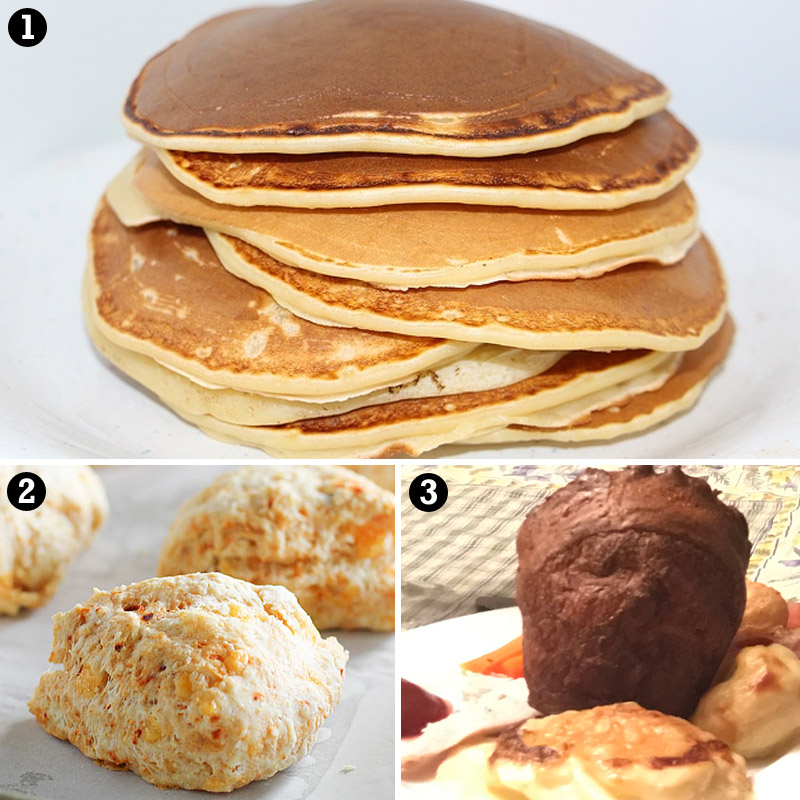
Here is the lineup of delicious recipes Jen put together this week (shown above):
Pancakes
Cheddar Biscuits
Yorkshire Puddings
Pancakes
About this recipe, Jen says… “they’re really simple and my kids love them! My 7 year old now makes her own pancakes!”
INGREDIENTS NEEDED*
—1 cup self rising flour
—1 cup milk
—1/4 cup white sugar
—1 egg
INSTRUCTIONS
—Combine all ingredients in a bowl and mix together.
—Heat a pan and melt some butter in the pan; pour desired amount of batter into the pan (depending on the size pancake you want to make).
—Wait until bubbles form across the top of the pancake, and then flip over. Let cook for another 2-3 minutes.
—Serve with topping of choice; we use syrup (and/or more sugar on top for extra sweetness!).
*makes 2 large or 4 small pancakes
Cheddar Scones
INGREDIENTS NEEDED
—200g self-raising flour (plus a little more for dusting)
—50g butter (chilled)
—75g grated cheese (plus extra for topping; optional)
—150ml milk
INSTRUCTIONS
—Preheat oven to 220 C (about 425 F)
—Place the flour in a large bowl, and then grate in the butter.
—Stir in the cheese, then the milk. If it feels like it might be too dry, add a touch more milk… then bring together to make a soft dough.
—Lightly dust your work surface with a little flour. Roll out the dough no thinner than 2cm. Using a 4cm plain cutter, cut out the scones.
—Transfer to a non-stick baking sheet, dust with a little more flour (and/or grated cheese topping), and then bake for 12-15 mins until well-risen and golden.
Yorkshire Puddings
INGREDIENTS NEEDED
—140g plain flour (this is about 200ml/7 oz)
—4 eggs
—200ml milk
—sunflower oil
INSTRUCTIONS
—Preheat oven to 230 C (about 450 F).
—Drizzle approx 1-2 TBSP sunflower oil evenly into 2 x 4-hole Yorkshire pudding tins or a 12-hole non-stick muffin tin and place in the oven to heat through.
—To make the batter, add 140g plain flour into a bowl and beat in four eggs until smooth.
—Gradually add 200ml milk and carry on beating until the mix is completely lump-free. Season with salt and pepper.
—Pour the batter into a jug, then remove the hot tins from the oven. Carefully and evenly pour the batter into the holes.
—Place the tins back in the oven and leave undisturbed for 20-25 mins until the puddings have puffed up and browned. Serve immediately with lots of gravy!
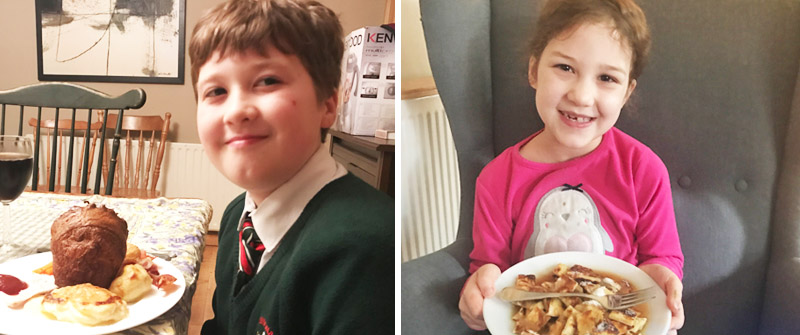
Here’s a fun photo Jen provided of her two kids eating the Yorkshire Puddings (left) and pancakes (right)… two of their favorites!
Doesn’t that all look delicious?!
If you’re up for a challenge… come to the forum and check out the latest edition of our Recipe Book challenge, which launched this month and is designed to help you create a quick-&-simple book of your favorite recipes — get this — in time to print it up and give it to friends and family members as a holiday gift later this year(!). Sound like fun? Come check it out HERE.
Meanwhile, it wouldn’t be a designer feature week without a fantastic sale and a special Free-with-Purchase offer… so you’ll be excited to see what Jen has in store for you! Not only is her entire shop marked down 30% OFF throughout her entire feature week(sale prices will be valid through 11:59pm ET on Thurs 10/26)… but she also has this awesome deal in her shop all week long, as well! Spend $5+ in the Jen C Designs, and get the following BRAND NEW template set that just launched in her shop today — completely FREE!
About the authorAstrid is a member of the creative team here at The Digital Press. She lives with her husbandand her 2 teenage/adult kids in Germany. As a mini-jobber with only 10 hours/week, she has plenty of time for her digital scrapbooking hobby. She has Netflix and Amazon Prime, and is addicted to nearly all series. Vampires, zombies, vikings… it doesn’t matter; she likes everything. She loves the ocean and the summer heat, but lives in the opposite: mountains. Therefore, she loves visiting her family in Algeria or the south of France.
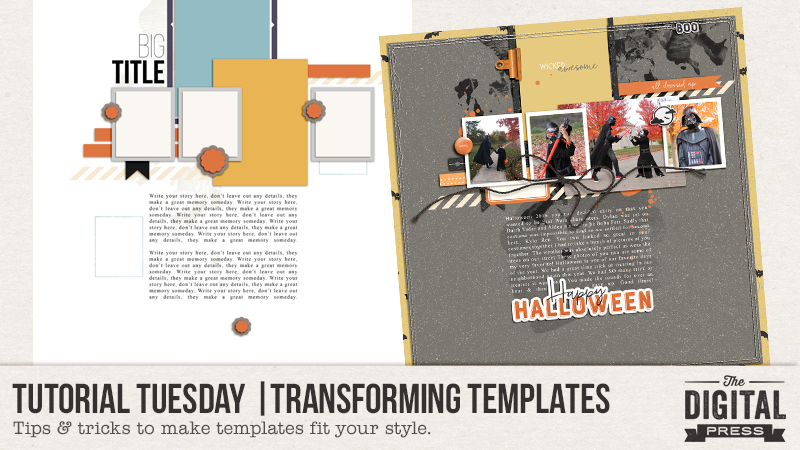
Welcome to another edition of Tutorial Tuesday here on The Digital Press blog! Today, I thought it would be helpful if I shared a few ways that you can creatively transform templates to fit your scrapbooking needs! These tips and tricks will help you get the most bang for your buck when purchasing and using templates!
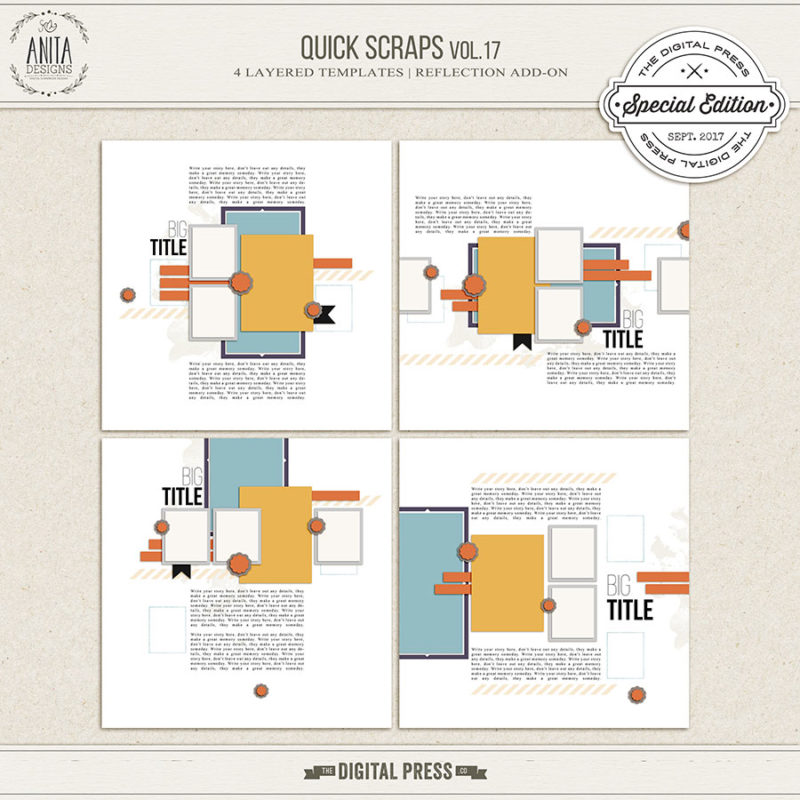
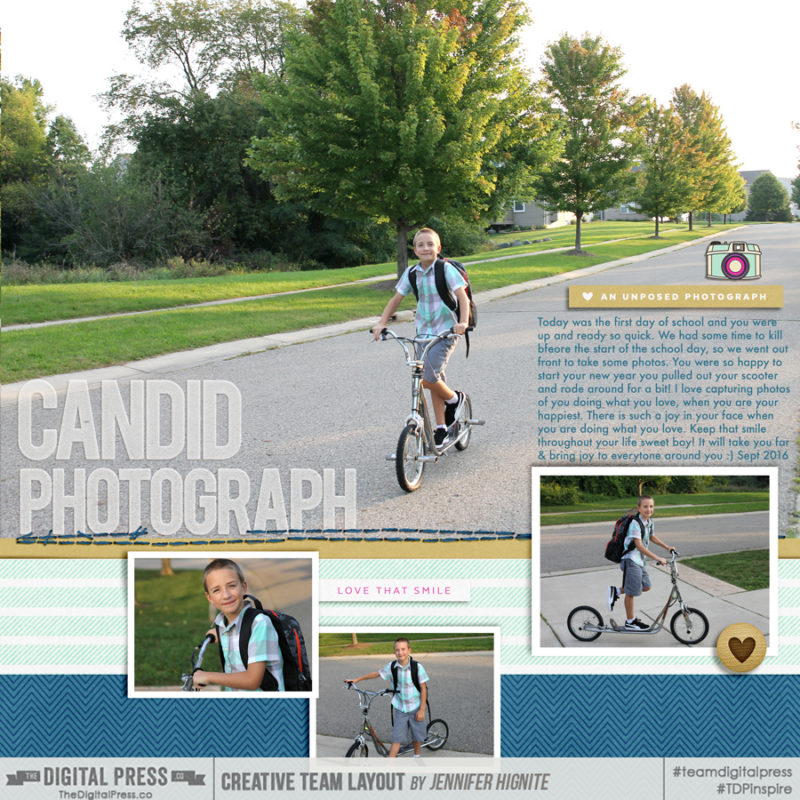
More often than not I find I have more photos that I want to scrapbook, than the template allows for. To remedy this I often add in more photos in places on the template that are suggested to be papers. For this layout I use Anita Designs Quick Scraps Vol. 17:
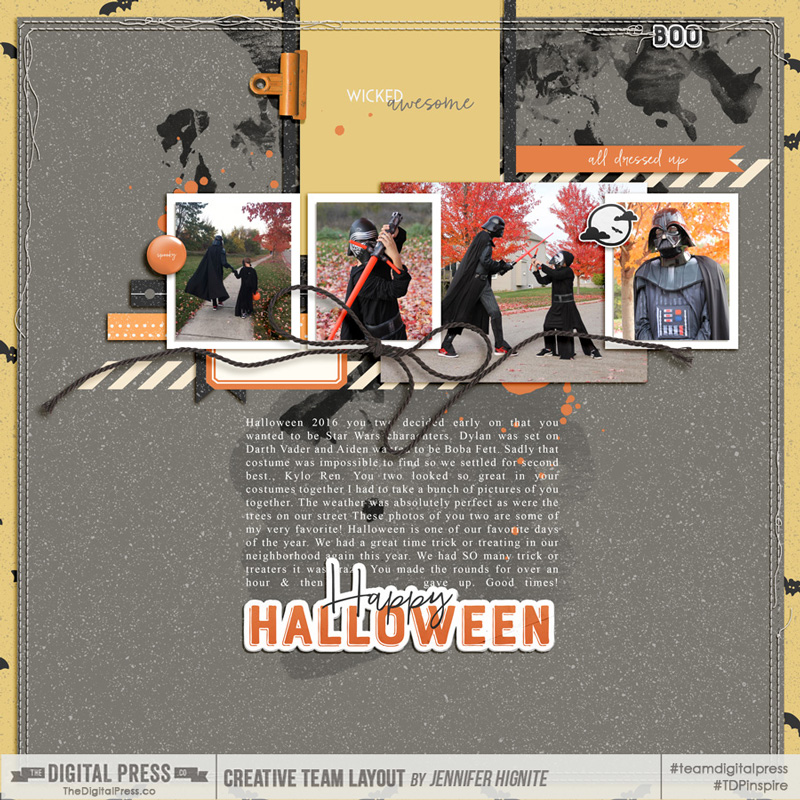
I altered the bottom left template by rotating & adding a photo to the spot that could have been background paper. I love the look of the larger unframed bottom photo behind the three framed photos. It gives the layout more dimension, helps tell the story & visually leads your eye across the page.
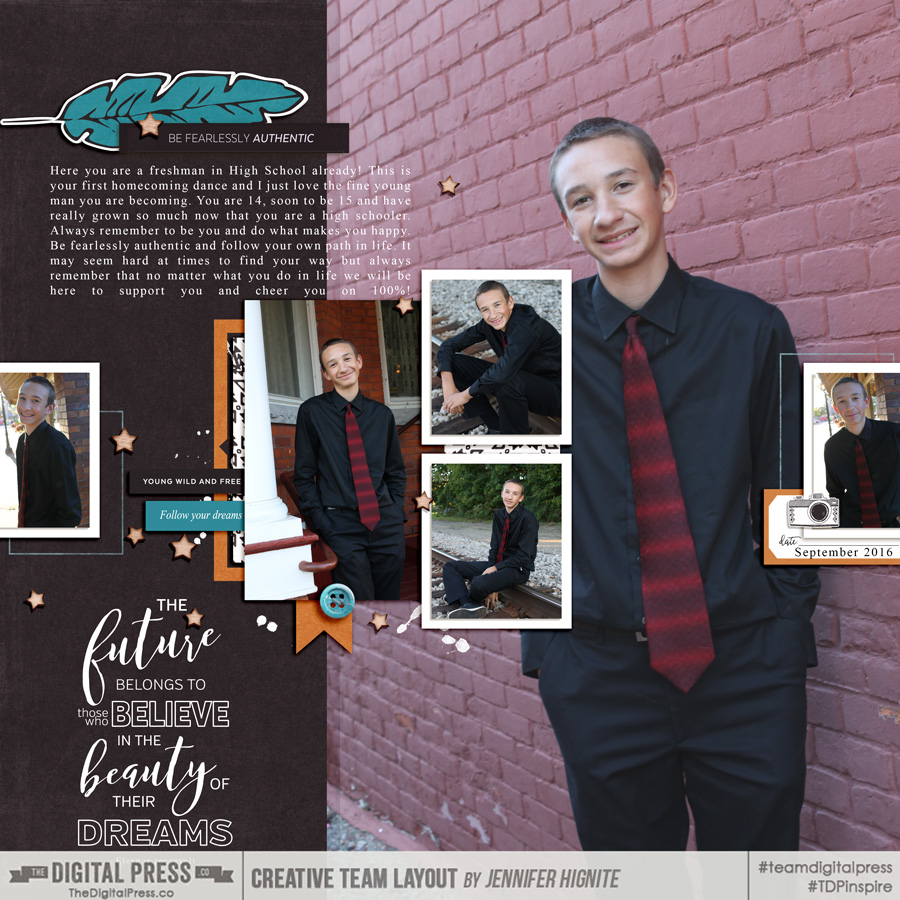
For this layout I used another template from the same pack (the top right template) and added a large photo underneath the layers of the template. Large photos help showcase the subject of a page and are a a great way to catch the eye of the reader.
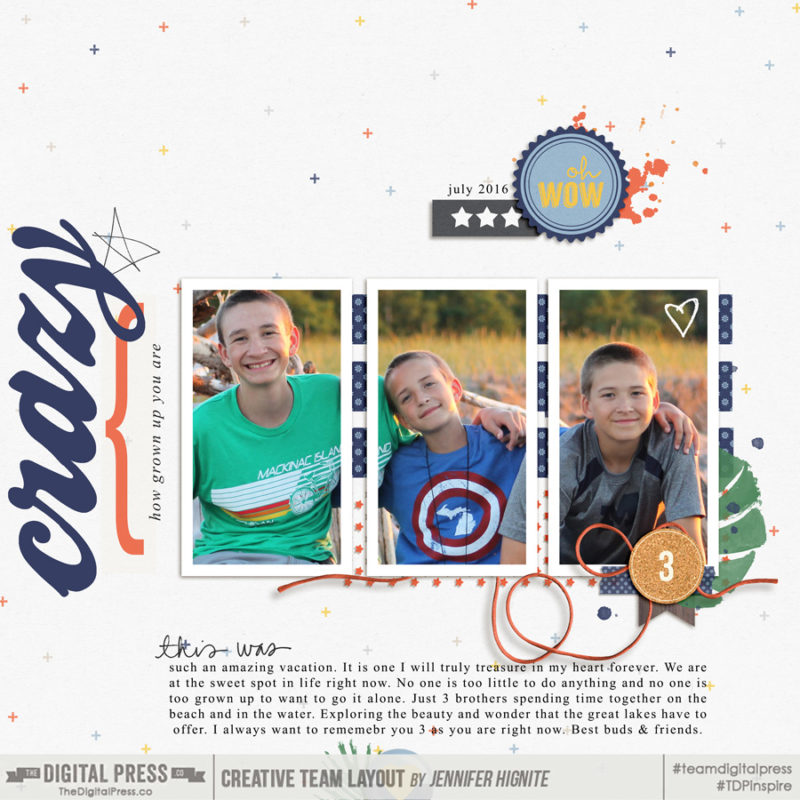
Another way to use templates is to break up your single photo to fit multiple spots. For this layout I used another template by Anita Designs A December Story Captured (template 21)
I placed a single photo in the three photo slots in the template. To get this look I merged the three photo layers (Command +E) in the template and then placed my photo on top of that layout and clipped it (Command +G) to the frames. A super easy and unique look to make a template work to tell your story!
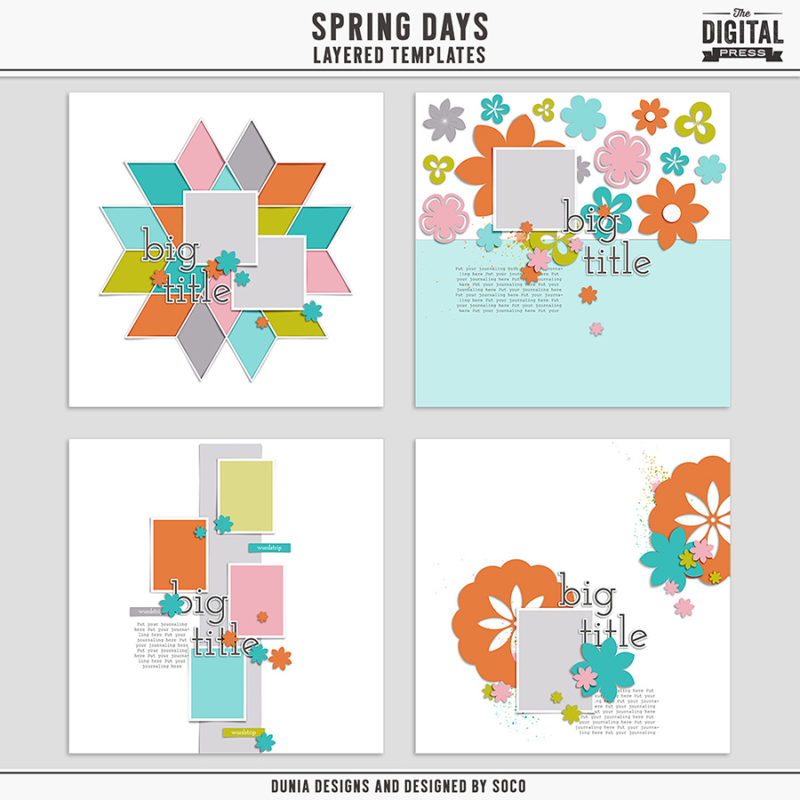
You can also rotate and delete parts of a template to make them work for your layout. I did exactly that with the bottom left template by Dunia Designs:
Again a large photo takes center stage of the layout. I rotated the entire template and moved everything to the bottom quarter to make more room to showcase the large photo. You can always move and tweak a template to make it work. Start with the end in mind and you can make your vision come to life with a few little changes!
Remember just because a template is set up one way by a designer, it doesn’t mean you have to keep it that way! Change those templates up and make them work for you and your personal style! Happy Scrapbooking!
Jennifer Hignite is a mom of three boys and new homeowner with her fiance in the mitten state of Michigan. When she is not scrapbooking, she enjoys photography, watching her boys play sports, decorating, and shopping at Target.
Hello everyone, and welcome to another edition of our Foodie Friday series here at The Digital Press!
Foodie Friday is our newest blog series, and is based on the amazing response we had to the “Mess Hall” activities during TDP’s Summer Camp, back in July. As such, most every Friday throughout the rest of the year, we will be combining this fun feature with our weekly designer feature series — and having some fun in the kitchen! Every week you will get the chance to peek into the lives (and kitchens) of your favorite TDP designers and creative team members.
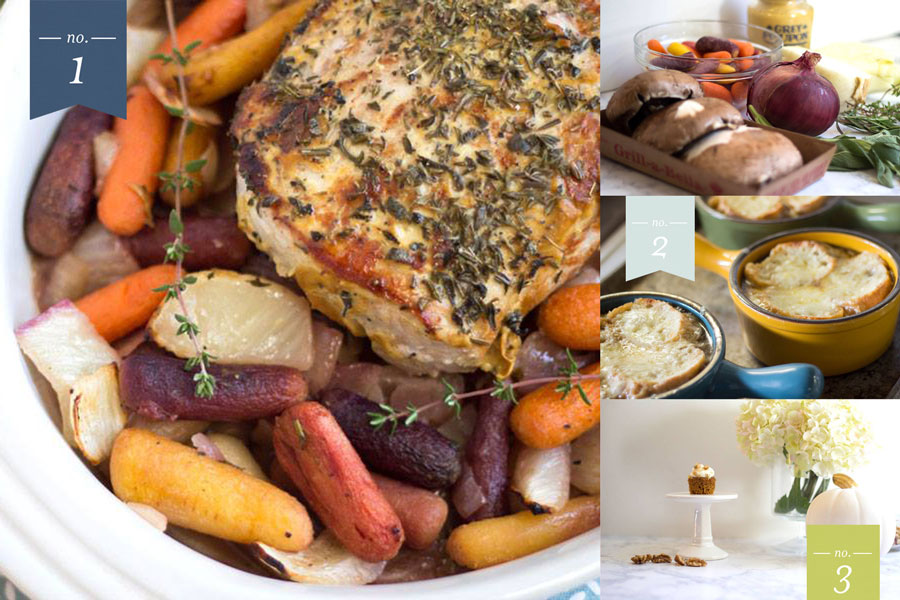
This week… we have the awesome Amie from Little Lamm & Co. joining me (Sabrina, from the creative team here at TDP)… and we’re cooking up a few delicious autumn-inspired recipes from Amie’s kitchen!
[all photo credits to Amie Lamm of Little Lamm & Co.]
Amie loves to cook and photograph her yummy food. She said that if she had more time on her hands, she would definitely be a food blogger. Amie is also a big fan of autumn… and had the followoing to say about her recipes: “I cannot wait for autumn each year — just for all the soups! I have a bucket list of soups and stews to make each season.”
Here is the line up of delicious recipes Amie put together this week (shown above):
Sunday Night Roast Loin of Pork with Fall Vegetables
‘Autumn is Here’ French Onion Soup
Mini Carrot Cupcakes
Sunday Night Roast Loin of Pork with Fall Vegetables
Amie says: “There is something about how the mustard, wine and herbs in this dish meld together to make the most delicious sauce. If your sauce ends up a bit lacking, because roast times can lengthen depending on the size of your loin, you can add low sodium chicken broth to thin it out. I do make this dish on a week night occasionally, only because once you put it in the oven, there isn’t anything to do until it’s ready. I just have to be home at least two hours prior to dinner to start preparing.”
INGREDIENTS NEEDED
—2 pounds boneless pork loin roast
—1 tablespoon olive oil
—1 tablespoon Dijon mustard
—1 tablespoon fresh sage (finely chopped)
—1-1/2 teaspoons fresh rosemary (finely chopped)
—1-1/2 teaspoons fresh thyme (finely chopped)
—1/2 teaspoon kosher or coarse sea salt + 1/2 tsp black pepper(for meat)
—4 medium carrots (washed and peeled, cut on the bias into slices 1/4-inch thick)
—2 medium yellow onions (large diced)
—1 fennel bulb, stems removed (rough cut into large pieces)
—2 tablespoons olive oil
—1/2 teaspoon kosher or coarse sea salt + 1/2 teaspoon black pepper (for vegetables)
—1 cup dry white wine
INSTRUCTIONS
—Preheat oven to 400 degrees F.
—In a small bowl, combine the finely chopped sage, rosemary, and thyme with salt and pepper and set aside.
—Heat a frying pan with 1 tablespoon olive oil over medium-high heat. Once the pan is hot, brown the pork on all sides until golden brown all over, about 2 minutes per side with a little extra time on the top layer. Set aside to cool for a couple of minutes.
—Brush the top of the roast with an even layer of Dijon mustard, and follow that with an even coating of the fresh herb mixture.
—In a separate frying pan, heat 2 tablespoons of olive oil over medium heat and then saute the carrots, onions and fennel until slightly brown, about 3 to 5 minutes. Add salt and pepper and toss to coat.
—Place the roast in the center of a roasting pan or baking dish and surround with the sautéed vegetables. Pour one cup of dry white wine over the vegetables and bake in a 400-degree oven for about 50 minutes, until golden brown with an internal temperature of 160 degrees.
—Let pork rest for 3 to 5 minutes (maximum), and then cut into half-inch thick slices and serve.
[serves 4 to 6]
‘Autumn Is Here’ French Onion Soup
About this soup recipe, Amie says: “This recipe today is by far my favorite. Probably because we don’t make it super often (it’s a tad labor intensive). My second favorite, though, is Zuppa Toscana. It’s the only way I get my boys to eat kale!”
INGREDIENTS NEEDED
—3 tablespoons unsalted butter, cut into 3 pieces
—6 large yellow onions (about 4 pounds, halved and cut pole to pole into 1/4 inch-thick slices)
—table salt
—2 cups water (plus extra for de-glazing)
—1/2 cup dry sherry
—4 cups low sodium chicken broth
—2 cups beef broth
—6 sprigs fresh thyme (tied with kitchen twine)
—1 bay leaf
—ground black pepper
ADDITIONAL INGREDIENTS NEEDED FOR CROUTONS
—1 small baguette (cut into 1/2 inch slices)
—8 ounces shredded Gruyère cheese (about 2 1/2 cups)
INSTRUCTIONS
—Adjust oven rack to lower-middle position and heat oven to 400 degrees.
—Generously spray inside of heavy-bottomed large (at least 7-quart) Dutch oven with nonstick cooking spray.
—Place butter in pot and add onions and 1 teaspoon salt. Cook, covered, 1 hour (onions will be moist and slightly reduced in volume).
—Remove pot from oven and stir onions, scraping bottom and sides of pot.
—Return pot to oven with lid slightly ajar and continue to cook until onions are very soft and golden brown, 1-1/2 to 1-3/4 hours longer, stirring onions and scraping bottom and sides of pot after 1 hour.
—Carefully remove pot from oven and place over medium-high heat. Using oven mitts to handle pot, cook onions, stirring frequently and scraping bottom and sides of pot, until liquid evaporates and onions brown, 15 to 20 minutes, reducing heat to medium if onions are browning too quickly.
—Continue to cook, stirring frequently, until pot bottom is coated with dark crust, 6 to 8 minutes, adjusting heat as necessary (scrape any fond that collects on spoon back into onions).
—Stir in 1/4 cup water, scraping pot bottom to loosen crust, and cook until water evaporates and pot bottom has formed another dark crust, 6 to 8 minutes.
—Repeat process of de-glazing 2 or 3 more times, until onions are very dark brown.
—Stir in sherry and cook, stirring frequently, until sherry evaporates (about 5 minutes)
—Stir in broths, 2 cups water, thyme, bay leaf, and 1/2 teaspoon salt, scraping up any final bits of browned crust on bottom and sides of pot.
—Increase heat to high and bring to simmer. Then reduce heat to low, cover, and simmer 30 minutes.
—Remove and discard herbs, then season with salt and pepper.
—For the croutons: while soup simmers, arrange baguette slices in single layer on baking sheet and bake in 400-degree oven until bread is dry, crisp, and golden at edges, about 10 minutes. Set aside.
—To serve: adjust oven rack 6 inches from broiler element and heat broiler. Set individual broiler-safe crocks on baking sheet and fill each with about 1-3/4 cups soup. Top each bowl with 1 or 2 baguette slices (do not overlap slices) and sprinkle evenly with Gruyère. Broil until cheese is melted and bubbly around edges, 3 to 5 minutes. Let cool 5 minutes before serving.
[serves 6]
Mini Carrot Cupcakes
About this recipe, Amie says, “I am all about vegetables in my desserts. I love pumpkin everything! But because you might be sick of PSLs by now, here is my favorite carrot cake recipe. And I always try to do dessert in miniature. It makes portion control so much easier! Until you eat 6 at a time.”
INGREDIENTS NEEDED
—1 1/4 cups all-purpose flour
—1/2 cup chopped walnuts
—1 teaspoon baking powder
—1/2 teaspoon baking soda
—1/2 teaspoon salt
—1/2 teaspoon ground cinnamon
—1/2 teaspoon ground nutmeg
—1/2 teaspoon ground ginger
—1/4 teaspoon ground allspice
—1 1/2 cups grated carrots
—2/3 cup vegetable oil
—1 cup granulated sugar
—3 large eggs
—1 teaspoon vanilla extract
INSTRUCTIONS
—Preheat oven to 350 degrees F.
—Line two 24-cup mini-muffin pans with paper liners.
—Put the flour, walnuts, baking powder, baking soda, salt, and spices in the food processor and pulse until the nuts are finely ground.
—Whisk the grated carrots, vegetable oil, granulated sugar, eggs and vanilla in a large bowl until combined.
—Stir in the flour mixture until just combined.
—Divide amoung the muffin cups, filling each three-quarters of the way.
—Bake until a toothpick comes out clean, 10-15 minutes.
—Transfer to a rack and let cool 5 minutes, then remove cupcakes from pans to cool completely.
—Meanwhile, for the frosting: beat the confectioner’s sugar, cream cheese, unsalted butter with a mixer until fluffy. Beat in the lemon juice and almond extract.
—Pipe or spread the frosting onto the cupcakes and sprinkle with chopped walnuts.
[makes 48 mini cupcakes]
Does’t that all look delicious?!
If you’re up for a challenge… come to the forum and check out the latest edition of our Recipe Book challenge, which launched this month and is designed to help you create a quick-&-simple book of your favorite recipes — get this — in time to print it up and give it to friends and family members as a holiday gift later this year(!). Sound like fun? Come check it out HERE.
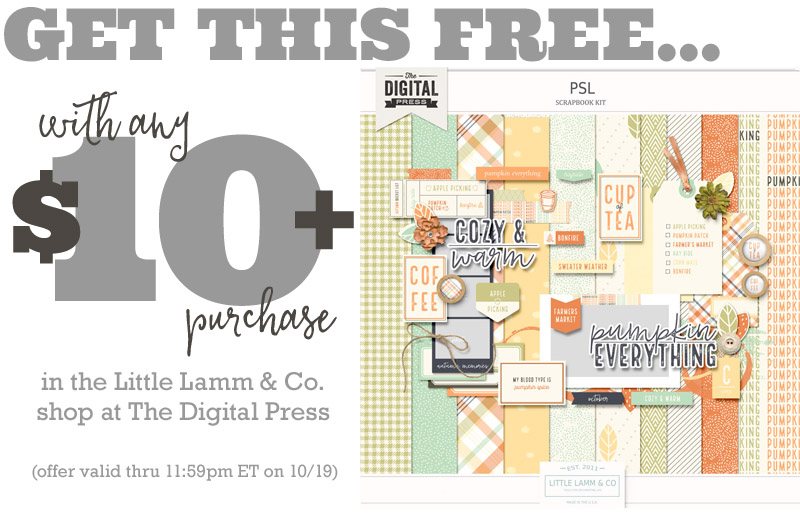
Meanwhile, it wouldn’t be a designer feature week without a fantastic sale and a special Free-with-Purchase offer… so you’ll be excited to see what Amie has in store for you! Not only is her entire shop marked down 30% OFF throughout her entire feature week(sale prices will be valid through 11:59pm ET on Thurs 10/19)… but she also has this awesome deal in her shop all week long, as well! Spend $10+ in the Little Lamm & Co. shop, and get the following BRAND NEW KIT that just launched in her shop today — completely FREE!
About the AuthorSabrina is married to a hard-working man and has two rambunctious kids, nicknamed Captain and Sunshine. She spends every free minute creating at her crafty space. Digital layouts, hybrid layouts, project life and just anything memory keeping. She also loves to read, kickbox and go a bike ride.
One of the key things that attracts me to hybrid memory-keeping are all of the wonderful digital embellishments that can be used (and/or tweaked to work for any project!). Namely, the ability to print and cut digital elements many times over is definitely a huge bonus for crafters on a budget (one purchase = endless uses!). Even better, though, is the fact that if you need to alter an element slightly to make it fit into one of your projects — with digital elements, you can do this! Today, I am going to show you how to take a standard digital element and customize it for your project.
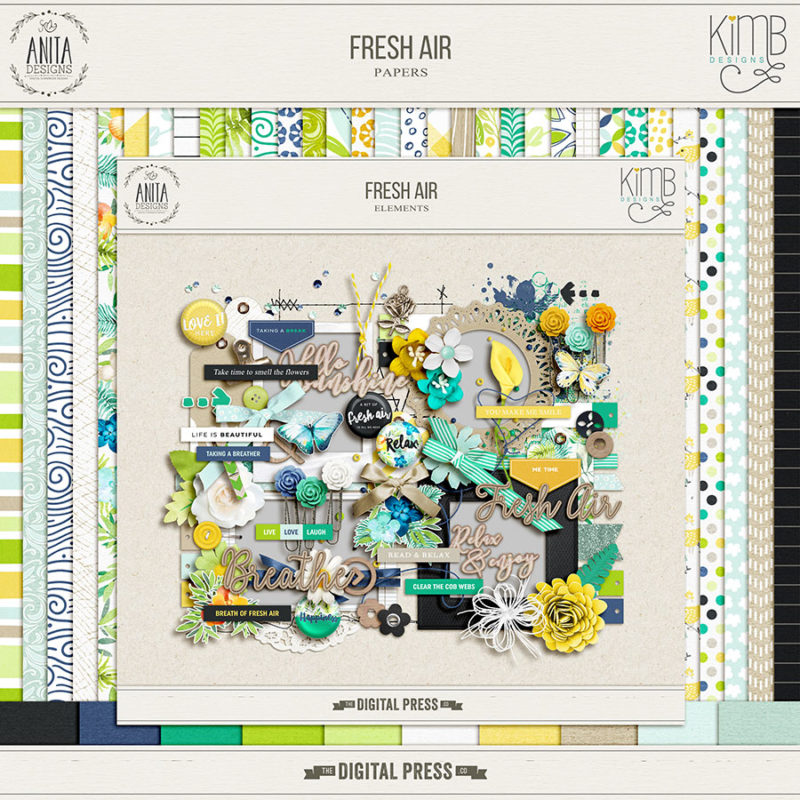
The first step is to choose a digital kit from the amazing selection at The Digital Press. I chose the gorgeous Fresh Aircollection designed by Anita Designs and Kim B Designs, because I love the color combination and the clean lines…
For my projects, I wanted to use one of the tags found in this collection (see below). The “Love” tag in the kit is gorgeous — but I wanted a shorter version for my project, so it would fit better into the space I had available. This next simple editing trick works wonders for tags that have a plain section.
Shorten a Tag
You will need photo editing software such as Photoshop (PS) or Photoshop Elements (PSE) — but there are plenty of alternative applications (there’s even a free online PS tool/version).
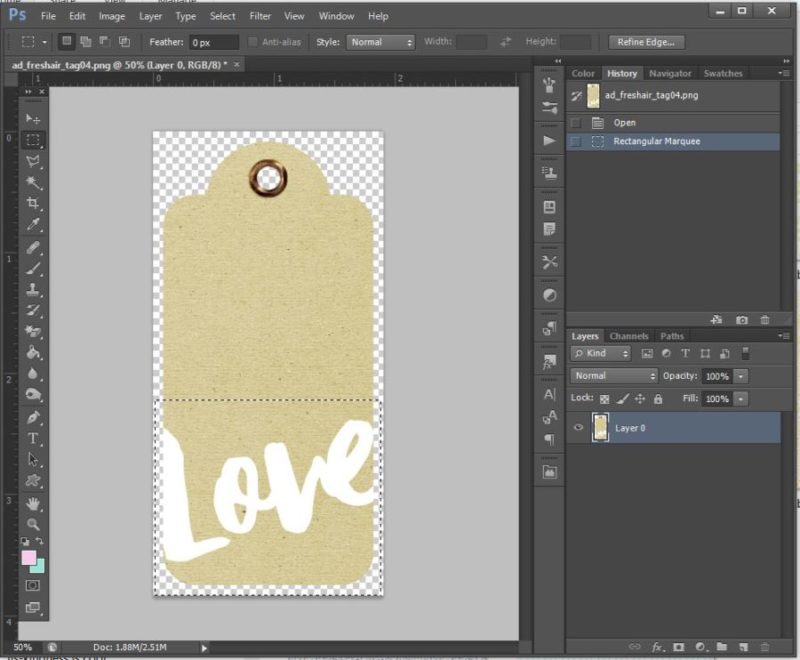
Open your tag in the editor and select the marquee tool (shortcut key + m + the dashed rectangle on the left).
Now select an area to move. We will shorten the tag by moving the lower section up towards the top of the tag. Drag the mouse to select an area as shown below…
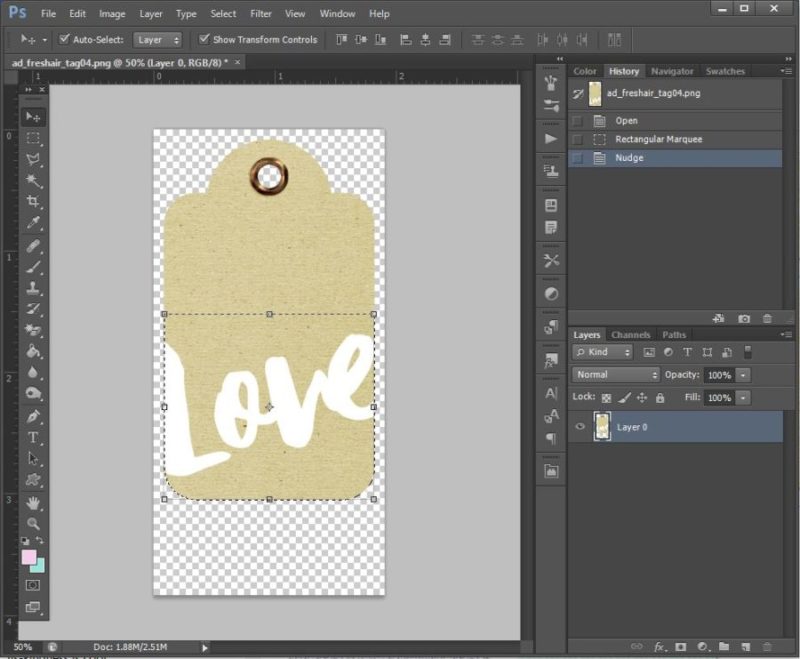
3. Switch to the move tool (shortcut key =+ v).
4. Using the arrow keys, move the selected area up; you should see the tag becoming shorter as you move it…
Voila! The tag is now shorter — and it’s just right for my project! This techinique is very simple but very effective.
*TIP* don’t forget to “Save As” a new document, or you will actually overwrite the original file — which you don’t want to do!
Cookie Cut Your Own Tag
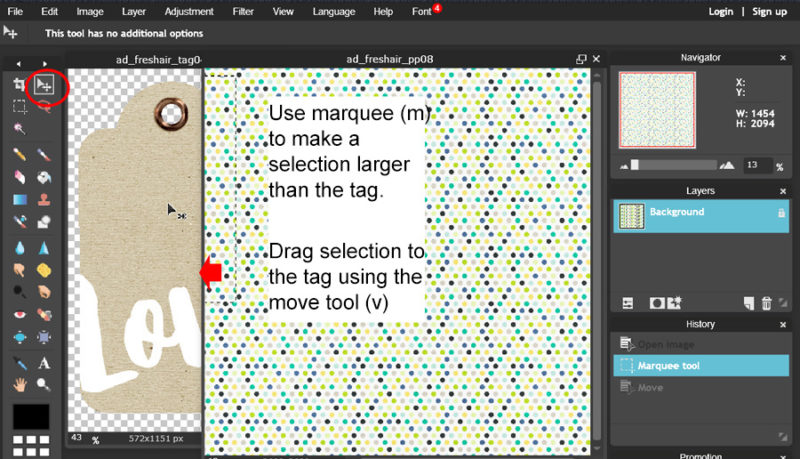
Next up, how about making your own version of the tag? We will use a cookie cutter effect to create another tag from patterned paper. This time I’ll use the free online Photoshop tool to demonstrate…
Open a tag and paper; the paper can be patterned or plain.
On the patterned paper window, make a selection larger than your tag using the marquee tool (m).
Now click and hold on the selected area to drag the paper selection across to the original tag. There will be 2 layers in the tag window.
Close the patterned paper.
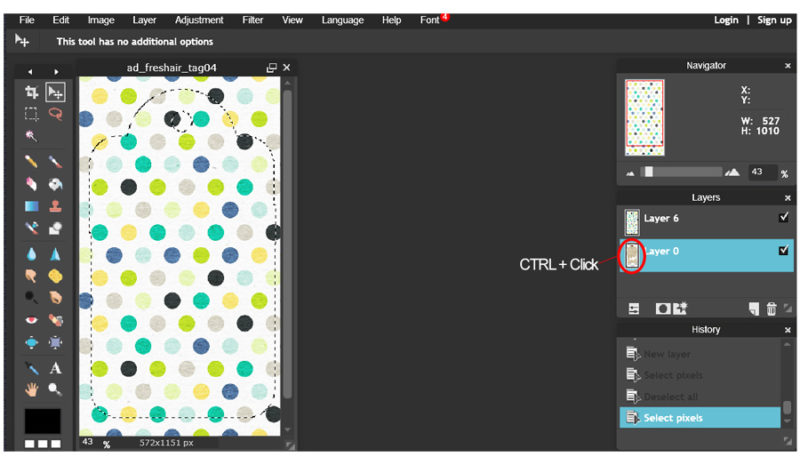
5. In the tag window, Ctrl+click on the icon on the tag layer (layer 0 as shown above). This selects the image outline. You will see the “marching ants” around the outside of the tag.
6. The current selection is the tag itself but we only want to cut the ‘excess paper’ outside of the tag. To invert the selection, Edit > Invert Selection. This selects everything except the tag shape.
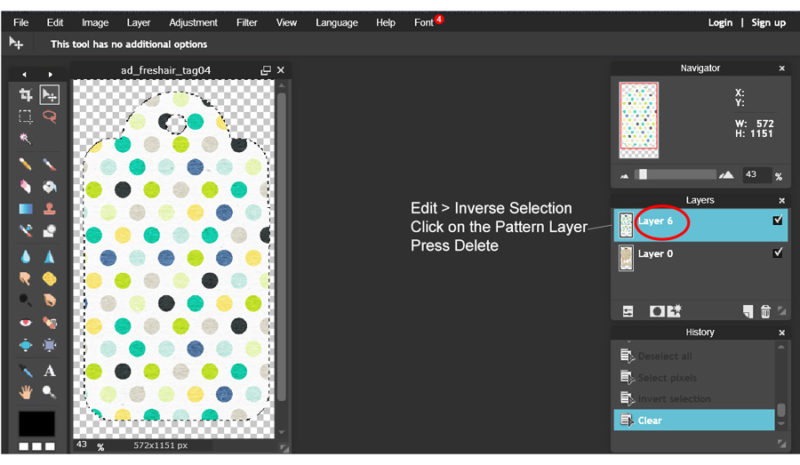
7. To cut out the patterned paper in the shape of the tag, click the patterned paper layer.
8. Click Delete to delete the selected area. The excess paper is deleted leaving only the tag behind.
Ta-da! Your new tag is ready to decorate… but again, don’t forget to save as a new document first (so you don’t overwrite your original file).
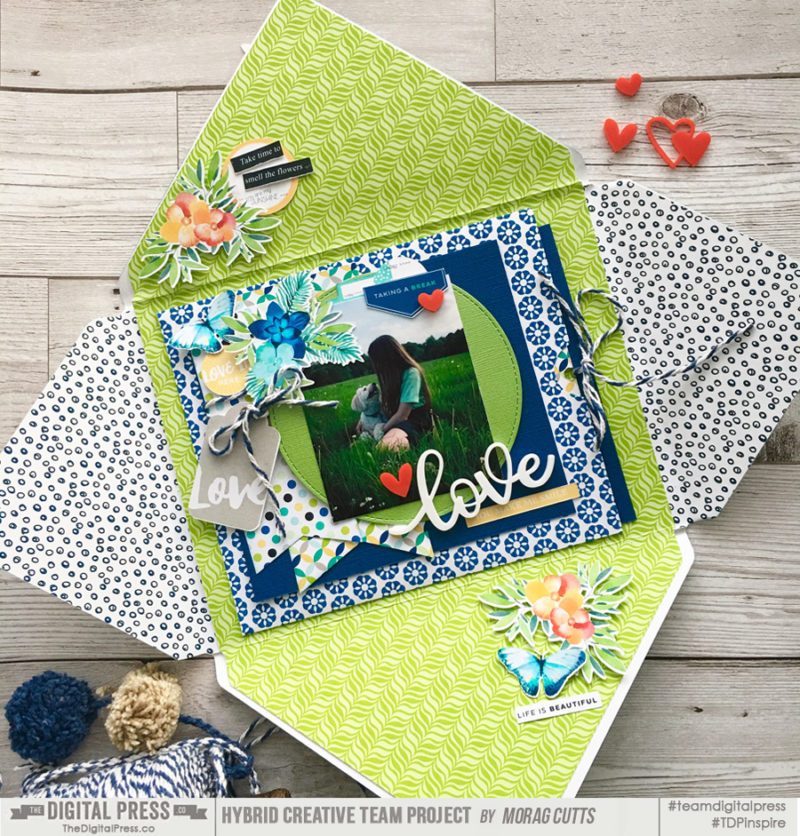
Here’s a look at my finished project, which is a decorated envelope (happy mail!)…
I used patterned papers from the kit to make an ‘envelope’. There are plenty of free envelope templates on the internet to use as a guide.
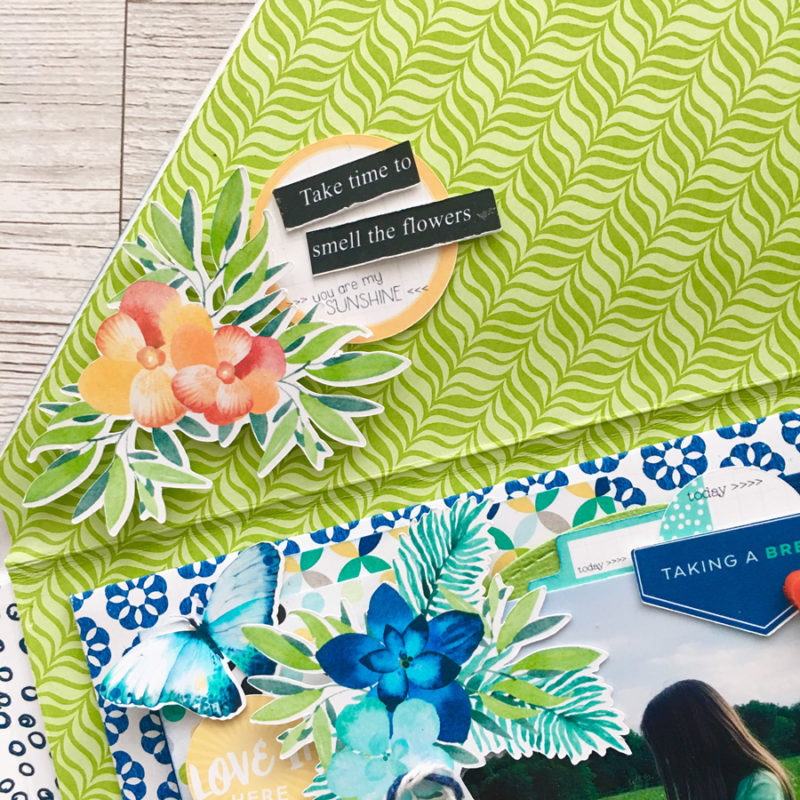
Here’s another closer-up view…
I only have singled-sided printing paper, so I lined the envelope with different papers. I really like the additional interest this created. It also made the project a bit more sturdy. A simple pocket holds a tag (for a message or for adding journaling). To finish off, I fussy-cut some flowers and butterflies and added tags and labels…
I hope that with a few of these ideas, I have inspired you to use elements from your own digital stash and tweak them around to make them work better for your own projects (and maybe even inspire you to try making your own happy mail and embellish with customised elements?). I think receiving a project like this would really make someone’s day!
Morag Cutts is part of the Hybrid Creative Team here at Digital Press. Morag has been an avid scrapper and photographer for ten years. Although she adores the flexibility and creativity of digital, Morag can’t resist playing with paper and embellishments – so hybrid scrapping is the perfect medium for her! Morag lives in the UK with her hubby, two kids and puppy.
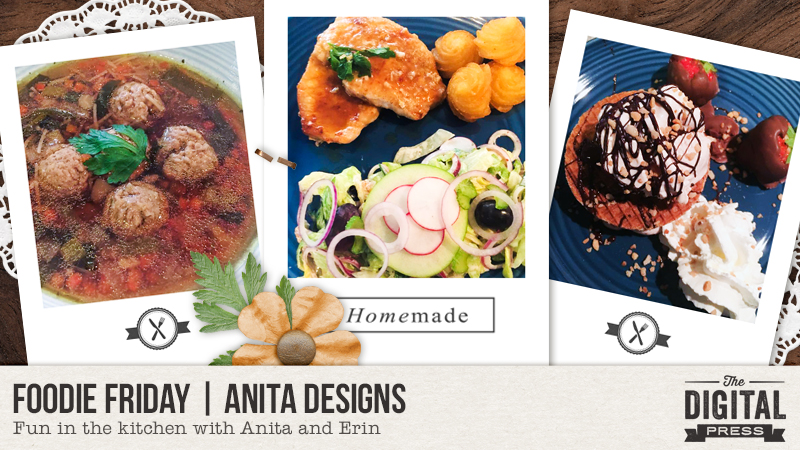
Well hello again, and welcome to another edition of our Foodie Friday series here on The Digital Press blog!
As you have likely already caught on throughout this past month… Foodie Friday is a new series based on the amazing response we had to the “Mess Hall” activities during TDP’s Summer Camp, back in July. As such, every Friday throughout the rest of the year, we will be combining this fun feature with our weekly designer feature series — and having some fun in the kitchen! Every week you will get the chance to peek into the lives (and kitchens) of your favorite TDP designers and creative team members.
This week’s fabulous recipes are coming to you from the spectacular Anita of Anita’s Designs. If you did not know already, Anita loves to cook… so she was very excited about sharing these recipes with you this week. I really enjoy cooking as well — and I love trying out new recipes — so I was super excited to see some new things here that I have not tried before!
Today we are sharing a series of recipes that Anita cooked one weekend this month for her family. In a way, this is “A Day in the Kitchen with Anita” documented! 🙂
[all photo credits to Anita ]
So, what are these delicious things you see pictured above?
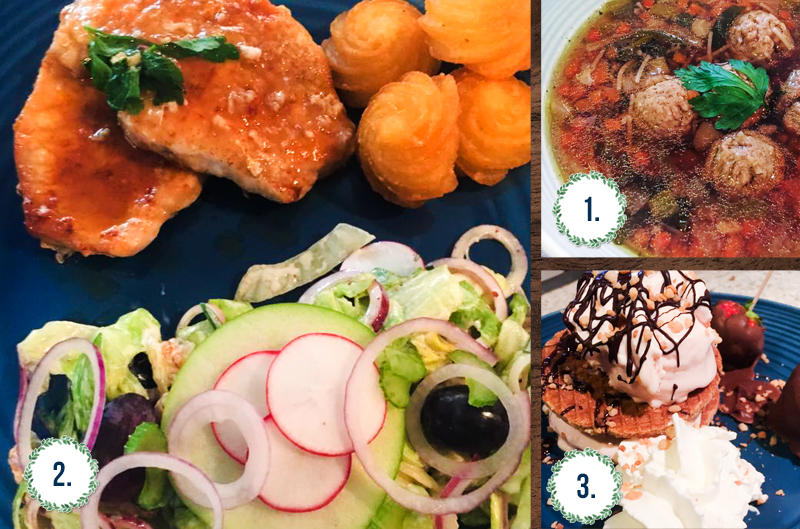
Sunday Soup (a.k.a. Meatball Veggie Soup)
Waldorf Salad and Tarragon Oil
Pork Filet (Minute Steaks) in White Wine Sauce
Ice Cream with Chocolate Dipped Strawberries
Sunday Soup (a.k.a. Meatball Veggie Soup)
Anita says, “this is a soup most people in Holland know and eat. My grandma used to cook this on Sunday for all kids and grand-kids. My husband’s mom makes it too sometimes, and hers is just as delicious as the one my grandma made. We call it ‘Groentesoep’.”
INGREDIENTS NEEDED
—4 liters (about 1 gallon) water
—broth to make 4 liters of soup
—500 gm (about 1 lb.) minced meat
—500 gm (about 2 cups) finely chopped mixed veggies ( carrots, cauliflower, leek, celery, white cabbage, etc)
—a handful of vermicelli
—flavor enhancers for soup (optional)
INSTRUCTIONS
—In a large pot bring the water to a boil.
—In a bowl add seasoning to the meat (salt, pepper, paprika, etc. to taste).
—Mix the seasoning into the meat and then form small meatballs.
—Add the meatballs to the boiling water and reduce the heat to low.
—Cook the meatballs in the water for about 60 minutes, removing the foam that collects on top every 10 to 15 minutes.
—Add the broth to the soup and cook for an additional 60 minutes.
—Add the chopped veggies to the soup.
—If desired, add the flavor enhancers to the soup and cook for additional 55 minutes.
—Add the vermicelli and cook until the vermicelli is soft, then remove from heat. [serves: 8-12 people]
Waldorf Salad and Tarragon Oil
INGREDIENTS NEEDED
—3 Granny Smith apples, thinly sliced
—2 celery stalks, leaves picked, stalks thinly sliced
—1 red onion, thinly sliced
—100g (1/2 cup) walnuts, toasted and chopped
—170g (1 cup) raisins or a bunch of purple grapes
—50g (1/4 cup) tarragon leaves, roughly chopped
—1/2 Tb white wine vinegar
—60ml (1/4 cup) extra virgin olive oil
—a bunch of radishes
—juice from 1 lemon
—150 gm (about 3/4 cup) mayonnaise
INSTRUCTIONS
—Combine lemon juice and mayonnaise in a bowl and season to taste with salt and pepper.
—Place the apple, celery stalks and leaves, onion, nuts and raisins in a large bowl and toss with the dressing.
—Make the tarragon oil by combining the tarragon, vinegar, olive oil in a bowl.
—Serve the Waldorf salad and drizzle with tarragon oil on top.
[serves: 6-8 people]
Pork Filet (Minute Steaks) in White Wine Sauce
About this dish, Anita says… “I served the pork filet and Waldorf salad with pomme duchess (duchess potatoes).”
INGREDIENTS NEEDED
—8 thin pork filets
—4 Tbs flour
—100gm (1/2 cup) butter
—4 cloves of garlic
—250 ml (about 1 cup) white wine
—200 ml (about 1 cup) broth
—20gm (3/4 cup) fresh chopped parsley
INSTRUCTIONS
—Mix the salt and and pepper into the flour and dip the pork filets in the mixture.
—Shake off excess flour and saute them in 50 gm (1/4 cup) of butter for about 4 to 6 minutes, turning over once in the middle.
—Remove from skillet, cover with foil and let rest.
—Add in remain butter and saute the garlic for about 1 minute.
—Add the wine and broth.
—Bring to a boil and let it boil for about 10 minutes or until it is 1/3 reduced.
—Place the meat back in the pan, and warm it on a low heat for about 7 minutes with the lid on the pan.
—Remove from heat and plate filets.
—Add parsley to the butter wine sauce and give it a good stir. Serve the sauce in a bowl, or over the meat in the plate. [serves: 8 people]
Ice Cream with Chocolate Dipped Strawberries
INGREDIENTS NEEDED
—200 ml (1 cup) semi-skimmed milk
—2 tbs liquid honey
—250g (1 and 1/4 cup) fine sugar
—600 (3 cups) ml crème fraîche
—250 grams strawberries
— 2 icecream waffles per person
—100 ml (1/2 cup) water
—additional fresh strawberries (to coat with chocolate)
INSTRUCTIONS
—Put the milk, honey and 1 cup of sugar in a pot on low heat and whisk until the sugar dissolves.
—Remove from heat and let cool slightly.
—In a bowl, add the cooled milk/honey sugar mixture to the fresh cream. whisk until blended.
—Place cream mix in an ice cream machine and let it work 1.5 to 2 hours (if you don’t have a ice cream machine, put the mix in a container and put in freezer and stir it gently every 15-20 minutes).
—Remove the green from 250gm of strawberries and slice in half.
—Add strawberry halves, 100ml water and 50gm sugar to a pot and bring to boil on med/high heat.
—reduce heat and crush the strawberries let the mix thicken for about 20-25 minutes (it should be syrup like).
—Remove from heat and let cool.
—Once cooled, mix the strawberry syrup into the freezing ice cream mixture with a fork and return to freezer for at least 20 minutes.
—Skewer the remaining strawberries from the top.
—set a bowl above a pot of boiling water and add chocolate to the bowl, stirring regularly until the chocolate is melted.
—Holding your skewer, dip the strawberries into the chocolate and twist to coat evenly.
—Place dipped strawberries on a baking sheet to cool, then store in the fridge until needed.
TO SERVE
—You can simply serve the ice cream in a bowl, and garnish it with the chocolate-dipped strawberries… OR…
—You can also place a waffle on a plate, and put a scoop of ice cream on top; add a second waffle on top and do another scoop; top with some chocolate sauce, sprinkled chopped nuts, and some whipped cream; serve with chilled chocolate dipped strawberries on the side. [servings: 1 liter/10 people]
I don’t know about you, but just reading through those recipes and looking at the photographs got me ready to hit the kitchen (or at least have a nice snack!). Everything looks so amazing!
If you’re up for a challenge… come to the forum and check out our Recipe Book challenge, which launched this month and is designed to help you create a quick-&-simple book of your favorite recipes — get this — in time to print it up and give it to friends and family members as a holiday gift later this year(!). Sound like fun? Come check it out HERE.
Meanwhile, it wouldn’t be a designer feature week without a fantastic sale and a special Free-with-Purchase offer… so you’ll be excited to see what Anita has in store for you! Not only is her entire shop marked down 30% OFF throughout her entire feature week(sale prices will be valid through 11:59pm ET on Thurs 9/28)… but she also has this awesome deal in her shop all week long, as well! Spend $10+ in the Anita Designs shop, and get the following brand-new FULL COLLECTION (!) that just launched in her shop today — completely FREE!
Erin is an artsy crafty kind of girl who is currently dabbling in far too many things, but is working hard to enjoy every moment of it, while avoiding the rain, which is difficult due to living in the land of many rains. She is slowly learning to use her smart phone to capture all the fun little bits of life that would otherwise go unremembered in the busy craziness that is raising a family!

 About the Author Andrea Albuquerque is part of the Hybrid Creative Team here at Digital Press. Andrea has been a scrapper since 2010 and a photographer since 2012. Although she adores the flexibility and creativity of digital, she can’t resist playing with paper, paint, and embellishments… so hybrid scrapping is the perfect medium for her! She lives in Brazil with her hubby.
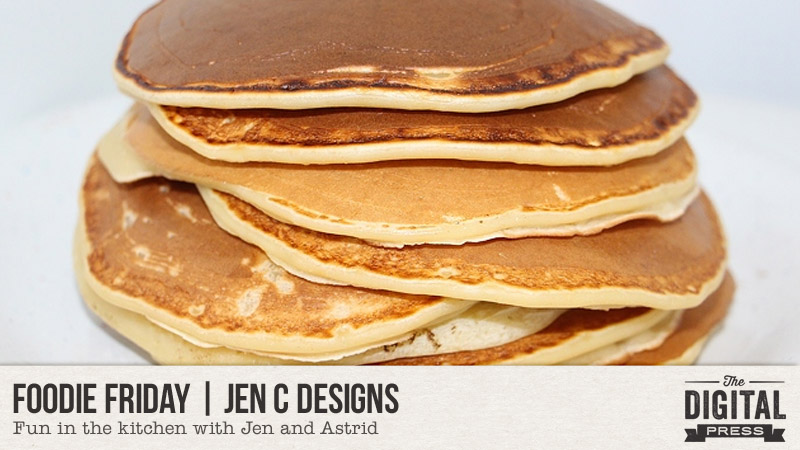


 Jennifer Hignite is a mom of three boys and new homeowner with her fiance in the mitten state of Michigan. When she is not scrapbooking, she enjoys photography, watching her boys play sports, decorating, and shopping at Target.
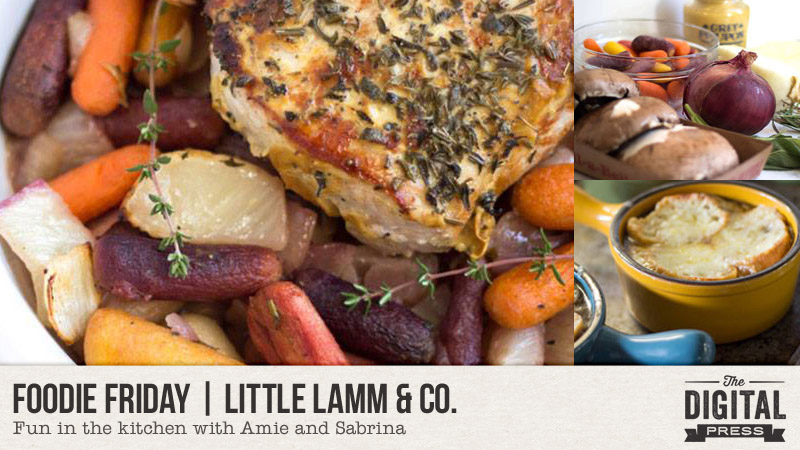

 Morag Cutts is part of the Hybrid Creative Team here at Digital Press. Morag has been an avid scrapper and photographer for ten years. Although she adores the flexibility and creativity of digital, Morag can’t resist playing with paper and embellishments – so hybrid scrapping is the perfect medium for her! Morag lives in the UK with her hubby, two kids and puppy.