Hello everyone! It’s Donna here, and I’m excited to share another edition of our Hybrid How-To series with you here on The Digital Press blog! With spring just around the corner, I thought I’d show you how to use your digital scrapbooking stash to create a couple of cute (but simple!) gifts for the gardeners in your life.
For this tutorial, I will be using the latest Digiscrap Parade collection from February 2019 — called Plant a Seed (it is available for FREE throughout February 2019, and it’s perfect for this project)! You could also use any digital kit/collection of your choice and achieve equally gorgeous results.
Okay, let’s get started!
SUPPLIES NEEDED
- digital kit of your choice
- photo editing program (such as Photoshop or Photoshop Elements, etc.)
- white card stock or matte photo paper
- presentation or printer paper (I used presentation paper)
- blank notebook (I used a composition book)
- cutting machine or scissors
- adhesive (I used a glue stick & double-sided tape)
- Mod Podge (or you can make your own using 1 cup of white glue and 1/3 cup of water)
- foam brush or paint brush
- ribbon (optional)
- pop dots (optional)
INSTRUCTIONS
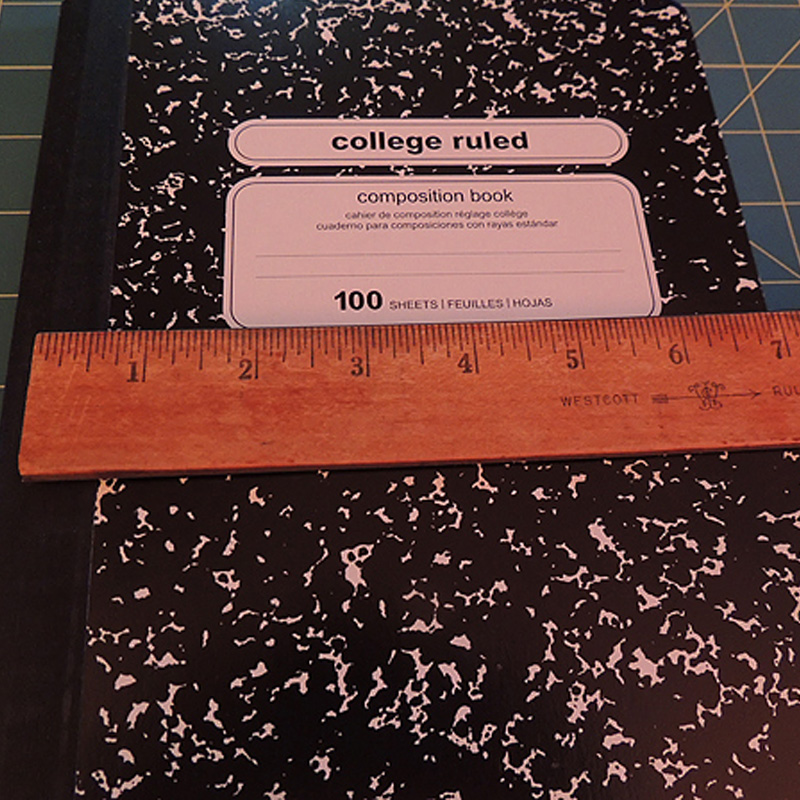
First, you’ll want to determine what size to make your Garden Journal’s front and back covers. You’ll do this by measuring the size of your notebook, leaving about 1/4 inch of the binding exposed. My book is 9.75 inches tall and 7.25 inches wide… so my covers will measure 9.75 inches tall and 7 inches wide (because I’m leaving about 1/4 inch of the black binding on the left exposed).
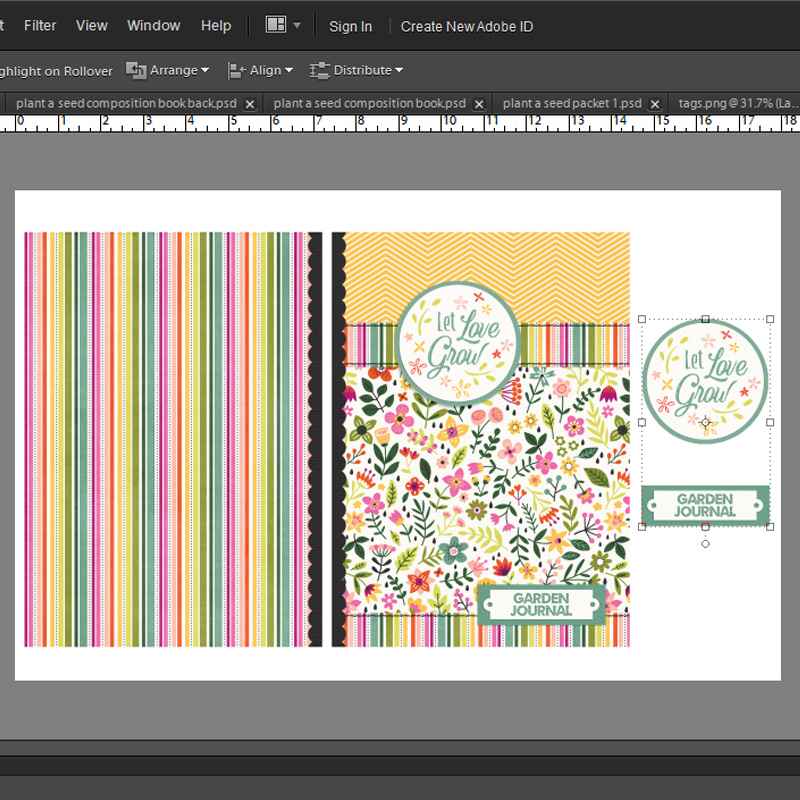
Next, you’ll open your photo editing software and create a canvas using the size you determined in the previous step. Use that canvas to design your front and back covers. Here’s a look at what I came up with…
After you come up with a design you like… you’ll print your covers on white card stock or matte photo paper. Cut them out and set them aside.
**TIP** Want to add some dimension to your book covers? I did this by printing 2 tag elements separately (see my screenshot, above; they’re the elements on the right). I cut them out separately, so I could attach them later using pop dots/etc.
Because we will be Mod Podging these covers onto the notebook, I think it’s wise to allow the ink to set up for a minimum of 2 hours before applying the Mod Podge (I usually wait overnight, just to be safe). This helps to prevent the ink from smudging once the Mod Podge is applied.
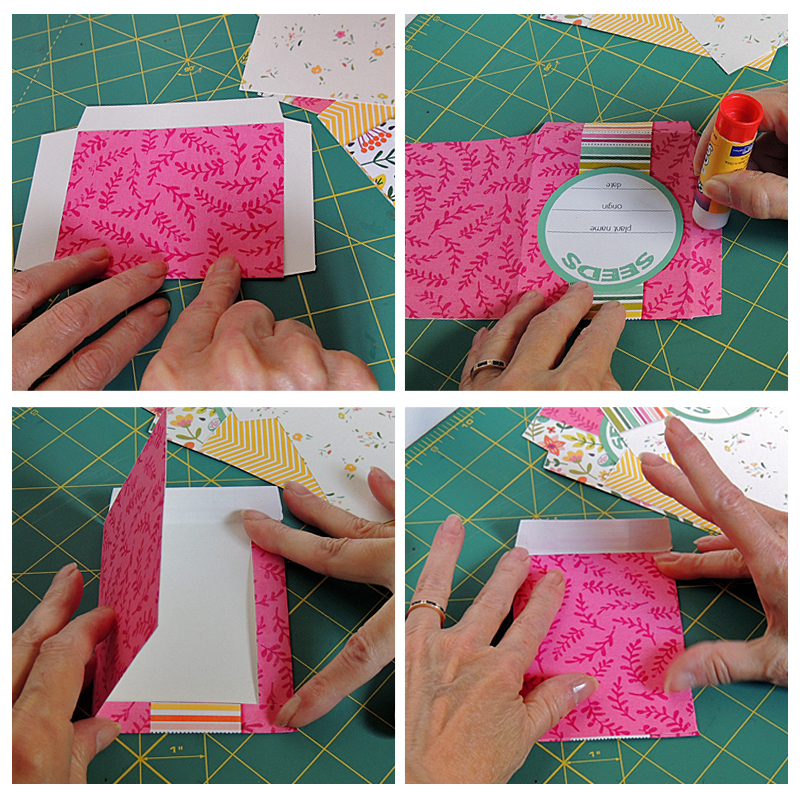
Our next step is to design the seed packets. For my project, I used a simple template that I created (see image, below); you can download it HERE if you’d like to use it and follow along.
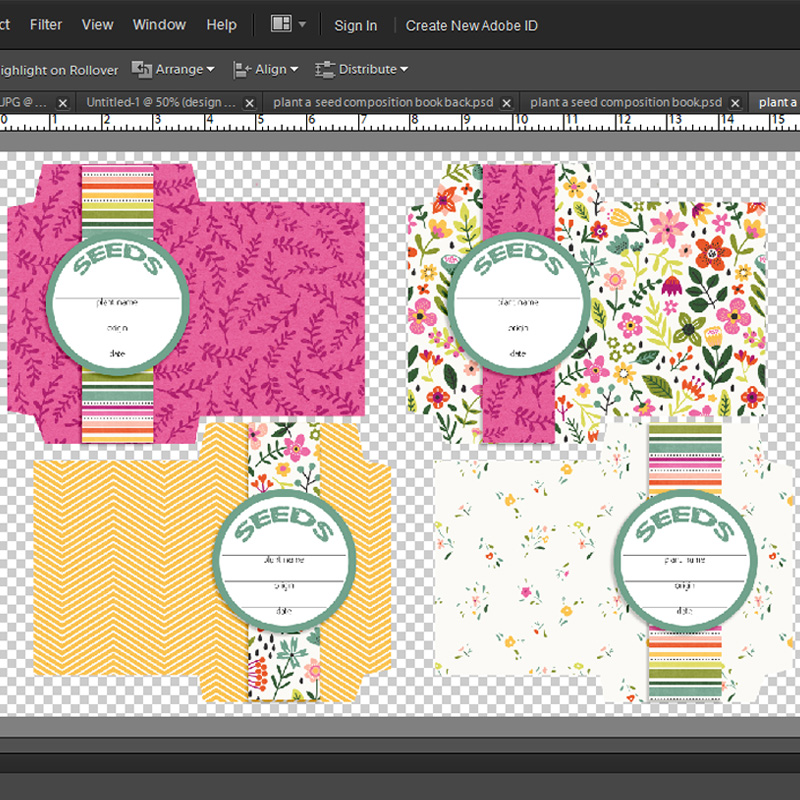
Print the seed packets on printer paper or presentation paper. We will not be mod podging the seed packets, so it’s OK to cut and assemble them right away. I used a glue stick, but any adhesive or double-sided tape will work just fine.
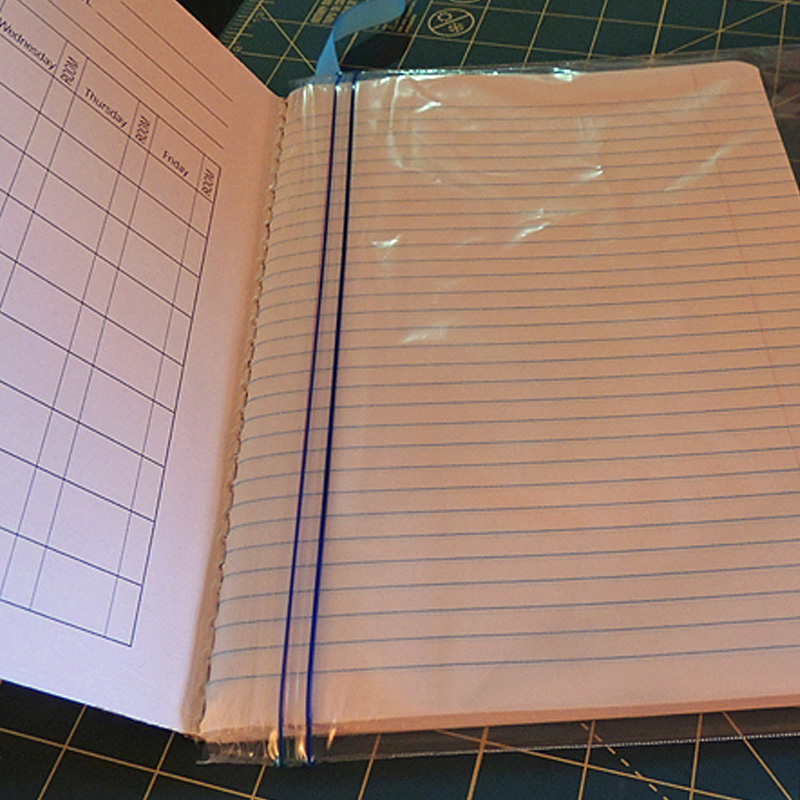
Before applying the front and back covers to the notebook, I wanted to add a ribbon bookmark. You could certainly skip this step, but if you have some extra ribbon lying around, it does add a little pizzazz to the finished project!
Cut your ribbon about 4 inches longer than the height of your book and adhere it 2 inches from the top on the back of your book. (Make sure you apply it far enough away from the binding to ensure that your back cover will cover the ribbon completely.) I used double-sided tape to attach it, but most adhesives will work.

Our next step is to attach the covers to the book. Since Mod Podge can be quite messy, you’ll want to protect the inside pages to avoid glue getting on them. I found that a gallon sized zippered plastic bag works perfectly, as shown here…
After the inner pages are protected, glue on the covers with Mod Podge. Don’t skimp when applying the Mod Podge; you’ll want it thick enough to allow some wiggle room to get the covers on straight.
Repeat this step for the back cover and allow the glue to set for a minimum of 20 minutes.
Before we apply the top coat of Mod Podge, we’ll want to trim the corners of our cover to match the corners on the book. (If your book has square corners you can skip this step)…
When applying the top coat of Mod Podge, load a generous amount onto your paintbrush and use a continuous stroke (either from top to bottom or left to right). Be careful to not overwork an area or your ink may smear. Don’t worry if you can see your brush strokes… as they will diminish as the Mod Podge dries. If you are adding any elements to your cover, be sure to apply a coat of Mod Podge to those as well so that everything has the same texture.
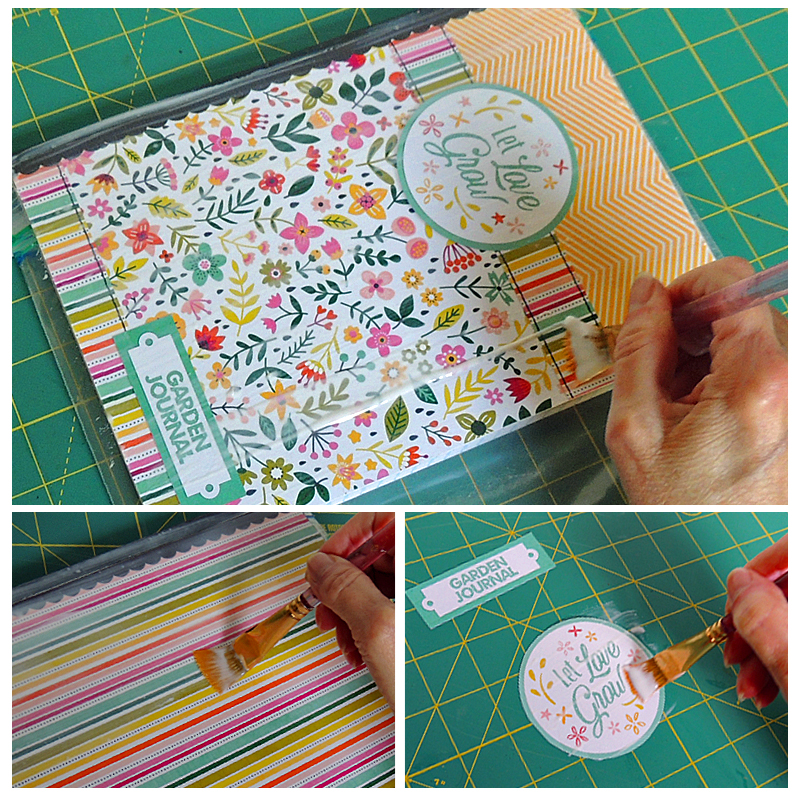
Once everything dries, the final step is to attach the tag elements to the front cover. As noted above, I used pop dots to add a little dimension.
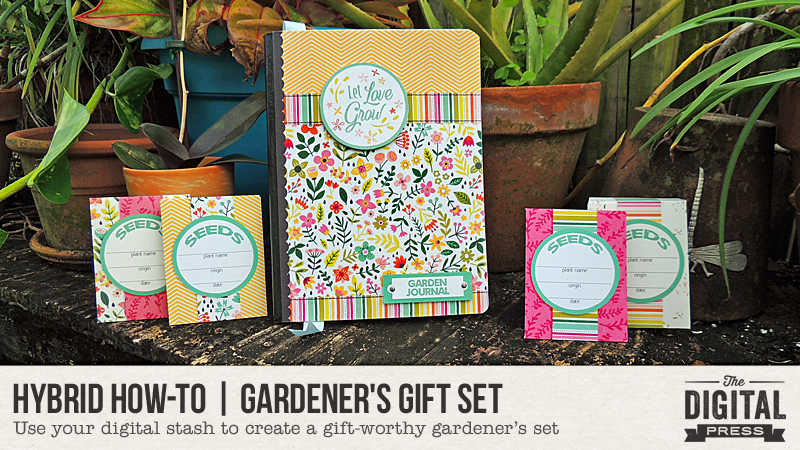
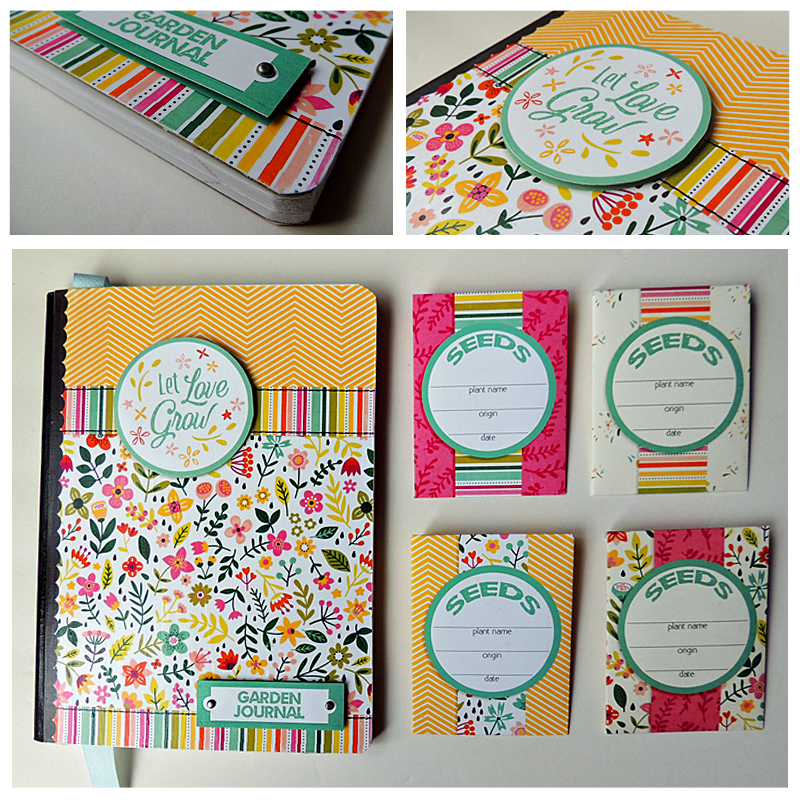
And here’s a look at my finished gardener’s set, ready for gift giving…
I hope today’s tutorial inspires you to re-think your own digital supply stash to make something completely new and fun (and gift-worthy too)!
And even better news — if you want to give this project a try, and you combine 2 (or more) different TDP designers’ contributions from the February 2019 DigiScrap Parade — Plant A Seed — when creating your project… you will meet the requirements for the FEBRUARY 2019 PARADE CHALLENGE, which you’ll find in the CROSSWORD SECTION in The Digital Press forum. This challenge is open/available through the end of 2/28/2019, so go jump in and have some fun! You can earn points toward everything from discounts to free kits! I hope that you will join in. 🙂
 About the Author Donna is a member of the hybrid team here at The Digital Press. She has been a digital scrapper and hybrid crafter for over 10 years, and loves the flexibility digital products provide. When she’s not scrapping you’ll find her in front of the TV, at the computer, or in the kitchen cooking up something scrumptious. She has been married for 40 years to her husband, Sonny, and they live in South Florida with their sweet little dog, Casey, and kitty siblings Cashmere and Velcro. She also enjoys swimming, gardening, traveling, and chocolate (of course!).