Get Your Photos Off Your Camera

Get Photos Off Camera


A few months ago, I wrote a post about taking pictures to help you document your everyday. This month, I’d like to discuss getting those photos off your cameras and phones and onto your computers in an organized way so they can be scrapped in a timely manner. I have found that automating this process as much as possible has helped me keep my camera’s SD card as well as my Camera Roll on my phone clean so that I never run out of space on either. Here is my process:


Phone Photos

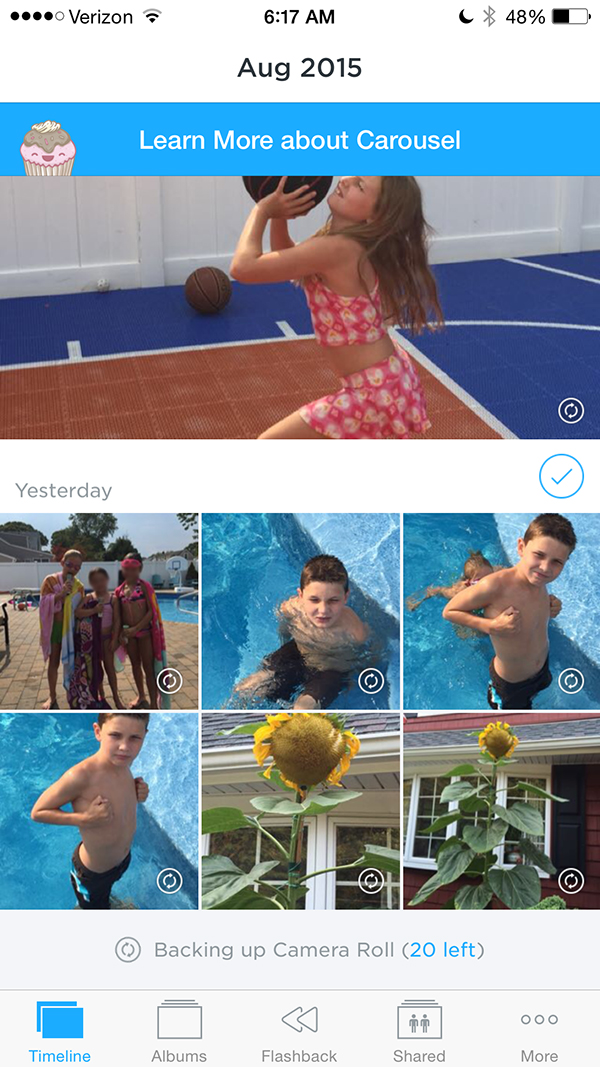
Like most of you, I use my phone to take a lot of photos. I use an app called Carousel by Dropbox to organize and back up my phone photos. When you take a picture, it automatically backs it up to Dropbox if you have that option set up. I have mine set to back it up when I am connected to WiFi so that it doesn’t use my cellular data. Therefore, when I am home, I just open up my Carousel app and it automatically starts backing up any photos on my camera roll.


Get Photos Off Camera 2

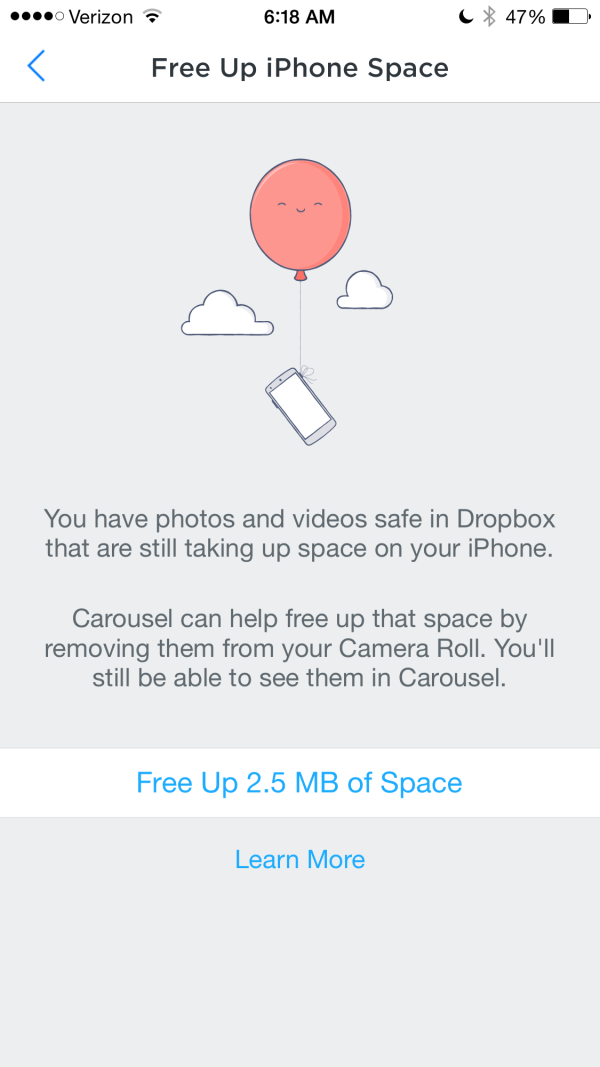
The beauty of Carousel is that it will also alert you when your storage is low on your device. This way, you will never get a message telling you can’t take another photo because you have too many old ones stored on your phone. I don’t typically wait that long. When I think of it, I tap the ellipses at the bottom of the app, go to settings and select Free Up iPhone Space. Then, Carousel will tell me how much space it can free up by removing my photos that are safely stored in Dropbox from my Camera Roll:


IMG_7029


Wait. It gets better. Dropbox can get expensive so I don’t use it to store backups of all my photos. So, I need to get my photos out of my Dropbox folder and onto my computer. Enter Lightroom.


Lightroom works with Carousel by way of its Auto Import feature. Anytime a photo is uploaded to a watched folder, Lightroom will automatically import it into its catalog whenever Lightroom is launched and it will move it wherever you tell it. It’s pretty easy to set up. First, you need to enable Auto Import:


Choose File > Auto Import > Enable Auto Import


Next, you need to specify the settings:


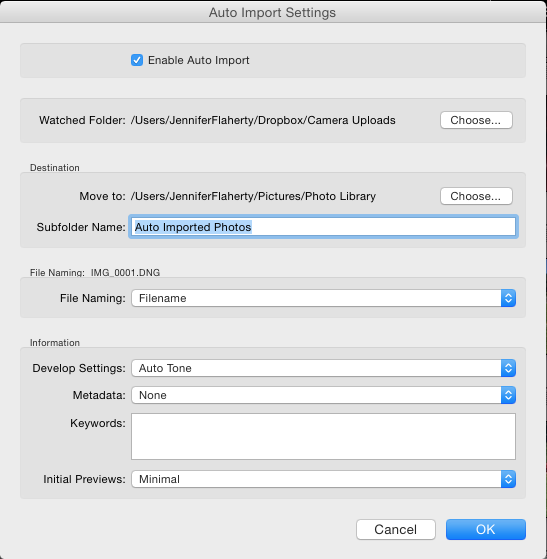
Choose File > Auto Import > Auto Import Settings


In the Auto Import Settings, you will specify the name of the Watched Folder. This folder must not contain any subfolders. In the case of Carousel, the Watched Folder would be the Camera Uploads folder within your Dropbox folder. Next, specify the Destination where you want the photos moved. I move mine to a folder on my hard drive called Auto Imported Photos. Next, you can choose a File Naming option which will rename all of your imported photos. (I don’t do this.) And finally, in the Information section, you can choose to apply Develop Settings, add Metadata and/or Keywords. I apply the Auto Tone develop setting upon import which applies automatic corrections for Exposure, Blacks, Brightness, and Contrast:


Auto Import Settings


While a lot of what I said may sound overwhelming, let me stress that that is a one time set up. To be clear, my process for uploading my phone photos to Lightroom with color corrections is as follows:


Open Carousel.


That’s it. All I have to do is open the Carousel app and everything else is automatic!


Now, onto my process for downloading my dSLR photos. Unfortunately, my process for that is not as easy, but it can be.


dSLR Photos

I choose to tether my camera to my computer to download photos. My reason is this:  I feel there is less probability for damaging or losing my SD card if I don’t take it out of my camera. I keep my camera and cord by my laptop, so it is not really a big deal. I just connect the wire, connect my EHD (because that is where I store my photos), open Lightroom and press the Import button.


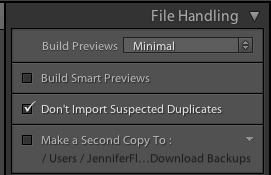
Along the right hand side, a number of panels open up: File Handling, File Renaming, Apply During Import and Destination.


Under File Handling, I check the box “Don’t Import Suspected Duplicates.”


File Handling


I don’t do anything under Rename my files, however, this is where you could choose to rename all your files by date or event name. I just don’t do that.


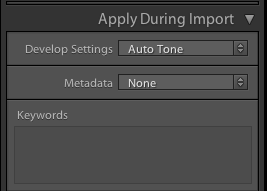
Under Apply During Import, I choose the Develop Setting Auto Tone which can be found under the Lightroom General Presets. As I stated earlier, this automatically corrects the Exposure, Blacks,  Brightness, and Contrast.


Develop Settings


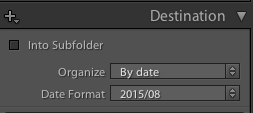
Finally, under Destination, I choose to organize them By Date using the Year/Month format. Then, I select my External Hard Drive and navigate to my Pictures folder. There Lightroom will automatically copy my photos from my camera to my EHD and store them in a yearly folder which is then separated again by month.


Destination


Once my photos are in Lightroom, there are a number of ways they can be organized to make scrapping them a breeze. I will talk about this in another blog post. However, I did want to share with you how some others on our team get their photos off their computer.


Sabrina says: I use an app called PhotoSync and it transfers the photos wirelessly. I also have downloaded the application my computer so it can do the transfer. Super easy!! You can get it for iPhone or Android.


Jamie says: If you’re working with everything Apple (Mac and iPhone), Airdrop is a great feature to get pictures from your phone (or anyone else also on an iPhone) to your computer. That’s what I usually use to get pics from my phone to computer, then I import them into Lightroom at that point. When getting them off my DSLR, I just put the SD card in my computer, and import through LR. (Note: If you are working with an older Mac computer or iPhone, Airdrop may not be compatible.)


Juliette says: My compact camera automatically files my photos by date on my Mac (over wifi from anywhere in the world provided the Mac is turned on) when I press a button on the camera. It’s a Samsung WB800F; it’s absolutely brilliant!


Kathryn says: I use Google Photos auto sync to back up my phone photos. It’s a really easy process for Android users as it’s built in and the backup is free. I do also have an Eyefi SD card to do wireless transfer from my dSLR.


So, as you can see, there are a number of ways to get your photos off your camera pretty easily, so they are ready and waiting for you to scrap them. So, how about you, what’s your process?


Jen Flaherty

About the Author: Jen is a member of the Pocket Team at The Digital Press. Having scrapped digitally for many years, she has come to embrace the simplicity of Pocket Scrapping since it fits more easily into her busy lifestyle of shuttling her three children from field to field. When she is not on the computer, you will find her working out or really doing anything else she can besides cooking, cleaning and doing laundry.

Explore Your Hometown

Explore Your Hometown


Hi scrappers! Today I want to talk to you about rediscovering some of the amazing places in your very own hometown. Sometimes I feel like my family gets in a rut of going to the same places and doing the same things. When we start to get bored with our usual activities, we play tourists in our own city. Living in Orlando, it is easy to find new things to try, but every hometown has their own little gems worth exploring. Some of my favorite places to visit with my family are new parks, splash pads, libraries, museums, and cultural events and festivals. We also love to go to the Disney parks whenever we can!

Explore Your Hometown

I have had a lot of luck just searching for family friendly activities on the internet. This summer we took an airboat ride, went to several food festivals, tried a brand new ice cream shop, and visited the new Crayola Experience that just opened here. We love trying new things without having to spend too much money, and playing tourist in your own city is a great way to do that! The memories make for wonderful layouts, too. I scrapbook to give my children the opportunity to remember experiences that they otherwise might forget as they grow older. I want them to be able to look back on all the special moments and memories we created as a family.

Explore Your Hometown

I hope that this inspires you to go out and explore your own hometown! It is amazing when you realize all of the wonderful things that are happening in your own little part of the world. I’m hosting a challenge over on the forums and I hope you will come play along and share a layout you created while exploring your hometown!

Katie

About the Author: Katie is a member of the Creative Team here at The Digital Press. She lives in Central Florida with her husband and their four sweet, crazy boys. When she’s not dodging Nerf bullets or trying to dig out from under the never ending pile of laundry, she enjoys photography, cooking, going to Disney World with her family, and, of course, digital scrapbooking.

Tutorial: Simple Hybrid Mini-Albums

DonnaEspiritu-TheDigitalPress-Hybrid-IGMini-tut-06

Hello everyone. Donna here to share a simple and cute mini-album with step-by-step tutorial.

Since Instagram became famous, I noticed most of my photos were cropped in square, ready for IG posting. So, for today, I want to share with you a couple of mini-albums to use for square pictures.

1. First step is to print and cut your chose digital papers/elements to use. Papers size: 4×4 inches, resized to 8×8/6×6. Elements were resized as well.

DonnaEspiritu-TheDigitalPress-Hybrid-IGMini-tut-01

2. Adhere papers to cardstock. Approximately, cardstock is 4.5 x 4.5 inches.

DonnaEspiritu-TheDigitalPress-Hybrid-IGMini-tut-02

3. Punch two holes as seen in the image. I used my Crop-a-dile to punch several layers simultaneously. I also used a doily on the first page/cover.

DonnaEspiritu-TheDigitalPress-Hybrid-IGMini-tut-03

4. Adhere everything as seen in the image. use foam dots/tapes on some of the embellishments for dimension.

DonnaEspiritu-TheDigitalPress-Hybrid-IGMini-tut-04

5. I just added some flowers from my stash to decorate the front page/cover.

DonnaEspiritu-TheDigitalPress-Hybrid-IGMini-tut-05

This is how it looks like with a pink sheer ribbon tied to one of the metal rings. I used Danielle Engebretson’s REMINISCENT papers and elements

DonnaEspiritu-TheDigitalPress-Hybrid-IGMini-tut-07


I also created another one with fewer pages, using YESTERDAY ONCE MORE papers and elements. I just added some stickers, alpha stickers, flowers, stamps and sheer ribbon from my stash.

DonnaEspiritu-TheDigitalPress-Hybrid-IGMini-tut-08


That’s it! I hope you liked my project and tutorial. Thanks for dropping by, happy crafting!

Donna


About the author: Donna Espiritu is a mom to a little girl who just turned 10 months and wife to a very supportive husband. She is currently living in the Kingdom of Saudi Arabia with them. When she is not scrapbooking, she likes to read books/e-books (sci-fi/romantic/time-travel) or watching old episodes of some of her favorite TV shows.

Explore Your Childhood

exploreyourchildhood

Hi everyone! I am so excited to be here to talk about something that I am so passionate about … scrapbooking YOUR childhood. Many of us spend most of our scrapbooking time focused on creating pages for and about our children or our current lives. And we sometimes forget how important it can be for us to also ensure that we capture the photos and stories of our childhoods. Even if you don’t have photographs from your childhood, it can be a great idea to get some of the stories or things you remember down in your scrapbooks! I often think about how much I’d love to have more information about my mother’s childhood – I will come across a photo and wonder what was happening at that time in her life. I wish she’d taken the time to document some of her childhood moments as I think they could help me understand who she was and where she came from more fully. I have made a commitment to begin getting MY stories into our family scrapbooks, especially the stories from my own childhood.

Here is a recent layout that I did about the picnics we’d take when we lived in Caroline County when I was a little girl & my memories of those adventures! Just looking at this photo brought back so many memories and details about those picnics! And my children love seeing what I looked like when I was little and what sorts of things I did as a little girl.

Picnics_900Overlay

Another member of the Digital Press CT, Kacy, has created quite a few layouts about her childhood so I thought I’d share a few with you for additional inspiration!

11911938_10204654947835814_737463754_n

11908051_10204654948715836_906585531_n

11924661_10204654946435779_1898796491_n

And here is a childhood layout from another CT member (Sokee) which is fantastic!

TDP.home1972900

OK, I hope you’re feeling inspired to create some pages about your own childhood! So, now it’s your turn! I would love to see what you can do to explore YOUR childhood by creating a scrapbook page with your childhood photos and/or a story from your childhood.  I’m hosting a challenge over on the forums and I hope you will come play along!  Check it out at The Drawing Board: Challenges.

Amy
About the Author: Amy lives in Reston, VA with her husband of 13 years and their 9 year old boy/girl twins. Their 18 year old daughter is beginning her third year at West Virginia University!  Amy has been scrapbooking since the early 1990s but discovered digital scrapbooking in 2005 when her twins were born and has primarily scrapped digitally since that time. She is passionate about telling her family’s stories and documenting their life together! Amy is a huge reader (mostly literary fiction) and is a pop culture junkie! She also LOVES all things beauty & makeup!


Explore Your Home

blogtemplate_exploreyourhome

This month we are exploring lots of different aspects of our lives. I would love for you to explore inside your home. Every once in awhile, usually in August, I like to snap a few photos of our home. I take photos of what has changed, the rooms, the favorite spots that I have decorated or the spots where we gather like the family table.

This a layout I did from 2013 where I captured our home and all the aspects that make it ours. I was also inspired by a Becky Higgins project to capture the home. Since I was 9 months pregnant I went with quick snapshots and a grid layout to simplify the project. I love looking back on this especially seeing the baby ultrasounds hanging up!

2013-TWD--Stories-of-Home-S


And this the layout that inspired my explorations around my home. I wanted to capture our house right now. I love that this exploration is in the now (well, after I straightened up of course). I included a few recent improvements to my house like the fireplace mantel and wall gallery. I am also taking a snapshot of the outside of our house each month so I included the most recent one.

Home-August-SP

I would love for you to document your home; your favorite spots inside it or what it looks like on the outside or your decorated, completely areas. Just go exploring inside your home!
Can’t wait to see your projects!

_________________________________________________________________________________________________________


TDP_blog_sabrina About the Author
: Sabrina spends her days chasing after a feisty 2 year old who always insists everything goes her way and at 3pm adds a 6 year old into the mix. He thinks life is unfair and fights for its injustice. When she isn’t battling the little people, she is taking a few minutes (or hours) to scrap the night away. And if she isn’t scrapping she is reading. Scrapping, reading and negotiating with little people keeps her life action packed.

Six Steps to Speedy Scrapping


Honestly, I am the slowest scrapper. I love the process of scrapping. Really, I do. I will play with different papers, placements and format of my title (alpha, fonts or stamps?) and will even switch out my photos as I try all those amazing filters in my Lightroom library. It is nothing for me to spend an hour on a one-photo 12×12 layout…..and double or triple that time for a pocket page spread.

But, this Summer I’ve had to speed up my scrapping. My kids are home and want attention, there is lots of outside fun to be had and I just haven’t had much time to sit at the computer. Here are the six steps I’ve been using to speed up my scrapping, but still make the process fun for me AND make a page that I want to print for my album!

  1. Scraplift Myself  – I gotta admit, when I first did this it seemed like cheating. But I loved my layout and figured why not? If not my layout, I head to my crazy huge Pinterest board where I have hundreds of amazing paper and digital layouts pinned. I can usually find something that I think will work in a couple minutes and then I am on my way to creating my page. But if something doesn’t pop out, I try #2.
  2. Grid Layout  – Ok, most people would assume I would say use a template. Frankly, for me they aren’t quick. Templates gives you limitless options for clipping all the amazing papers in a kit to various blocks, shapes, mattes and for me this would take more time. What does work for me is to quickly build a grid-type horizontal or vertical layout. Using either clipped paper blocks or filling a “square” with a flower or flair and then adding a 3×4 journaling or title card. I love that I can get the most out of a kit this way, but I don’t have to worry about all those pesky design principles that 10 years of scrapping have ingrained in me (visual weight and direction, rule of thirds, focal point, alignment, etc.).
  3. B&W Photo – When I have a kit I love and I know what photo I want to use and I want to do it quick, I make my photos B&W. It makes it so much quicker to scrap. I don’t do this that often (as I prefer color!!), but I love the contrast with my other album pages and end up loving the effect. Plus, then I don’t have to “worry” about using that orange paper that I LOVE with my son wearing his purple soccer shirt.
  4. Group Dump the Elements on the Page – I normally pick and choose my elements carefully…but when I have less than half and hour to scrap, I’ll select 10-15 elements and just drag them en masse right on my layout. It’s almost like a puzzle trying to place them in just the “perfect” spot. A lot of times I’ve found an element that I didn’t think I would EVER use that works perfectly once I see it on my layout!!
  5. Word Art for Title – Next to the photos, titles are my biggest time-sucker. I love playing with fonts (and rasterizing/clipping papers) and alphas. There is some great word art out there and will work perfectly for your layout. I do still subscribe to the principle that every layout needs a title…..but, it doesn’t have to be a big, bold statement….a little word strip could work great.
  6. Journal Poetry-Style – This is my term for journal in quick, short sentences right on my layout background, almost like a list. I don’t have to find the right size and color of a journaling block that will fit my journaling or spend time crafting just the right words. This way I can jot down my thoughts and space it how I want. I also like how it adds to the flow of the page.

Here are some layouts in my TDP gallery where I used my Speedy Scrapping Steps above.

Six Steps to Speedy Scrapping


Six Steps to Speedy Scrapping


Six Steps to Speedy Scrapping


avatar100x100About the Author:  JennV is a lover of history and art (luckily she lives 5 miles outside of Washington, DC) and an accountant by training.  She currently stays home with her two boys and is pursuing a career in photography, when she is not busy volunteering for every school and county initiative!!