10 Holiday Tips & Tricks | Day One

Hello there! Amie here (of Little Lamm Paper Co.)… wishing you a very Happy December and welcoming you to Day One of the 2017 edition of our always-popular 10 Holiday Tips & Tricks series here on The Digital Press blog!

Today I’m here to share a fun “book-a-day” style Advent Calendar that I am doing this December with my son, Ian. I’m hoping this post is early enough to be helpful for anyone who has kids (or book-loving adults?) in their household and still needs Advent Calendar ideas for the upcoming holiday season!

I’m not going to lie… originally, in the beginning, my plan was to wrap up 24 books individually and tag each one with the numbers 1-24… but then I found a really easy (and actually quite fun!) “lazy” way to get this project up and running — an awesome time-saver, and yet still exciting for the recipient!

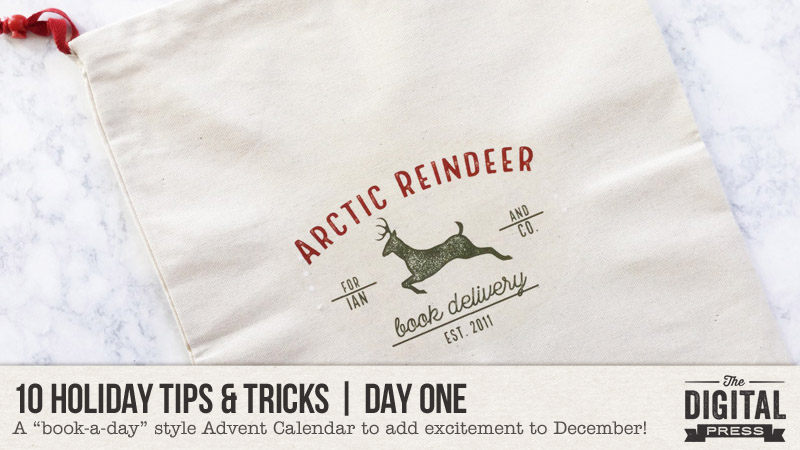
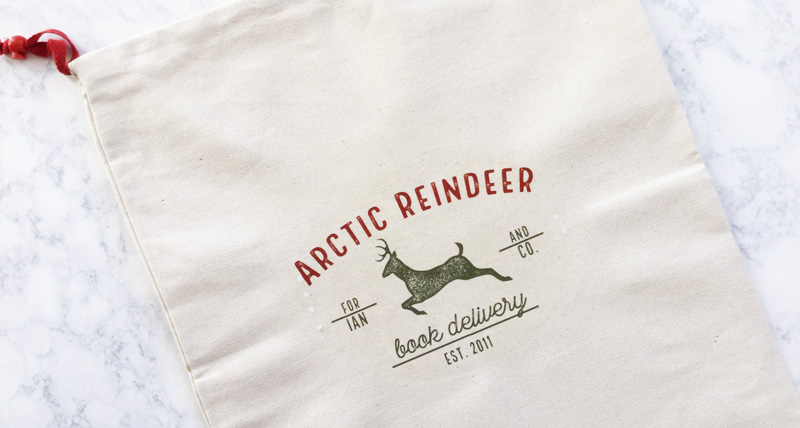
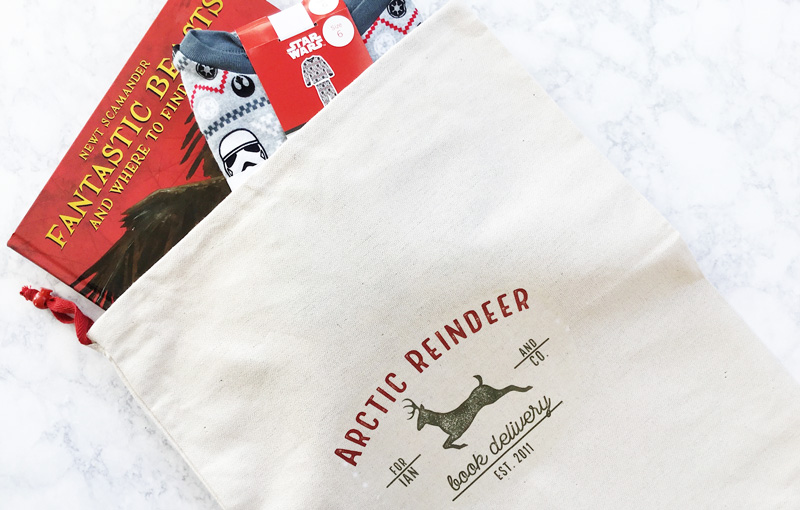
I was saved from the work (and waste) of endless wrapping by none other than the Dollar Spot at Target (you red card holders know where that is!). There, I found some cute burlap-ish gift bags and bought one to use as a daily “Santa Bag,” of sorts, to deliver each day’s book. I decided to alter one of my own home decor designs — the Arctic Reindeer print — to make an iron-on transfer for the bag…

After making birthday shirts for 6 years now, I definitely have a few tips to share for successful iron-on transfers…

  1. Don’t forget to reverse your image! If the image is not backwards on the paper, it will be on the shirt/bag. 😉
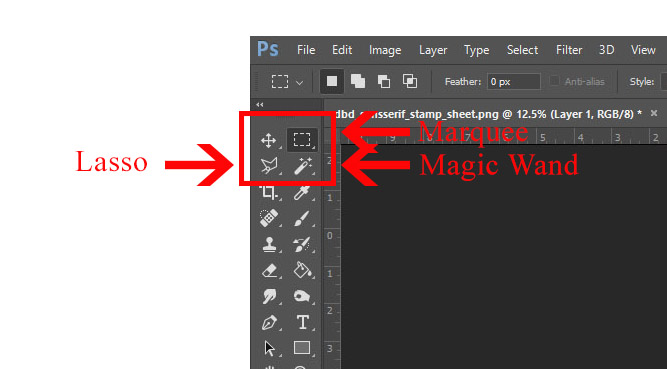
  2. Don’t use the “iron transfer” setting on your printer. This has always come out with fuzzy images on any printer I’ve ever owned. Instead, I reverse the image myself in Photoshop… and I print it out as a photo on matte paper at the best printing level. This gives me a perfect crisp image every time.
  3. LINT ROLLER YOUR CLOTH BEFORE DOING THE TRANSFER! We have 2 cats and a bulldog in our house, and no surface stays clear for more than 2 seconds. Most of my son’s birthday shirts have a cat hair embedded into the image if I forget this step.
  4. Don’t forget to let the image cool completely before taking off the paper.
  5. Save money by planning ahead. I’ve learned not to buy iron-on transfers from local big-box stores like Office Depot, etc. (where I have, in the past, spent $18 on the same item I could have gotten from Amazon for $8).

With regard to the book-a-day part of this Advent Calendar project… I have heard of some people who wrap library books or buy used books (BetterWorldBooks is a great used book source). Some people also just use any stories — they don’t necessarily have to be Christmas-themed!

For our family, we unwrap our last book on December 23rd due to the fact that we spend Christmas Eve with family. On that final night, my son gets a new book and a set of pajamas as his final gift. This year, we got him the Fantastic Beasts and Where to Find Them book because it has a Griffin on the cover (a family name!)… and also some Star Wars PJs so he can wear them to the late showing of the upcoming The Last Jedi movie on his birthday, which is December 26. 🙂

To make sure I remember to re-fill the book bag each night… I have set a reminder on my phone for 9:00pm each night starting on November 30th — and that’s when I put a new book into the sack. Then, the sack will go into the basket with any books that we have already opened…

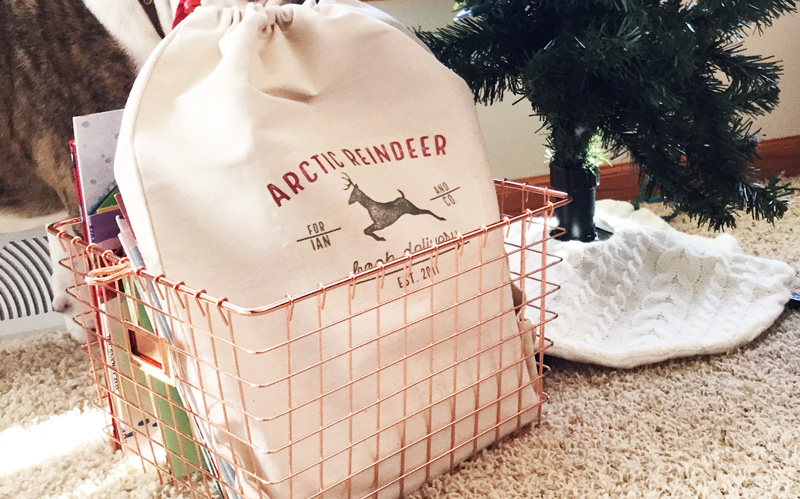
Every morning when Ian wakes up, there will be a new package under the tree.

In case you need some ideas for books… here are some of my of favorite Christmas/winter-themed books from over the years…

  • Christmas for Greta and Gracie by Yasmeen Ismail
  • The Day Santa Stopped Believing in Harold by Maureen Fergus
  • Maple & Willow’s Christmas Tree by Lori Nichols
  • Bear’s Winter Party by Deborah Hodge
  • Bear Stays Up For Christmas by Karma Wilson
  • The Gingerbread Man Loose at Christmas by Laura Murray
  • Beyond the Pond by Joseph Kuefler
  • The Tea Party in the Woods by Akiko Miyakoshi
  • Du Iz Tak by Carson Ellis
  • Harold at the North Pole by Crockett Johnson
  • The Snowy Day by Ezra Jack Keats
  • Olive, the Other Reindeer by Vivian Walsh
  • A Wish to Be a Christmas Tree by Colleen Monroe
  • The Christmas Wish by Lori Evert
  • Olivia Helps With Christmas
  • Walking in a Winter Wonderland by Richard B Smith
  • Wendell The Narwhal by Emily Dove
  • The Christmas Eve Tree by Delia Huddy
  • The Lost Gift: A Christmas Story by Kallie George
  • The Great Spruce by John Duvall
  • The Wish Tree by Kyo Maclear
  • First Snow by Bomi Park
  • Little Penguins by Cynthia Rylant
  • The Little Reindeer by Nicola Killen
  • Pick a Pine Tree by Patricia Toht
  • Red and Lulu by Matt Tavares
  • Walk This World at Christmastime by Debbie Powell

If you’re thinking of trying this… head over to The Digital Press’s challenge forum and get the details about how you can earn challenge points for December 2017 at TDP if you try any of our “Holiday Tips & Tricks” throughout the month as they appear here in this blog series! Additionally, I’d love to see any photos of your December/holiday projects using TDP goodies in the gallery this month, so link me up after you’re finished creating and uploading! 🙂


Amie Lamm

About the Author  Amie Lamm is the designer behind Little Lamm Paper Co. at The Digital Press. She is a work at home mom/graphic artist living in Fargo, North Dakota with her hubby, her almost 6 year old son, 2 lazy cats, and a hyper bulldog. She survives her days with copious amounts of coffee and recorded episodes of Fixer Upper.

Tutorial Tuesday | How to Use Alpha Sheets

Welcome to another edition of Tutorial Tuesday here on The Digital Press blog!

Today, I am going to show you how to use that full-page alpha sheet that comes with some digital products.  If you are not sure what I mean by that, I am referring to the .PNG file that contains ALL of the letters/numbers/punctuation in one place (as opposed to the individual .PNG files you sometimes get for each of those items).

Full alpha sheets are really simple to use, but it just takes a little knowledge of the tricks behind doing so. You’ve probably realized, over time, that if you simply try to click and drag a single letter over to your layout, you will end up getting ALL of the letters. But fear not! I’m here today to help you learn how to easily select and use just the letters/numbers you need.

So, lets get started…

Today, for this tutorial, I am using products by Dawn by Design. She has some lovely alphas to mix and match in your layouts, and many of those alphas include a full-page alpha sheet.

When I open the alpha sheet in Photoshop (PS), it looks like this:

You will notice that this is a .PNG file, which means it has a transparent background and the individual letters arranged across the canvas.

In order to arrange these letters into words on my layout, I will need to first select and copy individual letters. I can either drag the entire alphabet onto my layout and work from there, or I can copy individual letters from the original file and drag them over to my layout one at a time. Either way… in order to grab just ONE letter, first I have to select the letter I want to use. There are many ways to do this, but I will share with you some of the easier ways!

First, you are going to need to know how to use some of your selection tools… so let’s get familiar with the Marquee Tool, the Lasso Tool, and the Magic Wand Tool.

Here is how to use each one.

1. Marquee Tool — this is perhaps the easiest method, as you simply click and drag to draw out a box surrounding the letter you wish to select…

2. Lasso Tool — sometimes the letters are too close together to use the marquee tool easily.  In these instances, the lasso tool works wonders. I prefer to use the polygonal lasso, as I can control where the lines go.  You simply left-click to anchor a line into a point, and then click and drag to draw out a shape around the letter you want to use…

3. Magic Wand Tool — this one is a little trickier because there are more variables to consider, but some people prefer to use it. It is a good tool to use in really ornate (or messy) alphas, as well. To use the magic wand, you want to zoom in a bit on the letter you want to select. Then, using your little wand, click on the letter…

You should see the marching ants form around the letter. If you see marching ants on ALL of the letters, you will need to go up and check the box next to the word contiguous. This constrains the selection to pixels that touch each other…

Whichever method you chose, you should now have your letter selected. At this point, you can simply hit Control-J (or Command-J for Mac users) and it will automatically copy your letter onto a new layer. Now, simply drag that layer over to where you want to place your letter…

Repeat this for each letter you need to use on your layout.

And there you have it! Now you know exactly how to handle those full alpha sheets like a pro!

The beautiful thing with using these full sheets is that instead of having to go back into to your folders and open a new letter file for each letter  you need, you can simply open this one file and select the letters you need as you form your words. This will save you time, and it will save your computer from having to switch back and forth all the time.

And just for fun, here is the layout I made using Dawn’s Sophisticate Kit and San Serif Stamp Alphas, I also used Legacy Templates from Calista’s Stuff…

Now go give it a try, yourself, and show us in the gallery all of your beautiful pages!


Erin is an artsy crafty kind of girl who is currently dabbling in far too many things, but is working hard to enjoy every moment of it, while avoiding the rain, which is difficult due to living in the land of many rains. She is slowly learning to use her smart phone to capture all the fun little bits of life that would otherwise go unremembered in the busy craziness that is raising a family!

Tutorial Tuesday | Creating Photoshop Actions

Welcome to another edition of Tutorial Tuesday here on The Digital Press blog! Today, I am going to talk to you about quickly creating actions in Photoshop — cutting down the time it takes to perform repetitive tasks, and leaving you more time to scrap! If having more time to scrap interests you, creating actions is a really simple answer. They are easy to create — and can be used for simple as well as complex tasks.

First off, you’ll want to create your own Action Set to house all of the bright and shiny new actions you are going to create once you fall in love with actions (and you will!). Creating your own Action Set will allow you to find your actions quickly.

How to Create Your Own Action Set

1.  Start with a blank Photoshop canvas or open up a scrapbook page or photo.

It doesn’t matter what you start out with when you’re creating an Action Set. You just need something open.

2. Open the Action panel

Open the Action panel by clicking Window > Actions.

3.  Click on the icon on the top right of the Actions panel. It looks like 4 lines atop each other.

A pop-up window will appear. Choose “New Set.”

4.  Name your Action Set

A dialog box will appear. Here you will type in the a name for your Action Set (your name perhaps?). Then click OK.

5. That’s it!

And now that you’ve got your action set created… let’s move on to actually creating an action or two…


How to Create an Action

1. Begin with a blank Photoshop window, a photo or a scrapbook page

What you start with is completely up to you and depends what you want your action to do.

TIP | Out of an abundance of caution, I make sure that whatever layout or photo I have open is a copy, or that I’ve saved it before I write my action so that I don’t inadvertently write over my original file.

2. Open the Actions panel

Open the Actions panel by clicking Window > Actions.

3. Now you are going to begin writing your Action

Click the Create New Action button on the bottom of the Actions panel (it looks like a piece of paper with a folded corner). An alternative is to choose New Action from the Actions panel menu.

3. You will now name your Action, choose where it’s going to be saved, and begin recording

  • The name I chose for my sample action was “Save for Web 900px” (the name you choose will obviously depend on the action you are going to create). Examples of actions you may want to write may be to “Save to JPG,” “Save to Web,” “Add guides to a layout,” “Change a photo to black and white,” “Warp a shadow,” “Frame a photo,” etc. You get it… the sky’s the limit!
  • I placed my action in the Action Set I created above — “Barbara’s Actions.”
  • NOTE: there are other options you can choose in this dialog box, but it’s ok to leave them at their defaults, which is what I do.
  • Then, click Record to begin recording your action.

7. Now the fun (recording) begins!

Any steps you take from this point on will be recorded in the Actions panel. Perform all of the commands and operations you want your action to record.

FYI, if you look at the bottom of the Actions panel at this point you will see a Red Dot which indicates that you are recording an action.

RecordButton

8. Stop Recording

When you’ve finished recording all the steps you want included in your action, you can either click the Stop Recording button at the bottom of the Actions panel (it looks like a filled in white square) OR you can choose Stop Recording from the Actions panel menu.

That’s it — the basic “how-to” of recording an action!


So as not to ignore the obvious, let’s go over the steps of how to play/use the action you just recorded!

Play the Action You’ve Just Recorded

1. Have a file open in Photoshop

2. Open the Actions panel.

The Action panel is opened by clicking Window > Actions.

3. Navigate to the action you want to play and hit the PLAY SELECTION button.

The Play Selection button is the right pointing triangle button on the bottom of the Actions panel.

So, what do you think? Recording actions is not so difficult, right? It’s basically just the act of coming up with an idea for an action, naming it, clicking record when you’re ready to start recording, and stopping the recording when you’re done — just like you would on a tape recorder. [NOTE, I  know, I said tape recorder. That’s because I’m old. LOL!]

Enjoy. They sky’s the limit … really! As always, if you have any questions, feel free to ask them here in the comments — or in The Digital Press forums — and I (or one of the many other scrappers in The Digital Press world) will be happy to help you out!

Happy early Thanksgiving everyone!


BarbaraAbout the Author:  Barbara is a member of the creative team here at The Digital Press. She’s a mom to two adult “kids” (an almost 21 year old son and an 18 year old daughter). In her free time (since her kids are adults, like it or not she has plenty of free time) she loves to tell her family’s stories through digital scrapbooking, learn all she can about Photoshop and Lightroom, take photos, travel and hang out with her family. Life is good!

Hybrid How-To | Napkin Rings

Hi, everyone! Kate here, bringing you another edition of our Hybrid How-To series on The Digital Press blog!

Today, I am going to show you how to use your digital scrapbooking stash to make some really cute paper napkin rings. It’s so easy!

Thanksgiving is next week for those of us in the United States, but this would make a fun addition to any table setting. There are so many digital kits to choose from… and you could easily find one that matches the theme of just about any dinner party!

Supplies Needed

–White cardstock paper
–Scissors or a cutting machine (I used a Silhouette)
–Adhesive or fastener of your choice (I used a stapler)
–Photo editing software (such as Photoshop or Photoshop Elements, etc.)
–Digital scrapbooking kit of your choice (I used Gather by Dunia Designs and Little Lamb & Co., shown below)

Instructions

1. Use your photo editing software to design your rings. I made mine 1.5″ wide and the length of the paper I was using (11″). If you don’t plan on using a cutting machine, my tip is to keep the design really simple so it’s easier to cut by hand…

2. Print and cut. I used a Silhouette for mine because the wreath has a lot of intricate details and the whole inside needed to be cut out…

3. Wrap the long edges together and adhere to form a ring. I used a stapler for this, but you could use double-sided tape, or even glue. Then, you’ll use adhesive (glue dots, tape, etc.) to attach your decorative piece to the ring you’ve created…

4. Once you’re finished, fold the napkins however you like, slip the rings over them, and you’re all finished. They’re ready for your table! So easy, right?

I hope that you have enjoyed this edition of Hybrid How-To, and that you will give this a try and come up with some of your own napkin rings! Don’t forget to visit the CROSSWORD SECTION in The Digital Press forum, and jump into this month’s Hybrid Challenge if you are thinking of trying this project. You can earn points toward discounts & FREEBIES!


Kate About the Author  Kate is on the hybrid team here at The Digital Press. She lives on the Utah/Colorado border with her husband, 5 kids, 10 chickens, and a dog named Gracie. She’s a city-born girl who found she’s really a country girl at heart. She can be found outside, barefoot, and probably in her garden.

Foodie Friday | Tracie Stroud

Welcome to another edition of Foodie Friday here on The Digital Press blog!

With Thanksgiving right around the corner, I can almost taste all of the deliciousness that the holidays brings! This week, we have a special treat for you scrappy food lovers… Tracie Stroud and I are here to share some delicious Thanksgiving recipes and tips that will have you looking forward to Turkey Day!

Thanksgiving is my absolute favorite holiday, and Tracie loves it too! There is something so special about family and friends gathering to share delicious food and appreciate all they have. When I asked her about her favorite Thanksgiving dishes, Tracie said, “I grew up in South Louisiana, and for Thanksgiving we always had a few must-haves: Cornbread Dressing, Green Bean Casserole, and Jambalaya. All three are still favorites in our family.”

And seriously, don’t these dishes look amazing?…

photo credits: [1] All Recipes [2] French’s and [3] Louisiana Cookin’

So, what is all of this deliciousness you see above?

  • Cornbread Dressing
  • Green Bean Casserole
  • Chicken and Sausage Jambalaya

Cornbread Dressing

About this recipe, Tracie says, “The key to authentic cornbread dressing is to use day-old cornbread. I don’t know why, but it makes all the difference. When the dressing is done, we always add some of the Thanksgiving turkey into it.”

My favorite tip for cornbread dressing is to add some jalapeños. It gives the dressing a little kick that can cut the richness a bit.

INGREDIENTS NEEDED

—2 tablespoons butter
—1/2 cup chopped celery
—1 small onion
—2 eggs, beaten
—2 cups chicken stock
—2 tablespoons dried sage
—salt and pepper to taste

INSTRUCTIONS

—Prepare the dry corn bread mix according to package directions. Cool and crumble.
—Preheat oven to 350 degrees F (175 degrees C). Grease one 9×13 inch baking dish.
—In a large skillet over medium heat, melt the butter and saute the celery and onion until soft.
—In a large bowl, combine the celery, onions, 3 cups crumbled corn bread, eggs, chicken stock, sage and salt and pepper to taste; mix well.
—Place into prepared dish and bake at 350 degrees F (175 degrees C) for 30 minutes.

[ recipe adapted from All Recipes ]

Green Bean Casserole

The classic side dish! About this dish, Tracie says, “This is my very favorite dish from my childhood. My mom had this one down to an art, and she would always give me a few of the extra “crunchies” to munch on. She always used the French’s recipe, and it was always perfect. My kiddos aren’t crazy about green beans, so sometimes I make a smaller batch of this just for me.”

My own tip for delicious green bean casserole — it is the perfect make-ahead dish. On Thanksgiving, I am always running around like a crazy person. To save some time, I prep the green bean casserole the day before… just leaving off the fried onions on the top. By doing that, you can save yourself some time on the big day and give all the flavors in the casserole a chance to come together.

INGREDIENTS NEEDED

—1 can (10 1/2 oz.) Campbell’s® Condensed Cream of Mushroom Soup 
—3/4 cup milk 
—1/8 tsp. black pepper 
—4 cups cooked cut green beans or 2 cans (14.5oz each) any style Del Monte® Green Beans, drained
—1 1/3 cups FRENCH’S® Crispy Fried Onions 

INSTRUCTIONS

—MIX soup, milk and pepper in a 1 1/2 -qt. baking dish.

—Stir in beans and 2/3 cup Crispy Fried Onions.
—BAKE at 350°F for 30 min. or until hot. Stir.
—TOP with remaining 2/3 cup onions. Bake 5 min. until onions are golden.

[ recipe adapted from French’s ]

Chicken and Sausage Jambalaya

Says Tracie, “Jambalaya takes a lot of practice to get right, and it can be quite an undertaking, but it’s always worth it in the end.”

INGREDIENTS NEEDED

—2 pounds mild smoked pork sausage, sliced ¼-inch-thick
—2½ pounds boneless, skinless chicken, chopped
—1½ pounds onions, finely chopped
—1 cup finely chopped celery
—1 cup finely chopped bell pepper
—2 tablespoons minced garlic
—1 cup diced tomato
—1 (6-ounce) can tomato paste
—1 tablespoon Creole seasoning
—1 tablespoon chopped fresh parsley
—2¼ teaspoons fresh thyme
—2¼ teaspoons chopped fresh basil
—5⅓ cups chicken stock
—1½ pounds long-grain rice

 INSTRUCTIONS

—In a large cast-iron Dutch oven, cook sausage on high heat for 3 minutes.
—Add chicken, and cook until browned on all sides, 15 to 20 minutes.
—Lower heat to medium, and add onion, celery, bell pepper, and garlic; cook until vegetables are soft, about 15 minutes.
—Add tomatoes, tomato paste, Creole seasoning, parsley, thyme, and basil. Simmer over low heat for 10 minutes.
—Add chicken stock, and bring to a boil over high heat.
—Add rice, and stir. When jambalaya returns to a boil, reduce heat to simmer.
—Cover and cook until rice has absorbed all liquid, about 25 minutes.

By Cafe Reconcile, New Orleans, Louisiana
[ recipe adapted from Louisiana Cookin’ ]

Don’t these recipes make you want to pop your turkey into the oven and start prepping your holiday feast right now?

What are your favorite holiday foods? We would love to hear what recipes your families likes best to celebrate the holidays.

Meanwhile, it wouldn’t be a designer feature week without a fantastic sale and a special Free-with-Purchase offer… so you’ll be excited to see what Tracie has in store for you! Not only is her entire shop marked down 30% OFF throughout her entire feature week (sale prices will be valid through 11:59pm ET on Thurs 11/23)… but she also has this awesome deal in her shop all week long, as well — Spend $10+ in Tracie Stroud’s Shop, and get the following brand-new FULL KIT (just landed in the shop today) completely FREE!


KatieAbout the Author  Katie is a member of the creative team here at The Digital Press. She lives in Central Florida with her husband and their four sweet but crazy boys. When she’s not dodging Nerf bullets or trying to dig out from under the never-ending pile of laundry, she enjoys photography, cooking, going to Disney World with her family, and, of course, digital scrapbooking.

Tutorial Tuesday | Frame It Up

Hello everyone, and welcome to another edition of our Tutorial Tuesday series here on The Digital Press blog!

So what are we talking about today? Good old frames.

What comes to your mind when you run across a frame or set of frames in kit? Put a photo within it? Well, yes, that’s what I do too! Mostly. But then… frames can also be so much more, and I am hoping I can illustrate some examples for you today. I am using the term “frames” loosely — the same tips can apply to simple photo borders, etc.

So… let’s dive right in! Here are a few of my favorite ways to use frames while scrapping a page…

1. Doing what it says on the box

Frames, when used correctly, can add so much to a digital layout — just framing your beautiful photos and adding prominence. Take at look at the example shown below; it wouldn’t quite look the same without the white border frame around the photo, would it?

Frames don’t have to just be boring rectangles or square, though. Other shapes work just as well. I experimented with triangular frames in the next example, moving them around to suit my photos (and also splitting one photo between two overlapping frames; more about this later)…

2. Showing off details/key parts of your photo

I am sure you emply a lot of different means to bring out the details in your stories. Sometimes I like to do that by repeating a series of photos, and also highlighting some aspects using frames. In the following example, the different frames (and especially the one with multiple colored arrows) worked really well to show the dynamics between the sisters…

3. Adding dimension & focal points

I love that a frame can be used to add dimension to a layout. One of my favorite techniques is to clip a photo to a mask but use the frame on top of that to selectively show off some part of the photo or generally use it for a ‘cool’ effect. Here are few different examples of this technique…

In that first example, above, I used the “stack” of frames to add dimension to this 100% digital (flat) page. Stacking the frames is a fun way to create that effect. Here’s another example of that…

I love the effect that’s created here, of a stack of framed photos (arranged slightly askew, as though the photos were casually left on a table). It really creates a great dimensional effect with minimal effort, don’t you think?

In the next example, though, I used a combination of a frame and a mask; this helps add a focal point onto the layout and also ensures that the two duplicate photos — one clipped to the paint mask, and other to the frame — are linked so any adjustments are consistent between the two.

4. Using frames as design elements

Frames can also be used as design elements to accessorize your layouts.

In the next example, TDP creative team member Corrin used the frame on top of her cute photo (slightly askew) to draw attention to the photo. And it looks brilliant, doesn’t it? It definitely adds to the fun quotient of this layout…

In the next layout, I have used couple of frames — one for the photo and other just to add layering as well as partially show off the journal card underneath…

And in this next example… loads of frames! Looks like I have gone overboard! …but I love the quirkiness it adds to my layout…


5. Frames on pocket pages(?!) Yes! Why not?

So far, we have largely gone through examples of using frames on traditional layouts. But what about pocket pages? Well, they are definitely not out of bounds!

In the next example, I have used some photo borders and a few other frames placed here and there. It definitely adds so much detail to the layout and helps move the eye around — taking in all the different aspects of the story captured…

6. Splitting a photo into multiple frames or putting multiple photos in a frame

You can play around with how you want the photos split — it may be a subtle effect, as in the first layout… or a more dramatic split, as in the second layout…

Hugging-arms-Christmas-Day-2015-copy-for-web

Conversely, sometimes I struggle with cropping my photos just right to match the frame I’m using. Fret not! Creative freedom to the rescue! You may choose to use a photo and a Journal card together in a frame like TDP Creative Team member Anika has done here…

Or you can crop and size multiple photos in one big frame…

So these were just a few tips to enhance your layouts with frames! Hope you found them useful. I think the most important rule to remember is that there are no rules! It’s all about your interpretation, and if it works for you.

I can’t wait to see some of your creative uses for frames — do share your layouts with us in the gallery, and link us up in the comments below this post! As always, happy scrapping!


Profile pic avatar small

About the Author Shivani Sohal is a donner of many alter-egos. A finance professional by day in busy London, she morphs into a seemingly normal mum of two in the evenings and weekends. She is constantly found with her fingers in too many pies and juggling the metaphorical balls. That is living on the edge for her; aided by the two ankle biters and a darling hubby who define the warm and mushy for her. She is ferociously dedicated to memory keeping — almost immune to any nay-sayers (or equally-disruptive crying children or annoying house fires!); keeping her head down and forging ahead at all times.