Author: The Digital Press

Hybrid How-To | Butterfly Wreath

Hybrid: Butterfly Wreath

Did everyone pick up the March 2016 Collaboration kit, Fly Away? It comes with a beautiful butterfly cut file that I knew I wanted to use as soon as I saw it. I thought it would make a great wreath for my front door. It’s a super easy project, too… so let’s dive in!

Supplies Needed

  • Digital Kit of your choice (I used the new TDP collab Fly Away)
  • Cutting Machine
  • Cardstock
  • Wreath of your choice
  • Hot Glue Gun & Gluesticks

Instructions

The first thing I did was cut the butterflies. I wanted them in a variety of colors and sizes. I primarily used the cut file for my butterflies… but I also pulled in a butterfly element from the main kit and clipped paper to it.

Hybrid: Butterfly Wreath


This is how I do wreaths at my house. I use young Willow or River Birch branches and twist them around each other (tucking in the ends) until I have a sturdy, circular wreath. I find that twist ties really help to secure the first layer. It’s super easy (but you can also buy ready-made wreaths at your local craft store).


Hybrid: Butterfly Wreath


After that was done, I started attaching the butterflies with hot glue. I didn’t think too hard about placement; I basically just spread out the larger butterflies first, and then went from there.


Hybrid: Butterfly Wreath


The whole project took an afternoon and I just love how it looks on my front door!


Hybrid: Butterfly Wreath

Ready to try out your own wreath?  Join us in the forum for a fun challenge to make your own Spring wreath!
(*NOTE* this post was originally published in 2016 and the challenge is no longer active)


KateAbout the Author: Kate is on the hybrid team here at The Digital Press. She lives on the Utah/Colorado border with her husband, 5 kids, 10 chickens, and a dog named Gracie. She’s a city-born girl who found she’s really a country girl at heart. She can be found outside, barefoot, and probably in her garden.

Accomplish: Learning Something New

Hey there, scrappers! As we say goodbye to winter and welcome spring, it is the perfect time to learn something new!

I love learning about new techniques and tools that will help me in my scrapping journey, and this time of year seems like the perfect time to break out of my scrapping rut and try something new. So, I decided to peruse The Digital Press Blog for some new ideas.

If you haven’t checked out any of the site’s amazing Tutorial Tuesday posts in a while, you are missing out! There are some really fantastic posts with techniques from color editing, to photography, to hybrid projects, and more. I am blown away by the awesome ideas shared in these posts. So, I decided to highlight a few fabulous tutorials that you might be able to incorporate into your next project or layout.


Photography Tips

First, if you’re hoping to improve your photography skills now that the weather is nicer and you can get outside with your camera… TDP creative team members Farrah and Chloe have both shared great tutorials recently.

Check out…

Here’s an image I created using Farrah’s color tutorial….

I don’t usually use selective color with my photos, but I am working on a layout about my son Will’s favorite stuffed animal. I love this photo because it captures how he is always carrying “Raffi” (his giraffe) around, however, the colors and background were quite distracting. By using selective color, I was able to eliminate the conflicting colors and put the focus on his favorite toy.


Scrapping Techniques

If learning a new scrapping technique is on your to-do list, The Digital Press Blog has you covered with a few really great recent articles by team members Pallavi and Biancka.

Check out…


Hybrid How-To’s

Finally, The Digital Press blog is also overflowing with hybrid goodness. A lot of us digital scrappers get nervous when we see/hear the word “hybrid” because it looks… well, just so complicated and difficult! But some of these recent articles really simplify the process and make it seem like an attainable goal for anyone!

Check out…

  • Alina’s recent post Prettify Your Pantry, in which she uses hybrid techniques to organize and beautify her pantry while up-cycling containers that she already had laying around the house!
  • Tanya shared some adorable mini Easter baskets in her tutorial. I think these would be really cute as party favors, too, decorated with festive paper and embellishments!


With all these amazing ideas and tutorials on the blog, you are sure to find something new to learn!

And to give you an incentive to give one of them a try… I am hosting a challenge over in the The Digital Press Forum, in which you can use one of our fabulous Tutorial Tuesday posts to create your own project. I hope you will come check it out, play along, and earn some TDP challenge points! Happy learning and happy scrapping!


Katie

About the Author  Katie is a member of the creative team here at The Digital Press. She lives in central Florida with her husband and their four sweet-but-crazy boys. When she’s not dodging Nerf bullets or trying to dig out from under a never-ending pile of laundry, she enjoys photography, cooking, going to Disney World with her family… and, of course, digital scrapbooking.

Accomplish Something

Accomplish Something

Happy April!  No tricks on this April Fool’s Day – just fun inspiration, challenges, and tutorials coming up this month.  Our word of the month here at TDP is ACCOMPLISH.  I always think of Spring as the start of something fresh – starting with a Spring cleaning of my home and decluttering what we no longer enjoy and need.  Of course, I also take that cleaning frenzy and apply it to my EHDs by cleaning out older digi supplies, making room for the oodles of new goodies the TDP Designers are sure to create.  To me, this is a sense of ACCOMPLISHED and always makes me feel like I am ready to tackle something more exciting and new.  What about you?  What makes you feel like you have ACCOMPLISHED something?

Browsing around the web, I found some fun inspiration images to kick-start your thoughts about the word ACCOMPLISH

Accomplish Something

[ sources 1, 2, 3, 4, 5, 6, 7, 8, 9 ]

Each month, we like to encourage you to step out of the box with regard to our challenges. Below, you will find the list of upcoming challenges for the month of February — each of which focus on our theme of ACCOMPLISH. For more information about our challenge system, please read this information post in the TDP forum.

The handy image you see above can be saved to your computer for reference throughout the month, as it features our schedule for March. 🙂 It was made by the ever-talented Alina from TDP’s creative team, using the brand new store collab, Hello, Beautiful Daywhich was released today and can be purchased for just $4.00 for the first 4 days of the month!

We cannot wait to see how you implement our Word of the Month into your daily lives and memory-keeping!


About the Author  Rachel Alles is on the creative team here at The Digital Press. She is fortunate to share her life with her loving husband, Doug, and her two blessings: Madeline and Maxwell. The three of them are her main source of inspiration for her pocket and traditional style pages. When she’s not scrapping, she enjoys anything Disney-related, learning more about photography (and attempting to turn the dial off “Auto”), and dabbling in home decor projects.

Tutorial Tuesday | Layers Panel Options in Photoshop

Layers Panel Options

I always play around with the settings in Photoshop and sometimes you find something that really makes your life easier when it comes to scrapping. This time I want to show you a little trick that will change the look of your Layers in the Layers Panel. When you scrap, you end up with a lot of Layers and I always had a difficult time finding out which element/papers was on which Layer. You can see what I mean….

Layers Panel Options

As you can see, you can’t make any sense of it. I decided to see if I could change those settings and I ended up opening the Panel Options. You can find the Panel Options by clicking on the small menu icon in the top right corner of the Layers Panel.

Layers Panel Options

Layers Panel Options

I was still using the standard settings that are used after you install Photoshop, but as you can see, you can change the look of the Layers Panel so you have a better understanding of all the Layers in your layout (are you still with me ?? ;)).

Layers Panel Options

I wanted to see the elements/papers, etc. in my Layers Panel so I chose the largest size of icons, but you can chose any of the sizes that suit you more. The other thing you have to do is also choose the option ‘layer bounds’. This will make the icons visible…..if you don’t change this setting, you will not see the icons.

Layers Panel Options

Here is what my Layers Panel looks like now…

Layers Panel Options

I love it that I can see everything and don’t have to guess which layer everything is on.

This is a very quick & easy tutorial and I hope that some of you didn’t know this yet (I just found this out myself ;)). Have fun changing the settings of your Layers Panel!


biancka

About the Author: Biancka is a creative team member here at The Digital Press. She is a stay-at-home mom (SAHM), a wife to Edwin, and mom to Jasper. She lives in the east of The Netherlands (about 30 minutes from the German border). She is addicted to scrapping, but also enjoys baking, reading books (mostly thrillers), watching her favorite TV shows, and photography.

Capture the Everyday Moments

CaptureTheEverydayMoments


I’m sure I’m not the only memory-keeper out there that loves to scrap the ‘big’ stuff in life. You know what I mean…  the vacations, the birthdays, the celebrations, the weddings, and the holidays. There are obviously many reasons to document those “big” moments, and they definitely have an important place in our scrapbooks.  In fact, going through photos of those “big” events at a later date conjures so many memories and wonderful feelings. Anyone else feel the same?

But… what about the “small” things?

So much of our lives are made up of the little everyday moments. Someday, we’ll love remembering those moments, too.

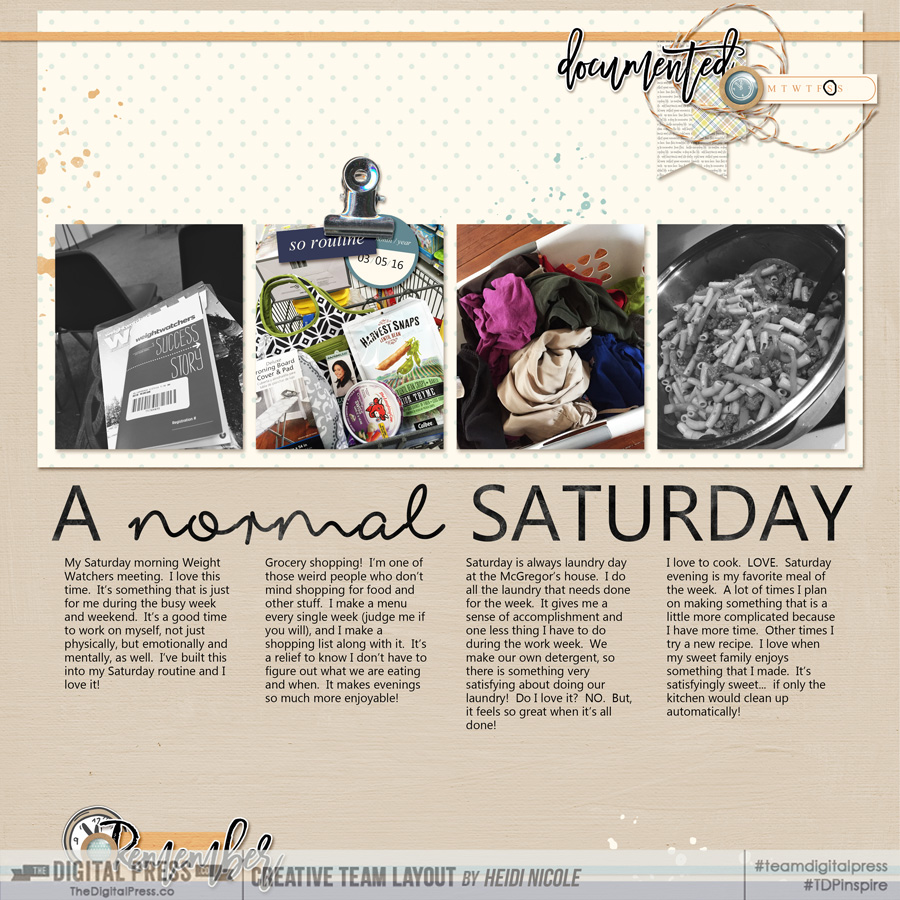
I’m talking about the moments, activities, and feelings that happen during the course of a “normal” day. I’ve really been contemplating this idea lately — the question of “who on earth would want to know what happens during my typical day?” But then I think to the future… I think of my kids growing up to become adults, and looking through the scrapbooks that I put my heart and soul into creating. I think of them reminiscing about vacations we enjoyed, celebrations we happily celebrated, and proms that they attended. I also think of them looking through these scrapbooks and thinking about our everyday life. I want them to see and remember all the facets of our lives… from the “boring” to the exciting. I want them to know ME. I want them to see how I spent my Saturdays (because, let’s face it, they are a little clueless when it comes to what goes into running a household!). Scrapbooking is about documenting our lives, and what a great way to share those memories, even the little things.

Here’s a layout I recently created that shows what a “normal” Saturday in our life looks like through my eyes (created with Talkative Templates by Scotty Girl Design and Daily | Scrapbook Kit by Little Lamm & Co.)…


If you need some ideas on the “little” things that you may want to document… just think about what makes up your life each day. You may be so annoyed about the toys on the floor… but, before you know it, there won’t be toys on the floor. Capture them while they’re a part of your story! How about that pile of dirty laundry? Think of how blessed you are that you are and your family are clothed and warm. Think of sharing a meal with your family… the smiles, the food, the conversation. Don’t you always want to remember how it feels right now? What about that wonderful glass of wine that is so deserved after a very long day… take a photo of it and document why it is so deserved! There are so many little moments during the course of our day that all add up to create our lives… and we don’t want to forget these “little” things, because they’re really not that little. We want to capture them, so they can live on and reflect our real lives…. that’s the legacy we want to leave. Our REAL lives.

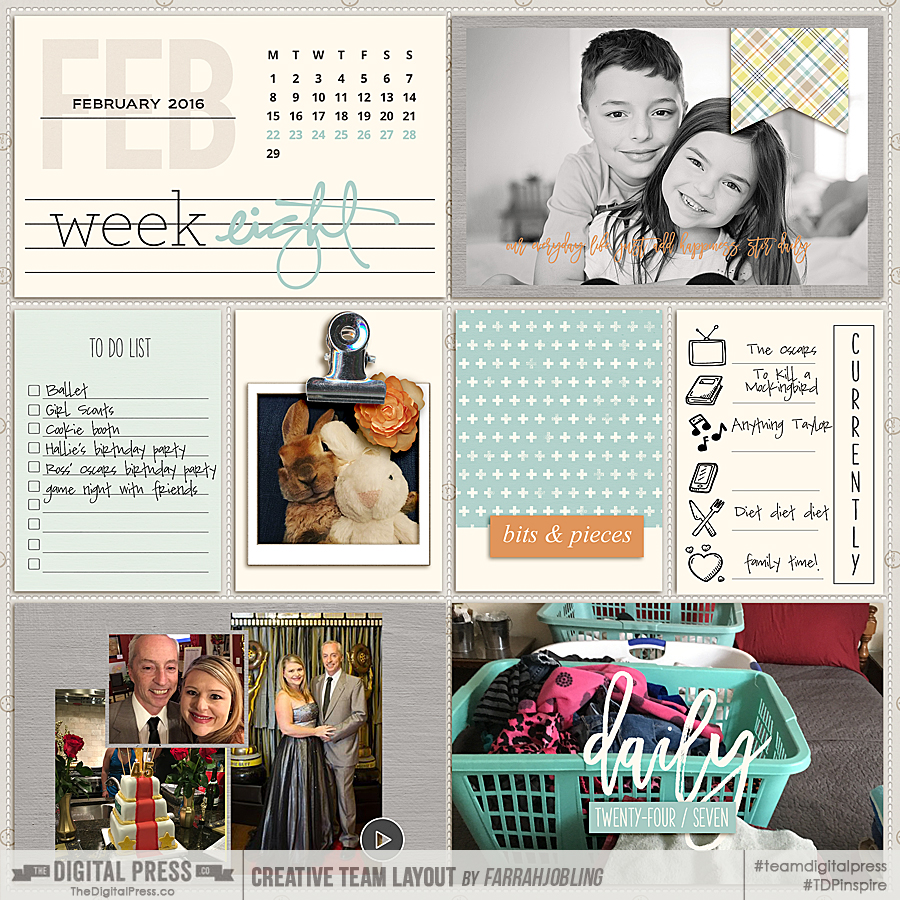
Here’s another great example of capturing the “little” things… this lovely pocket-style page was created by the very talented Farrah of TDP’s creative team (using Daily | Photoshop Templates, Daily | Scrapbook Kit, and Daily | Pocket Cards and Printables by Little Lamm & Co.)…


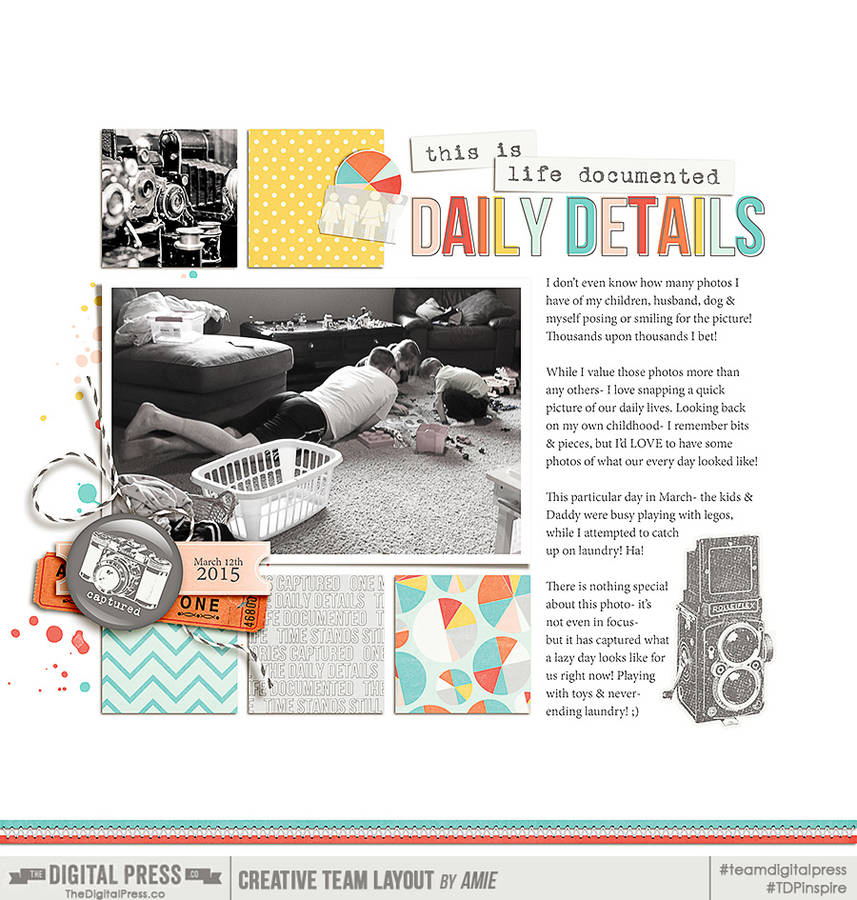
I have one more fantastic “everyday life” layout to share with you… this one, created by Amie, another one of the wonderfully-inspiring TDP creative team members (she created this with the Project Twenty Sixteen | March Kit by Wishing Well Creations and Talkative Templates by Scotty Girl Design)…


Hopefully this post has given you some ideas about ways to use the “everyday moments” in life to help you capture your real life when you scrapbook. It is such an important part of leaving our legacy!

And now… are you ready to capture your own everyday moments? Head over to The Digital Press’s challenge forum, because I have a related challenge waiting for you!


Heidi NicoleAbout the Author  Heidi Nicole is happily married to an amazing man, a step mama to 2 wonderful kiddos, and mama to 3 sweet and sassy furbabies. She’s a radiation therapist by day, and creator of pretty things by night (she’s pretty confident that she’s hit super hero status, but refuses to wear a cape). She loves cats and huskies, coffee, audio books, Friends reruns, St. Louis Blues hockey, cooking, baking, and traveling. Oh, and wine… she really likes wine. She lives a normal and happy life, and enjoys all the absolutely extraordinary people she gets to share it with on a daily basis!

Hybrid Saturday | Tissue Decoupaged Bunny

HYBRID: Tissue Decoupaged Bunny

I am a sucker for bright colors, and Easter is one of my favorite holidays of the year! Arielle here with today’s “fun, easy, inexpensive and perfect to work on with the kiddies” project, a Tissue Decoupaged Bunny. Wouldn’t it make an awesome centerpiece for your Easter table? This technique is perfect for other decor items, such as picture frames, miscellaneous objects, old wooden chairs… you name it!

First, pick your favorite papers! I used It’s a Spring Thing | Papers by Juno Designs and Wendy P Designs. All these beautifully bright papers were perfect for my little bunny!

HYBRID: Tissue Decoupaged Bunny

Then gather your crafty supplies —

  • Thin cardstock
  • Tissue paper
  • Adhesives (I used a Xyron machine & scotch tape)
  • Scissors or paper trimmer
  • Other embellishments such as ribbon and buttons.
  • Paper mache animal (or picture frame, etc…)
  • Mod Podge (optional)
  • Paint and brushes (optional)

HYBRID: Tissue Decoupaged Bunny

Start off by cutting some tissue paper to fit your cardstock.  (I picked up some cheap tissue at the dollar store.) I cut it approximately 7.5″x 11″, then using invisible tape, I adhered it to the cardstock at the top and bottom. Be sure to put the paper into your printer so that it will print onto the tissue.

ahg_easterhybrid2

Set up a document of “swatches” to print. My swatches measured 3.5″ x 2.5″, and I was able to fit eight, centered, onto each page.

HYBRID: Tissue Decoupaged Bunny

Remove the tissue, and trim off the excess, then run it through the Xyron. If you don’t have one, use Mod Podge, or some other glue. Be careful though and use it sparingly to prevent the ink on the tissue from bleeding.

HYBRID: Tissue Decoupaged Bunny

Tear your tissue into pieces and start applying. You’ll notice I also put a thin wash of white paint on my bunny before I started. Keep tearing and sticking the tissue to your project until it’s covered. It took a little over 2 sheets to cover everything.

HYBRID: Tissue Decoupaged Bunny

To finish, you can cover it in Mod Podge or spray a fixative on it to preserve it. I also added a pink button nose and an orange ribbon around his neck! Get creative ~ you could even add paper flowers, pearls or beads.

HYBRID: Tissue Decoupaged Bunny

Add some candy and Easter grass and you’ve got a great centerpiece!

HYBRID: Tissue Decoupaged Bunny


Want to try your hand at this easy decoupage? Please come join us in The Digital Press’s forum for a fun challenge related to this tutorial! You can create fantastic decor items AND earn points doing it! Points can later be cashed-in for discount coupons to the shop at the end of the month if you participate in the challenge system at The Digital Press!


Arielle H Gordon About the author  Arielle H Gordon is a wife and mom of two crazy kiddos, ages 6 & 7. She moved around (a lot!) before returning to settle down in her hometown of Enterprise, Alabama, to marry her sweetheart and start her family. She is an avid crafter — digital, hybrid and otherwise! She LOVES Jesus, family time, camping, gardening, reading cozy mysteries, hot tea, popcorn, and anything on the BBC! This time of year, you’ll find her hoarding Cadbury Mini Eggs and Peeps, dying Easter eggs and waiting for Lent to be over so she can resume one or two of her less obnoxious vices…