Author: The Digital Press

Tutorial Tuesday | Documenting ‘Then and Now’

Hello everyone, and welcome to another edition of our Tutorial Tuesday series here on The Digital Press blog! Today we are going to talk about scrapbooking ‘Then and Now’ pages. I have used this technique many times in the past… but was recently prompted to think about it again when my teenage step-daughter posted a stunning selfie on Instagram. I just stared at this beautiful young lady, and I couldn’t stop thinking about the cute little girl that walked into my life ten years ago. In that moment, I knew I had to create a layout comparing and contrasting the past and present.

There are several approaches to creating a ‘Then and Now’-themed layout, but I want to start with a few tips…

  1. Make Your Comparison Clear — When creating a layout that compares and contrasts, it’s important that the viewer clearly understands what is being compared.  For example, scrapping your photos at a distinctly different size can immediately convey that there is a comparison being made.  If you would rather keep the photos the same size, it helps to make sure the subject in the frame is also the same size.  You could use one black and white photo, and one colored.  Finally, you can clearly split your layout into two distinct sections to show the comparison.
  2. Embrace Your Photos — When using a technique such as this, you may hesitate to use older photos that may not be the best quality. Use them! The quality doesn’t matter as much as the connection you are making, and the memory you are documenting.
  3. Be Open-Minded About the Scope — The photos you are using do not have to be years apart. It could be that the photos are only weeks apart (or even yesterday/today — think: kids getting braces off their teeth, etc.)… but as long as the story is clear, the comparison can be easily made.

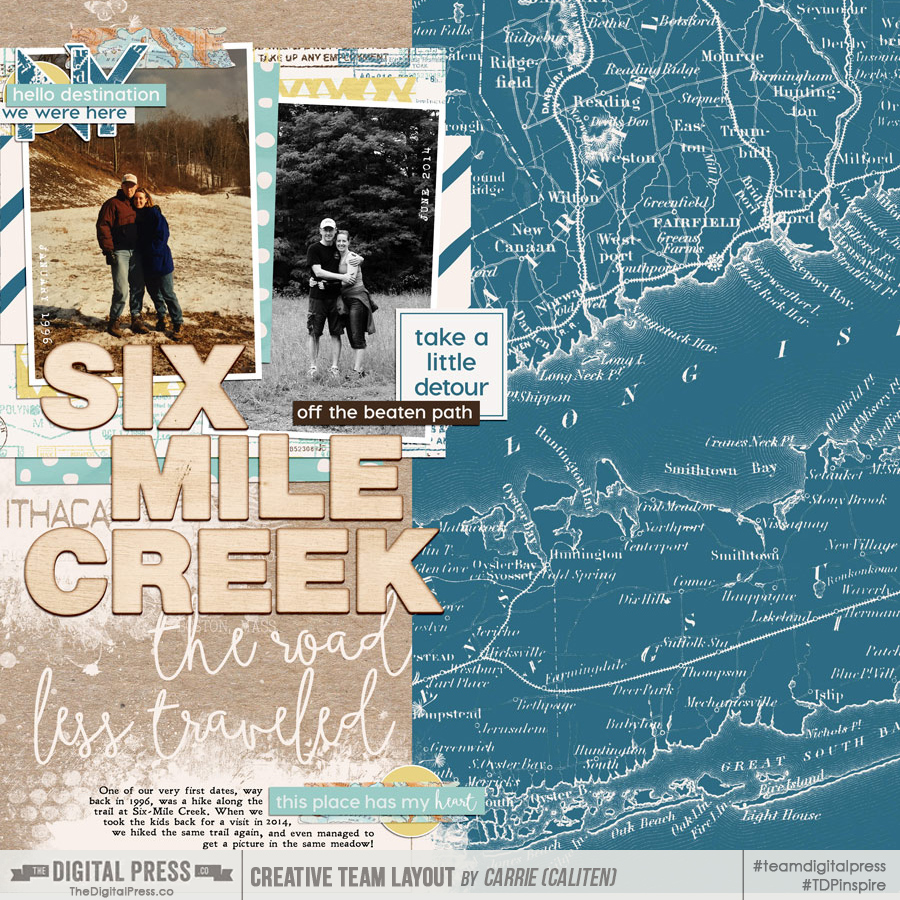
To begin giving you some examples and eye candy… we’ll begin with one of The Digital Press’s talented creative team members, Carrie, who created this lovely layout that clearly conveys the comparison of two people in the same spot, many years apart.  She did this by using a colored photo and a black and white photo… keeping the subjects the same size… and using journaling to tell her story. Take a look…

[ credits: Wanderlust Collection by Little Lamm Paper Co. and Then and Now | Photo Masks by Anita Designs ]

This next layout, created by TDP creative team member Chloe, uses both photos and journaling to show the connection between her ‘Then and Now’ comparison. This is a beautiful layout that clearly shows the journey that she has been on. In this instance, the journaling tells her story, and the photos show the time gap…

[ credits: Fresh Starts Papers and Elements by k. becca and Straight Up Alpha by Dawn by Design ]

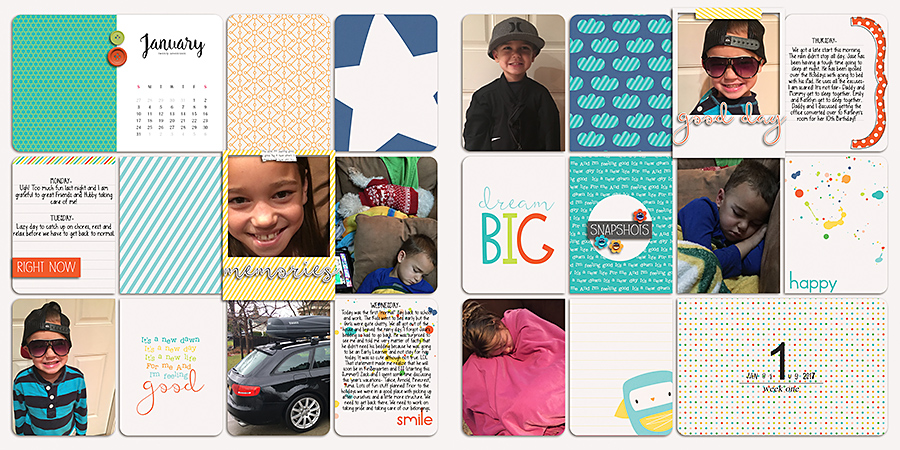
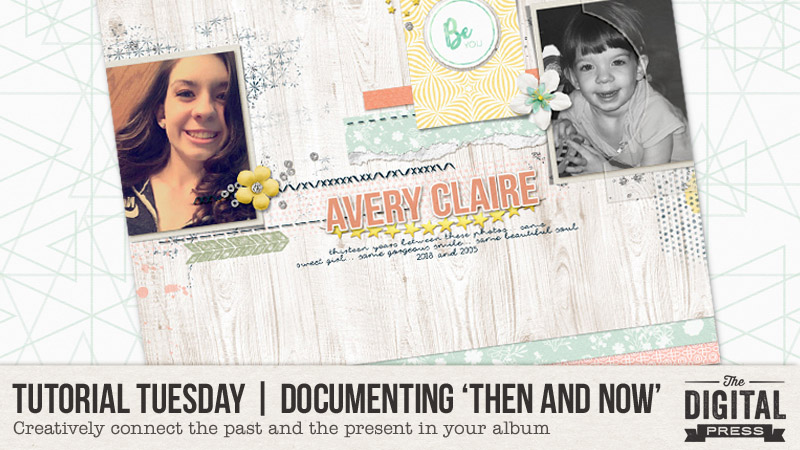
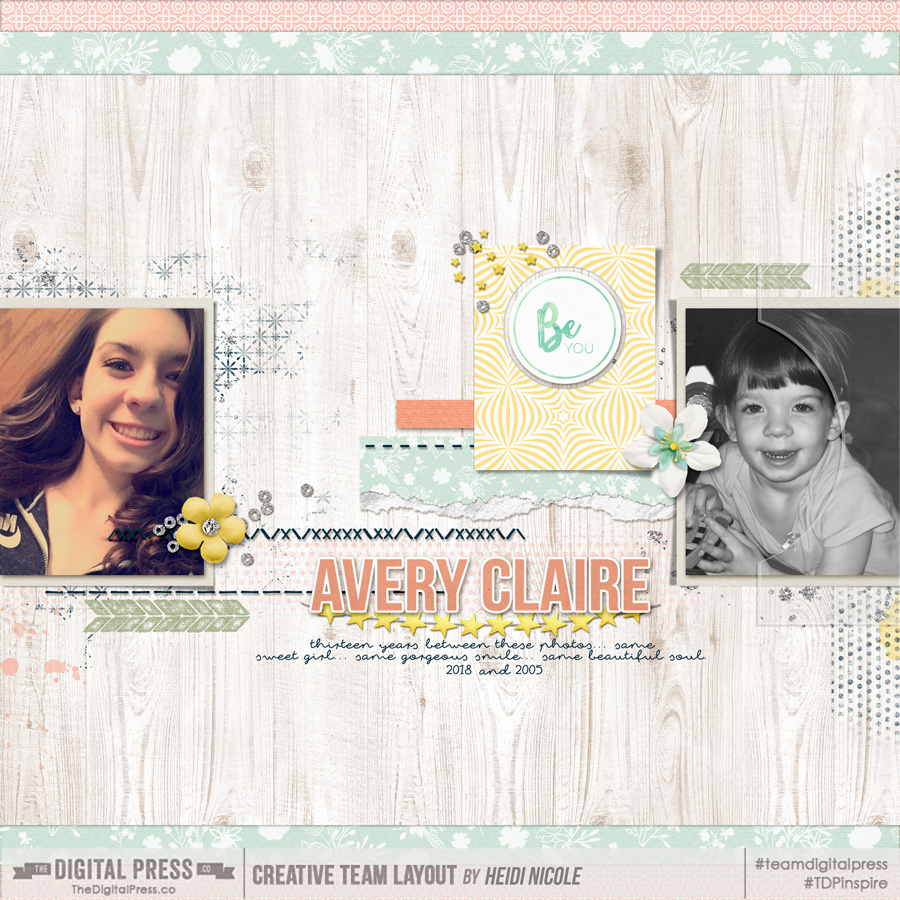
Finally, here’s a look at my own layout — based on the comparison and memory I described up above, about my step-daughter Avery and a look at her present-day self as compared to the little girl I first met a decade ago…

[ credits: Quick Scraps Vol. 09 Templates and Shine by Anita Designs ]

Now that you’ve seen a few visual examples and have (hopefully!) been inspired to create a page like this of your own… I wanted to share a few ideas about approaches you can take when documenting these types of comparison memories.

Focus on current changes — This approach would be used when comparing, for example, the first day and last day of a school year.  It’s best used when there hasn’t been a lot of time that has passed between photos.  It’s contrasting your child, loved one, or pet when there hasn’t been significant physical changes, but there has been maturing or changes that are unseen.  You would definitely want journaling on your layout to tell the story, because in this approach, it’s often not as evident in the photos.

Focus on similarities or differences — This is a really fun approach, and to explain what I mean, I’m going to use an example.  I would use this approach if I wanted to compare and contrast a photo of myself at the age of seventeen, to a photo of my child at the same age.  Your journaling could talk about your likes and dislikes, or similarities and differences.  You could have a lot of fun with this by displaying the differences in your music playlists, favorite foods, hobbies, and I could go on and on…

Focus on the journey — This approach is probably the most commonly used.  I adapted this approach when creating this layout of Avery.  There are many years between the photos, and it’s quite evident that I’m comparing the two.  You can use journaling in this approach, but you could also forego the journaling, and just have the photos and a title.  It’s all about the journey between the photos in this approach.


My hope is, after learning about the schools of thought surrounding this type of layout, and seeing it in action, you are inspired to try it out. It’s truly fun, and the possibilities are endless when it comes to topics. Start with surveying your photos… and I bet you will find a myriad of photos that are rich with possible connections between yesterday and today!


HeidiAbout the Author  Heidi Nicole is happily married to an amazing man, a step mama to 2 wonderful kiddos, and mama to 3 sweet and sassy furbabies. She’s a radiation therapist by day, and creator of pretty things by night (she’s pretty confident that she’s hit superhero status, but refuses to wear a cape). She loves cats and huskies, coffee, audio books, “Friends” reruns, St. Louis Blues hockey, cooking, baking, and traveling. Oh, and wine… she really likes wine. She lives a normal and happy life, and enjoys all the absolutely extraordinary people she gets to share it with on a daily basis!

Foodie Friday | ninigoesdigi

nini2

Hello everyone, and welcome to another edition of our always-popular Foodie Friday series here on The Digital Press blog! This week, we are excited to be featuring Nini of ninigoesdigi. Nini joined The Digital Press as a permanent designer this past year, and therefore this is her first feature on the blog. We are so excited to have her sharing her recipes with us, as she loves to cook and has whipped up some really unique things in her kitchen this week!

Nini

What are those yummy things you see, above?

  1. Ham Mousse
  2. Quiche (without pastry)
  3. Gateau au Chocolat

Ham Mousse

INGREDIENTS

  • 250 g of white ham
  • 400 ml (2 cups) of fresh cream (divided in 250 ml + 150 ml to be used separately)
  • 6 g of gelatin (soak it in a little bit of cold water – this time I tried with only about 2 g to see if it was less hard and I prefer that texture. You will need to test and see what you prefer)
  • salt and pepper to your taste (depending on the saltiness of the ham too)

INSTRUCTIONS

  • Cut  away the hard bits (hard gristle) the white ham might have. I take out the white soft greasy parts too. I only keep the pink meat of my ham 😉
  • Put 250ml of liquid fresh cream in a saucepan with the ham cut into small pieces on medium heat. Don’t let it boil. Take off the heat once it starts make bubbles.
  • Place that mixture in your blender, or like me, mix with a hand mixer until smooth. Add the gelatin. I am not patient so when the recipe said “blend 10 minutes until smooth” I totally didn’t follow through lol. Just blend as desired until you think it is smooth enough for you. Scrape the mix from the sides too so that everything gets well blended.
  • Cool the mixture by placing your bowl or saucepan on an icy bain-marie (water bath). Slowly mix with a spatula to cool it down evenly.
  • Whip the rest of the fresh cream so it gets to be the same consistency of the ham mixture (about 80% of normal whipped cream).
  • Add the cream and ham mixture to the cooled mixture in the bain marie and mix gently together. If it is not seasoned enough for you, you can add salt and pepper to your taste.
  • Pour into a bowl and refrigerate for at least 20 minutes before serving.

Special note: this amount makes quite a bowl of ham mousse so maybe you could try half of it first, if you are concerned it will be too much.
I love to spread it on a slightly toasted baguette pieces, or fresh baguette. One suggestion: if you have a French baguette that is 1 day or 2 days old, spray a bit of water on your slice before you toast it. It will help bring back the good crunchy outside/soft inside taste, like a fresh baguette.


Quiche (without pastry)

INGREDIENTS

  • 200 g of diced bacon
  • 3 eggs
  • 500 ml of milk
  • 100 g of flour
  • 140 g of grated Gruyère / but for the one on the picture I used grated Parmesan
  • salt (to your taste but depends also on the bacon) + pepper

INSTRUCTIONS

  • Brown the bacon bits in a pan.
  • Spread them in a cake pan/mold (about 24cm, and buttered).
  • In a pitcher/bowl, mix the flour, the eggs one by one, the milk, 140 g of grated cheese, or Parmesan like I did. Pour the mix on top of the bacon.
  • Bake for about 40 minutes at 180°C or 200°C (350°F/390°F) depending on your oven you might need more or less time. Take a look sometimes to see if it’s not too burnt! lol

Special note: I usually make this when I have guests, for a party and I use silicon mold with many divisions. That’s why in my picture I have serving sized  bits of quiche (some round, some square). Perfect for an appetizer, no? Since there is no pastry/pie at the bottom you can make as many shapes as you like. But don’t forget to adjust the cooking time if they are smaller than a whole pie. I loved using the Parmesan instead of some other grated cheese. The cheese taste was delightfully  stronger.


Gâteau au Chocolat

INGREDIENTS

  • 200 g of black chocolate (70%)
  • 125 g of butter
  • 100 g of flour
  • 8 to 10g of baking powder (I usually put 10g)
  • 4 eggs (separate yolks and whites)
  • 200 g of sugar
  • 1 pinch of salt

INSTRUCTIONS (20 mins preparation time)

  • In a saucepan melt the chocolate with the butter. Remove from the heat and pour in the flour and the baking powder. Mix well.
  • Pre-heat your oven to 180°C (350°F)
  • In a bowl beat the yolks with the sugar until they whiten. Mix with the chocolate.
  • Beat the whites with a pinch of salt. Add them to the chocolate, mix slowly so that the meringue doesn’t break too much.
  • Pour the mix in a mold that has been buttered and floured.
  • Put in the oven for 30 minutes. Check around the end of the cooking time by sticking the cake with a knife to see if it comes out dry. I actually don’t mind it to be a little humid as it means the outside is cooked but the middle is still a little moist. Yum! Be careful that the top of the cake doesn’t burn too much. If you think it’s too cooked but need to add a few more minutes because the inside is not yet cooked, add a layer of foil on top.
  • Let it cool before you turn it out.

Special note: This is my all-time favorite. I use French cooking chocolate that I bring back from France or that my mum kindly sends me to Japan. It is a 70% cacao chocolate bar. I tried with the cooking chocolate selling in common Japanese supermarkets but it got super greasy… I don’t know why. Maybe there was too much fat in that chocolate? But I won’t make that mistake twice.


These recipes all sound fabulous, and definitely easy enough to pull off! Please share in the comments if you try the recipes, and let us know what you think of them!

Meanwhile, as is always the case with our designer feature weeks — they come with a fantastic week-long sale and a special Free-With-Purchase offer. You’ll be excited to know that the entire ninigoesdigi shop at The Digital Press will be marked down 30% throughout her feature week (sale prices will be valid through 11:59pm ET on Thursday 2/15)… and if that weren’t good enough news, she will also have the following Free-With-Purchase offer available in her shop all week long as well — spend $10 in the ninigoesdigi shop at The Digital Press and get the following brand-new FULL KIT completely FREE!


small avi

About the author Stefanie is a member of The Digital Press creative team and a stay at home mother of three older children living in Cape Town, South Africa with her hubby of 29 years, two of their three children and 4 Siamese cats. She loves photography, traveling and digital scrapbooking, documenting the good and the ordinary everyday.

Hybrid How-To | Valentine Notebooks

Valentine’s Day is coming up and I have these cute hybrid notebooks to share with you. They’re super easy to put together – no cutting machine needed! They’d make great gifts for a classroom full of kids.

Supplies

  • Digital journaling cards of your choice. I used Life Stuff | 3×4 Cards by Julia Makotinsky.
  • Photo editing program like Photoshop or Photoshop Elements
  • Cardstock or Photo Paper < for more vibrant color
  • Plain copy paper for inside pages
  • Scissors OR paper cutter
  • Sewing machine OR stapler

Instructions

1. Get those cards ready to print! I wanted the back to be a fun color to match the cover. I dragged the cards onto a new canvas in Photoshop Elements, duplicated it and filled it with a coordinating color. Make sure the front of the cover is on the right side and the back is on the left.

2. Print covers and cut them out.

3. I cut my plain copy paper to just smaller than the covers, centered them inside the covers, and then sewed down the middle of them. You could just as easily staple the books together – three staples down the middle. Fold the books in half.

I loved putting these together. Using journaling cards makes this a quick and simple project, and of course what kid doesn’t love a blank notebook! It’s sure to be a hit.


Kate About the Author  Kate is on the hybrid team here at The Digital Press. She lives on the Utah/Colorado border with her husband, 5 kids, 10 chickens, and a dog named Gracie. She’s a city-born girl who found she’s really a country girl at heart. She can be found outside, barefoot, and probably in her garden.

Foodie Friday | Julia Makotinsky

Hi everyone! It’s Friday, and as always that means it’s time for another edition of our Foodie Friday series here on The Digital Press blog! This week, we’re featuring Julia Makotinsky who recently jointed The Digital Press as a permanent design team member. Therefore, as this is Julia’s first blog feature here at TDP, I have asked her to give a brief introduction.

Julia was born in Moscow, Russia… but now resides in New York in the USA, where she has lived for a little over 25 years. She graduated as an illustrator from the Fashion Institute of Technology in New York, and then later began designing digital scrapbook kits in 2008. She says, “learning as a designer is a never-ending process. But designing is my passion — and not only digitally. My style is mostly hand-painted/sketched and illustrative, and I do love to sketch. I am a night owl and quiet evenings are the time when most of my creativity begins. I love to drink black tea with lemon or fresh mint. I also love to ski, I love living right by the ocean, I love riding my bicycle in summer, and I love reading books and flipping actual paper pages (rather than kindle). “

If you have not checked out Julia’s store here at The Digital Press yet, you are in for a wonderful surprise! Her extraordinary and unique art features prominently in her designs, which are also highly colorful.

Julia also loves to cook… and says, “we Russians are big on cooking — especially during holidays — and most of our food is very colorful, both in taste and calories! 🙂 I prefer more healthy choices, lately, however.”

Here’s a look at two of Julia’s favorite recipes, and one of mine…

What are those amazing, delicious-looking items you see up above?

  1. Herb Crusted Salmon with Arugula Salad
  2. Oven Baked Chicken
  3. No-Bake Date Slice

Herb Crusted Salmon with Arugula Salad

INGREDIENTS

  • 2 salmon fillets (6oz each)
  • 1 heaping tablespoon coconut flour
  • 2 tablespoons fresh parsley (or dried, if you have on hand)
  • 1 tablespoon olive oil
  • 1 tablespoon dijon mustard
  • salt and pepper, to taste

FOR THE SALAD

  • 2 cups arugula
  • 1/4 red onion, sliced thin
  • juice of 1 lemon
  • 1 tablespoon white wine vinegar
  • 1 tablespoon olive oil
  • salt and pepper, to taste

INSTRUCTIONS

  • Preheat oven to 450 degrees.
  • Place salmon fillets on a parchment or foil lined baking sheet.
  • Top your salmon off with olive oil and Dijon mustard and rub into your salmon.
  • In a small bowl, mix together your coconut flour, parsley, and salt and pepper.
  • Use a spoon to sprinkle on your toppings on your salmon and then your hand to pat into your salmon.
  • Place in oven for 10-15 minutes or until salmon is cooked to your preference.
  • While the salmon is cooking, mix together your salad ingredients.
  • When salmon is done, place salmon on top of salad and consume.

Oven Baked Chicken

In Julia’s words “This is my girlfriend’s recipe… and all of our friends absolutely love it, I’ve cooked it myself at my house many times, but I still prefer hers. It’s the easiest recipe ever and the best part there is no measuring involved!”

INGREDIENTS

  • Chicken thighs or entire legs (thigh and drumstick) fatty part cooks best so chicken breasts won’t work
  • salt and pepper
  • minced garlic from the jar

INSTRUCTIONS

  • Preheat oven to 400 degrees.
  • Place chicken into oven pan, sprinkle each piece with salt and pepper working it into chicken, use your hands to smear it on all sides.
  • Do the same with minced garlic even going under the skin.
  • Cover the entire pan with aluminum foil on top and place in the oven for an hour.
  • After an hour remove the foil and using  a spoon baste each piece of chicken with the juice that came out of the pieces. Place them back into the oven uncovered for another hour, basting occasionally as required.
 “That’s it! It takes 2 hours to cook all together but it’s sooooo delicious and juicy inside and crisp outside, and can be served with any side dish of your choice such as mashed potatoes, salad, pasta etc.”

No-Bake Date Wafers

“This was my own favorite biscuit recipe growing up as a child. My mum used to prepare it whenever she needed something quick to take out. Now we only prepare this at Christmas, due to the sugar content… but I still love it.” ~Carolyn

INGREDIENTS

  • 4 cups puffed rice or Rice Bubbles
  • 3/4 cup sugar
  • 2 oz margarine
  • 1 large lemon (juice and rind)
  • 1/2 pound chopped dried dates
  • 1/2 teaspoon vanilla extract
  • 4 Tablespoons unsweetened desiccated coconut.

INSTRUCTIONS

  • Line biscuit tin (rectangle app 12″ x 7″) with paper then sprinkle half of coconut over base.
  • Cook dates on stove top (medium heat) until soft with sugar, butter and lemon rind. (This will take app 15 minutes)
  • Remove from stove and add all remaining ingredients (except coconut).
  • Spread mixture over coconut in lined tin then sprinkle remaining coconut over firmed down biscuit.
  • Cool in fridge before cutting into squares.

I hope that you have enjoyed these new recipes from Julia and myself. Let us know if you decide to try one of them, or if you have any questions!

Meanwhile, it wouldn’t be a designer feature week without a fantastic sale and a special Free-With-Purchase offer! Not only is Julia’s entire shop marked down 30% OFF throughout her entire feature week (sale prices will be valid through 11:59pm ET on Thurs 2/15)… but she also has the following Free-With-Purchase offer available in her shop all week long, as well — spend $10+ in Julia Makotinsky’s shop at The Digital Press and get the following item completely FREE!


AvatarAbout the author  Carolyn lives with her partner and 2 rescue dogs on 5 acres of paradise in the hinterland of the Sunshine Coast, Australia. Her camera, along with an assortment of lenses, is never out of sight. When not taking photos, she loves cooking and gardening and, of course, scrapbooking.

Tutorial Tuesday | Streamline & Scrap an Entire Year Fast!


Hello everyone, and welcome to another edition of our Tutorial Tuesday series here on The Digital Press blog! Today I am here to show you my plan for getting an entire year’s worth of photos and memories scrapped — and fast (!) — using a pocket page-style system of scrapping.

I have been documenting our everyday memories using weekly pocket pages for years now, and yet recently I have found myself a little behind. Well, actually a lot behind! I have not scrapped a single week for 2017! I do have the photos (and some notes for the journaling), but I still need to actually create the weekly scrapbook pages. All 52 of them!

Therefore, I knew needed a plan in order to get an entire year of everyday memories scrapped. I needed it to be fast… and I needed it to be easy.

I think that starting a big project like this is always the hardest part. It can feel so overwhelming,,, which is normal when taking on such a daunting task… but it doesn’t have to be paralyzing. If you simplify the entire process, it can actually be really easy and go really quickly!

For me, the first step was to choose a template pack/design that I could use for the entire year. I chose Every Day Life | Templates No3 by MEG Designs…

More specifically… I decided to really simplify things by choosing the same templates to use for the entire project (thus cutting out the time/etc. it takes to choose a template for each new page/2-page spread). I chose template 10 for all of my left side pages… and template 9 for all of my right sides.

Similarly, I knew it would speed things up if I chose a calendar card to use at the beginning of each month on the left side (in the upper left-hand pocket).
For this, I chose Calendar 2017 — also by MEG Designs…

Then, as soon as I had a chunk of time (1-2 hours) available to scrap, I did the following:

(1) I inserted a calendar card for every month and saved the PSD file into my 2017 folder on my desktop…

(2) Then, I chose (a) date stamps and (b) weekly cards to use throughout my album… with the idea that these items (combined with the monthly cards I’d already chosen, above) would create a simple and consistent look throughout the entire year/album. For the date stamp, I chose Date Stamps | Stamps & Brushes by Dawn by Design… and for the weekly cards, I used Weeks Volume 2 by MEG Designs…

Then, I re-opened each of the layout files I created in Step 1, above, and I inserted each of the weekly cards and the date stamps into the right side of all 52 weeks (see next image, below). This did take some time… but I binge-watched Netflix while doing it, and got it done! 🙂


(3) Once I had all 52 of my templates started and saved in my folder, as detailed above, I started working on January. My plan was to set aside a chunk of time to complete 1 month at a time. In theory, that would mean that in just 12 “chunks” …I would have a completed 2017 album!

For me, the fun part is always choosing what digital kit to use! I am typically an embellishment-loving scrapper — meaning I like to add all kinds of chunky embellishments and layers on my layouts. But I knew that if I was going to get 2017 completed, I would have to keep my layout spreads simple. With that in mind, I decided that in addition to the cards and date stamps already discussed above, my plan would be to use: (a) plain backgrounds, (b) journal cards, and (c) minimal embellishments.

Here’s a look at how I began “filling in” my templates with journal cards. For the first week, I chose to use the January Documented Cards by Dunia Designs…

*PRO TIP*
Even though I didn’t keep up with the actual scrapbooking of my weekly spreads in 2017, I did keep up with my daily journaling. I simply sent myself an email every morning with a recap of the day before — along with random memories like the silly things the kids said or did, and/or any other special moments. Then, I filed these in a folder in my gmail account. Easy, right?!

Using these notes in the “emails to myself,” I copied and pasted some journaling onto my cards/layouts…

Then, I added my minimal embellishments…

And finally, I added my photos (which I keep organized in SmugMug throughout the year, as I take them)…

After completing my first week’s spread… I repeated this process to finish out the rest of the month of January 2017.

As I worked my way through the month, it turned out that I didn’t have too many photos for Week 2, so I created a single page. There are lots of other types of pages that I can put in place of the “missing side” (some ideas I like are: a “Currently” page, a “Current Events” page, a “Travel Bucket List” page, and/or a list of “Resolutions”).

Here’s what my single-page Week 2 layout looked like, once finished (using the Hello January Bundle by Dunia Designs)…

After that, I created my Week 3 spread (using products designed by one of TDP’s guest designers in January 2018; no longer available at TDP)…


And finally… a look at my Week 4 spread for January 2017 (using the Make it count: January 2018 | Collection by Anita Designs)…

(4) Once each page was finished, I saved my files in 3 places:
1. External Hard Drive
2. Smugmug
3. Blurb (that way, my files will already be uploaded when it comes time to print!)

(5) And now… I just need to do this 11 more times and I will have a finished 2017 album! 🙂

But truly, it was really quick (and easy!) to get an entire month’s worth of photos from a year ago scrapped and recorded in just a couple of hours. Streamlining the process (with the monthly cards, weekly cards, and date stamps) really sped things up. Using my emailed notes from last year was a life-saver, as well!

So now… go give this a try! If you’re feeling behind and you have a mountain of memories to document, give this system/process a go! You’ll be happily surprised at how much you can get done in a really short time if you “automate” the page composition and the decision making.


About the Author  Krista Lund is a mom of 3, married to her high school sweetheart and living in the San Francisco Bay Area. Some of her favorite things are brownies, chips ‘n’ dip, taking pictures, and documenting her family’s story.

Foodie Friday | Jimbo Jambo Designs

Hi everyone! It’s Friday, and as always that means it’s time for another edition of our Foodie Friday series here on The Digital Press blog! This week, we’re featuring Aga of Jimbo Jambo Designs. This amazing designer has already been featured twice (if you want to learn even more about her, you can find her first feature article from October 2016 HERE, and her second feature article from May 2017 HERE).

In addition to creating super fun and inspiring templates, she has many other talents as well… including cooking! Let’s discover the three fabulous recipes she will be sharing with us today…

What are those yummy things you see, above?

  1. Chicken in Garlic and Orange Juice
  2. Gazpacho Andaluz
  3. Strawberry Crumble Cake

Chicken in Garlic and Orange Juice

INGREDIENTS

  • 4-6 pieces of chicken
  • 1/4 teaspoon salt
  • 1/3 teaspoon pepper
  • 1/2 cup orange juice
  • 1 teaspoon honey
  • 1 teaspoon ground ginger
  • 1/2 teaspoon curcuma
  • 2  clove of garlic
  • a bit of rosemary and cayenne (pepper) if you like spicy food.

INSTRUCTIONS

  • Season chicken with oregano, salt and pepper, to taste; set aside.
  • Melt butter in a large oven-proof skillet over medium high heat. Add chicken, sear both sides until golden brown, about 2-3 minutes per side; set aside.
  • Mix all ingredients and heat up without boiling and leave to cool.
  • Add chicken and toss to coat. Cover and marinate at least 3 hours up to overnight in the refrigerator.
  • Place into oven and roast until completely cooked through, reaching an internal temperature of 180 degrees C, about 25-30 minutes.

Gazpacho Andaluz

INGREDIENTS

  • 1 kilo of ripe tomatoes (with an accentuated red color)
  • 1 green pepper Italian type (about 60 grams)
  • 1 piece of cucumber (about four fingers wide)
  • 1 piece of onion (about 100 grams)
  • 1 clove garlic
  • 3 tablespoons olive oil
  • 3 tablespoons of white wine vinegar
  • 1 small spoonful of salt
  • Optional: 1/2 green apple (for example a Golden) and cold water

INSTRUCTIONS

  • Wash tomatoes, apple, cucumber and pepper well. Let it drain. If you want you can remove the tomatoes’ skin.
  • Remove the corner and seeds from the pepper, cut it into four or five pieces and put it with the tomatoes.
  • Peel the clove of garlic and put it with the rest of the vegetables.
  • Take the piece of onion (peeled) and cut it into three or four pieces. Add to the blender jar.
  • Take a piece of cucumber about four fingers long and peel it. Cut it into four or five pieces and to the blender.
  • Now that all the vegetables of the gazpacho are in the glass of the blender we will turn it on (well covered) and we will leave it working until there is no piece of vegetable left (the time will depend on the power of the blender).
  • Now add the salt, the oil, and the vinegar. I advise you to start with three tablespoons of vinegar and to rectify (adding more) to your liking. Give the blender five seconds and try. Rectifies of salt and vinegar to taste.
  • makes 4 glasses (1 liter)

Strawberry Crumble Cake

INGREDIENTS FOR CRUST

  • 200 g of wheat flour or spelled or oat flour
  • 50 g of rice or potato flour
  • 1 teaspoon of baking powder
  • 150 g butter (cold)
  • 50 g sugar
  • 1 egg

INGREDIENTS FOR CRUMBLE

  • 150 g of wheat flour
  • 50 g of rice or potato flour
  • 50 g sugar
  • 125 g butter (cold)

INGREDIENTS FOR FILLING

  • 800 g strawberries
  • 3 tablespoons of potato flour
  • powdered sugar

INSTRUCTIONS

  • Put baking paper in a form of a size 24 x 34 cm.
  • Put into the bowl both flours, add baking powder, sugar, cut into pieces butter and an egg. Rub your fingers with the rest of the ingredients into a small crumble, then quickly knead the dough by combining the ingredients into a homogeneous sphere. Place the bottom and a piece of the side of the mold with the dough. Punch the bottom with a fork and put in the fridge. Heat the oven to 180 degrees C.
  • Place the baking tray with the dough in the oven and bake for 15 minutes for a pale golden color. Take out the dough, but do not turn off the oven.
  • Crumble: pour the flour into the bowl, add the sugar and cut into pieces cold butter. Rub the butter with the rest of the ingredients with your fingers until you have a crumble (small pastry crumbs).
  • Strawberries: cut into smaller pieces (eg into quarters), put in a bowl, mix with potato flour.
  • Put the strawberries on top, put the crumble on top and put in the oven. Bake for approx. 35 – 40 minutes for a golden color. After baking sprinkle with powdered sugar.

All of those recipes look amazing, right? Aga is a world traveler, and it definitely shows in the foods she prepares! I love them! Unfortunately, I won’t be able to try the gazpacho because I’m allergic to raw tomatoes… but I hope you’ll tell me in the comments if it’s as tasty and delicious as it sounds!

And of course, it wouldn’t be a designer feature week without a fantastic sale and a special Free-With-Purchase offer! Not only is Aga’s entire shop marked down 30% OFF throughout her entire feature week (sale prices will be valid through 11:59pm ET on Thurs 2/8)… but she also has the following Free-With-Purchase offer available in her shop all week long, as well — spend $10+ in the Jimbo Jambo’s shop at The Digital Press and get the following item completely FREE!


ChloéAbout the author  Chloé is in charge of PR and communication for her small town by day, is a digiscrapper “by night,” and a photographer whenever the light is beautiful. She lives with her man and fur-babies in a small town of Alsace (in the northeast of France), where she loves to read, watch good TV shows (TWD being her absolute favorite), and just hang out with her friends — no matter if they are close by, online, or away in her Swiss hometown. She recently became quite obsessed with Bullet Journaling, FLyLady and Zero Waste.