If you are like me and working on multiple albums at the same time, you will no doubt have experienced the following problem — in which you cannot remember the basic technical specifications for each of your albums. For example… you may be working daily on a pocket-scrapping project, and then also go back to do a page in your recipe book and find that you have forgotten what font you were using (or what shadow styles you were using, etc.). It’s frustrating to constantly need to go back to a previously-completed page to check out all this information before you can start a new page, right?
If the above description is you, then I have a great tip – Setup Photoshop CC Libraries.
I discovered this feature early in the year and now use it on a regular basis.
So what are libraries?
Libraries can be used in many ways, but for me they are basically collections of style presets for the photo books/albums that I am working on. They can be accessed in the top right-hand corner of the page, and are on a tab next to “Adjustments” and “Style” (*NOTE* to enable libraries you may first have to select Window/Libraries).
Here, you can see how I have setup my “Project Life 2016” library…
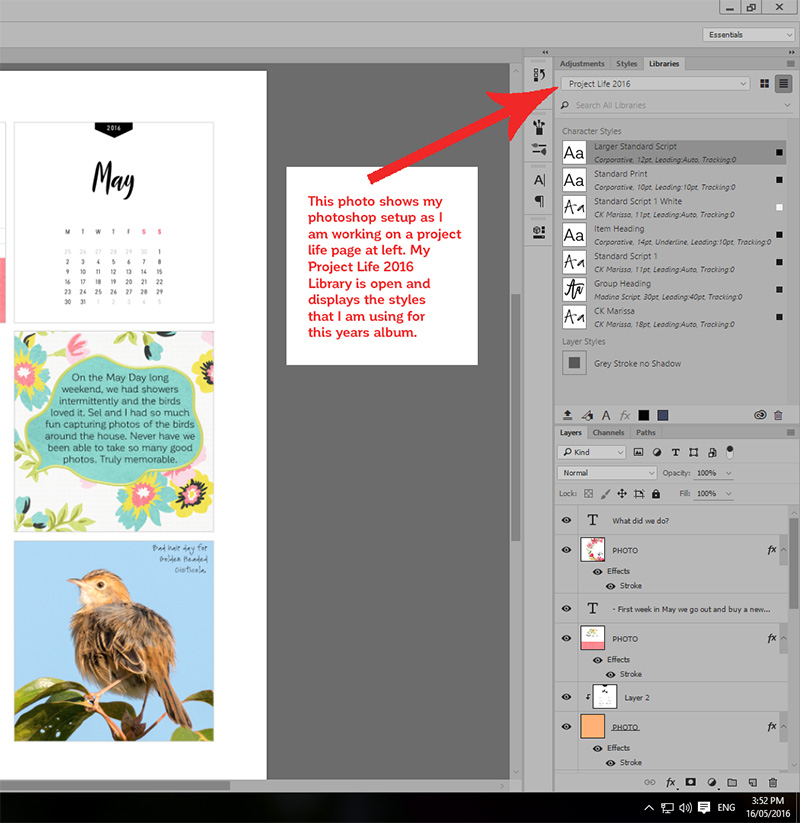
As you can see, I have added the “character” and “layer styles” that I regularly use to this library collection… but you can also add things such as “colors” and “smart objects,” as well.
HOW TO DO THIS
1. Set up your Libraries
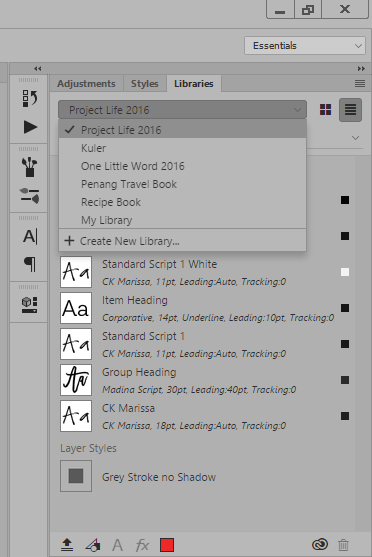
Click on the Libraries tab, and then click anywhere in the text box to bring up the dialogue with “Create New Library.” Select this option and name your new library. You can set up as many libraries as you like. For myself, I have created libraries for my “Project Life 2016,” “Penang Travel Book,” “Recipe Book,” and “One Little Word Book.”
2. Add items to your Library
There are 2 methods that I use to add items to my libraries.
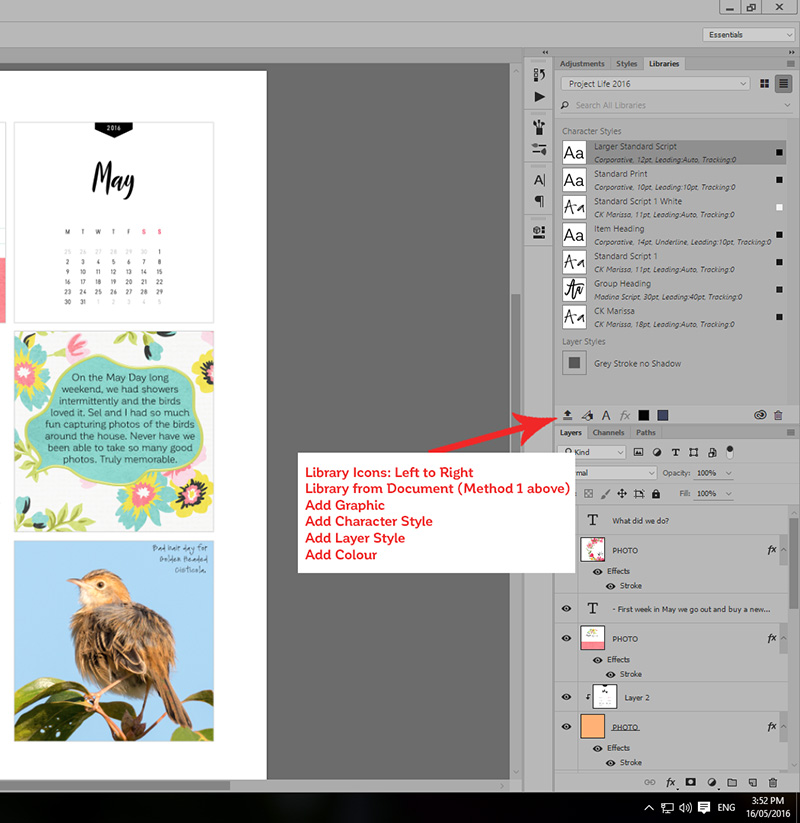
The first is to add all styles from a document. I used this at the beginning of the year when I had started my “Project Life 2016” book, and already had some complete pages. To do this… open your completed layout and (after you have created your library) select the first icon with the upward arrow at the bottom of the libraries panel. All styles from your page will automatically be added to your library. You can then go in and modify them by right-clicking on each library style item.
The second method — which happens to be the one which I use more often — is to add items individually to the library. To do this, you select the layer in the layers panel of the style you wish to add to the library. Then just click on the relevant icon at the bottom of the libraries panel to add it to the library. If you mouse over the icons, you can see there is one for Graphics, Character Style, Layer Style and Color.
Now comes the fun part…
3. Use your library of styles
I find the easiest way is to apply the style after adding the photo or text to a page. For example, I add text to a page using any font. Once text input is complete and text layer is still selected in layer panel, all you need to do is click on the font style you want to use in the library and the font automatically changes. Simple!
You can also apply the effect across multiple layers. So, for example, I have created my own templates for “Project Life 2016” …but each photo layer has a shadow layer style. To use these templates for my flat graphic style this year, I open a template in Photoshop, select all photo layers and then click on the “Grey Stroke no shadow” layer style within my library. This year’s stroke style is now applied to all my photo layers, instead of last year’s shadow.
Isn’t this easy? It’s such a time saver, too.
I hope that you find using Libraries as helpful as I have. Enjoy!
![]() About the author Carolyn lives with her partner, eldest daughter, and 3 rescue dogs on 5 acres of paradise in the hinterland of the Sunshine Coast, Australia. Her camera, along with an assortment of lenses, is never out of sight. When not taking photos, she loves cooking and gardening and, of course, scrapbooking.
About the author Carolyn lives with her partner, eldest daughter, and 3 rescue dogs on 5 acres of paradise in the hinterland of the Sunshine Coast, Australia. Her camera, along with an assortment of lenses, is never out of sight. When not taking photos, she loves cooking and gardening and, of course, scrapbooking.
I’ve only been using full Photoshop for not quite a full year and I was curious about this Library thing, but hadn’t explored it yet. This was a very helpful post. Thank you!
Oh, wow! This is mind-blowing! I just discovered libraries as well but only used them for color themes. Being able to mass-apply shadow styles or fonts to keep things consistent across the pages in an album is fantastic! Thanks so much for the reminder of all of the possibilities available to us scrappers today. 🙂
OMG! This is awesome! I use CS6 so I can’t do this. I’m so sad! I’m going to have to add it to my list of reasons I want to switch to CC some day.
Thanks for the great tutorial!
Thanks for the comments. I love this discovery and it has certainly saved me a lot of time on my project books.
Great tips Carolyn! I need to save this page so I can give it a go!