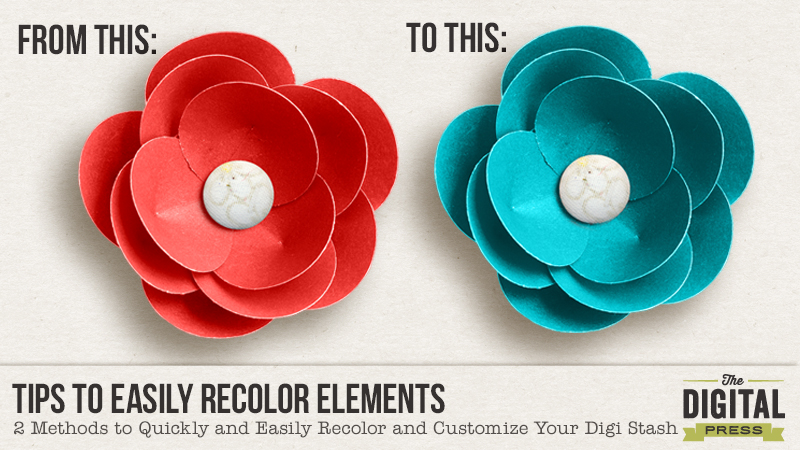
With Photoshop, there are lots of way to recolor and customize your digital stash. I thought I’d share with you two of my favorite ways to recolor in Photoshop:
#1 Using a Color Overlay Style
#2 Using a Fill/Adjustment Layer
NOTE: There are lots of different ways to recolor items. These are just two of my “go-to” methods.
#1 HOW TO: Recolor Using a Color Overlay Style
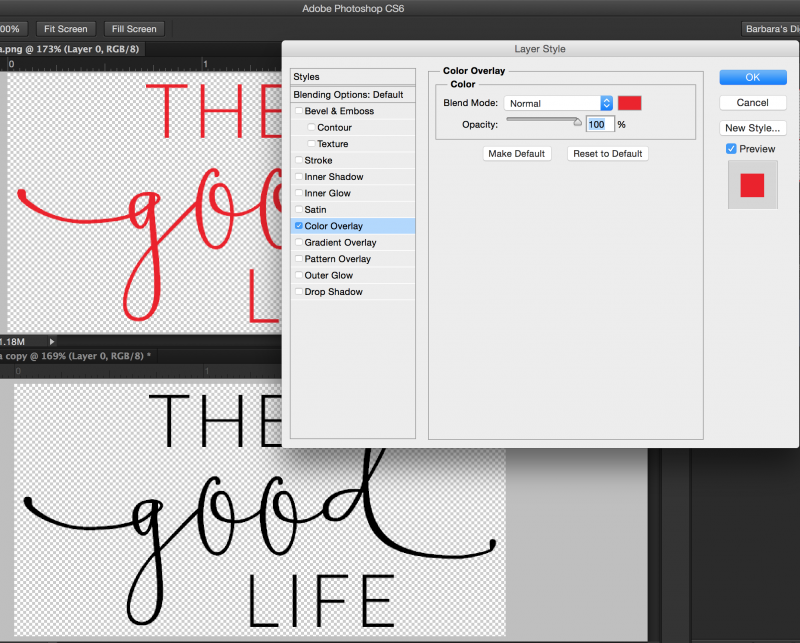
When I’m recoloring an item with just one color (i.e. a single colored flat item like a brush), I like to use a color overlay style. For my example I’ll use a PNG word art from Digital Design Essentials Live Colorfully Word Art. Here are the steps I use:
1. Make sure the item you want to recolor is the active layer in the layers panel.
2. Click on the fx button in the layers panel and choose Color Overlay. (Another option is to go to Layer > Layer Style > Color Overlay)
3. Click on the color box and select the color you want to use as a replacement. You can sample a color from your layout, choose one of the foreground or background colors, or choose a color from the color wheel.
4. The default blend mode is set to Normal. If the item you are recoloring is completely flat you can leave the Normal blend mode and your element will be recolored. If your item is more dimensional (i.e., a flower or button), change the blend mode from “Normal” to “Color” and your recolored element will retain the depth and color variations of the original item.
#2 HOW TO: Recolor Using a Fill/Adjustment Layer
When I’m recoloring a dimensional item (an item with shading or more than one color) I like to recolor using a fill/adjustment layer. Here are the steps I use:
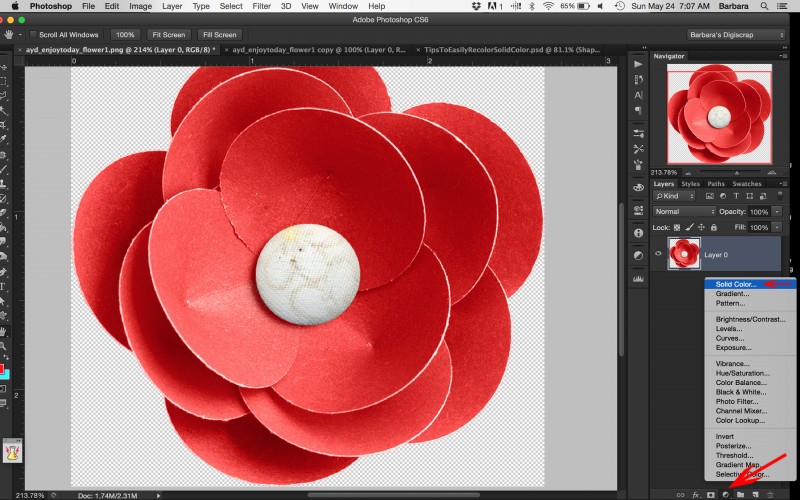
1. Make sure the element you want to recolor is active in the Layers Panel
2. Click the New Fill or Adjustment Layer icon (it looks like a half white/half grey circle) and choose Solid Color. Your new layer will be filled with the foreground color. (Another option is to go to Layer > New Fill Layer > Solid Color) Don’t worry, you will just see a layer of solid color, you won’t be able to see the element you’re recoloring until the next step.
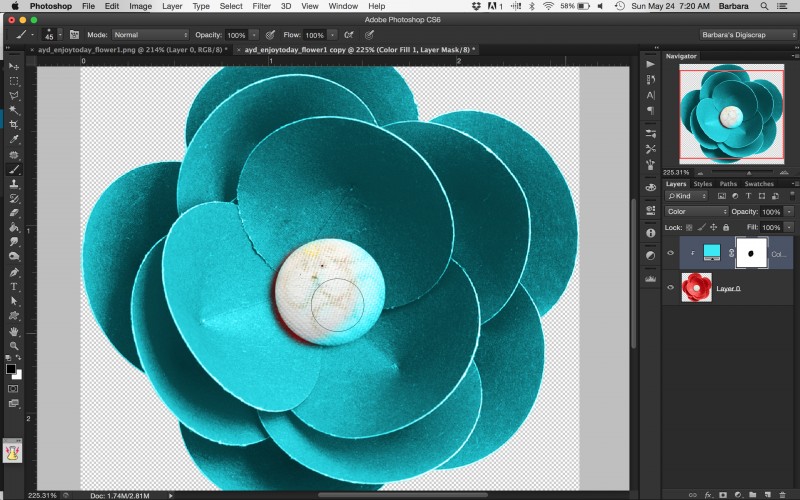
3. Clip the new fill layer to the element you want to recolor by pressing OPT+Click (Alt+Click on a PC) on the line between the two layers. (Another option is to right click on your new color fill layer and choose Create Clipping Mask.)
4. Change the Blend Mode to “Color”.
NOTE: Since you used an adjustment layer you can go back and change your replacement color or the blend mode at any time.
For my example I’m using a flower from Amanda Yi Designs’ Enjoy Today Mini No. 2 kit. You can see that the entire flower is a shade of red but the fabric button in the center is a cream color. I want to recolor the paper petals of the flower, but I want the center of the flower to remain the cream color. I will accomplish this using the layer mask that was created when I created the new fill/adjustment layer. To do that, just add the following steps:
5. Make sure that the layer mask is active by clicking on the layer mask. You will see a white bounding box around the mask.
6. Choose a soft round brush (Hotkey b activates the brush tool) set to 100% opacity. (NOTE: Depending on the shape of what you are masking out, a hard round brush may be more appropriate.)
7. Set your foreground color to black. (Hotkey d) Resize the brush to fit to the area you are masking out. In my case it’s the center of the flower.
8. Paint over the area you want to mask out (return to the original color).
Voila, that’s’ it! You’ve now got a recolored flower and the center stayed the same color!
Like I mentioned, as with all things in Photoshop there are lots of different ways to recolor items. These are just two of my favorite go-to methods. If you’ve got another tried and true recoloring method you use and that you’d like to share with us, please share that in the comments!

About the Author: Barbara is a member of the creative team here at The Digital Press. She lives with her husband, two teenage kids and their fluffy dog, although as she types this she realizes her son is moving away to college in less 3 months and she won’t be able to say she lives with her 2 kids for much longer. EEK! In her free time she loves to digi scrap, take photos and hang out with her family.


One comment