Create a Valentine’s Day Printable

Valentine’s Day Printable


I am a hopeless romantic, and just love Valentine’s Day. Today, I am here to show you how to create a simple Valentine’s Day printable using word art and digital elements from The Digital Press. You can print and frame for a piece of artwork… or make a card to send to a loved one.


Valentine's Day Printable

Step 1. Gather a collection of Digital Supplies that includes any word art and elements you would like to use. For my printable, I used l’Amore by Little Lamm & Co., Be Mine by Mari Koegelenberg & Danielle Engebretson, and the TDP mini kit Cherished.

Step 2. Create a new 8×10 canvas in your photo-editing program (it should be 300dpi for print-resolution). Place your words on your layout until you have them arranged in the desired position.

Step 3. You can add color to some of the words, or clip digital papers to items you’ve chosen. You can even add drop shadows to a few of your words to add dimension.

Step 4. If desired, add a few digital elements to embellish your word art (you can see that mine uses hearts, arrows, etc.).

Step 5. Print it out onto paper and frame at 8×10 to show off your new lovely artwork.

Valentine’s Day Printable

Step 6. If you would also like to create a greeting card using your printable, simply re-size it to 5×7 and then print, seal with a kiss, and send to your loved one.

Valentine’s Day Printable


Cute, isn’t it? And so easy!

Hopefully this tutorial helps you think of ideas for repurposing your digital products and creating your own home printables and cards.


LindyKrickbaum

About the Author  Lindy Krickbaum is a member of the creative team at the Digital Press. She is a happily-married wife, and best friend to her twin sister. She currently lives in Johnson City, Tennessee in the United States. Lindy is a self-admitted scrap-a-holic, rarely missing a day to scrap. She also enjoys designing jewelry, reading, and traveling every chance she gets.


Hybrid Saturday | Jar of Hearts

header blog2


I love the month of February. Valentine’s Day is always a great time to show appreciation and love to family and friends.  Today, I am here to show you a few simple ways to dress up a jar as a Valentine’s Day gift. They make fun teacher gifts, also! I love to collect jars of all sizes and use them for gift-giving. For this project, any small to medium-sized jars will work perfectly.

Supplies Needed:

  • jars
  • twine/string/etc.
  • felt
  • needle and thread
  • cotton balls
  • toilet paper roll (optional, to be used as filler)
  • candy
  • digital elements (Valentine-themed, etc.)
  • card stock

To begin, choose your favorite digital scrapbook kit. For my jar labels and tags, I chose Be My Valentine Kit and Love is in the Air Journal Cards from the shop at The Digital Press.


Next, let’s work on the jar of felt hearts. I used various colors of felt: red, pink, blue, and green. I hand-drew a heart pattern that was about 2.5 inches wide, and after cutting out the hear shapes I hand-stitched half of two hearts together with white floss. Then, before completing the stitching all the way around the heart shape, I slipped a cotton ball inside and stitched up the other side. I sewed about 15 of these hearts to fill the largest jar (TIP: when you are filling a larger jar, it’s helpful to add in a filler; I slipped a toilet paper roll inside the jar and placed the hearts around it).

layout

To create a topper for the jar, I chose some elements and papers from the Be My Valentine Kit. In my photo-editing program, I sized the elements and paper to the size of the lid of the jar (my lid was roughly 3 inches in diameter). Then, I printed my image on card stock and used the jar as a template to cut it out by hand.

Here is a look at the finished jar with the topper, tag, and stitched felt hearts inside it. Isn’t the word art sweet? I love that bit of gold print on the tag. It matches perfectly with the XOXO topper.

Enhance-jarPS

Next, check this out… I love how easy it was to create a tag using a journal card from the Love is in the Air Journal Cards set. I chose this darling “You Have My Heart Always” card (shown below), and then sized it to fit my jar, printed it, and cut it out. I punched a small hole at the top and slipped some ribbon through so I could tie it around the jar.

enhanced-photo3PS

Here’s another example of a fun jar topper and tag combo… I just loved the heart shape made out of flowers (found as a digital element in the Be My Valentine Kit, and used as the topper on the candy hearts jar shown below). Before printing it out, I simply noted the specifications of the lid size — making it easy to know what size to print that heart element onto the background paper for the topper.

enhanced-photoPS

Once created and filled with goodies, each jar is unique and ready to give to that special teacher, friend, or family member on Valentine’s Day!

enhanced


Want to give this a try? Please come join us in The Digital Press’s forum for a fun challenge related to this tutorial! Not only will you end up with some adorable hand-made gifts… but you can earn challenge points while doing so, which can later be cashed-in for discount coupons to the shop at the end of the month if you participate in the challenge system at The Digital Press!


TerresaAbout the Author  Terresa is a mother to 5 beautiful children. She loves capturing memories with her digital camera and then creating a visual family memory book to be enjoyed and treasured. She also loves to design and create personalized items for her home and children. Other interests are crafting and gardening, and you will often find her enjoying the outdoors and soaking in the beauty of nature.


Cherish Your Past


I always find that I’m easily attracted to new stuff, whether it’s products… trends… recent photographs or memories — they’re often the first things that come to mind when I sit down to scrap. It’s not often I dip back into older products when I scrap (shh, don’t tell my husband — they were an investment!), but I do like to dip into those older moments.

Sometimes the two come together — the new Project Grateful collection* at The Digital Press got me thinking about baking with my girls. After knocking up some treacle and chai spiced flapjacks with them, I started hunting through my back-catalogue of photos to see what I’d taken over the years.

I keep my (considerable) library of photos in Lightroom, and I try to tag them as I import them. I generally tag them by place, by person, and I also have a list of ‘activity’ tags — one of which is baking. You don’t need Lightroom to tag, however — other programs may have this ability (including Photoshop Elements Organizer, which I have also used in the past).

I could easily have picked a recent photo of a baking session, or even taken some new ones while we were covering the kitchen… but I thought it would be fun to pick a selection of photos which spanned a period of years. I ended up with pictures of my kids small enough that they needed to reach up to whip some meringue… all the way through to them looking all grown-up (and tall enough to reach easily without a step to stand on!).

Here’s a look at the page I created, using older photos and newer products…

Layout : Bakers


This is a great way to cherish the past, in the present-day. 🙂

If you fancy the idea of delving through your photo library… please join me for today’s challenge over in The Digital Press’s forum!

*you can find parts of the Project Grateful collection in this month’s Pennysaver sale! (and each part also links to the whole collection in the shop, for those who want to see it all)


JudeAbout the Author  Jude is part of the creative team here at The Digital Press. She lives in the UK with her husband and two fantastic girls. She loves traveling, and would be off in her campervan every weekend if she could get away with it. She loves time spent exploring new places, trying new experiences and photographing them! She also spends too much time on the computer, and still doesn’t go running as often as she says she’s going to.

Tutorial Tuesday: How To Create Digital Embossing

How To Create Digital Embossing

What’s the one thing I miss when it comes to paper crafting?  Embossing.  It doesn’t matter if it’s dry embossed or heat embossed, both techniques are just pure joy.  Guess what?  I’ve mastered digital dry embossing and I’m here to share just how easy it is to create this look.

I created this page using the Fireside Kit by Sahin Designs.  This kit is a nod to sitting by an open fire, draped in a fleece blanket with a warm cup of cocoa, milk, coffee or tea, enjoying a good book.  The colors in this kit are rich, warm earth tones.

So, without further adieu, let’s move on to the tutorial.

How To Create Digital Embossing:

Step 1: Open a patterned paper in Photoshop.  It’s best to choose a paper with high contrasting designs and colors but this technique can work with almost anything.

Step 2: Go to File, Save As to change the paper from a .jpg extension to a .psd file extension.  Note: You should rename the paper so that you do not override the original. 

Step 3: In your new working document (not the .psd you just created), select the paper layer you want to emboss into a smart object.  You can find this under FilterConvert for Smart Filters (this is an important step – don’t skip this).

2016-02-02-HowToCreateDigitalEmbossing-img01

Step 4: With your paper layer still selected in the Layers panel, go to the Filter menu then scroll down to select Filter Gallery.  Under the list options choose the Texture folder then select Texturizer.

2016-02-02-HowToCreateDigitalEmbossing-img03


Step 5: Time to play with the Texturizer settings.

  1. First you will need to load the pattern paper that you saved as a .psd file by using the drop down menu.

2016-02-02-HowToCreateDigitalEmbossing-img04

  1. The two main settings are the Scale and Relief option.  The scale reduces or enlarges the pattern.  For my page I chose a scale of 200%.  The relief determines how deep the embossed impression looks on the page.  For my page I chose a scale of 20.  These settings will be different for you depending on the pattern you’ve chosen. When you’re done, click OK.

2016-02-02-HowToCreateDigitalEmbossing-img06

After returning back to your layout you will notice in the Layers panel a new layer named Smart Filters.  If you don’t like the look of the embossing, double-click the Smart Filters again and you are right back in an editable state allowing you to change the scale and relief sliders until you get your pattern to look perfect.

How To Create Digital Embossing

Finishing Touches: After the raised embossing pattern is as I like it on the page, I then moved onto re-coloring the paper.  With the eyedropper tool, I selected a warm rusted red from the striped pattern paper.  Then, I double-clicked the Smart Object icon in the Layers panel that belongs to the embossed paper layer.  This opens an editable copy of the layer where I then filled it with the warm rust color.  This results in a warm, rust colored paper with a seamless embossed pattern all throughout.  Perfection!

2016-02-02-HowToCreateDigitalEmbossing-img09

We’re almost done…stay with me!

Next I wanted to be able to see the beautiful striped pattern beneath the embossed paper so I reduced the Fill/Opacity and added a drop shadow to create the look of a vellum paper. Brilliant, beautiful, bold and striking!  Yup – she’s a beauty!

I couldn’t be any happier with the end result.

20160115_rherron_sahindesigns-weboverlay


Rachel

About the author: Rachel works at a law firm by day and loves to create digitally using Photoshop in her spare time at night. She is a busy mom of two girls and a wife who lives in the greater Philadelphia region. She has a passion for storytelling and likes to use techniques to recreate the look of paper.

Cherish Life

wotm_cherish

Happy February!  We interrupt this message to announce a fun-filled month of amazing deals!  That’s right – Pennysaver is back!!!  Every Tuesday and Friday, throughout the month of February, our amazing Designers will have new products on sale for $1!!!!!  This is the perfect time to grab lots of new goodies and jump in on our monthly challenges!

For February our word of the month here at TDP is going to be CHERISH.  This word is an important one for me personally as it makes me stop and think about what is most important in my own little world – to not take anything for granted and to be thankful for all that I have.  How about you?  Does it do the same for you?

Browsing around the web, I found some fun inspiration images to kick-start your thoughts about the word CHERISH

cherishinsp

[ sources 1, 2, 3, 4, 5, 6, 7, 8, 9 ]

Each month, we like to encourage you to step out of the box with regard to our challenges. Below, you will find the list of upcoming challenges for the month of February — each of which focus on our theme of CHERISH. For more information about our challenge system, please read this information post in the TDP forum.

The handy image you see above can be saved to your computer for reference throughout the month, as it features our schedule for February. 🙂 It was made by the ever-talented Alina from TDP’s creative team, using the brand new store collab, My Favorite Thingswhich was released today and can be purchased for just $4.00 for the first 4 days of the month!

We cannot wait to see how you implement our Word of the Month into your daily lives and memory-keeping!


About the Author  Rachel Alles is on the creative team here at The Digital Press. She is fortunate to share her life with her loving husband, Doug, and her two blessings: Madeline and Maxwell. The three of them are her main source of inspiration for her pocket and traditional style pages. When she’s not scrapping, she enjoys anything Disney-related, learning more about photography (and attempting to turn the dial off “Auto”), and dabbling in home decor projects.

Renew Your Love For Unfinished Projects

UnfinishedProjects

Okay, let’s see a show of hands.

How many of you out there have a December Daily album that you have not yet finished? Now, I’m not necessarily talking about the December just past. Oh, no. Come on, be honest… did you finish that one from 2014 (or maybe 2013 or earlier)? How about that vacation album that you started with such gusto, and then things just fizzled out? Don’t even get me started on Project Life (I swear, one year I will finish that!). How many of us have these sorts of unfinished projects laying around?

Earlier this month, Chloe shared some great tips for staying up-to-date with long-term projects, such as those I’ve listed above. Today, however, let’s talk about some ideas to actually renew and recharge those creative juices and help you revisit a project that’s laid dormant for a while (you know, the one that you always say you’ll get around to finishing … eventually!).

For myself, with regard to the examples that I just mentioned above — I have one version or another of all of them sitting on my external hard drive. My December Daily album from (wow!) 2013 is the most complete… with all pages completed through December 26. Then nothing. Sure, I have photos, but they have never actually made it onto a finished page.

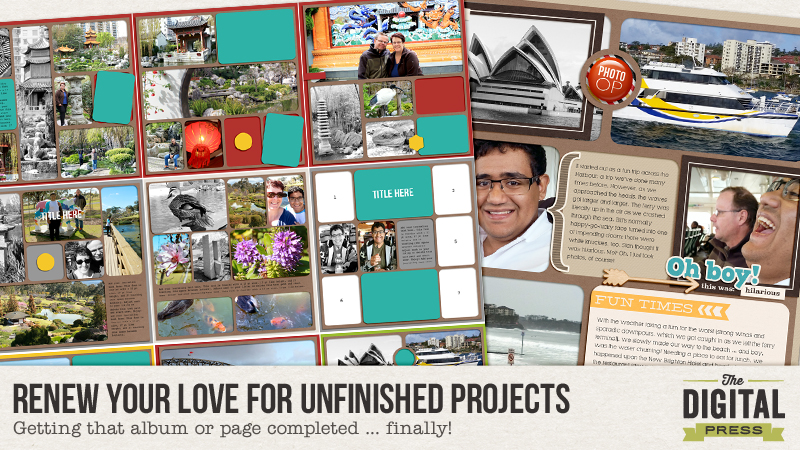
Here’s an example of one of my unfinished projects: a vacation album from a trip to Australia…

WorkinProgress

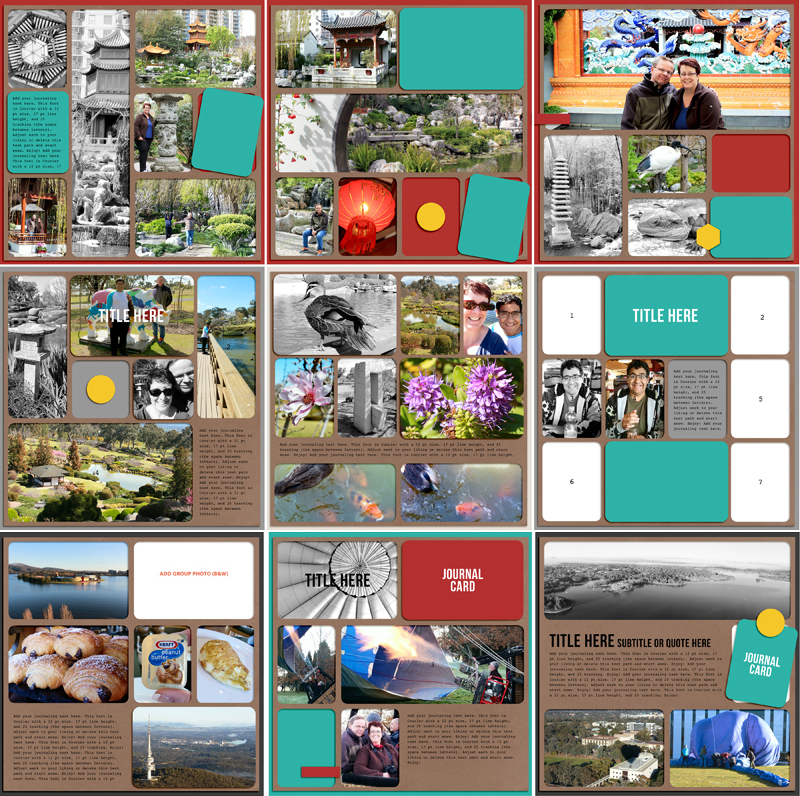
As you can see, I have a bunch of partially-completed pages (there’s more than this, too!), and I had made a really good start with putting pictures into templates (shown here using Simply Tiffany Studio’s “Window Series” templates). But there’s nothing else. No journaling (the words on the files are just the default “you can journal here” text). No embellishments. In fact, some windows are left blank where, I assume, I was planning to put journal cards. This vacation was from late summer 2014, so who knows where my head was at that time!

The thought of suddenly focusing on 10, 15 or even 20 or more pages as a spur-of-the-moment project to complete can be quite overwhelming. In fact, this may be the very reason that those larger single-event projects don’t get finished. Our intentions are great … at the start. Then… well, life happens. Burn-out. Loss of enthusiasm.

We can do this, though! Get that initial love for your project back with these quick and easy tips:

  • Don’t panic! No, seriously, relax! As an organized, project-oriented list-maker (I even have to-do lists for weekend household chores!), I can often slip into a situation of putting too much pressure on myself to finish what I’ve started. Do you? Relax. A finished project is awesome, but it doesn’t have to be completed in one sitting or over one weekend. Remember: You should enjoy the process of recording your family memories, not feel panicked or stressed out by it!
  • If an album is your end goal, keep the “formula” for your pages similar. Not only does this lessen your stress level (because there’s less to think about from page to page), but it also adds some cohesiveness to your pages. In my vacation album, for example, I opted for templates, sticking to one designer, and all pages have a kraft paper foundation. It’s the “keep it simple” methodology that Chloe mentioned in her blog post earlier in January.
  • Ask family members for their favorite memory! If you’re revisiting a project that’s several years old, ask those who were present for their input on what they remember about the event. Think of this as a mini-brainstorming session. Friends and family members might remember events a little differently from you — and their memory might trigger something for you, as well.
  • Following on from that last thought, as you look back on not-so-recent events, use this as an opportunity to really look at the photos you’d like to include in your album. You might have taken 700 or 800 (or more!) photos during a long-weekend trip to the beach, but let’s be honest here: how many pictures of sand and the beach do you really need? That previous need to scrap everything in sight from a vacation or event can now be tempered with a little restraint as you focus on those photos that really evoke the mood or memories you want to capture.

How do these tips work, in practice?

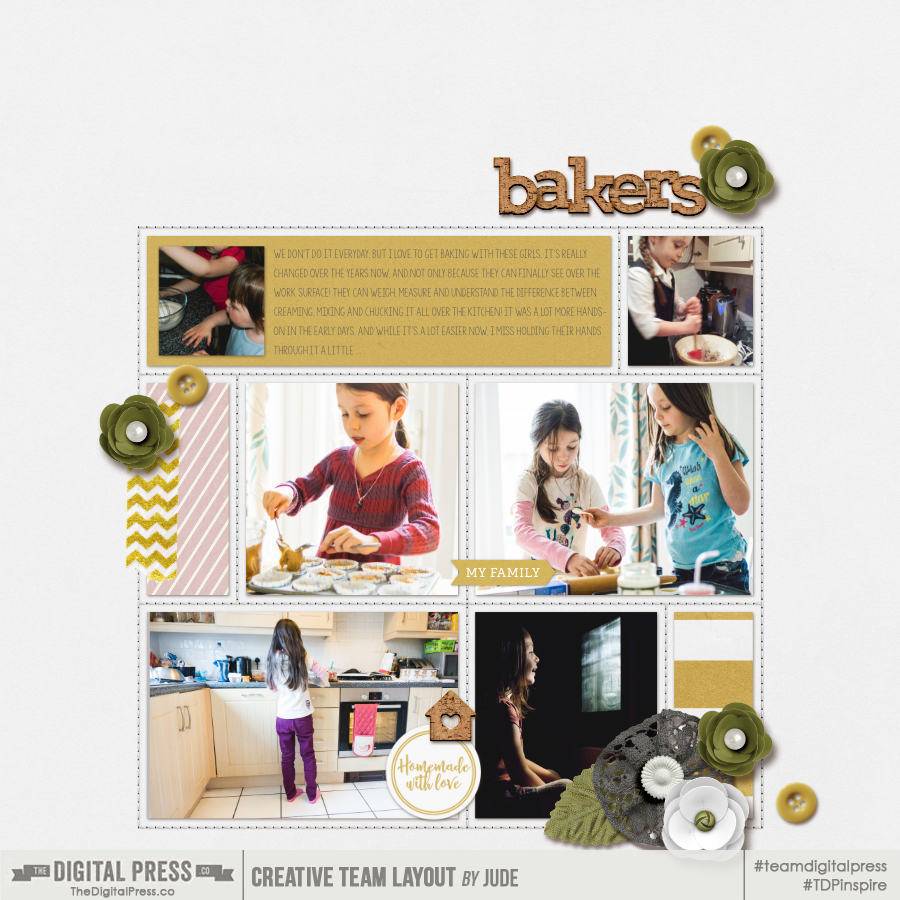
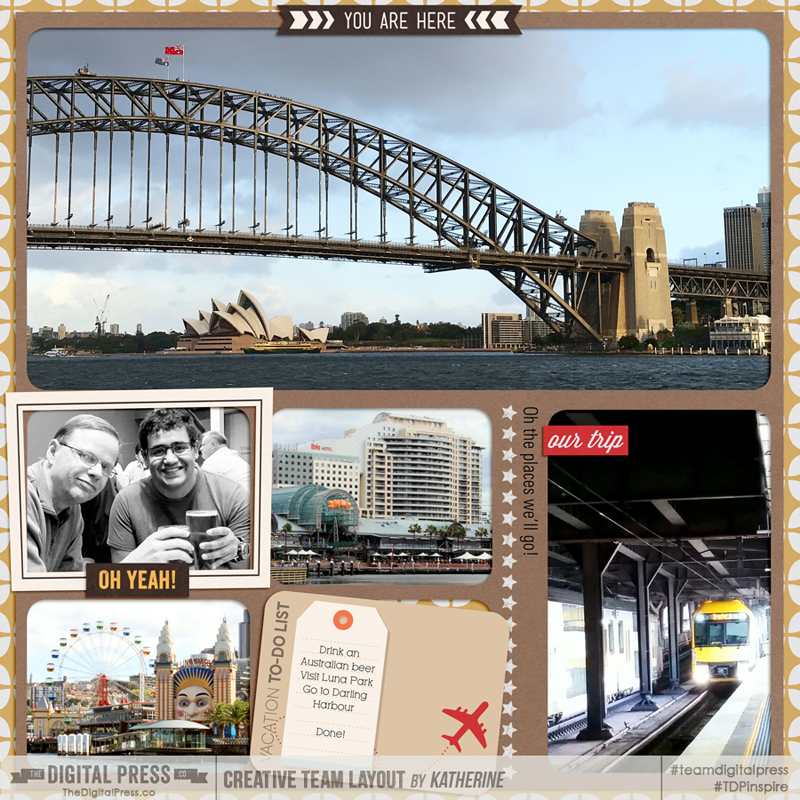
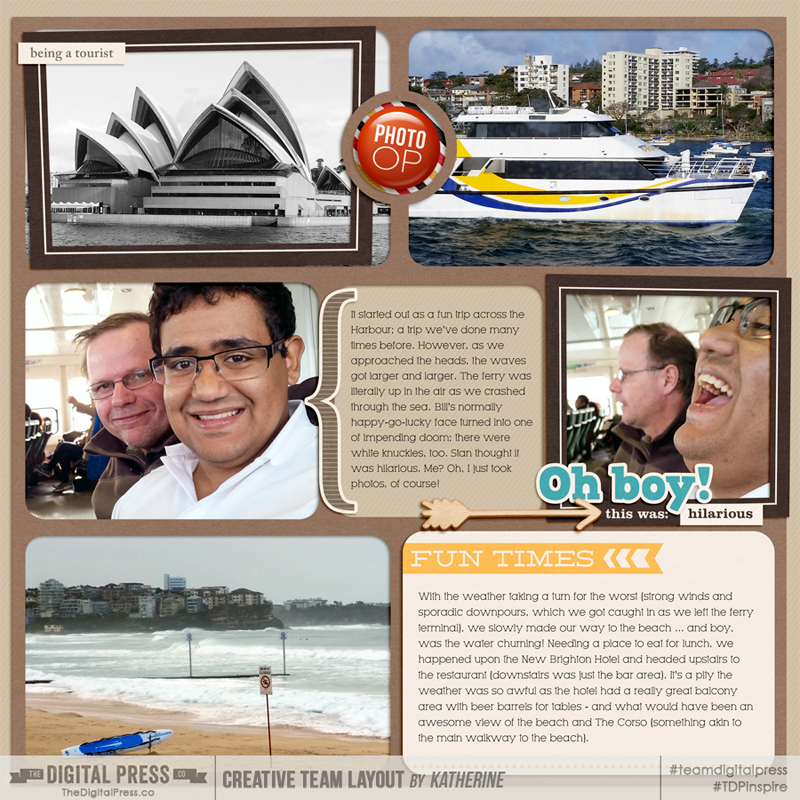
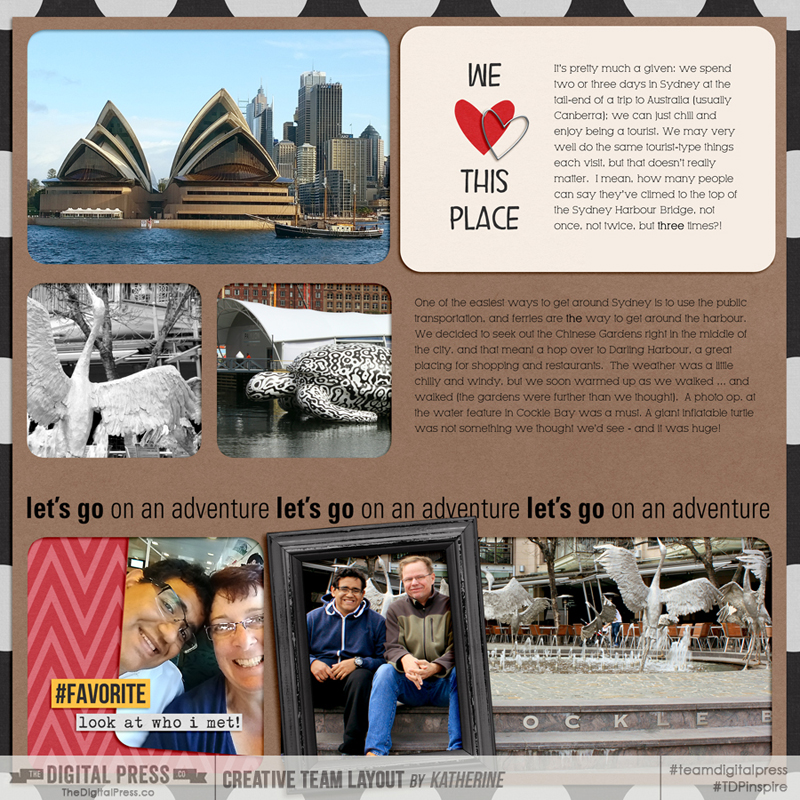
Above, I shared nine incomplete pages from my Australian vacation album, but there were more stored on my hard drive — a lot more! The original goal was to have two or three pages for each mini-event from the trip. But where to start? My foundation was set, so that was a big help. However, I deployed the “ask family members” tip and talked to my son, asking what he remembered the most from our vacation. I let him scan through the photos and when he came upon a few from a day we spent in Sydney, well, I couldn’t shut him up! He recounted a ferry ride on the harbour and the panic on his father’s face due to the really bad weather and high seas. Ah ha! I now had my starting point to getting this project nearer to completion: tackle the page that had photos from the ferry ride. Did it work? It sure did – take a look! In a few hours in one evening, I got three pages from partially-completed to ta-done!

Sydney2

sydney3

Sydney1

Credits: Window series templates by Tiffany Tillman; That Magic Moment by La Belle Vie Designs;
Vacation Magic, Walt’s Park, Dreams Come True – Word Art, and 2014 Vacation by Scotty Girl.


So there you have it. Those long-time projects that have been collecting dust can have life breathed back into them. Why not give it a try? Renew your love for that unfinished project by creating a page (or two) to get you motivated to move closer towards completion. Join us over in the Drawing Board: Challenges forum and tackle this week’s challenge & share your pages!


Kat About the Author  Kat Hansen is a creative team member here at The Digital Press. A Director of Human Resources by day, she loves the opportunity to spend a few hours each day being creative. Vacation memories feature pretty heavily in Kat’s scrapbooking pages, as do her son and “daughter” (of the four-legged furry kind). Kat has quite the sense of humor (she “blames” her father for this), which she incorporates into her journaling and memory-keeping.